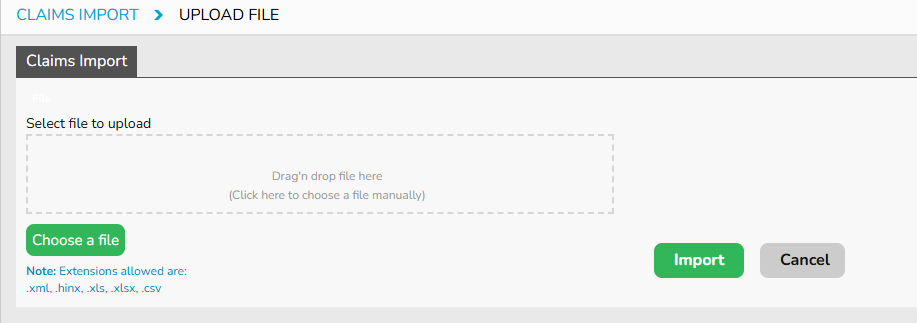
To save time double handling your radiology in-hospital claim data, import your data into FYDO and have the ECLIPSE claims paid within 4 weeks by the health funds, usually quicker.
NOTE: DVA in-hospital claims would go via the Medicare Online channel, not the ECLIPSE channel.
Minimum Data Set
Everything is mandatory unless stated otherwise.
- Patient Info
- External Patient ID
- First Name
- Middle Name (optional)
- Last Name
- Date of Birth
- Gender
- Medicare Number
- Medicare Reference Number
- Health Fund Code
- Health Fund Membership Number
- Health Fund Payee ID “also known as practice ID” (conditional)
- Claim Data
- Type of Service
- Service Type Code
- External Invoice ID (optional)
- External Servicing Provider ID
- Referring Dr Details (optional)
- Referring Dr Provider Number
- Referral Date
- Referral Period (conditional)
- Request Type Code
- Referral Override Code (conditional)
- LSPN (Location Specific Practice Number)
- Facility Provider Number
- Benefit Assignment Authorised
- Financial Interest Disclosure Indicator
- Accident Indicator
- IFC Issue Code
- Number of Items
- Time of Service (conditional)
- Item
- Date of Service
- Charge for Item (optional)
- Service Text (conditional)
- Restrictive Override Code (conditional)
- Duplicate Service Override Indicator (conditional)
- Duplicate Service Override Text (conditional)
- Paid Amount (conditional)
Notes
Patient Fields
External Patient ID – this is required so we can uniquely identify the patient. This must be unique to the patient. Every time a claim is imported, we override the patient details (e.g. first name, last name) for a patient with that same external patient id.
Token name is: ExternalPatientId
Patient Name – The first and last name is mandatory. The middle initial is not.
Tokens available:
- PatientFirstName
- PatientMiddleName
- PatientFamilyName
Patient Gender – patient gender.
- F = Female
- M = Male
- I = Indeterminate/Intersex
- N = Not Stated/Inadequately
Token name is: PatientGender
Address – patient address. Since this is optional (not required by ECLIPSE), unless you want to build your patient database in FYDO, leave the address tokens empty.
Tokens available:
- PatientAddressLine
- PatientAddressLocality
- PatientPostcode
Health Fund – this is the health fund the patient is with. Specify the ECLIPSE code.
Token name is: FundBrandID
Health Fund Membership Number and Universal Position Indicator (UPI) – The UPI appears on the patient’s fund membership card to uniquely identify the patient. It is the number in front of the patient name on the card. The UPI is optional, but the membership number is mandatory.
Token name is: PatientFundMembershipNum & PatientFundUPI
Health Fund Payee ID – (conditional) some funds require this, also known as the Practice ID. For example, BUPA requires this. If not required, leave blank.
Token name is: FundPayeeID
Invoice Fields
External Servicing ID – If you are billing under the one provider number, you can skip this field. If however you are billing under multiple provider numbers, then we will need something to identify which provider number to use. If you do not have the provider number, you can place your own unique code, and we will map that code to your actual provider number.
Token name is: ExtServicingDoctor
External Invoice ID – This is only required if you want to import the data back into your main system. Once claims are paid, we can send you a file back, with your external Invoice ID and Patient ID, so you can match it to the correct invoice/patient. But if you do not intend to import the data back, then you can skip this field.
Token name is: ExternalInvoice
Type of Service – this sets the type of claim for ECLIPSE. Always set to N.
- N – Inpatient/ In-hospital
Token name is: TypeOfService
Service Type Code – this sets the service type, i.e. General or Specialist or Pathology, for example
Token name is: ServiceTypeCde
Location Specific Practice Number – code provided to each practice.
Token name = LSPNum
Facility Provider Number – the provider number of the facility where the service was rendered.
Token name is: FacilityId
Benefit Assignment Authorised – Indicates that the patient has authorised the assignment of their rights of benefit to a provider. Always indicate authorised.
Required when ‘Type of Service’ is M or V, not required when Service Type = P. If set to N, the claim will not import.
Token name = BenefitAssignmentAuthorised
Charge [for each Item] – you do not need to provide any amounts as FYDO can work out the amount when we import the data. If, however, you are not charging the Medicare/DVA rate, then you will need to provide the charge amount for each item.
Token name = ChargeAmount
Number of Items – this is like a checker that confirms how many items we should be expecting within the claim/invoice.
Token name = NumberItems
Fee List (Optional) – If you are manually setting up item fees within FYDO, you can specify which fee level number should be applied by including it in the import file. Please note that if you choose this option, instead of including the charge for each item in the file, you will need to manually update the fees within FYDO whenever there is an increase to your private fees.
Token name is: feelist
Referral Fields
Referring Dr Title / First name / Last name – these are optional, but we would recommend including it in the file. But not a deal breaker.
Tokens available:
- RefDrFirstName
- RefDrLastName
- RefDrTitle
- RefDrAddress
- RefDrSuburb
- RefDrState
- RefDrPostcode
- RefDrPhone
- RefDrfax
- RefDrEmail
Referring Provider Number – provider number of the referring doctor.
Token name is: ReferringProviderNum
Referral Date – Date of the referral.
Format dd/mm/yyyy
Token name is: ReferralIssueDate
Referral Period – The number of months the referral is valid for. Format is numeric up to 2 digits.
Token name is: ReferralPeriod
Request Type Code – Type of referral. For radiology, set this to:
D – Diagnostic
Token name is: RequestTypeCde
Referral Override Type Code – Indicates why referral services were provided without referral from another practitioner. This is only required if you do not add referral information.
- L – Lost
- E – Emergency
- H – Hospital
- N – Not required (non referred)
- R – remote Exemption (DVA Only)
Token name: ReferralOverrideTypeCde
IMC Specific Fields
Financial Interest Disclosure Indicator – Indicates that the provider providing the hospital treatment under a gap cover scheme has disclosed to the patient any financial interest in any products or services recommended or given to the patient.
Must be set to Y if the Claim Type Code is set to SC
- Y = Financial Interest Disclosed
- N = No Financial Interest Disclosed
Token name is: FinancialInterestDisclosureInd
Accident Indicator – Indicates whether or not the associated information relates to the patient experiencing an accident.
- Y – Service result of an accident
- N – Service not a result of an accident or unknown
Token name is: AccidentInd
Compensation Claim Indicator – Indicates whether or not the invoice is subject to a compensation claim.
- Y – Claim maybe a part of compensation
- N – Claim is not part of compensation
Token name is: CompensationClaimInd
IFC Issue Code – indicates if an Informed Financial Consent (IFC) was provided to the patient prior to the episode of care.
If the Claim Type Code is set to SC, then this must be either: W or X.
If the Claim Type Code is set to AG, then this must be either: V, W or X
- V = Verbal
- W = In writing, where appropriate
- N = Not issued
- X = Not obtained
Token name is: IFCIssueCde
Fields related to the Item
Restrictive Override Code – Indicator used to allow payment for service where the account provides indication that the service is not restricive with another service either within the same claim or on the patient history.
- SP – Separate Sites
- NR – Not Related (Care Plans)
- NC – Not for comparison
Note, this can not be set if the Service Type Code = P
Token name: RestrictiveOverrideInd
Duplicate Service Override Indicator – indicates if the practitioner attended the patient on more than one occasion on the same day.
- Y – Not Duplicate
- N – Duplicate
Note, this can not be set if Service Type Code = P
Token name: DuplicateServiceOverrideInd
Time of Service – The time the service was rendered. This field is conditional.
Format HH:MM, expressed in 24-hour time, e.g. 14:35 for 2:35 pm.
This field must be set if any of ‘Duplicate Service Override’ Indicator, ‘Multiple Procedure Override Indicator’ or ‘Rule 3 Exemption’ is set to Y.
Token name is: TimeOfService
Service Text – Free text used to provide additional information to assist with the benefit assessment of the service. Only used when absolutely required, as text will mean the claim will need to be manually assessed, which delays the processing.
Token name = ServiceText
Paid Amount – This field is conditional. Field used to indicate how much a patient has paid for an item. If it matches the total amount for the item, the claim will be marked as Paid in Full
Token name = PaidAmount
Other tokens that might be required
Claimant Details – provide this if the claimant is other than the patient. If required, then the following is mandatory: First name, Surname, Medicare Number, Medicare Reference Number, Date of Birth. An example of when this is required is when the patient is a child under 18 years of age.
The address is not required. It is only required if you need to indicate a temporary address. The address cannot be a PO BOX.
Tokens available:
- ClaimantFamilyName
- ClaimantFirstName
- ClaimantDateOfBirth
- ClaimantMedicareCardNum
- ClaimantReferenceNum
- ClaimantAddressLine1
- ClaimantAddressLine1
- ClaimantAddressLocality
- ClaimantAddressPostcode
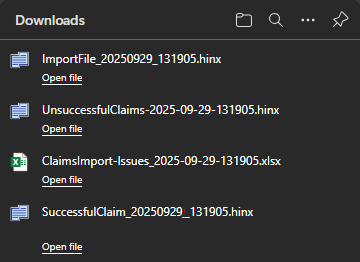
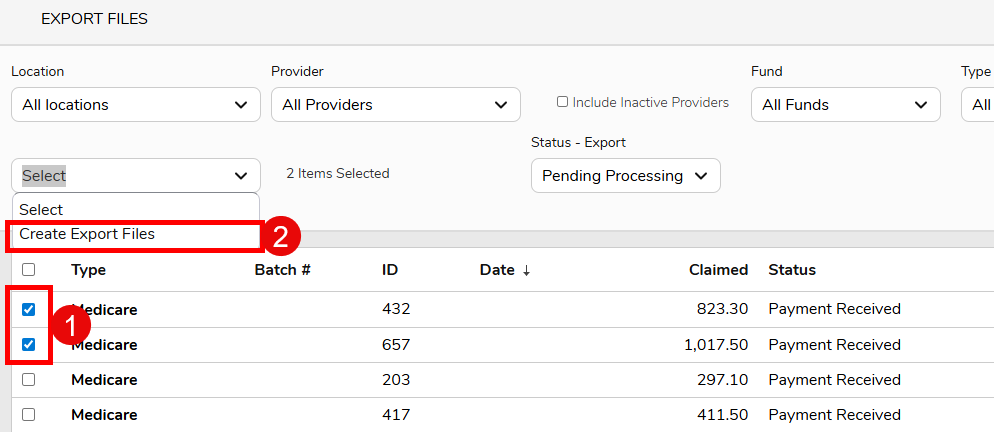
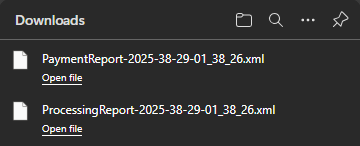
Returned Files that can be imported back into your system
This is an optional step, and is useful provided your main system can import files.
Read more at Claims Import – Returned Files – FYDO Wiki
Sample Files