Clinic Billing – Overseas Patients

Need to bill an overseas patient? Read on to learn how.

Step 1: Bill manual invoice

Overseas claims are received and processed manually. This means you cannot bill such claims through eclipse for electronic lodgement. Therefore, you’ll need to create and send a manual invoice.

Note: Ensure the Bill Type is set to: Private and the Type is set to: Health Fund


Step 2: Print manual invoice to PDF

Note sure how to print invoices? Click here to learn how


Step 3: (Conditional – If claim is for Medibank or AHM) complete the corresponding claim form and save it to your computer


Step 3: (Conditional – If claim is for BUPA, ) complete BUPA batch header form and save it to your computer

    • Click here to download batch header form
    • Enter the practice name as the location of the service and the practice id as the doctor’s BUPA FundPayeeId


If you have previously entered the doctor’s FundPayeeId into FYDO, you may find it by going to Settings > Doctors:


Step 4: Send off the documents

  • Once you are ready to send off the invoice, contact the health fund and ask what email address they would like the manual claim sent to, as well as whether they require any other supporting documents
  • Need their contact details? Follow the link below:

https://wiki.fydo.cloud/medicare-and-fund-contacts-dealing-with-rejections/


Step 5: Follow up & pay off the invoice 

  • We’d recommend you call the health fund a couple of business days after you email them to ensure your email has been received and will be looked at in the coming days
  • After this point, you may wish to follow up every couple of weeks, inquiring whether or not your invoice has been paid
  • Once the invoice has been confirmed to be paid, pay it off on FYDO


That’s it! That’s how to do overseas billing for patients. 


How to Resend a “Sent” Clinic Batch

From time to time, you may need to resend an already sent batch. But before we discuss how you’d do this, let’s first discuss why you may need to resend a batch.


In almost all cases, you’d need to resend a batch if it either:

  • Has not yet been paid / rejected within the expected period (up to 2 business days for Medicare/ DVA claims and up to 4 weeks for health fund claims). You’ve then called the health fund, Medicare, or DVA, and found out they have not received the claim. Thus, they’ve asked you to resend it
  • Has been partially or fully rejected and you can rectify the cause of rejection without rebilling


You do not want to resend a batch if:

  • It is rejected and you wish to resend it as it is, without making any changes to the original claim. Since, if nothing changes about the claim, it will likely be rejected again
  • If you have not first spoken with the body receiving the claim. It is always recommended that you first contact the organisation receiving the claim and inquire. This is because you do not want to send a duplicate claim if you do not need to. In most cases, this is not a major concern. However, it could cause problems such as a rejection of both claims (the original and the duplicate) or increased processing time if a duplicate claim is received

With that addressed, if you still need to resend an already sent claim, read on.


Start off by going to Claiming Medical.


If the batch Status is Sent or Processed, you may right-click on the batch and select Reset Batch Status


This will make the batch status revert to Closed, allowing you to resend the batch with the Send Batch button.


Otherwise, if the batch Status is Payment Received with a partial or full rejection, double click on the batch to open it up, revealing the invoice(s) inside.


If you wish to resend the invoice in its entirety (with all items inside), simply right-click on the desired invoice and click on Move Invoice Out.


Otherwise, if you wish to resend only a part of the invoice (1 or more items but not all), double click on the invoice, revealing the items inside.


Then, right-click on the item you wish to resent and select Move Item.

This will present you with the below pop-up window; and as you can see, it will move the invoice/ item to the current batch.


Current batch:

  • If it is a Medicare or DVA invoice: it will be moved into the Open batch for that provider. If no open batch is present, a new one will be created
  • If it is a Health Fund invoice: it will be moved into a new Closed batch.

From here, you may close the batch if it is not yet closed and send it by right-clicking the batch and selecting Send Batch.


Applying Manual Clinic Payments

Start off by opening the patient’s record and click on the Accounts tab to view their treatment/ billing history.


This button reveals a patient’s billing/ treatment history where each line is an invoice


From here, right click on the manual invoice to be paid off manually and click on Apply Payment.


Then, click on the Add Payment button


Enter the payment Type, payment Amount, click Save, and Save again.


That’s it! You’ve paid off the manual invoice.


How to Create a Manual Clinic Invoice

From time to time, you may need to bill a manual invoice. Other terms for this type of invoice include: private invoice or paper based invoice.

When would you need to bill a manual invoice? In the event a patient is a private patient and thus will be paying for services rendered directly. Or perhaps when the patient does not have medicare entitlements (such as overseas patients) and the invoice will need to be sent to their health insurance. Additionally, you may need to send the health funds a manual invoice where manual assessment is required; such as when you are seeking an adjustment.


Now that you know when you’d need to create a manual invoice, let’s jump right into it.

Start off by opening the patient’s record and click on the blue “Bill Patient” button.

You can also use the hotkey ‘B’!


This will take you to the Clinical Billing page, where you’ll need to select the:

  • Location: the location where the service took place. If you only have one, it will be defaulted
  • Practitioner: the practitioner who performed the service. If you only have one, it will be defaulted
  • DOS: date of service
  • Bill Type: Private
  • Type: ‘Patient’ If the invoice is being sent to the patient, or ‘Health Fund’ – If the invoice is being sent to the patient’s Health Fund


Referrals

The last step before we can begin billing is to enter any needed referral information. If this does not apply to you, click on Add Items and proceed to the next section.

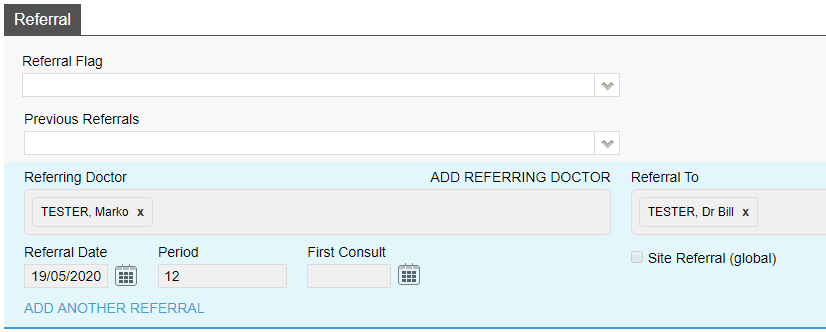
Otherwise, simply fill out the Referral section as seen below. If you only have one referring doctor for this patient, they will be automatically selected here (provided it has not expired).
 

Once you are done with the above segments, click on the green Add Items button in the bottom left corner of your screen.


You will arrive at the Clinic Billing page. Here we can see a brief overview of previous information for the patient, and where we can bill an invoice.


It is as easy as typing in the item you need and selecting it. There are two different ways to search for the item as shown below:


  • Search for the item number itself.
  • Search for a word in the description. This can either be at the start, or anywhere within the description!
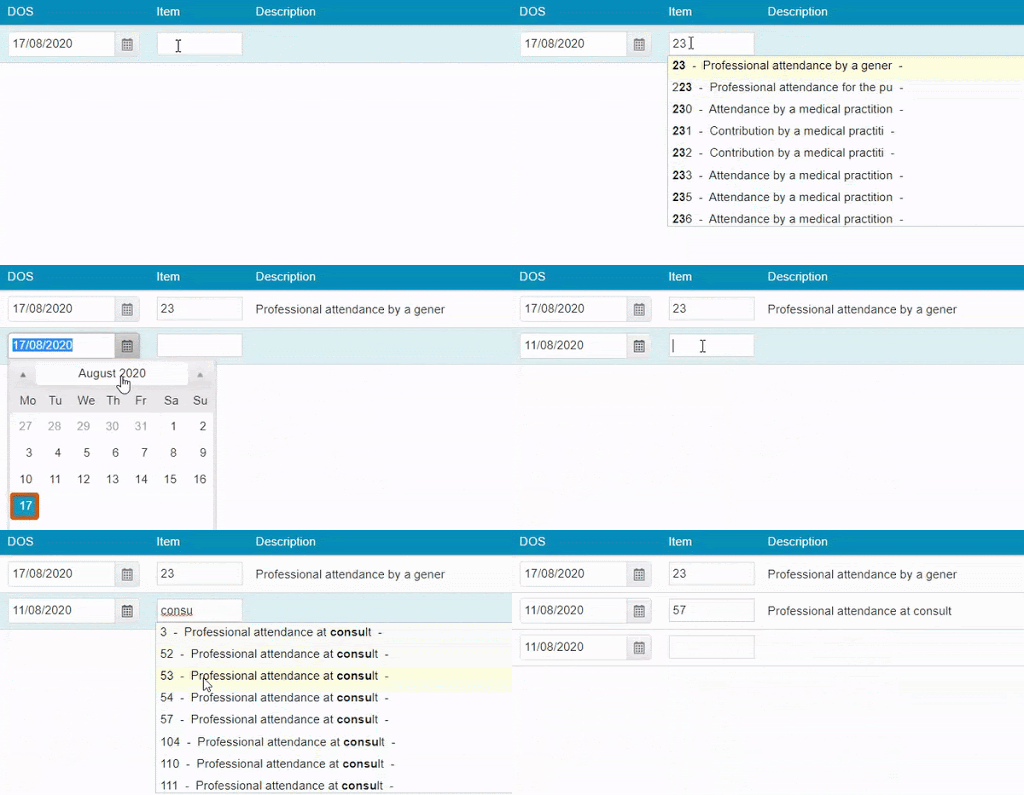


Once you have entered all your items and payments as desired, click on the Review Charges button to proceed to the final page of billing.


(Conditional) Applying Payment at the billing process

If the patient is paying the invoice, you can add payments captured from the patient onto the invoice using the Add Payment button. 

Otherwise, if you are sending the invoice elsewhere to be paid. Skip this step for now and proceed to ‘Clinic Review Charges’. You will be able to add payment against the invoice later, once it is paid.


The above button will present you with a pop-up to enter the payment information. The total invoice amount will be prefilled in the Amount field. 


So, you may simply allocate the payment type and hit save as below:
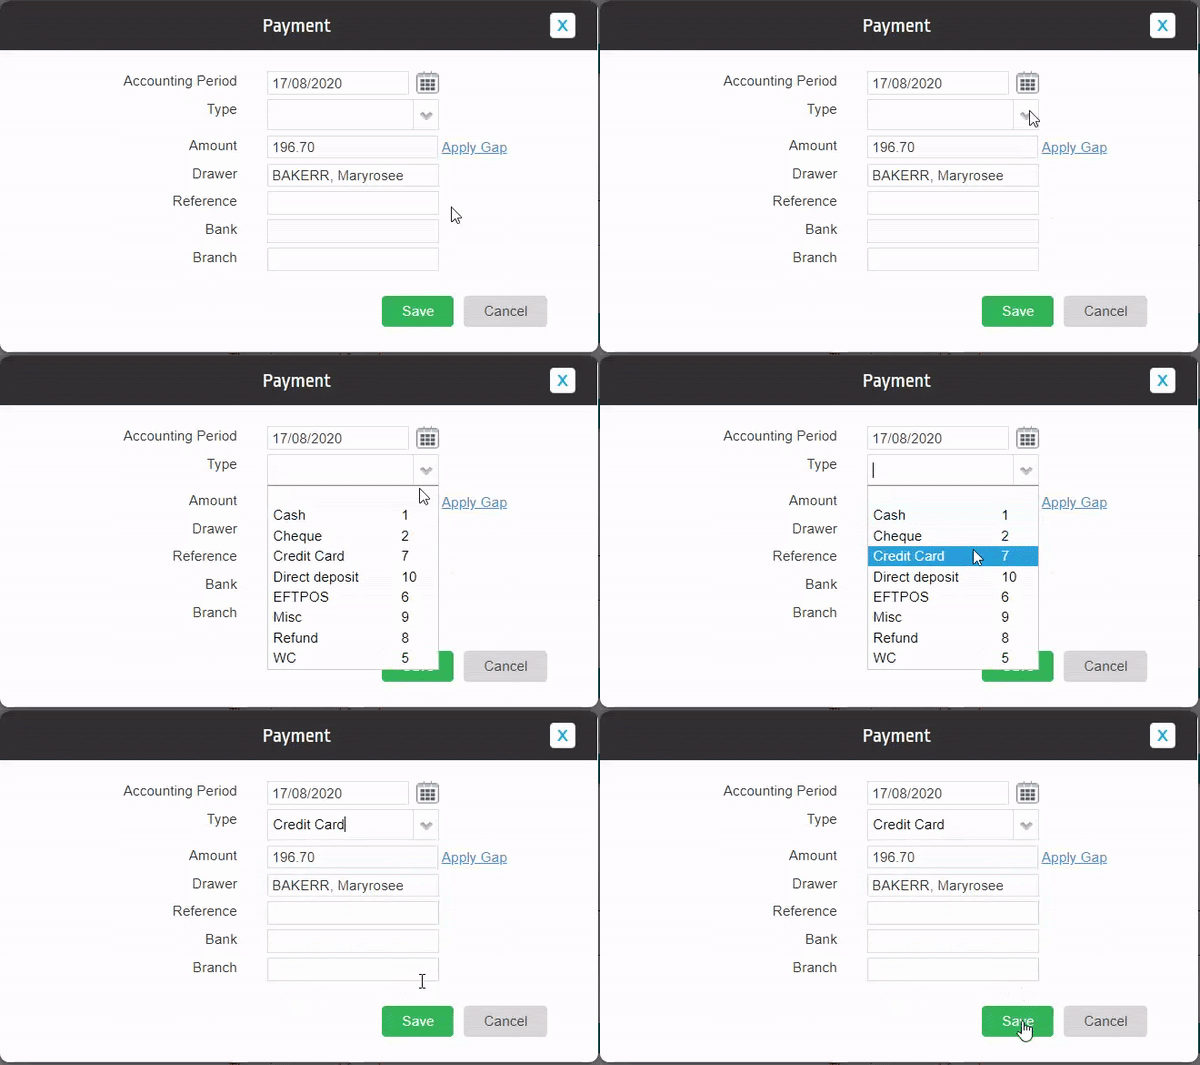
 

Clinic Review Charges

You may notice that this page looks nearly identical to the previous Clinic Billing page. The only real difference is that you can no longer add or change items, and there are additional buttons at the bottom.


You will also be able to see the Total Charges for the items you have billed like so:


Lets go over the options on this screen:


Edit Item And Charges: Realised you have made a mistake? Click this button to go back to the previous page and fix it up!

Cancel: Cancel out of this billing. This will take you back to the Patient Screen.

Save: Saves this invoice. 

Save & Print: this saves and prints the invoice.


That’s it! You’ve successfully created a manual invoice; and if you’ve paid it off on the spot, there is nothing else that you need to do.

Otherwise, assuming you’ve sent the invoice to a health fund, you will need to follow up with them every couple of weeks to see whether or not it is paid. Once it is paid, follow the steps below to pay it off on FYDO.


Applying manual payments

Your manual invoice is paid now? Click here to learn how to apply a manual payment to it.


Resubmitting and Deleting Clinic Batches

Sometimes you may need to Resubmit or Delete a batch depending on rejections.

You will only be able to move or delete a batch if the invoices within do not have payments

Resubmitting a Batch

To Resubmit a Batch you will first have to move each invoice within to a new batch. We can then go ahead and send that new batch.

  1. View the batch in question so you can see the invoices within
  2. Right click and select ‘Move Invoice Out’
  3. Confirm the move


If you head back to Claiming Medical, you will now notice a new batch that contains any invoices that were moved. Simply follow the usual process for closing and sending this batch.

For Eclipse claims, you will still only be able to have one patient per batch.


Deleting a Batch

To Delete a Batch, you will have to either move or delete each invoice within. Then the batch will simply disappear.

  1. View the batch so you can see the invoices within
  2. Right click and select ‘Delete Invoice’
  3. Provide a reason and select Delete

This is an internal reason just for your future reference.


You can also use Reverse. This produces an adjustment against the invoice, rather than just deleting it.


Rejected Clinic Batches

Once you have done some billings, you may notice that payments have come back for a lower amount, or perhaps you have received no payment at all!

Identifying batches with issues

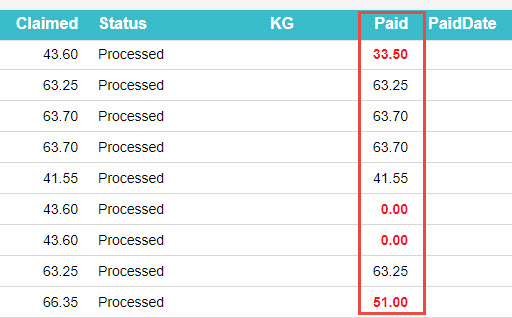
The easiest way to spot if a batch had an issue, is to simply look at the Paid column. If you see any amount in Red, then some action will be required.


We can see in the image above, that we have two batches that are partially paid (Less than what we claimed). We also have two batches that are just Rejected ($0.00 Paid).


Dealing with the Batches

First, double click on the batch to view inside. You can also right click and select View Batch Details if you prefer.

Once you can see a list of patients within a batch, the thing to keep an eye out for is an icon in the Issue column.


You may have one, or multiple patients with an issue. Any patient with a Rejection or Partial Payment will have the above icon.

Viewing the Rejection Reason

Now that we have identified which patient(s) have an issue. It’s time to see what the issue actually is.

Again, lets double click on a patient, or using the right click menu, select View Items.


In the above case, this is a fairly easy rejection to identify the issue. We have the error code 2001 No Hospital Claim (PEA). From this we can deduce that the hospital has not submitted their invoice yet, and as such we cannot be paid. Our options are to just wait and try to resubmit, or you could confirm with the hospital when they are sending their claim.

One of the most common issues is that you have been paid a different amount to what you claimed. This could happen for a number of reasons such as:

  • Fee Changes by Medicare/Health Funds
  • Doctors agreement with a fund
  • Old date of Service


To amend this, simply right click on the item and select Edit. Alternatively use the hotkey ‘E’Then just alter the Charge inc GST to be equal to the Payable amount, as shown above.


Contacts

Not all rejections will be as simple as the ones above. In a case where you are not sure what a rejection reason means, or why something has not been paid, it is best to contact the organisation who rejected it.

We have a complete list of phone and email for medicare and the health funds.


Printing Clinic Invoices Through Patient Records

Start off by opening the patient in question’s record and hit the Accounts button.


This button reveals a patient’s billing/ treatment history where each line is an invoice


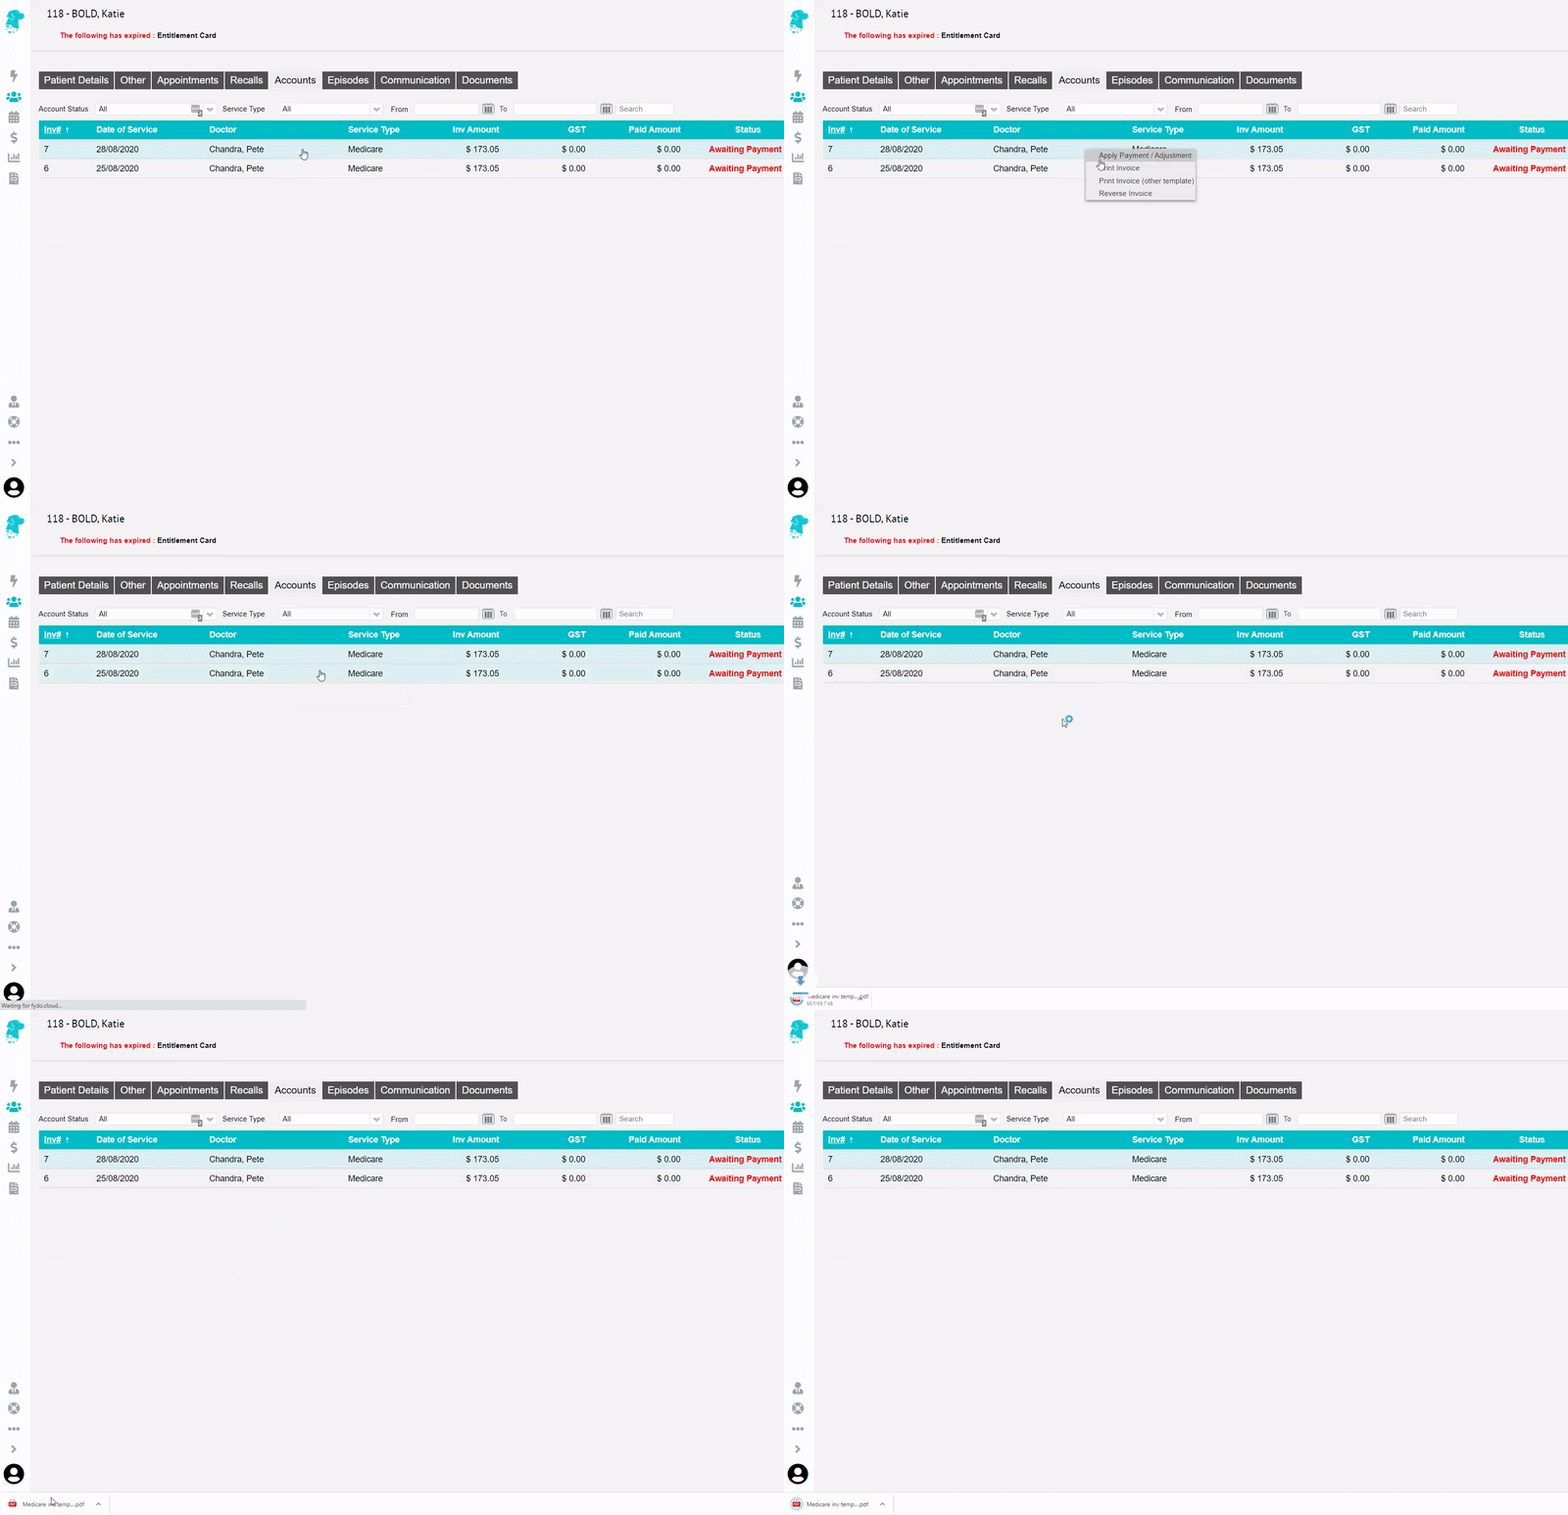
So from here, simply right click on the desired invoice to be printed and select Print Invoice. This will produce a PDF file of the invoice, which you may print or store/ send electronically.


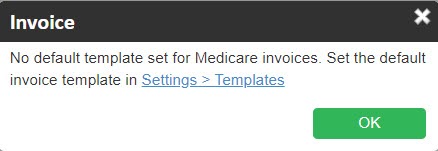
If selecting Print Invoice presents you with the below message, this means you do not have an invoice template for the type of invoice you are attempting to print,

So, click here to view our guide on how to upload an invoice template.


Uploading a Clinic Invoice Template

While you can create your own invoice templates from scratch in Microsoft Word, you may also contact FYDO support and request an invoice template be uploaded to your FYDO account, for you. 

This template will allow you to print invoices right away. You may further customise this template as desired, should you choose to.

Uploading / editing clinic invoice templates

To upload or edit existing templates, you will need to go to Settings > Templates.


This will reveal the templates currently in your FYDO account.


Note: an invoice template is necessary for each type of invoice; such as Medicare, DVA, and Private.


Adding a new template

So you may upload a template by clicking on the Add Template button to the top right corner of the screen.


Then, you will need to browse your computer for the template file or simply drag it in, as shown below.

Give it a Name, select a Category (invoices in this case) and a Sub Category (whether it is DVA, Medicare, Private, etc.).

Once you have entered the above details, hit the green Save button and you are all done!


You may also mark a given template as the default template for its category and sub category.


Editing an existing template

To make edits to existing templates, you will need to download the Word file by clicking on the Download button associated with the template.


Once you have downloaded the file, go ahead and open it, make the desired edits and save the document.

You may type whatever you’d like in plain text or add ‘tokens’ to print things onto the invoice that change from invoice to invoice like patient names, medicare/ health fund card numbers, servicing doctor, etc. 


Click here to view the list of tokens for clinic invoices, or

Click here to view the list of tokens for hospital invoices


Once the document has been updated with the desired edits, it is ready to be re-uploaded. You can do this by going back to where you downloaded the template at Settings > Templates, finding the template downloaded and hitting its associated  Upload button.


How to Delete Clinic Invoices

Needing to remove an invoice? As long as the invoice does not have a payment associated with it, and the accounting period is not yet closed, invoices can be deleted.

Not sure what the accounting period is? Click here to learn more.

There are two places where you could do so:

  1. Via the Patient’s Record, or
  2. Via the Batch in Claiming Medical

Additionally, there are two use cases for deleting invoices:

  1. Deleting the entire invoice (all items within the invoice)
  2. Deleting a part of the invoice (1 or some items deleted, but not all items)


Let’s take a closer look at both options.

Deleting through the Patient’s Record

Begin by opening the patient’s record and click on the Accounts button.


This button reveals a patient’s billing/ treatment history where each line is an invoice

From here, simply double click on the invoice you wish to delete.


This will open up the invoice, revealing the item numbers inside.

From here, you may simply right click on the desired item and hit delete, enter a reason, and hit OK to delete the item.


Alternatively, you can delete invoices from the Claiming Medical section of FYDO, found under the Claiming tab.


Deleting through the Claiming Medical

Important Note: Private and WorkCover invoices will not appear here as this screen is only for invoices that are to be sent electronically. 

Private invoices are invoices with the Bill Type set to Private in the billing screen.


Put your mouse over the Claiming tab and select Claiming Medical.


You will now see all your batches. So select the batch holding the invoice(s) you wish to delete.

Now, double click on the batch holding the desired invoice to be deleted.

You will now see the invoice(s) inside the batch. 

Important note: Pay attention to the number of items in the invoice to be deleted.

  • If you wish to delete all of the items within the invoice, simply right click on the invoice here, and select Delete Invoice


  • Otherwise, if you wish to only delete a portion of the invoice (some items, but not all), simply double click on the invoice to open it up. Then right click on the items to be deleted and select Move Item


Moving items out
Medicare/ DVA claims Eclipse claims
  • Items go into the current, open batch of the same bill type (e.g. Medicare)
  • If no open batch is present, a new one will be created
  • Items always go into a new, closed batch


Next, you will need to find the moved item(s) in the newly created invoice in the open/ closed batch, at the top of the Claiming Medical screen and delete as desired.


Closing the Accounting Period

Closing the ‘Accounting Period’ refers to locking down your financial figures up to a given date (usually the end of the month) so that they cannot be changed

We do not recommend closing the accounting period for the last month, on the first day of the current month. Rather, give yourself seven to ten days to get your figures to a point where you are happy. That is, after all rejections and adjustments are made. 

In other words, it ensures that the figures seen on your revenue report run out of FYDO match the figures seen on your bank account, to the cent. And that those figures then cannot be amended in FYDO. 

So let’s see where the accounting period is closed.

Start off by going over to settings.


Then, click Close Accounting Period.


Enter the date you wish to lock your figures to and hit Save.


I should also mention that this action is recorded in FYDO’s audit log, so you can see who closed the accounting period and when.

To view the audit log, go to Settings, then click on Logs.


You will see a log similar to this when the accounting period is closed.