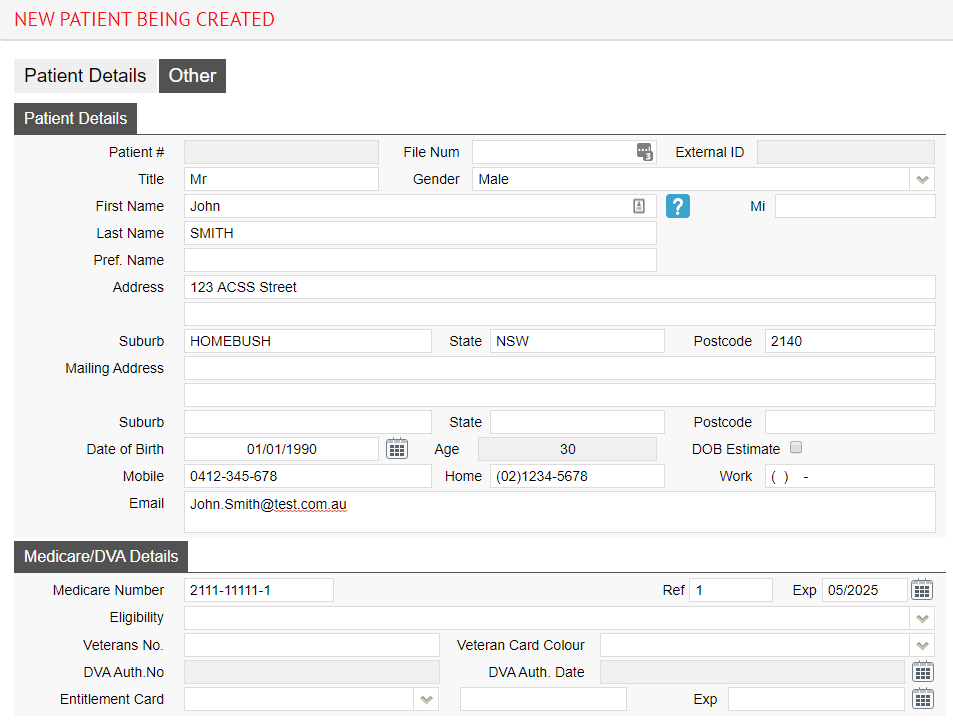
Patient Transfer (non API option)
As of September 2021 we do not have any inbound webhooks/APIs, meaning FYDO can not receive new patients via an API. FYDO can send webhooks/apis for new patients but not inbound as of this writing.
We do have a patient transfer option whereby you can send us a file via FTP and it can be loaded into FYDO. Currently this occurs at 3 scheduled intervals a day. 8am, midday and 4pm (SYD time).
We have a few formats we can accept the data in
- XML
- .txt
Option: XML
This format has been adopted as it is the format created by Genie.
| XML Tag Name | Details |
| Id | This is the MRN from the incoming system |
| ChartOrNHS | This could be another additional ID you have for the patient |
| Title | e.g Miss, Mrs |
| FirstName | |
| Surname | |
| MiddleName | |
| HealthFundAliasFirstName | Only required if the patent is known by another name with their health fund |
| HealthFundAliasFamilyName | Only required if the patent is known by another name with their health fund |
| AddressLine1 | |
| AddressLine2 | |
| Suburb | |
| State | |
| Postcode | |
| DOB | Format yyyy-mm-dd |
| Sex | e.g M, F or 1 – for Male 2 – Female 3 – Undertermined |
| HomePhone | Format 0299999999 |
| MobilePhone | Format 0415999999 |
| EmailAddress | |
| HccPensionNum | |
| MaritalStatus | Married De facto Same sex partner Single Widowed Divorced Separated |
| CultureCode | 1 – Aboriginal 2 – Torres Strait Islander 3 – Both Aboriginal / Torres Strait Islander 4 – Neither 9 – Not Stated |
| MedicareNum | |
| MedicareRefNum | |
| MedicareExpiry | Format yyyy-mm-dd |
| DvaNum | |
| HealthFundName | e,g MBP, HCF needs to be the fund code not the fund name. Or at the least the first 3 characters need to be the fund code. |
| HealthFundNum | |
| NokName | Format FirstName Surname |
| NokPhone | |
| Memo |
Option: Text File
This format was created by FYDO and has more fields than the XML option, referred to internally as AV2.
| Field Name | Start | Length | Details |
| PatExtId | 1 | 10 | This could be another additional ID you have for the patient, the main MRN is the PatType field |
| Title | 11 | 5 | e.g Miss, Mrs |
| Last Name | 16 | 30 | |
| First Name | 46 | 30 | |
| Address 1 | 76 | 40 | |
| Suburb | 116 | 25 | |
| Postcode | 141 | 4 | |
| DOB | 145 | 10 | Format dd/mmy/yyy |
| Medicare Number | 155 | 12 | Format 2111-11111-1 |
| Medicare Reference | 167 | 1 | |
| Entitlement Number | 168 | 14 | e.g. concession number or pension number |
| DVA Number | 182 | 14 | |
| Phone Home | 196 | 14 | Format (02)9999-9999 |
| Phone Work | 210 | 14 | Format (02)9999-9999 |
| Misc1 | 224 | 1 | Field now defunct, pls ignore |
| Gender | 225 | 1 | e.g M, F |
| State | 226 | 3 | |
| Medicare Expiry | 229 | 5 | Format mm/yy |
| Misc2 | 234 | 6 | Field now defunct, pls ignore |
| PatType | 240 | 10 | This is the MRN from the incoming system |
| Misc3 | 250 | 9 | Field now defunct, pls ignore |
| Misc4 | 259 | 1 | Field now defunct, pls ignore |
| SiteId | 260 | 4 | Field now defunct, pls ignore |
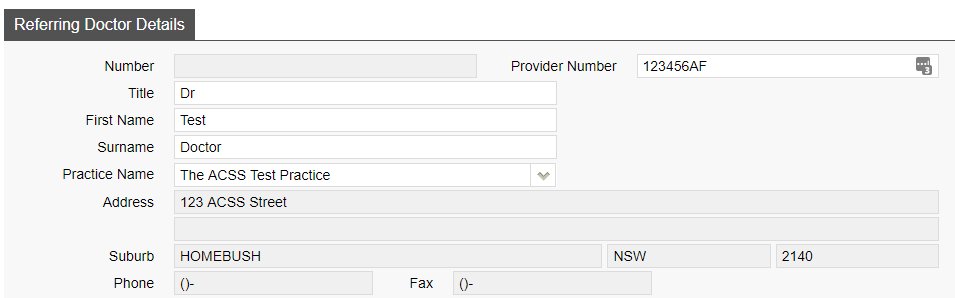
| Referring Dr Title | 264 | 6 | |
| Referring Dr First Name | 270 | 25 | |
| Referring Dr Last Name | 295 | 25 | |
| Referring Dr Suburb | 320 | 20 | |
| Referring Dr Provider Number | 340 | 8 | |
| Referral Date | 348 | 10 | Format dd/mmy/yyy |
| Referral Period | 358 | 2 | 99 for indefinite, other 3, 12 for example |
| Health Fund Membership Number | 360 | 20 | |
| Health Fund Code | 380 | 3 | e.g MBP, should be the eclipse code, that we can look up in FYDO |
| Health Fund Name | 383 | 37 | e.g Medibank |
| Misc5 | 420 | 25 | Field now defunct, pls ignore |
| 445 | 50 | ||
| Notes | 495 | 50 | |
| Mobile Number | 545 | 12 | |
| NOK Last Name | 557 | 25 | |
| NOK First Name | 582 | 25 | |
| NOK Relationship | 607 | 10 | e.g Brother, Father, Wife |
| NOK Phone Home | 617 | 13 | Format (02)9999-9999 |
| Patient Middle Initial | 630 | 1 | |
| DVA Card Type | 631 | 1 | |
| Indigenous | 632 | 1 | 1 – Aboriginal 2 – Torres Strait Islander 3 – Both Aboriginal and Torres Strait Islander 4 – Neither Aboriginal or Torres Strait Islander 9 – Not Stated |
| Referring Dr Practice Name | 633 | 50 | |
| Referring Dr Address 1 | 683 | 50 | |
| Referring Dr Address 2 | 733 | 50 | |
| Deceased Date | 783 | 10 | Format dd/mmy/yyy |
| Health Fund Alias First Name | 793 | 25 | |
| Health Fund Alias Last Name | 818 | 25 | |
| Referring Dr Phone | 843 | 14 | Format (02)9999-9999 |
| Referring Dr Fax | 857 | 14 | Format (02)9999-9999 |
| Referring Dr State | 871 | 3 | |
| Referring Dr Postcode | 874 | 4 | |
| Eligibility | 878 | 1 | 1 – Eligible – Australian Resident 2 – Eligible – Overseas Visitor 3 – Ineligible 9 – Not Known/Not Stated |
| Insurance Status | 879 | 1 | 1 – Basic Cover 2 – Full Cover |
| Other Card Id | 880 | 1 | |
| Other Card Number | 881 | 10 | |
| Allergy | 891 | 70 | |
| Marital Status | 961 | 1 | 1 – Married (including de facto) 2 – Never married (Single) 3 – Widowed 4 – Divorced 5 – Permanently Separated 6 – Not stated/inadequately described |
| Employment Status | 962 | 2 | 1 – Child not at school 2 – Student 3 – Employed 4 – Unemployed 5 – Home Duties 6 – Retired 7 – Pensioner 8 – Other |
| Language | 964 | 2 | Download List |
| Country | 966 | 4 | Download List |
| Mailing Address Line 1 | 970 | 40 | |
| Mailing Address Line 2 | 1010 | 40 | |
| Mailing Address Suburb | 1050 | 25 | |
| Mailing Address State | 1075 | 3 | |
| Mailing Address Postcode | 1078 | 4 | |
| Mailing Address Country | 1082 | 30 | |
| NOK Title | 1112 | 10 | |
| NOK Address 1 | 1122 | 40 | |
| NOK Suburb | 1162 | 25 | |
| NOK State | 1187 | 3 | |
| NOK Postcode | 1190 | 4 | |
| NOK Phone Work | 1194 | 13 | Format (02)9999-9999 |
| NOK Mobile | 1207 | 13 | Format 9999-999-999 |