FYDO allows facilities to set up email footers in two ways:
Universal Email Footer — applied as the default email footer for all users.
User-Based Email Footer — applied to an individual user’s emails.
Important Note
If a user has their own user-based email footer set up, this will override the universal email footer.
This means facilities can set up a universal email footer for all users, while still allowing individual users to customise their own footer if required.
In order to utilise any emailing features in FYDO, the user first has to set up the email feature by following the instructions in the below wiki page:
The universal email footer will apply as the default footer for users who have not set up their own individual email footer.
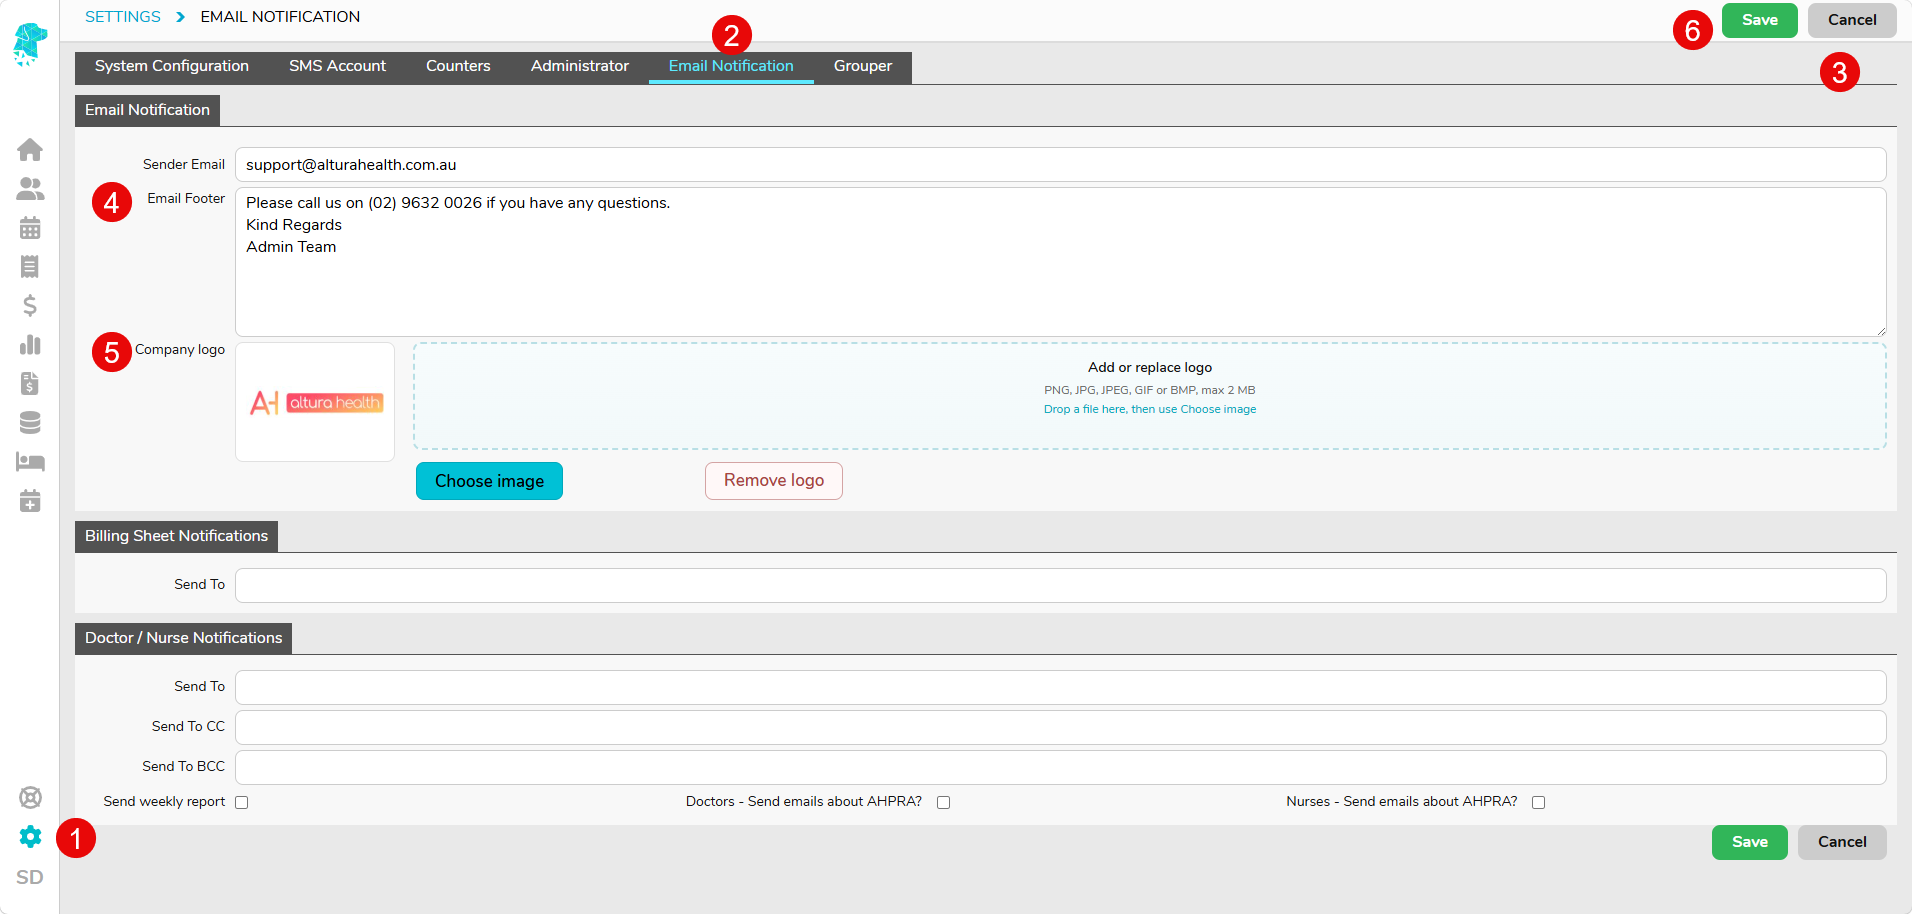
Go to Settings and select System Configuration.
Select the Email Notification tab.
Click Edit.
Enter any text required in the Email Footer field.
Drag and drop, or import by selecting Choose Image, the logo into the Company Logo section, if required. Ensure the file format for the logo meets the requirements displayed on the screen.
Once all relevant information has been entered, click Save for the logo preview to update.
The universal email footer will now be used as the default footer for outgoing emails, unless the individual user sending the email has their own user-based footer set up.
Part 2: Setting Up a User-Based Email Footer
A user-based email footer is set up from the individual user’s profile. This allows each user to have their own email footer and logo if required.
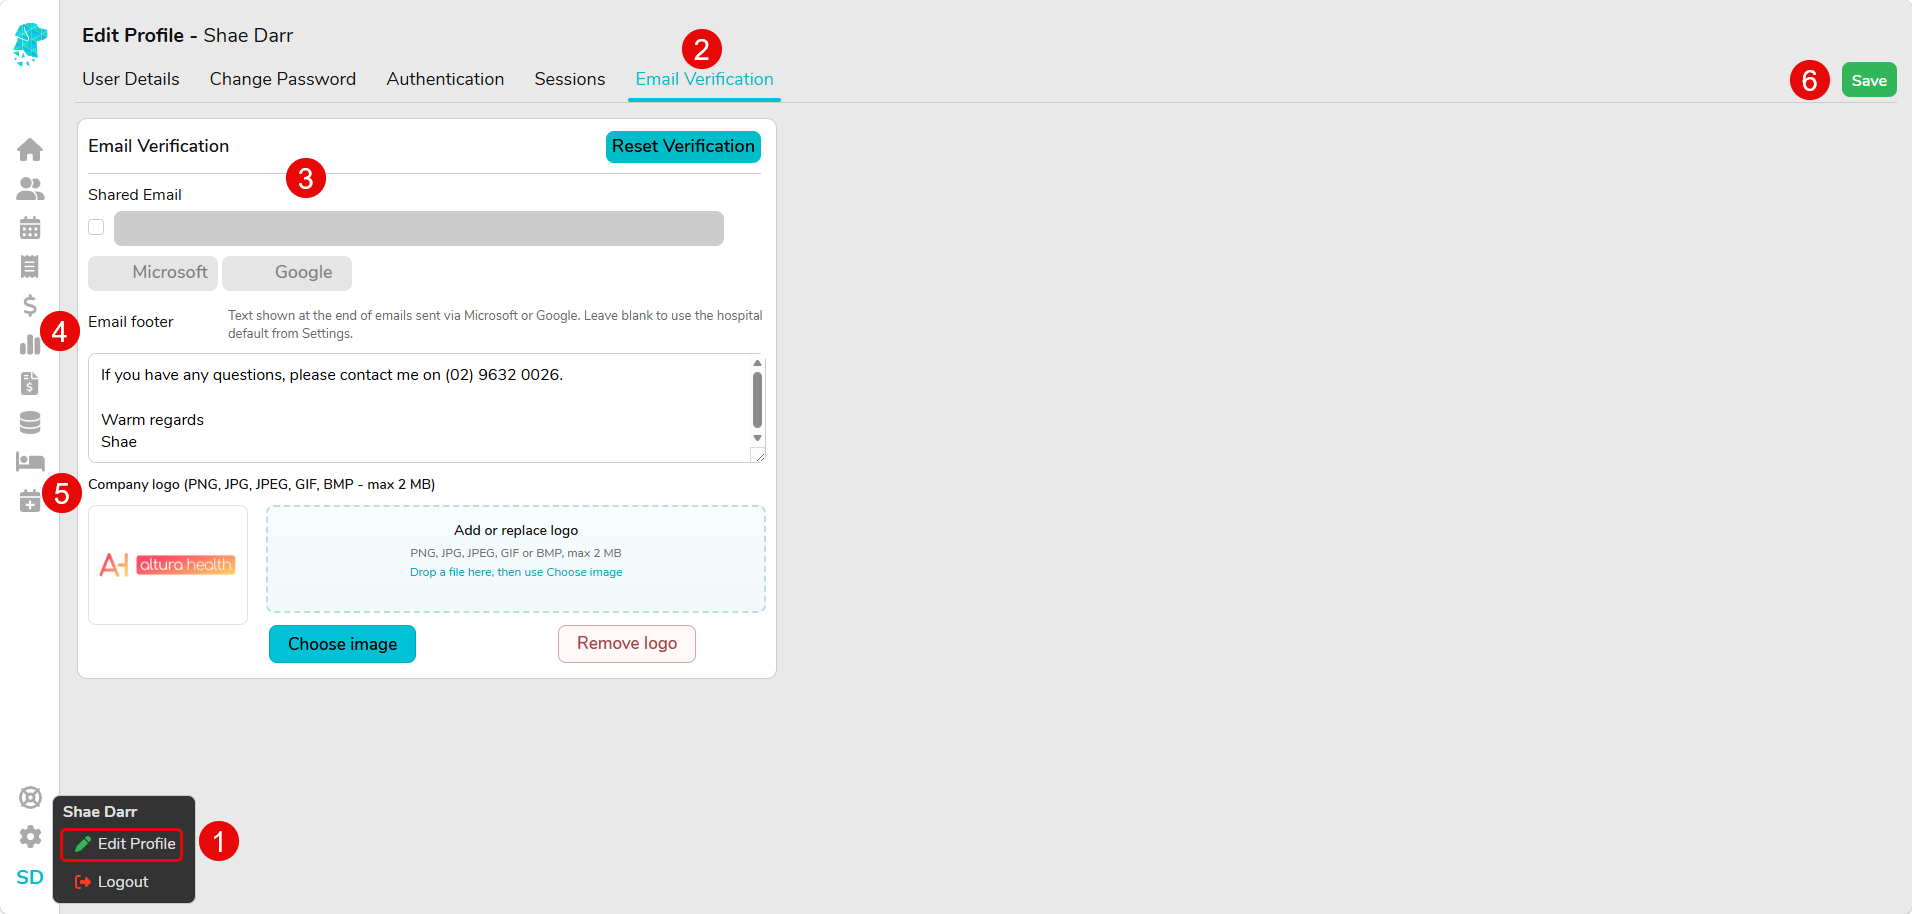
Hover over your User Initials, in the bottom left corner of your screen, and select Edit Profile.
Go to the Email Verification tab.
This is where you will need to verify your email address, if you haven’t already, in order to send emails from FYDO, as per the below instructional wiki page: Setting up to Email from FYDO
Navigate to the Email Footer field and enter any text required.
Drag and drop, or import by selecting Choose Image, the logo into the Company Logo section, if required. Ensure the file format for the logo meets the requirements displayed on the screen.
Once all required information has been added, click Save for the logo preview to update.
Emails sent by this user will now include their individual email footer and logo. This user-based footer will override the universal email footer set up in Settings.
Sending an Email to Check the Footer
Once the email footer has been set up, you can test how it appears by sending a document from FYDO. Further instructions on how to send different documents from FYDO via email can be found below:
There may be times where you are asked to clear your browser cookies and cache when troubleshooting issues within FYDO or Preadmit. Cached data stored within your browser can sometimes cause problems such as pages not loading correctly, old information continuing to display, login issues, or unexpected system behaviour after updates have been applied.
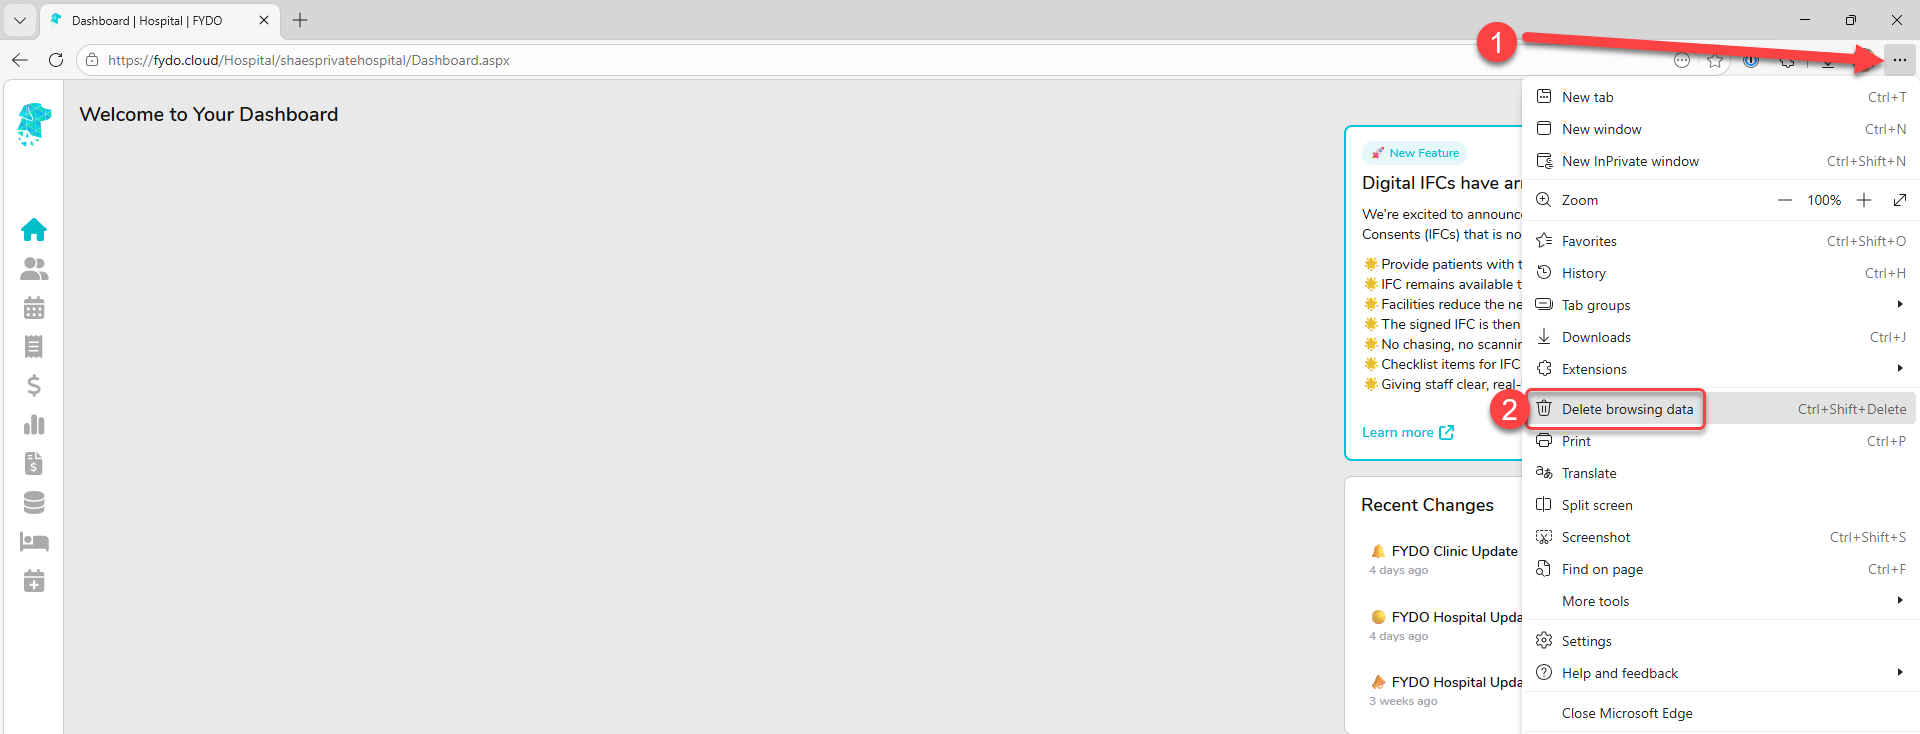
The below steps will guide you through how to clear cookies and cache within Microsoft Edge.
Select the 3 dots menu in the top right corner of Microsoft Edge
Select Delete browsing data
Change the Time range to All time
Tick Cookies and other site data
Tick Cached images and files
Click Clear now
Deactivating a User
When users no longer require access to FYDO, they can be deactivated in the system.
Select Settings
Click Users
3. Search for the required user and Double Click on their name
4. Click Edit 5. Untick the Active box 6. Click Save
7. Inactive users can always be viewed by utilising the Show Inactive option 8. Inactive users will be identified with an Inactive Status
Updating a Username
There may be instances when a user needs to change their name in FYDO. This can be done by the user themselves, by following the steps below. The only exception is the Subscriber who is unable to change their user name themselves and will need to contact FYDO Support if amendments are required.
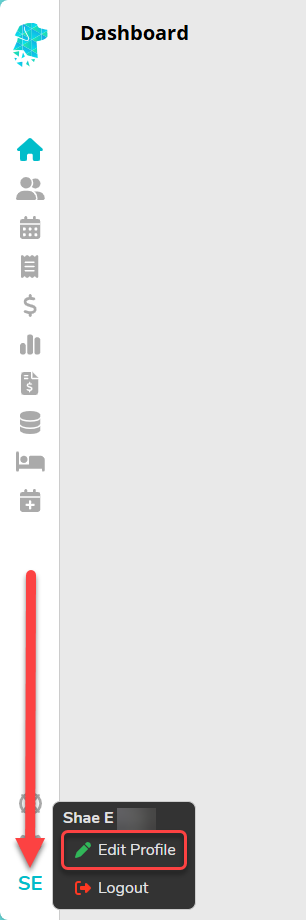
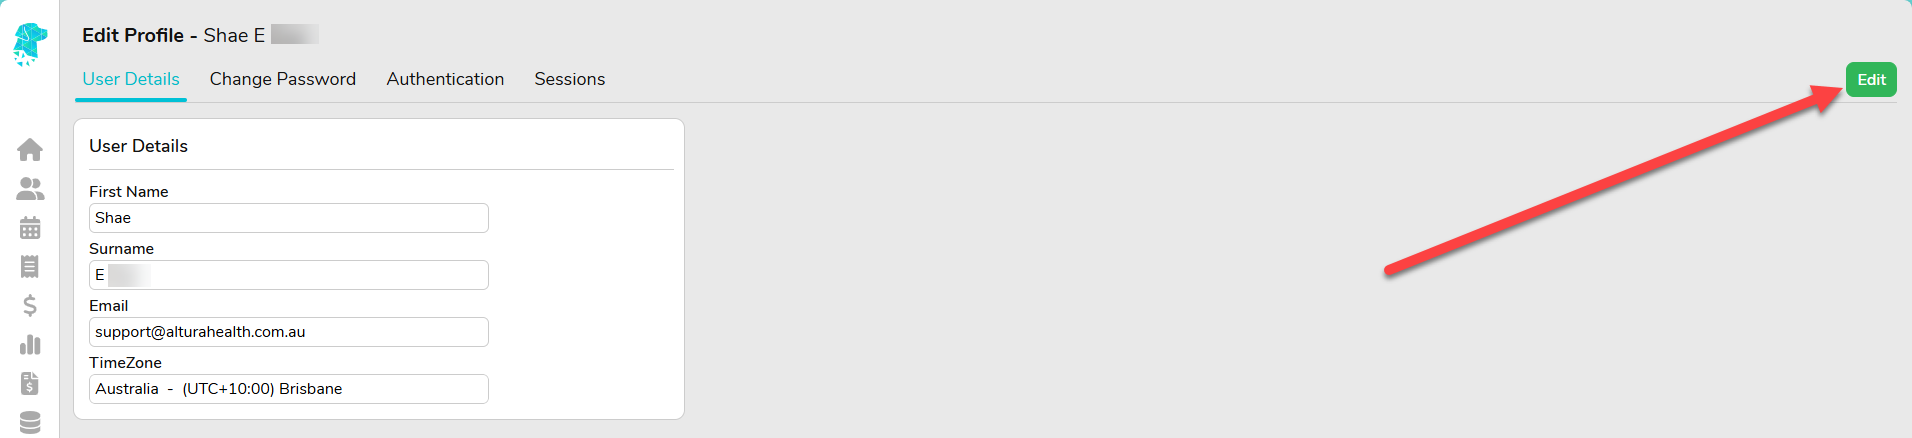
Hover over User Profile (Your Initials)
Select Edit Profile
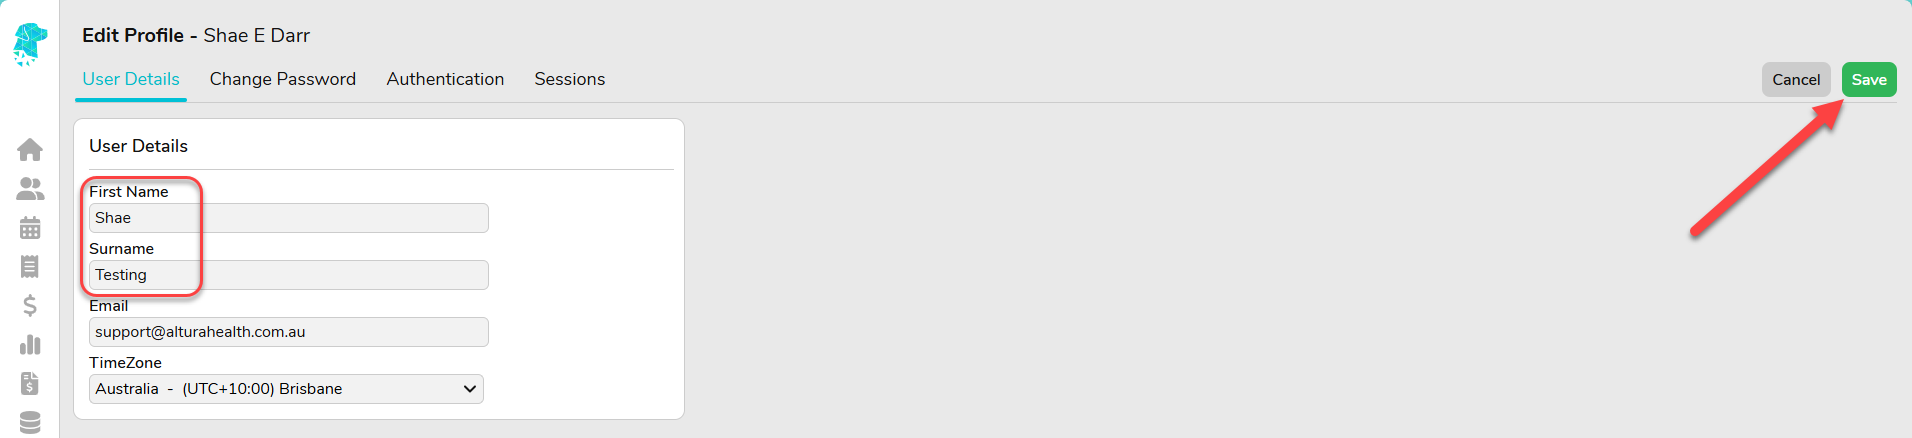
3. While on the User Details tab, select Edit
4. Amend the required First Name or Surname fields 5. Click Save
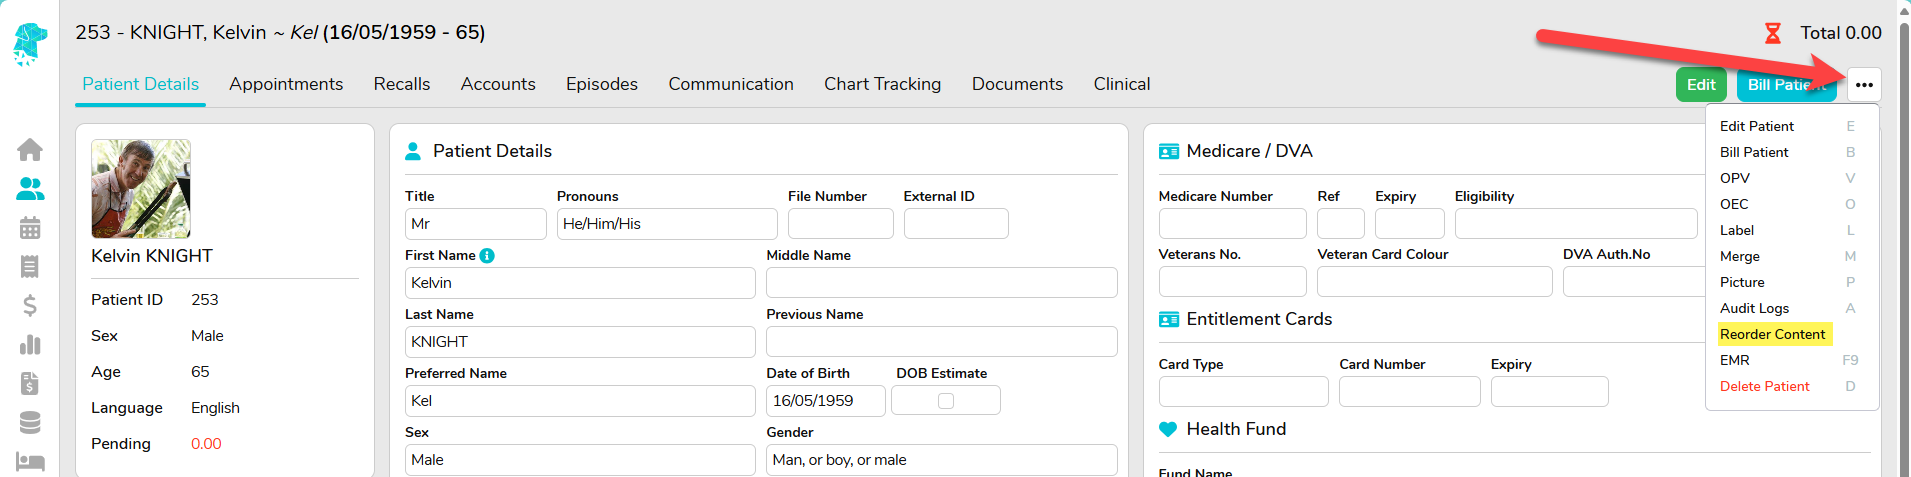
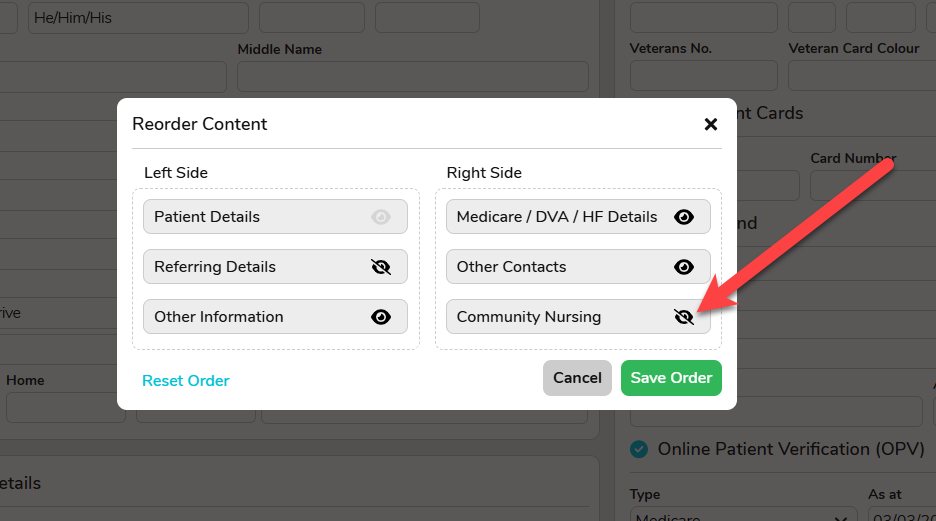
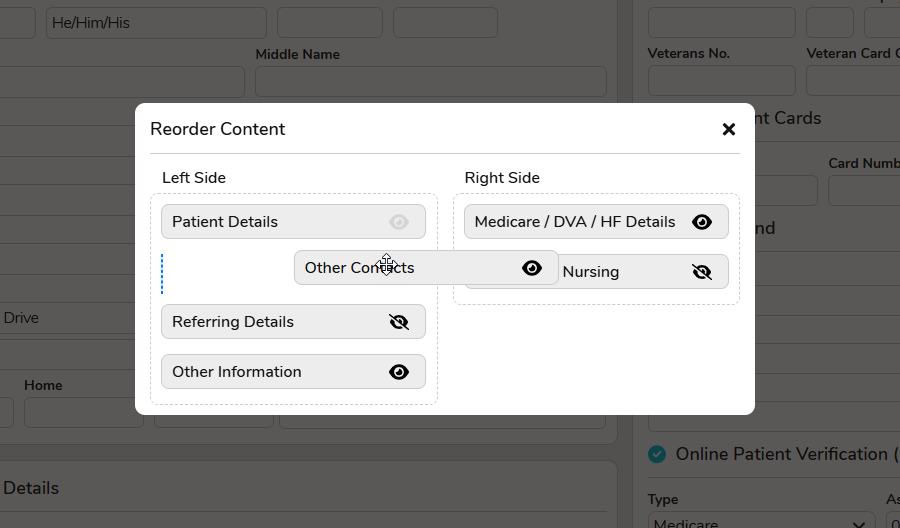
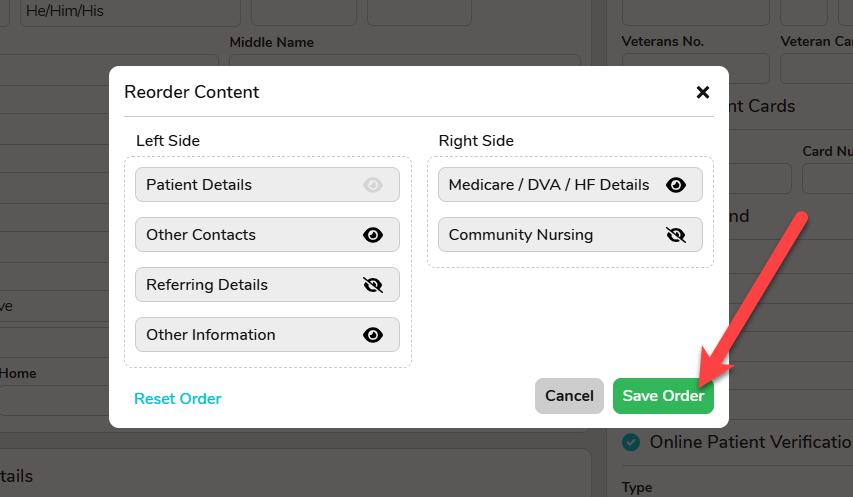
Re-Order Patient Screen
Users can customise the Patient Screen and display the details that are most relevant to them!
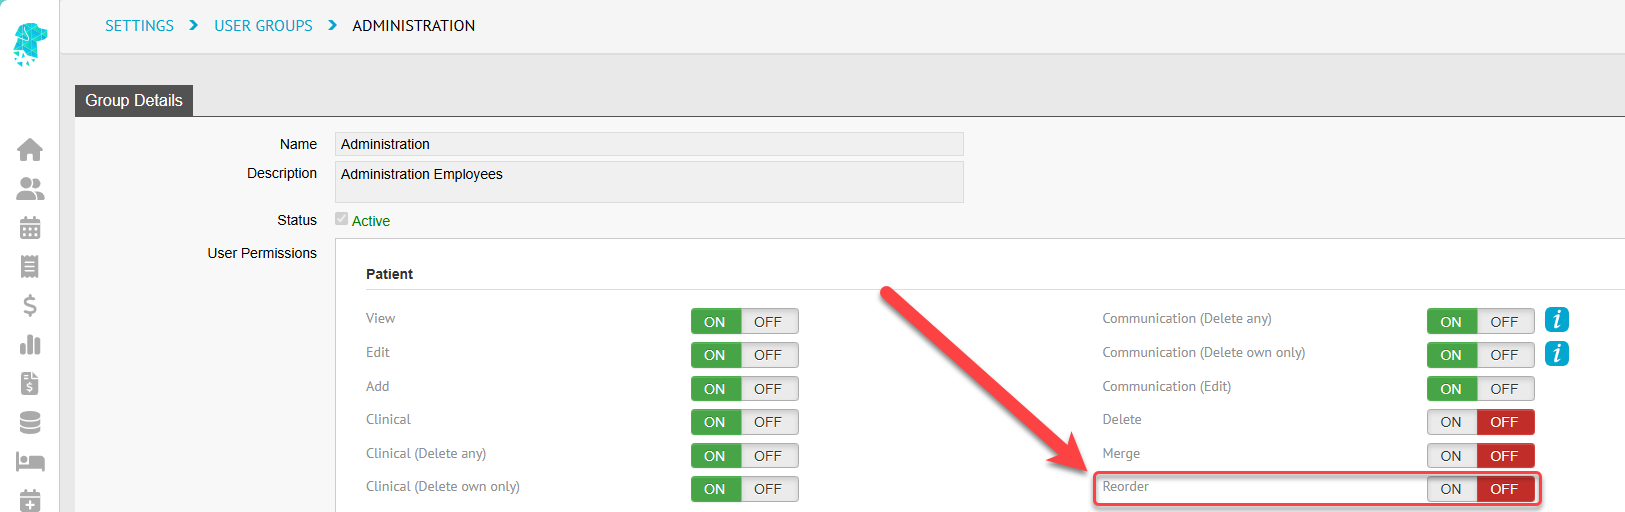
Access to this feature is managed at the User Group level, via Settings > User Groups, by amending the option under Patient for Reorder.
Users with the appropriate access levels can customise the layout of the patient screen by navigating to any patient and selecting Reorder Content from the Menu in the top-right corner.
This allows users to choose which groups of information are visible and hide irrelevant details using the eye icon.
Information groups can also be Reordered by dragging them to the appropriate spot. The layout can be displayed across two columns or condense it into a single column if needed.
Once the desired order has been selected, click Save Order and the view will be displayed whenever the Patient Screen is opened.
SMS Automation in FYDO
Stay connected with your patients effortlessly with the new Automated SMS feature in FYDO! This feature allows you to automatically send SMSs to patients before and after their admissions, at timeframes that work for you! – Need to send patients their admission times? Done. – Need to remind patients to complete their Admission Form? No problem. – Want to send a Post-Discharge follow-up or request feedback via a Patient Survey? It’s all possible!
We’re here to help you set up this automation. If you have any questions, don’t hesitate to reach out to our friendly team via email or phone!
SMS Automation: Once your templates are ready, you’ll need to set up SMS Automation in the FYDO Settings. Let’s walk through that now!
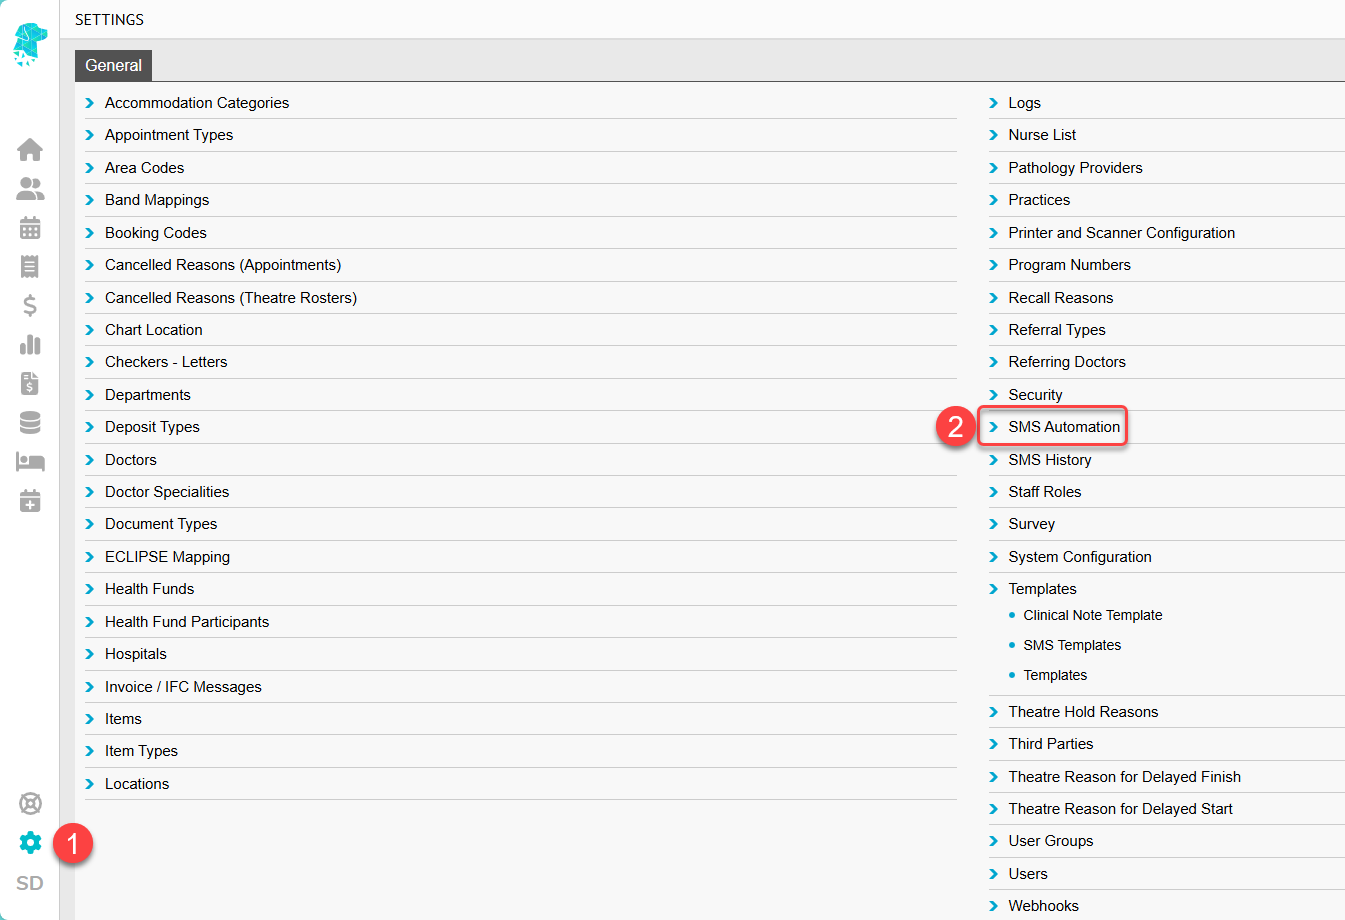
Navigate to Settings
Select SMS Automation
3. Click Add SMS Automation
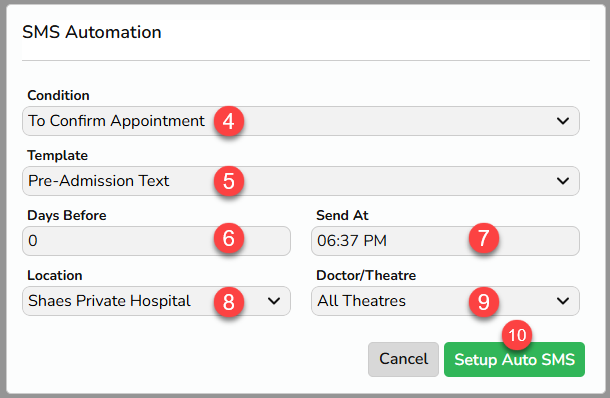
4. Select the Condition. (We will go into detail on each of the Conditions later in the instructions and explain what field in FYDO governs their status) 5. Select the required Template 6. Select the Number of Days Before or After the episode that you’d like the SMS to be sent 7. Select the Time that you’d like the SMS sent 8. Select the Location for Multi-Location databases. (Single location databases will not need to amend this field) 9. Select the specific Theatre if this Automated SMS is only going to apply to one. Otherwise leave the selection as All Theatres 10. Click Setup Auto SMS
Now we’ll go into detail on the different Condition options available for sending the Automated SMSs.
To Confirm Appointment
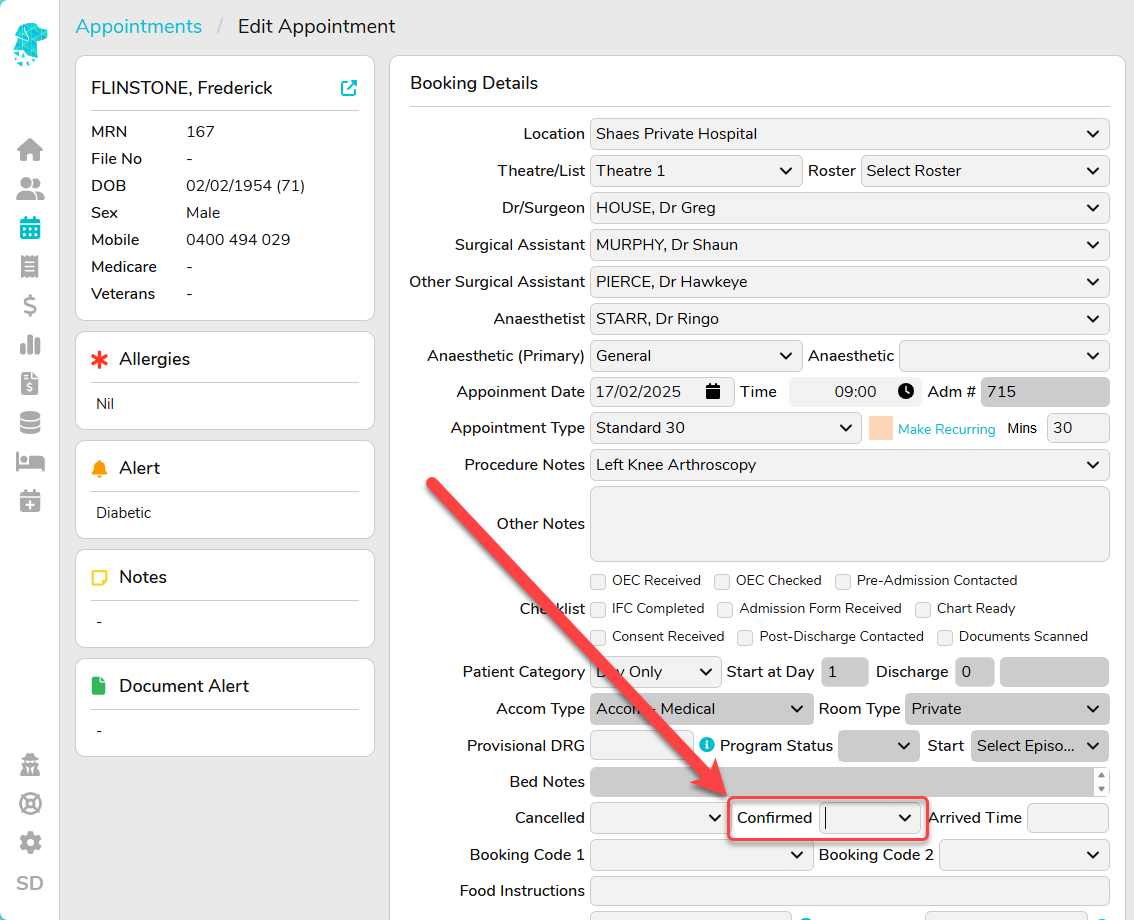
This type of SMS automation is triggered by the Confirmed field in the Edit Appointment Screen of each episode. When the Automated SMS Condition is set to To Confirm Appointment this field will be checked before sending, to ensure the message is only sent to appointments that haven’t been confirmed yet.
This is the only Automated SMS type that will reflect the icon on the Appointments Screen.
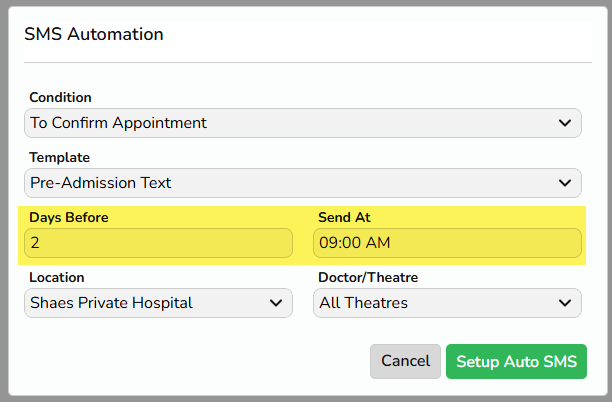
For example, the automated SMS feature will check for appointments scheduled in the next two days that haven’t been confirmed. It will send the selected SMS template at 9am. For the below example, let’s say today is Monday:
The system will check all appointments scheduled for Wednesday and send the SMS to those without an entry in the Confirmed field.
FYDO will also scan for any late additions to appointments within the two-day window to ensure these patients also receive the SMS.
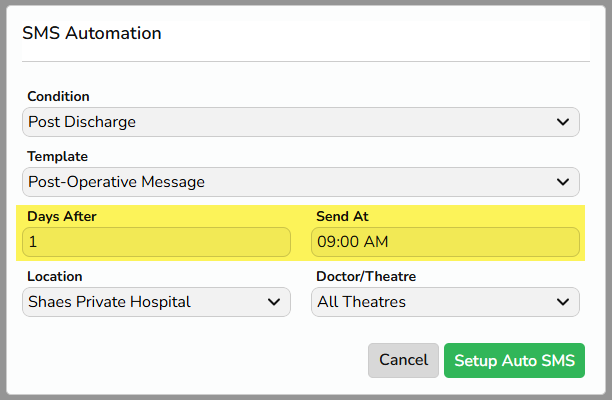
Post Discharge
This SMS automation is based on the Discharge Date. Once an episode is discharged, the SMS will be sent at the designated timeframe after the discharge date. For example, if today is Monday and a patient is discharged at 1pm, they will receive the automated Post DischargeSMS one day after their discharge date. In this case, the SMS will be sent on Tuesday at 9am.
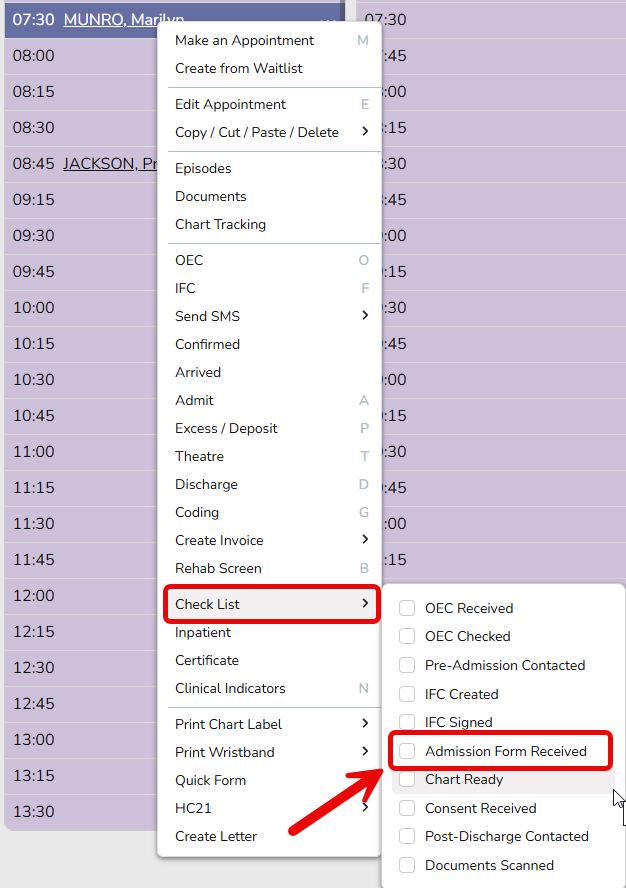
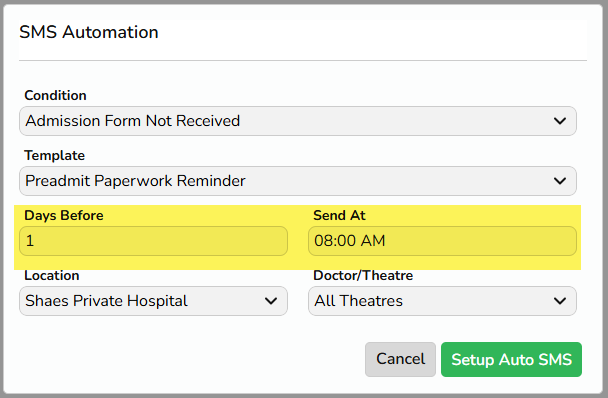
Admission Form Not Received
This automated SMS is triggered based on the Admission Form Received Check List item. If the checkbox is marked for a patient’s admission, they will not receive the automated SMS. This means the SMS will only be sent to patients who have not yet completed their admission form!
With the check box now automatically ticked when patients completed Online Preadmit Paperwork is committed, following up with patients who still need to complete this task has never been easier!
For the below example, if a patient is booked for Monday, they will receive their Admission Form Not Received reminder on Sunday at 8am, the day before their scheduled admission.
Keep in mind, you can set up multiple SMS Automations! So, if you want to remind patients every day until they submit their admission form, you can easily do that!
And again, we’re here to help you set up this automation. If you would like assistance with getting this feature up and running for your facility, please don’t hesitate to reach out to our friendly team via email or phone!
Let’s look at a demo setup for streamlining patient communication! Automating these SMS reminders can really help improve patient engagement and reduce the administrative burden on staff. Here’s an example of how it can work and why it’s effective:
Online Pre-Admission Form Link (4 days before admission) This gives patients a head start in completing their required paperwork. The fact that it only contacts those who haven’t already submitted the form is a great way to avoid unnecessary follow-ups and potential annoyance for patients who are already on top of their forms.
Follow-Up Reminder for Admission Forms (2 days before admission) A reminder just before the deadline to submit the form ensures that those who missed the first notification get another nudge, but again, it avoids bothering anyone who’s already completed the form. A gentle follow-up can help improve compliance.
Pre-Procedure Confirmation (1 day before admission) This is crucial for making sure patients are prepared with all the details – admission time, fasting instructions, what to do when they arrive, and appointment confirmation. It helps patients feel more confident and organized the day before their procedure.
Post-Discharge Check-In (1 day after discharge) Checking in on patients after they leave the hospital can show that you care about their recovery, making them feel supported and giving you an opportunity to catch any concerns early. Helping you meet your post-discharge obligations.
Patient Survey Link (5 days post-discharge) Asking for feedback via a patient survey is a great way to gather insights on their experience and identify any areas for improvement. Giving them a little time to settle into their recovery before asking for feedback might result in more thoughtful responses. Automating this follow up ensures all patients are given the opportunity to participate in providing feedback.
Single Sign On (SSO) with FYDO
At FYDO, we are committed to continuously enhancing the security and convenience of our platform for our valued customers. And because of that, we use Single Sign On (SSO) to FYDO! This feature will allow you to access FYDO using your existing credentials from Microsoft or Google, simplifying your login process while maintaining the highest level of security.
SSO is a secure authentication process that enables you to log in to multiple applications with a single set of credentials. By integrating SSO, we aim to provide you with a seamless and efficient log in experience.
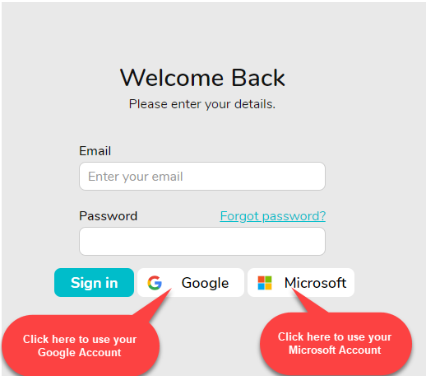
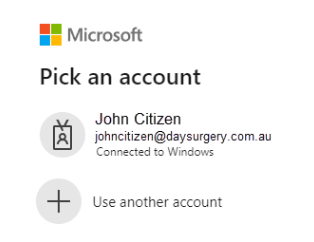
When you log in, you will notice two buttons for Microsoft and Google account access, as pictured below.
If you are already logged into your browser with either a Google or Microsoft account, you can click on the applicable button to log in. This will take you directly to the FYDO dashboard or the Two-Step Verification Process via SMS, email, or an Authentication App as usual.
Note– The account you use must already be set up in FYDO to proceed.
If you are not already logged into your browser with an account, you will be prompted to ‘Pick an account’ or ‘Use another account’ as shown below. You will need to enter your password to proceed.
You may still use your email and password to log in unless your FYDO account subscriber has forced SSO to be used. In that case, you may receive a message at the top of the screen, as shown:
If you receive the message above, please try using the Microsoft or Google buttons. If you still have problems logging in, contact your FYDO account subscriber(the person in charge of FYDO at your facility) before reaching out to Altura Health Support.
If you have forgotten your Microsoft or Google password, please contact your IT department. This issue is separate from FYDO and cannot be addressed by Altura Health Support.
How to enforce SSOin FYDO
SSO authentication can be enforced for all or selected users. Once SSO is enforced, an email invitation will be sent to the applicable user/s, advising them to activate their account via SSO. The user does not need to use the email invitation link; they can go directly to the FYDO website.
Note: Once a user is required to use SSO by their facility, their existing password will be deleted.
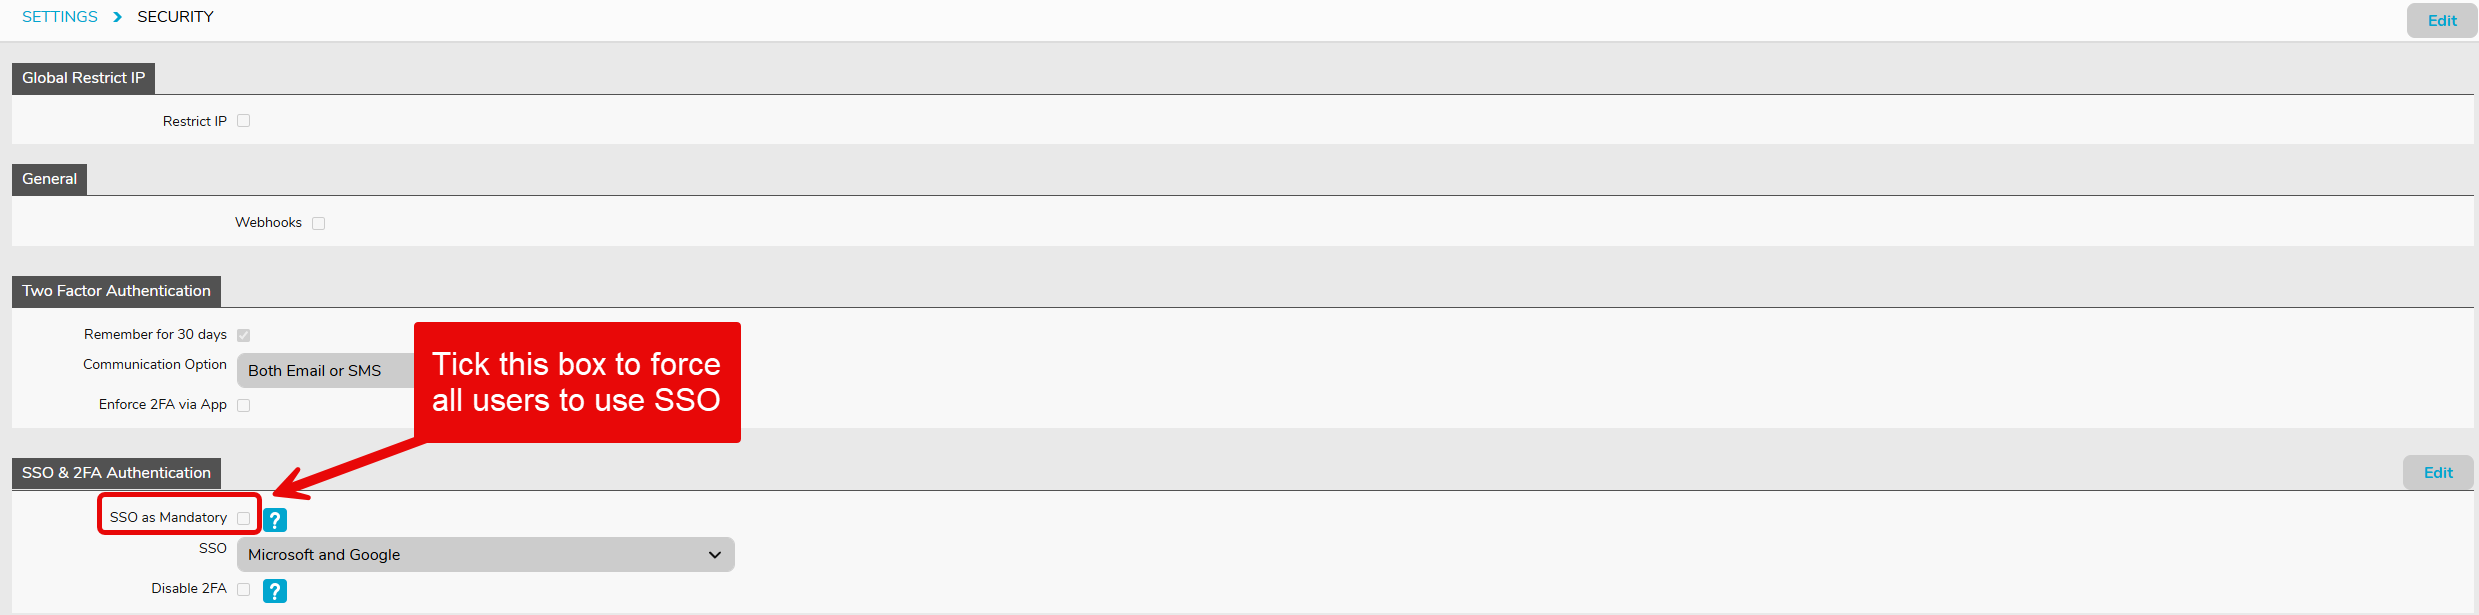
To enforce SSO for all users:
Go to Settings > Security and click Edit.
Tick the SSO as Mandatory tick box (as shown below) and click Save.
If, for any reason, some users are unable to authenticate using SSO, they can be reverted back to the standard email/password authentication method.
To revert all users to email/password authentication:
Simply untick the SSO as Mandatory box in Settings > Security.
To revert specific users to email/password authentication:
Go to Settings > Users
Double-click on required user
Click Edit
Untick SSO Mandatory
Click Save
Reverted users will receive another email invitation to set up their new password.
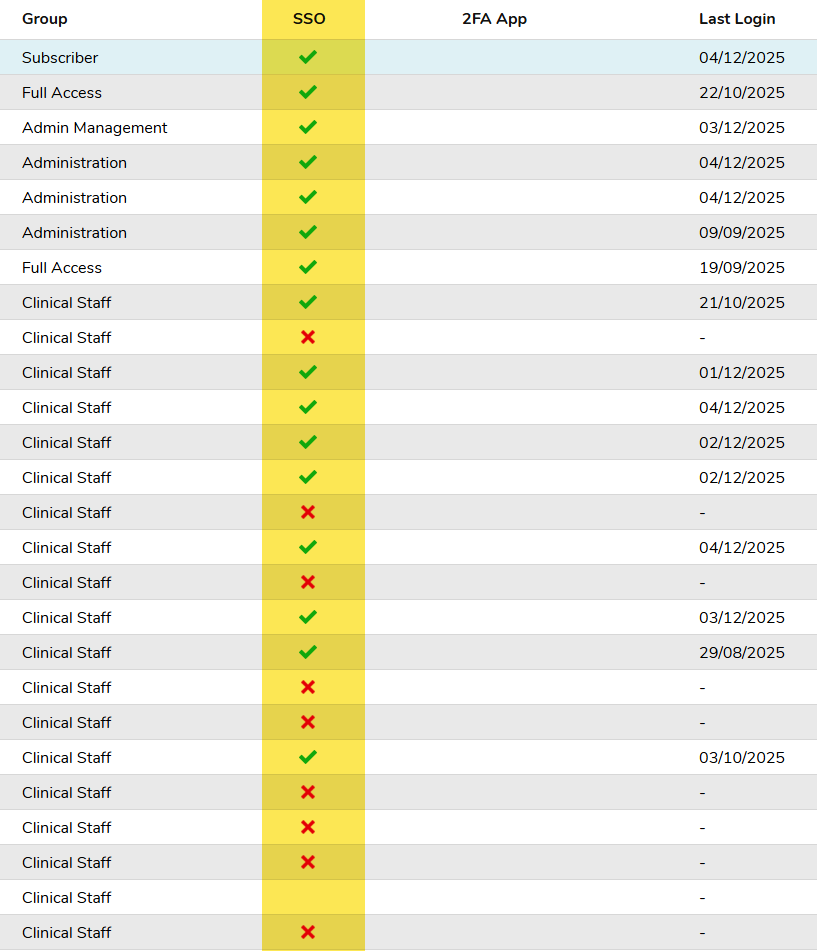
You can see which users have SSO enforced and whether they have successfully authenticated using SSO by going to Settings > Users.
SSO Blank: User not forced to use SSO
SSO Red Cross: User forced to use SSO but not activated
SSO Green Tick: User has activated SSO
Exporting Referring Doctors/Practices
How to Export Referring Doctors:
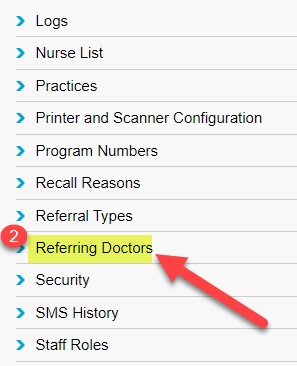
Click on Settings
Under General, Click on Referring Doctors
Click the Export To button and choose either Excel or PDF.
How to Export Practices:
Click on Settings
Under General, Click on Practices
Click the Export To button and choose either Excel or PDF.
Amending a User’s Email Address
There may be instances when a user needs to change their FYDO log in email address. This can be done by the user themselves by following the steps below. The only exception is the Subscriber who is unable to change their email address themselves & will need to contact FYDO Support if amendments need to be made.
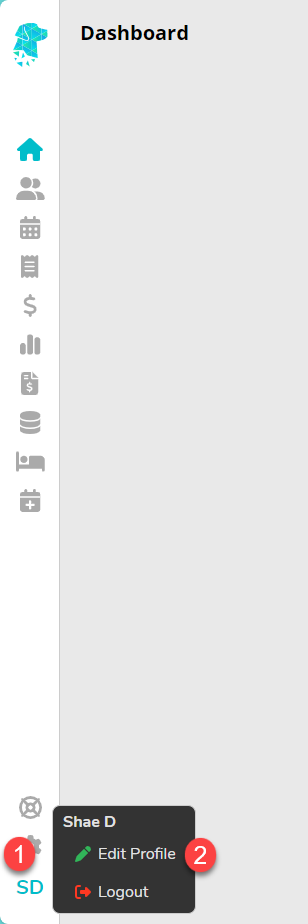
Hover over User Profile (Your Initials)
Select Edit Profile
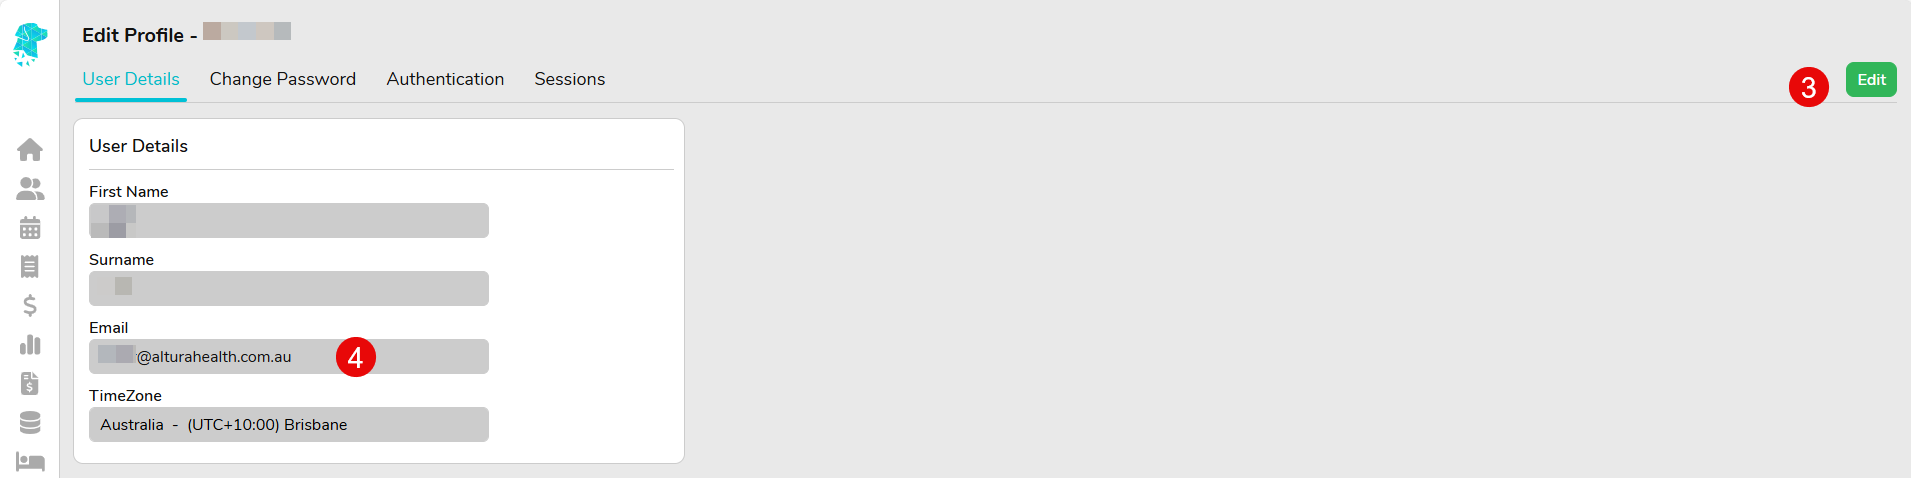
Select Edit
Amend Email
Click Save
The new email address will need to be used for log ins from there on.
How to change user’s timezone
Need to change your timezone? Read on to learn how!
Note: This setting is unique to the user. Therefore, each user will need to check their own timezone settings.
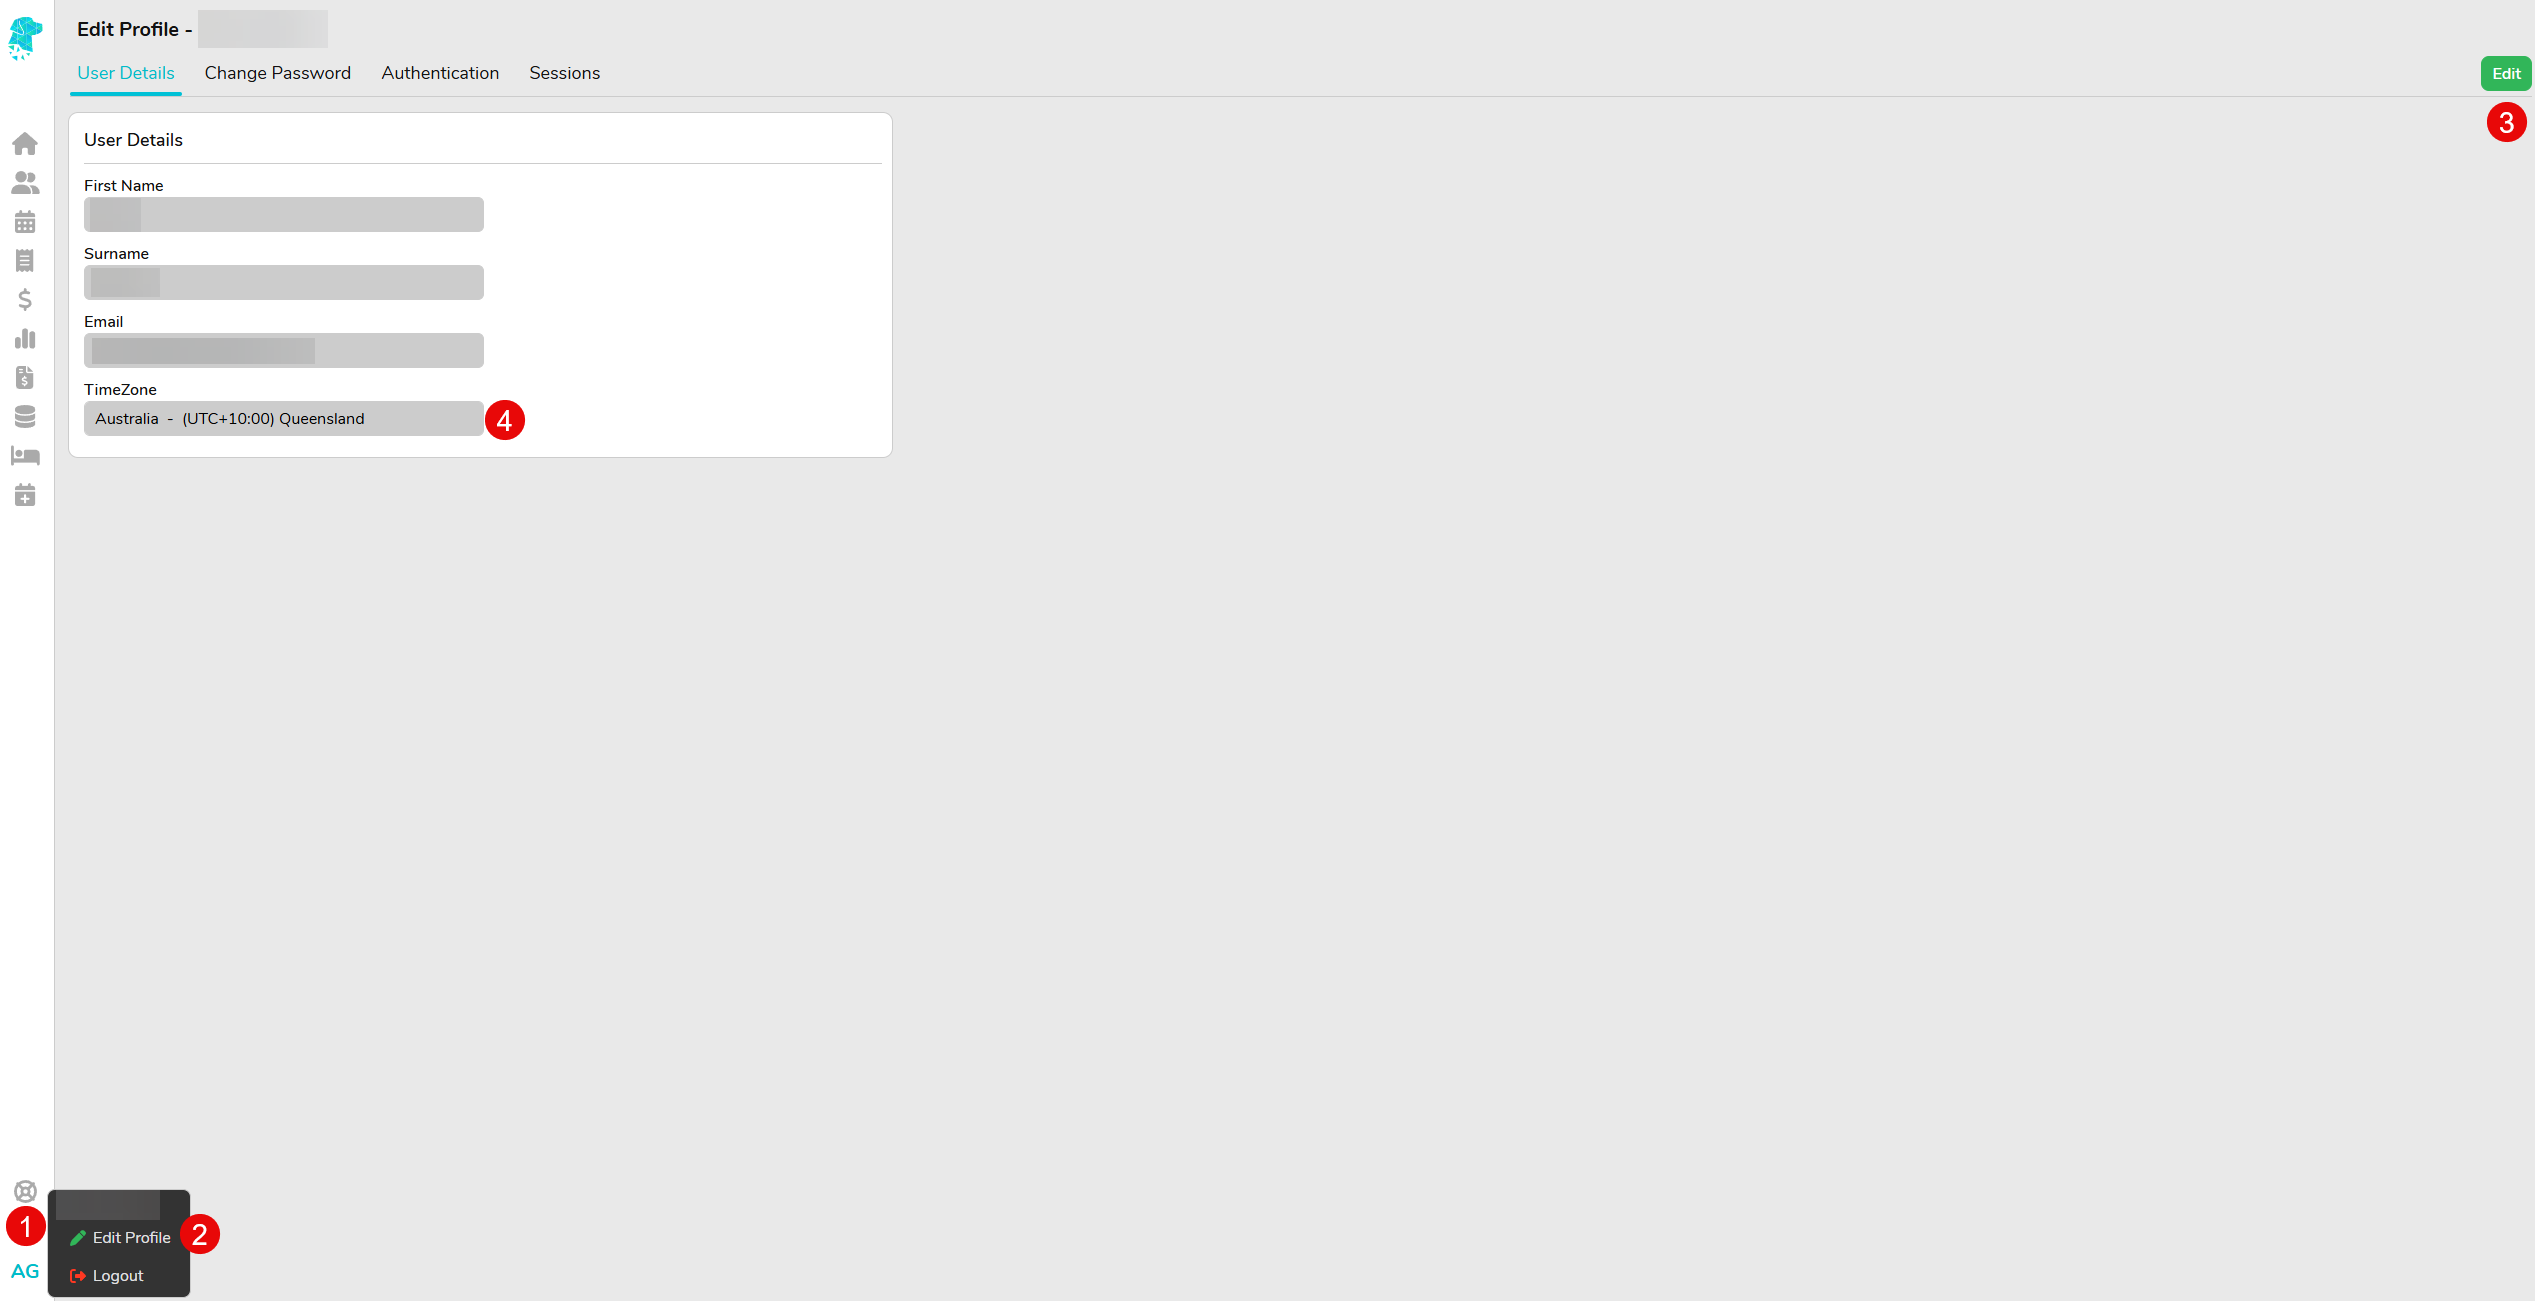
Hover over the profile icon(Your Initials)
Click on Edit Profile.
Select Edit
Select the desired TimeZone.
Click Save and you’re all done! You have successfully updated your TimeZone on this profile.