Tokens – Mailing Label
| Token Name | Data | Notes |
| <<PracticeName>> | Practice Name | |
| <<Title>> | Title | |
| <<FirstName>> | First Name | |
| <<LastName>> | Surname | |
| <<MailingAdd1>> | Location Address 1 | |
| <<MailingAdd2>> | Location Address 2 | |
| <<MailingAdd3>> | Location Address 3 |
| Token Name | Data | Notes |
| <<PracticeName>> | Practice Name | |
| <<Title>> | Title | |
| <<FirstName>> | First Name | |
| <<LastName>> | Surname | |
| <<MailingAdd1>> | Location Address 1 | |
| <<MailingAdd2>> | Location Address 2 | |
| <<MailingAdd3>> | Location Address 3 |
| Token Name | Data | Notes |
| <<DocFullName>> | Doctor Full Name | eg. SMITH, John |
| <<DocFirstname>> | Doctor First Name | eg. John |
| <<DocSurname>> | Doctor Second Initial | eg. SMITH |
| <<DocTitle>> | Doctor Title | |
| <<DocID>> | Doctor ID | |
| <<DocAdd1>> | Doctor Address 1 | |
| <<DocAdd2>> | If Address Line 2 is empty, this will show Suburb State Postcode otherwise it will show Address Line 2 |
|
| <<DocAdd3>> | If Address Line 2 is empty, this will show nothing otherwise it will show Suburb State Postcode |
|
| <<DocSuburb>> | Doctor Suburb | UPPERCASE |
| <<DocState>> | Doctor State | UPPERCASE |
| <<DocPC>> | Doctor Post Code | |
| <<DocMob>> | Doctor Mobile | 9999 999 999 |
| <<DocPh>> | Doctor Phone | 99 9999 9999 |
| <<DocFax>> | Doctor Fax | 99 9999 9999 |
| <<DocEmail>> | Doctor Email | |
| <<DocQualif>> | Doctor Qualification | |
| <<DocLoc>> | Doctor Location | |
| <<DocProv>> | Doctor Provider Number | |
| <<DocABN>> | Doctor ABN | |
| <<DocInvAs>> | Invoice As for Clinic | |
| <<DocAccName>> | Doctor Account Name | |
| <<DocBSB>> | Doctor BSB | |
| <<DocAccNum>> | Doctor Account Number | |
| <<DocBankAdd>> | Doctor Bank Address | |
| <<DocBank>> | Doctor Bank Name | |
| <<RefFullName>> | Referring Doctor Full Name | eg. SMITH, John |
| <<RefFirstName>> | Referring Doctor First Name | eg. John |
| <<RefSurname>> | Referring Doctor Surname | eg. SMITH |
| <<RefTitle>> | Referring Doctor Title | |
| <<RefID>> | Referring Doctor ID | |
| <<RefPractice>> | Referring Doctor Practice | |
| <<RefPracId>> | Referring Doctor Practice ID | |
| <<RefAdd1>> | Referring Doctor Address 1 | |
| <<RefAdd2>> | If Address Line 2 is empty, this will show Suburb State Postcode otherwise it will show Address Line 2 |
|
| <<RefAdd3>> | If Address Line 2 is empty, this will show Suburb State Postcode otherwise it will show Address Line 2 |
|
| <<RefSuburb>> | Referring Doctor Suburb | UPPERCASE |
| <<RefState>> | Referring Doctor State | UPPERCASE |
| <<RefPC>> | Referring Doctor Postcode | |
| <<RefMob>> | Referring Doctor Mobile | 9999 999 999 |
| <<RefPh>> | Referring Doctor Phone | 99 9999 9999 |
| <<RefFax>> | Referring Doctor Fax | 99 9999 9999 |
| <<RefEmail>> | Referring Doctor Email | |
| <<RefQualif>> | Referring Doctor Qualification | |
| <<RefSpecID>> | Referring Dr Speciality ID | |
| <<RefSpec>> | Referring Dr Speciality Description | |
| <<RefLoc>> | Referring Doctor Location | |
| <<RefProv>> | Referring Doctor Provider Number |
Whether it is Medicare, DVA, or Health Funds, FYDO keeps your item fees up to date, automatically.
Note: Your FYDO system maintains the latest Medicare/ DVA fees by default. To enable automatic fee updates for the Health Funds, click on the link below:
https://wiki.fydo.cloud/Health-Fund-Fees
Manually updating health fund fees
The manual procedure can only update fees for items that have already been added to your FYDO system. So, to prevent having to re-run the update for a given health fund, we recommend that you add all the items you need to bill before running the update.
Not sure how to add items? Click on the link below to learn how:
https://wiki.fydo.cloud/adding-mbs-items/
Ready to manually update your health funds fees? Let’s get started!
First, go to Settings > Bulk Fee Update

You will now see the Bulk Fee Update screen where you will need to update two sets of fees for each health fund. The first set are the “Old fees/ codes” and the second set are the “Current fees/ code” (To be updated in that order).
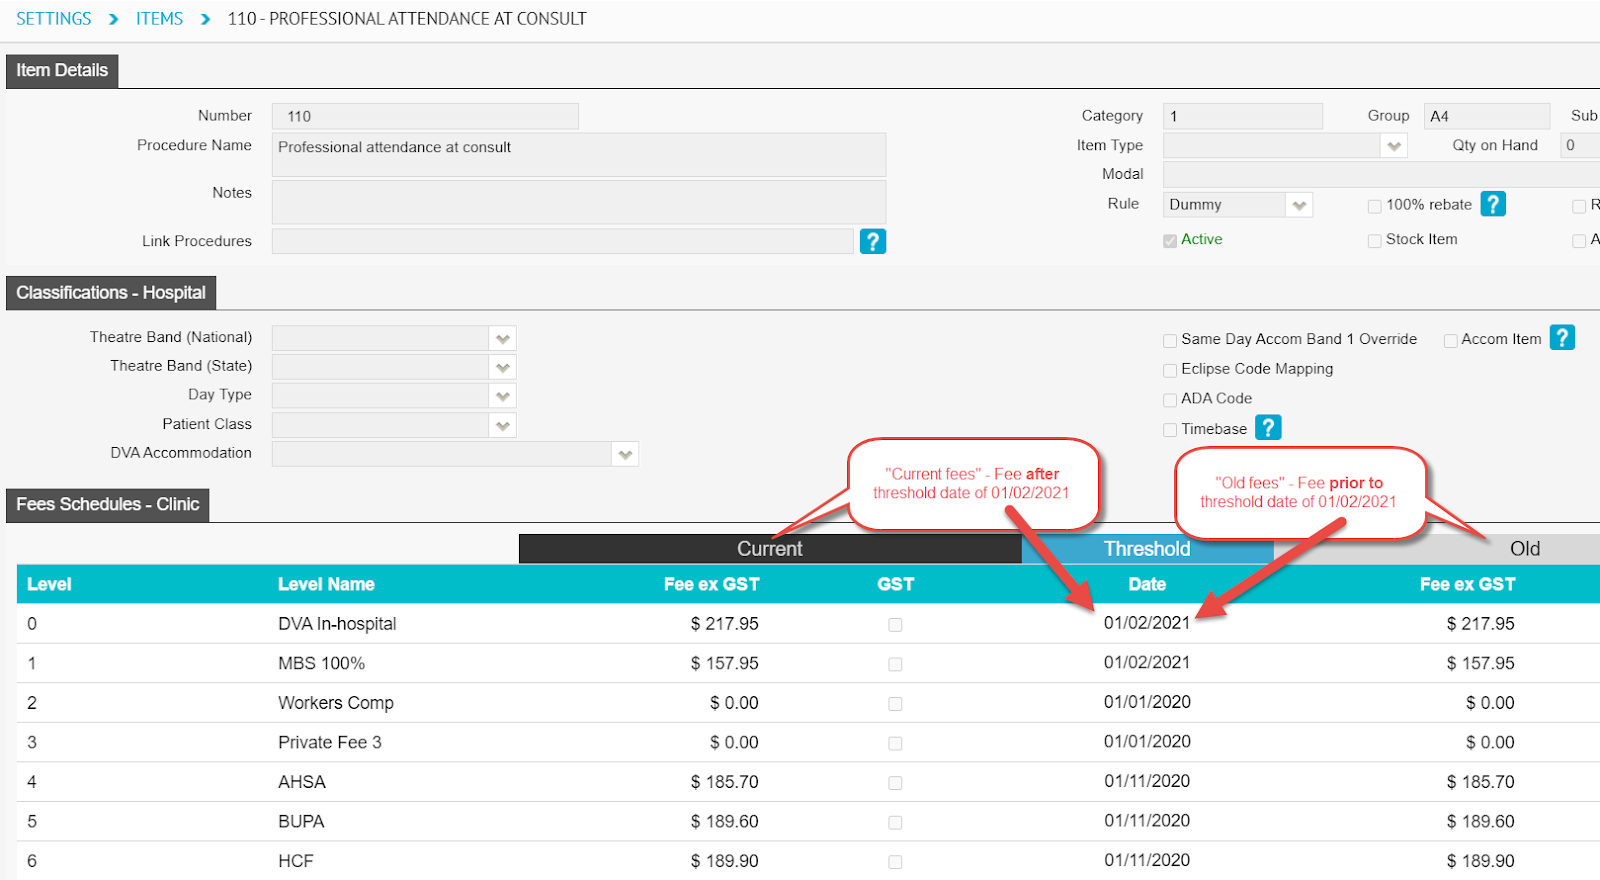
In other words, every item has two fees – the current fee and the last fee before the current. Therefore, before we can update the current fees, we need to push them to the old fees.
Updating the old fees
There are a number of ways to update fees:
This blog post recommends using the percentage option. So, as shown in the screenshot below:
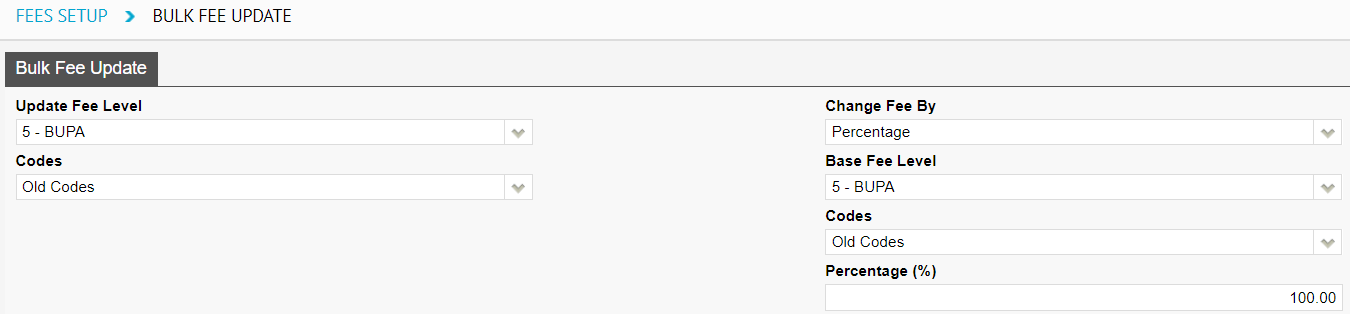
Then, click the Save button

This will replace the Old fees of all items for the selected health fund with the current value of the current fees.
Updating the current fees
Next, we must update the current fees; and we do this on the same screen as above. We will be updating the health funds fees by importing an Excel sheet.
As shown in the screenshot below:
Next, you’ll need to download the excel file containing the fees for that health fund from our website at the link below:
https://au.acsshealth.com/healthfundfees/
Note: Be sure to download the appropriate file based on your state (if applicable) and Gap or No Gap (if applicable).
Once downloaded, browse for the file using the Browse button, select the file, and hit Save.

This will replace the Current fees of all items for the selected health fund with the latest fees released by the health fund, from the Excel sheet uploaded.
That’s it! You have successfully updated the fees for the health fund. Repeat the process for as many funds as necessary.
Need to bill an overseas patient? Read on to learn how.
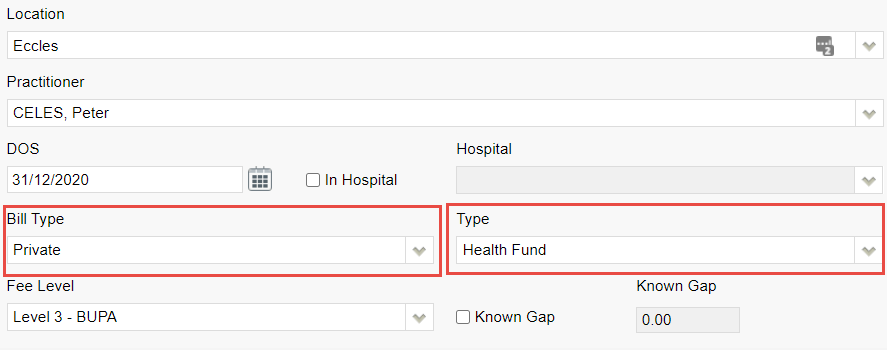
Step 1: Bill manual invoice
Overseas claims are received and processed manually. This means you cannot bill such claims through eclipse for electronic lodgement. Therefore, you’ll need to create and send a manual invoice.
Note: Ensure the Bill Type is set to: Private and the Type is set to: Health Fund
Step 2: Print manual invoice to PDF
Note sure how to print invoices? Click here to learn how
Step 3: (Conditional – If claim is for Medibank or AHM) complete the corresponding claim form and save it to your computer
Step 3: (Conditional – If claim is for BUPA, ) complete BUPA batch header form and save it to your computer
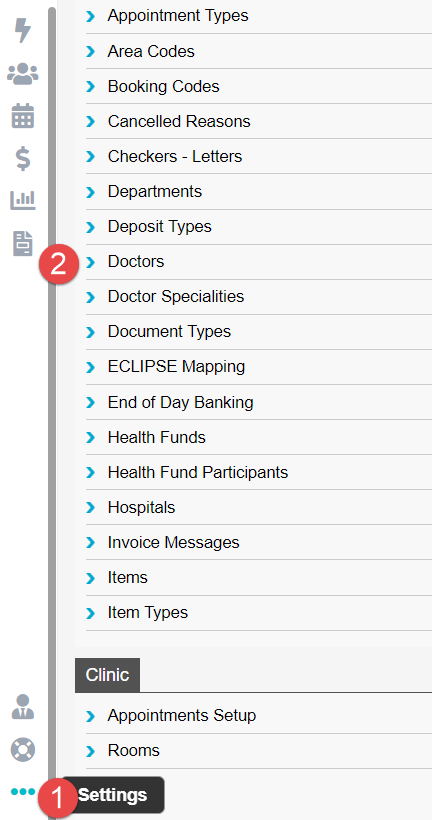
If you have previously entered the doctor’s FundPayeeId into FYDO, you may find it by going to Settings > Doctors:

Step 4: Send off the documents
https://wiki.fydo.cloud/medicare-and-fund-contacts-dealing-with-rejections/
Step 5: Follow up & pay off the invoice
That’s it! That’s how to do overseas billing for patients.
From time to time, you may need to resend an already sent batch. But before we discuss how you’d do this, let’s first discuss why you may need to resend a batch.
In almost all cases, you’d need to resend a batch if it either:
You do not want to resend a batch if:
With that addressed, if you still need to resend an already sent claim, read on.
Start off by going to Claiming Medical.
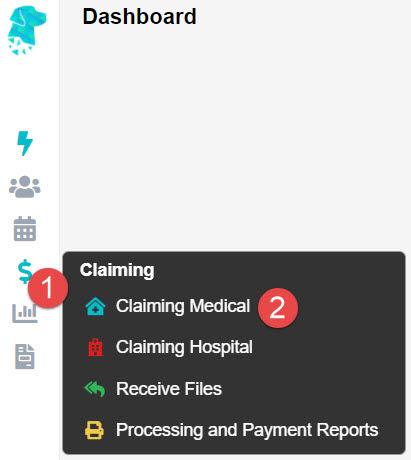
If the batch Status is Sent or Processed, you may right-click on the batch and select Reset Batch Status.
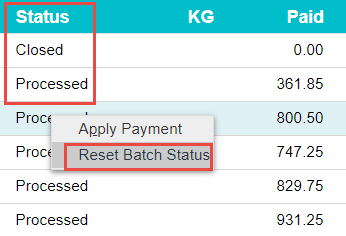
This will make the batch status revert to Closed, allowing you to resend the batch with the Send Batch button.
Otherwise, if the batch Status is Payment Received with a partial or full rejection, double click on the batch to open it up, revealing the invoice(s) inside.
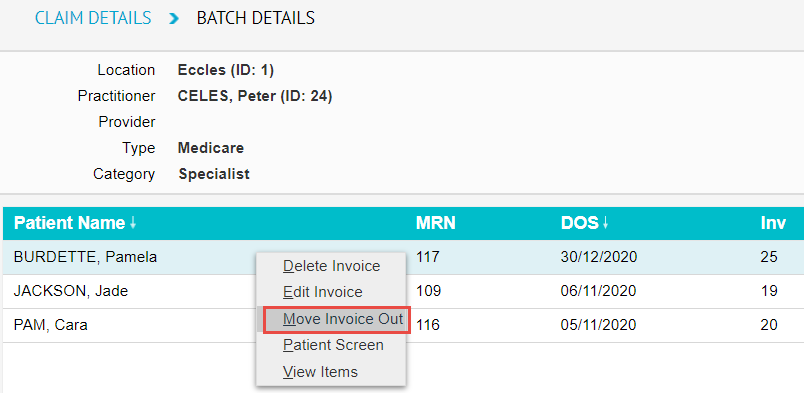
If you wish to resend the invoice in its entirety (with all items inside), simply right-click on the desired invoice and click on Move Invoice Out.
Otherwise, if you wish to resend only a part of the invoice (1 or more items but not all), double click on the invoice, revealing the items inside.
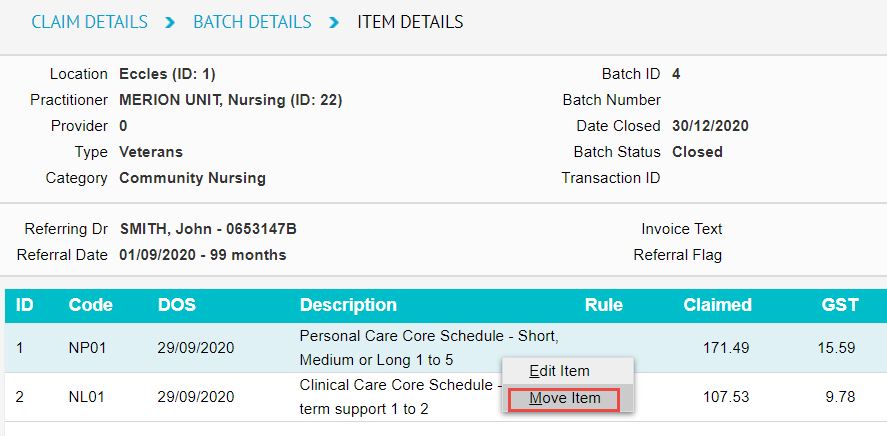
Then, right-click on the item you wish to resent and select Move Item.
This will present you with the below pop-up window; and as you can see, it will move the invoice/ item to the current batch.
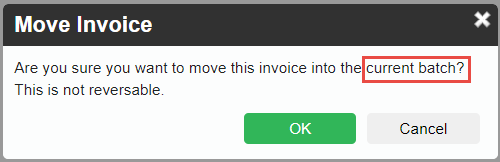
Current batch:
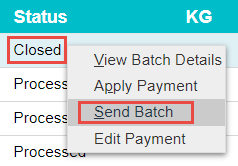
From here, you may close the batch if it is not yet closed and send it by right-clicking the batch and selecting Send Batch.
Need to bill Medicare, DVA, or a health fund for a patient that is now deceased?
You can always attempt to send the claim electronically. However, in most cases, you will need to create a manual invoice and send it manually, for manual review.
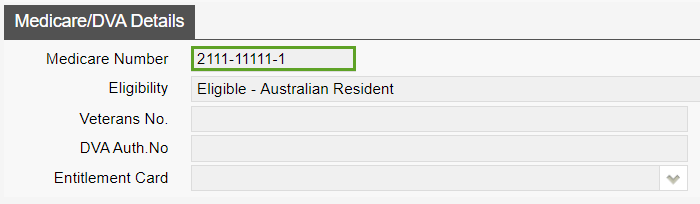
So, here’s one thing you can do before you decide whether or not to send the claim electronically. Run the Online Patient Verification check with the As At field date set to the latest Date of Service you wish to bill the deceased patient for.
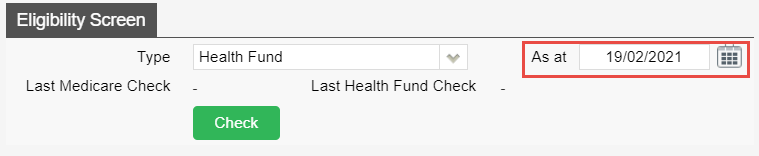
If the check returns an eligible patient (noted with a green box around the Medicare and health fund card numbers), you may consider sending the claim electronically, as you’re used to. However, this does not guarantee the claim will be paid.
To learn how to create a manual invoice, click on the link below:
https://wiki.fydo.cloud/How-to-create-a-manual-invoice
Do you regularly SMS patients? If so, you can create custom SMS templates to save time typing up the message every time and to send tailored messages, complete with the patient’s name, appointment time, serving doctor, and more.
To begin, first go to Settings.
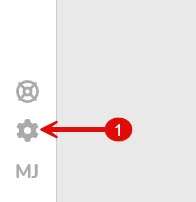
Then click on SMS Templates under the templates menu.
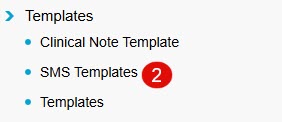
This reveals the SMS templates currently available. By default, an Appointment Reminder template will be available to you.
Adding a new SMS template
To add a new SMS template, click on the Add SMS Template button.
![]()
Then, select the SMS Type, enter the template Name, and type out the SMS content in the Description field.

SMS Tokens
You can use ‘SMS tokens’ which are commands that look like: <<patfirstn>> to send tailored SMS messages. The aforementioned token for instance dynamically pulls the patient’s first name.
There are SMS tokens for patient details, appointment details, doctor/ practice details, referral details, and more.
For a full list of tokens, click the link below:
https://wiki.fydo.cloud/?s=tokens
Once you’re happy with the contents of your SMS template, click Save and you’re done! Your new SMS template will be available next time you wish to send a custom SMS message.
For some SMS Template ideas see our helpful wiki page https://wiki.fydo.cloud/sms-template-examples/
Template Tokens
| Token Name | Data as set in the IFC Screen | Notes |
| <<IFCPatFullName>> | Patient name | |
| <<IFCMRN>> | Patient MRN | |
| <<IFCDOB>> | Patient date of birth | |
| <<IFCSexID>> | Patient gender | e.g. M, F |
| <<IFCSex>> | Patient gender | e.g. Male, Female |
| <<IFCAdd1>> | Patient Address Line 1 | |
| <<IFCAdd2>> | Patient Address Line 2 | |
| <<IFCSuburb>> | Patient Address Suburb | |
| <<IFCState>> | Patient Address State | |
| <<IFCPC>> | Patient Address Postcode | |
| <<IFCMobile>> | Patient Mobile | Format 0415 999 999 |
| <<IFCPhoneH>> | Patient Home Phone | Format 99 9999 9999 |
| <<IFCPhoneW>> | Patient Work Phone | Format 99 9999 9999 |
| <<IFCMed>> | Patient Medicare Number | |
| <<IFCMedRef>> | Patient Medicare Reference Number | |
| <<IFCLocId>> | Location | |
| <<IFCLoc>> | Location | |
| <<IFCLocAdd1>> | Location address 1 | |
| <<IFCLocAdd2>> | Location address 2 | |
| <<IFCLocSuburb>> | Location suburb | |
| <<IFCLocState>> | Location state | |
| <<IFCLocPostcode>> | Location postcode | |
| <<IFCLocPhone>> | Location phone | Format 99 9999 9999 |
| <<IFCLocFax>> | Location fax | Format 99 9999 9999 |
| <<IFCLocABN>> | Location ABN | |
| <<IFCDocID>> | Doctor/Surgeon | |
| <<IFCDoc>> | Doctor full name | e.g Michelle ROMERO |
| <<IFCDocFirstN>> | Doctor first name | |
| <<IFCDocLastN>> | Doctor last name | |
| <<IFCDocTitle>> | Doctor title | |
| <<IFCDocProvNo>> | Doctor provider number | |
|
<<IFCDocQualif>> |
Doctor Qualification |
|
| <<IFCDocSpec>> | Doctor speciality | |
| <<IFCDocSpecID>> | Doctor speciality | |
|
<<IFCDocAdd1>> |
Doctor address 1 |
|
|
<<IFCDocAdd2>> |
Doctor address 2 |
|
|
<<IFCDocSuburb>> |
Doctor suburb |
|
|
<<IFCDocState>> |
Doctor state |
|
|
<<IFCDocPostcode>> |
Doctor postcode |
|
|
<<IFCDocABN>> |
Doctor ABN |
Format 99 999 999 999 |
|
<<IFCDocPhone>> |
Doctor phone |
Format 99 9999 9999 |
|
<<IFCDocFax>> |
Doctor fax |
Format 99 9999 9999 |
|
<<IFCDocMob>> |
Doctor Mobile |
Format 9999-999-999 |
|
<<IFCDocAccName>> |
Doctor Account Name |
|
|
<<IFCDocBSB>> |
Doctor BSB |
|
|
<<IFCDocAccNum>> |
Doctor Account Number |
|
|
<<IFCDocBank>> |
Doctor Bank Name |
|
|
<<IFCDocBankAdd>> |
Doctor Bank Address |
|
| <<IFCFundId>> | Fund | |
| <<IFCFund>> | Fund | e.g. MBP |
| <<IFCFundName>> | Fund | e.g. Medibank |
| <<IFCFundNo>> | Membership number | |
| <<IFCNotes>> | Notes from review screen | |
| <<IFCUser>> | Name of person printing the IFC |
| <<IFCTotalC>> | Sums all charges | |
| <<IFCTotalR>> | Sums all rebates | |
| <<IFCTotGap1>> | Sums all charges – sums all Rebates | |
| <<IFCTotGap2>> | Sums all charges – sums all Fee Level Amount | |
| <<KnownGap>> | This is the Known Gap amount set by the user |
For the grid that will repeat (for the items)
| Token Name | Data to Insert | More Info |
| <<ICT>> | Transaction Type |
I – Invoice |
| <<ICode>> | Item | If in hospital, the code will show with an asterisk after the code |
| <<IDesc>> | Item Description | |
| <<Iid>> | Item Id/Sequence | |
| <<IDOS>> | Date of Service | dd/mm/yyyy |
| <<IQty>> | Quantity | |
| <<Itype>> | Invoice Type | e.g. M – Medicare V – Veterans |
| <<IUnit>> | Unit Price | |
| <<ICharge>> | Charge Amount | |
| <<iGST>> | GST Amount | |
| <<iRebate>> | Rebate Amount | |
| <<iFLAmt>> | Fee Level Amount | |
| <<IFLvl>> | Fee Level | |
| <<iGap1>> | Charge Amount – Rebate Amount | |
| <<iGap2>> | Charge Amount – Fee Level Amount | |
| <<IIH>> | In hospital flag | Shows an asterisk when in hospital |
| <iStext>> | Service text |
As of September 2021 we do not have any inbound webhooks/APIs, meaning FYDO can not receive new patients via an API. FYDO can send webhooks/apis for new patients but not inbound as of this writing.
We do have a patient transfer option whereby you can send us a file via FTP and it can be loaded into FYDO. Currently this occurs at 3 scheduled intervals a day. 8am, midday and 4pm (SYD time).
We have a few formats we can accept the data in
This format has been adopted as it is the format created by Genie.
| XML Tag Name | Details |
| Id | This is the MRN from the incoming system |
| ChartOrNHS | This could be another additional ID you have for the patient |
| Title | e.g Miss, Mrs |
| FirstName | |
| Surname | |
| MiddleName | |
| HealthFundAliasFirstName | Only required if the patent is known by another name with their health fund |
| HealthFundAliasFamilyName | Only required if the patent is known by another name with their health fund |
| AddressLine1 | |
| AddressLine2 | |
| Suburb | |
| State | |
| Postcode | |
| DOB | Format yyyy-mm-dd |
| Sex | e.g M, F or 1 – for Male 2 – Female 3 – Undertermined |
| HomePhone | Format 0299999999 |
| MobilePhone | Format 0415999999 |
| EmailAddress | |
| HccPensionNum | |
| MaritalStatus | Married De facto Same sex partner Single Widowed Divorced Separated |
| CultureCode | 1 – Aboriginal 2 – Torres Strait Islander 3 – Both Aboriginal / Torres Strait Islander 4 – Neither 9 – Not Stated |
| MedicareNum | |
| MedicareRefNum | |
| MedicareExpiry | Format yyyy-mm-dd |
| DvaNum | |
| HealthFundName | e,g MBP, HCF needs to be the fund code not the fund name. Or at the least the first 3 characters need to be the fund code. |
| HealthFundNum | |
| NokName | Format FirstName Surname |
| NokPhone | |
| Memo |
This format was created by FYDO and has more fields than the XML option, referred to internally as AV2.
| Field Name | Start | Length | Details |
| PatExtId | 1 | 10 | This could be another additional ID you have for the patient, the main MRN is the PatType field |
| Title | 11 | 5 | e.g Miss, Mrs |
| Last Name | 16 | 30 | |
| First Name | 46 | 30 | |
| Address 1 | 76 | 40 | |
| Suburb | 116 | 25 | |
| Postcode | 141 | 4 | |
| DOB | 145 | 10 | Format dd/mmy/yyy |
| Medicare Number | 155 | 12 | Format 2111-11111-1 |
| Medicare Reference | 167 | 1 | |
| Entitlement Number | 168 | 14 | e.g. concession number or pension number |
| DVA Number | 182 | 14 | |
| Phone Home | 196 | 14 | Format (02)9999-9999 |
| Phone Work | 210 | 14 | Format (02)9999-9999 |
| Misc1 | 224 | 1 | Field now defunct, pls ignore |
| Gender | 225 | 1 | e.g M, F |
| State | 226 | 3 | |
| Medicare Expiry | 229 | 5 | Format mm/yy |
| Misc2 | 234 | 6 | Field now defunct, pls ignore |
| PatType | 240 | 10 | This is the MRN from the incoming system |
| Misc3 | 250 | 9 | Field now defunct, pls ignore |
| Misc4 | 259 | 1 | Field now defunct, pls ignore |
| SiteId | 260 | 4 | Field now defunct, pls ignore |
| Referring Dr Title | 264 | 6 | |
| Referring Dr First Name | 270 | 25 | |
| Referring Dr Last Name | 295 | 25 | |
| Referring Dr Suburb | 320 | 20 | |
| Referring Dr Provider Number | 340 | 8 | |
| Referral Date | 348 | 10 | Format dd/mmy/yyy |
| Referral Period | 358 | 2 | 99 for indefinite, other 3, 12 for example |
| Health Fund Membership Number | 360 | 20 | |
| Health Fund Code | 380 | 3 | e.g MBP, should be the eclipse code, that we can look up in FYDO |
| Health Fund Name | 383 | 37 | e.g Medibank |
| Misc5 | 420 | 25 | Field now defunct, pls ignore |
| 445 | 50 | ||
| Notes | 495 | 50 | |
| Mobile Number | 545 | 12 | |
| NOK Last Name | 557 | 25 | |
| NOK First Name | 582 | 25 | |
| NOK Relationship | 607 | 10 | e.g Brother, Father, Wife |
| NOK Phone Home | 617 | 13 | Format (02)9999-9999 |
| Patient Middle Initial | 630 | 1 | |
| DVA Card Type | 631 | 1 | |
| Indigenous | 632 | 1 | 1 – Aboriginal 2 – Torres Strait Islander 3 – Both Aboriginal and Torres Strait Islander 4 – Neither Aboriginal or Torres Strait Islander 9 – Not Stated |
| Referring Dr Practice Name | 633 | 50 | |
| Referring Dr Address 1 | 683 | 50 | |
| Referring Dr Address 2 | 733 | 50 | |
| Deceased Date | 783 | 10 | Format dd/mmy/yyy |
| Health Fund Alias First Name | 793 | 25 | |
| Health Fund Alias Last Name | 818 | 25 | |
| Referring Dr Phone | 843 | 14 | Format (02)9999-9999 |
| Referring Dr Fax | 857 | 14 | Format (02)9999-9999 |
| Referring Dr State | 871 | 3 | |
| Referring Dr Postcode | 874 | 4 | |
| Eligibility | 878 | 1 | 1 – Eligible – Australian Resident 2 – Eligible – Overseas Visitor 3 – Ineligible 9 – Not Known/Not Stated |
| Insurance Status | 879 | 1 | 1 – Basic Cover 2 – Full Cover |
| Other Card Id | 880 | 1 | |
| Other Card Number | 881 | 10 | |
| Allergy | 891 | 70 | |
| Marital Status | 961 | 1 | 1 – Married (including de facto) 2 – Never married (Single) 3 – Widowed 4 – Divorced 5 – Permanently Separated 6 – Not stated/inadequately described |
| Employment Status | 962 | 2 | 1 – Child not at school 2 – Student 3 – Employed 4 – Unemployed 5 – Home Duties 6 – Retired 7 – Pensioner 8 – Other |
| Language | 964 | 2 | Download List |
| Country | 966 | 4 | Download List |
| Mailing Address Line 1 | 970 | 40 | |
| Mailing Address Line 2 | 1010 | 40 | |
| Mailing Address Suburb | 1050 | 25 | |
| Mailing Address State | 1075 | 3 | |
| Mailing Address Postcode | 1078 | 4 | |
| Mailing Address Country | 1082 | 30 | |
| NOK Title | 1112 | 10 | |
| NOK Address 1 | 1122 | 40 | |
| NOK Suburb | 1162 | 25 | |
| NOK State | 1187 | 3 | |
| NOK Postcode | 1190 | 4 | |
| NOK Phone Work | 1194 | 13 | Format (02)9999-9999 |
| NOK Mobile | 1207 | 13 | Format 9999-999-999 |
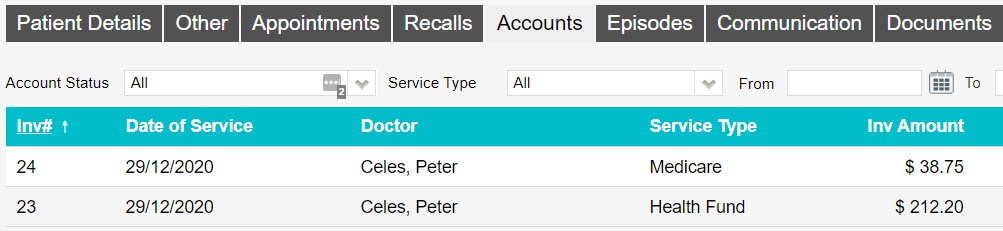
Start off by opening the patient’s record and click on the Accounts tab to view their treatment/ billing history.

This button reveals a patient’s billing/ treatment history where each line is an invoice:
From here, right click on the manual invoice to be paid off manually and click on Apply Payment.
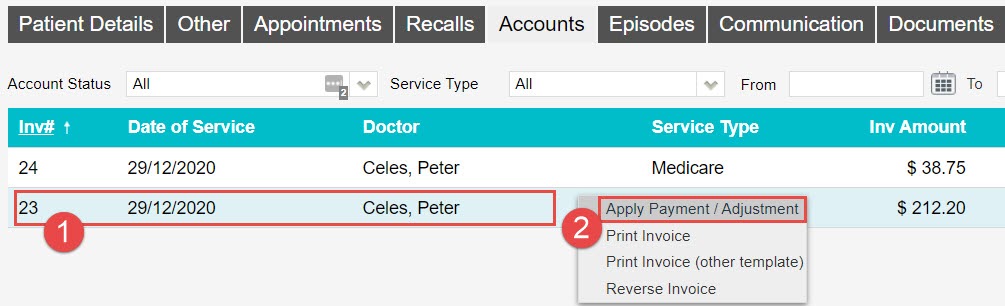
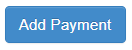
Then, click on the Add Payment button
Enter the payment Type, payment Amount, click Save, and Save again.
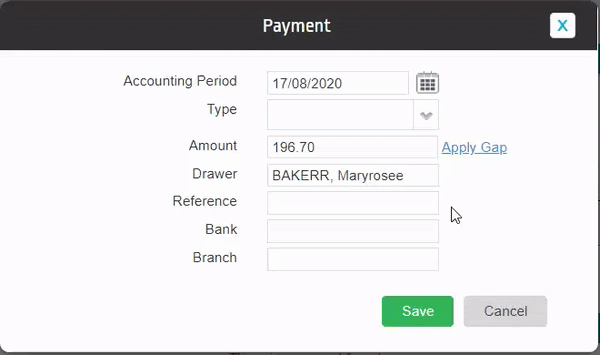
That’s it! You’ve paid off the manual invoice.