My Health Record – Adding your Doctors HPI-I to FYDO
In order to upload Discharge Summaries to My Health Record Clinical Staff (Doctors/Surgeons) will need to supply the facility with their Healthcare Provider Identifier – Individual (HPI-I). Doctors can find out what they HPI-I is by calling Healthcare Identifiers on 1300 361 457 or they can get it from AHPRA. This number needs to be entered into FYDO by following the instructions below.
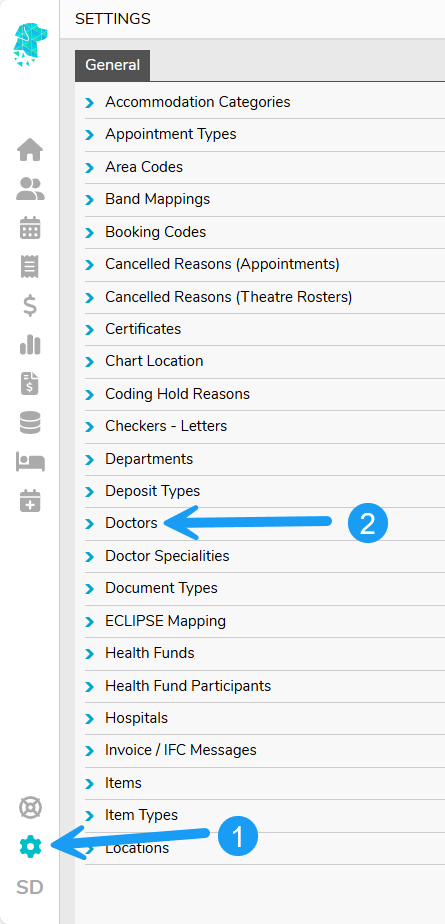
Navigate to Settings Select Doctors
Double click on the required Doctor & select Edit
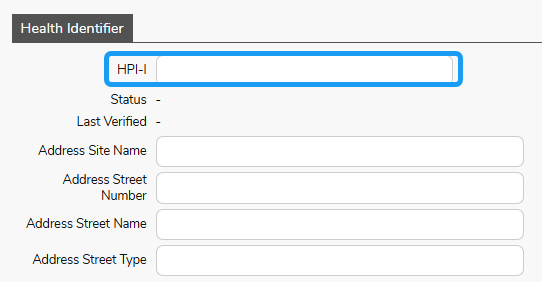
Type in the Doctors HPI-I, under the section Health Identifier, and click Save
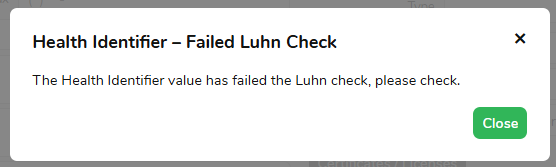
FYDO will automatically run an internal check, to ensure the HPI-I follows the required format, when you click save. If the number doesn’t meet the requirements, you will be given an alert.
You will then need to either correct the HPI-I or remove it to be able to save the rest of the information.
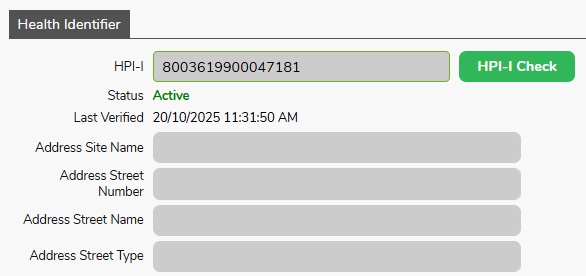
If the number was able to be saved, you can utilise the HPI-I Check button to verify the number. A successful verification will be identified with a GREEN boarder, and the Status and Last Verified date and time also be displayed.
For more helpful information related to My Health Record visit our associated wiki pages to:
Add your organisations HPI-O to FYDO here. Check a patients IHI in FYDO here. Upload a discharge summary in FYDO here.
My Health Record – Adding your Organisations HPI-O to FYDO
In order to upload Discharge Summaries to My Health Record organisations will need to have completed the registration process & received a Healthcare Provider Identifier – Organisation (HPI-O). This number needs to be entered into FYDO by following the instructions below.
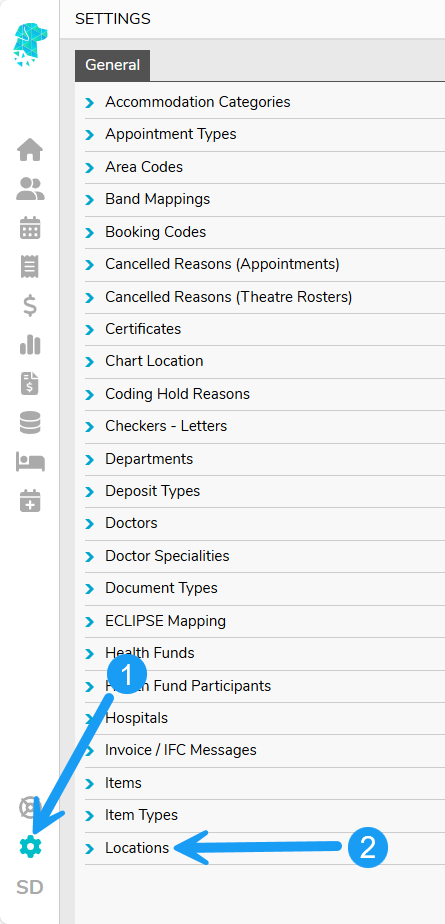
Navigate to Settings Select Locations
Double click on the required Location & Click Edit
Enter in the organisations HPI-O and click Save
You will then be able to click HPI-O Check and see the Status and Last Verified date and time.
A successful verification will be indicated with a GREEN boarder around the number as per above.
For more helpful information related to My Health Record visit our associated wiki pages to:
Add your doctors HPI-I to FYDO here. Check a patients IHI in FYDO here. Upload a discharge summary in FYDO here.
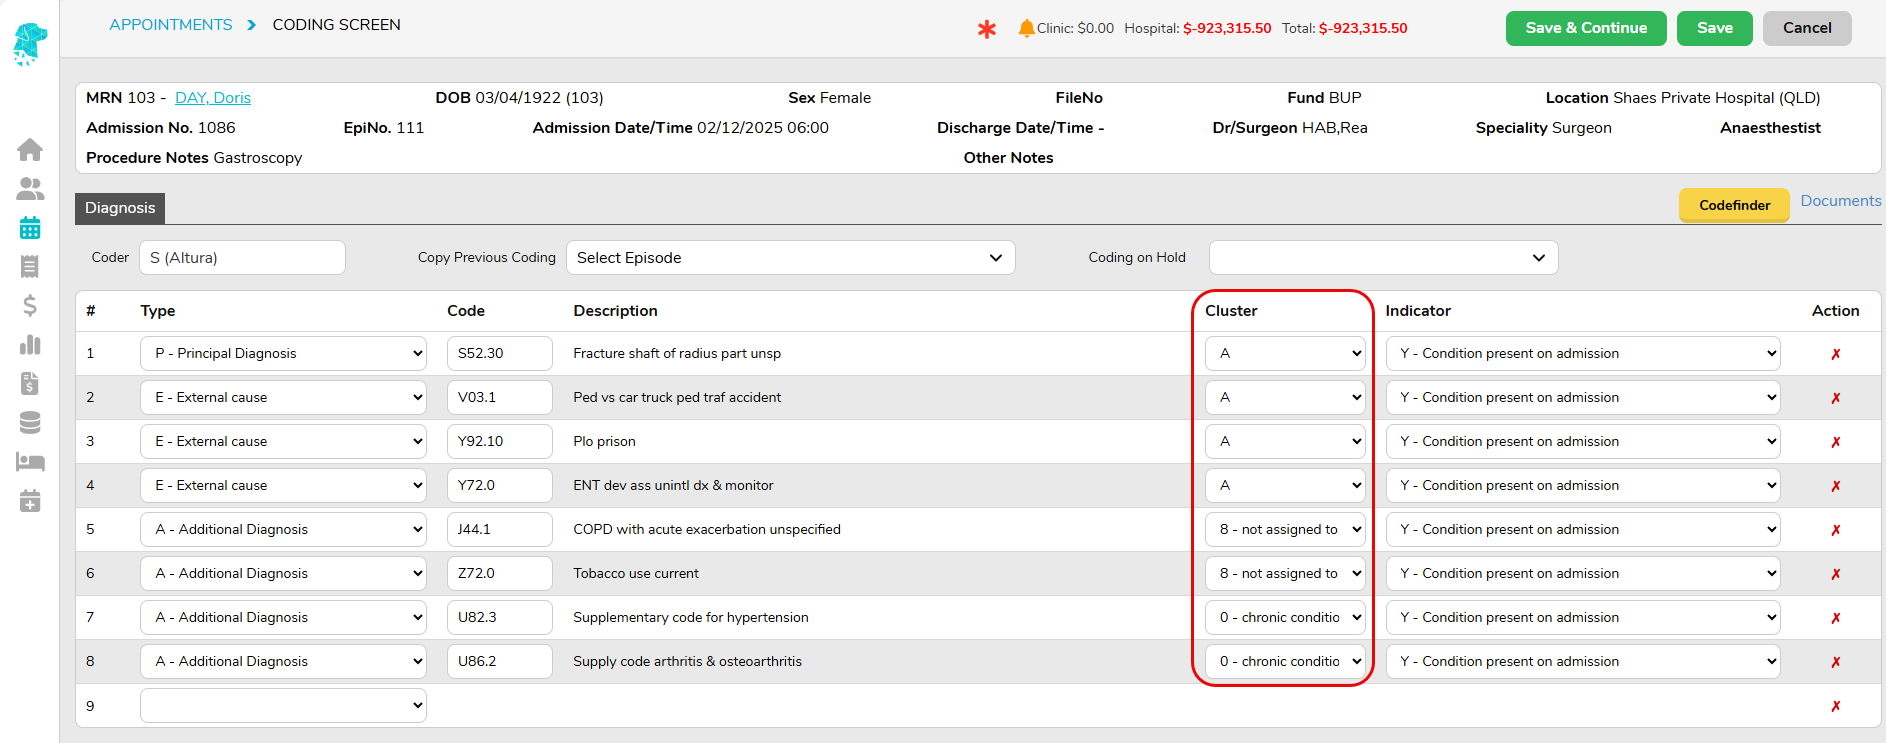
Diagnosis Cluster Code User Guide
This guide is written for end users (e.g. clinical coders, medical record staff) who assign the Diagnosis Cluster Code ID during routine workflows.
What is a Diagnosis Cluster Code?
A Diagnosis Cluster Identifier (DCID) is an alphanumeric character allocated to each ICD-10-AM code reported within an episode of care to identify and maintain the link between diagnosis codes as the data is collected, validated, processed and analyzed.
When should I assign it?
Cluster codes apply for ICD-10-AM and ACS Thirteenth Edition and will be mandatory starting from 1 July 2026.
Is FYDO Cluster Code Ready?
Yes, the Diagnosis Cluster Code field is already available on the FYDO Coding Screen for each diagnosis line.
Tip: FYDO automatically assigns 0 to condition codes (U78-U88), all other diagnosis will have default 8 assigned.
While not mandatory until 1 July 2026, hospitals have the option of assigning DCIDs now or leave the cluster code as default 8.
FYDO will include Diagnosis Cluster Codes in all statutory data extracts from 1 July 2026, in alignment with IHCPA requirements.
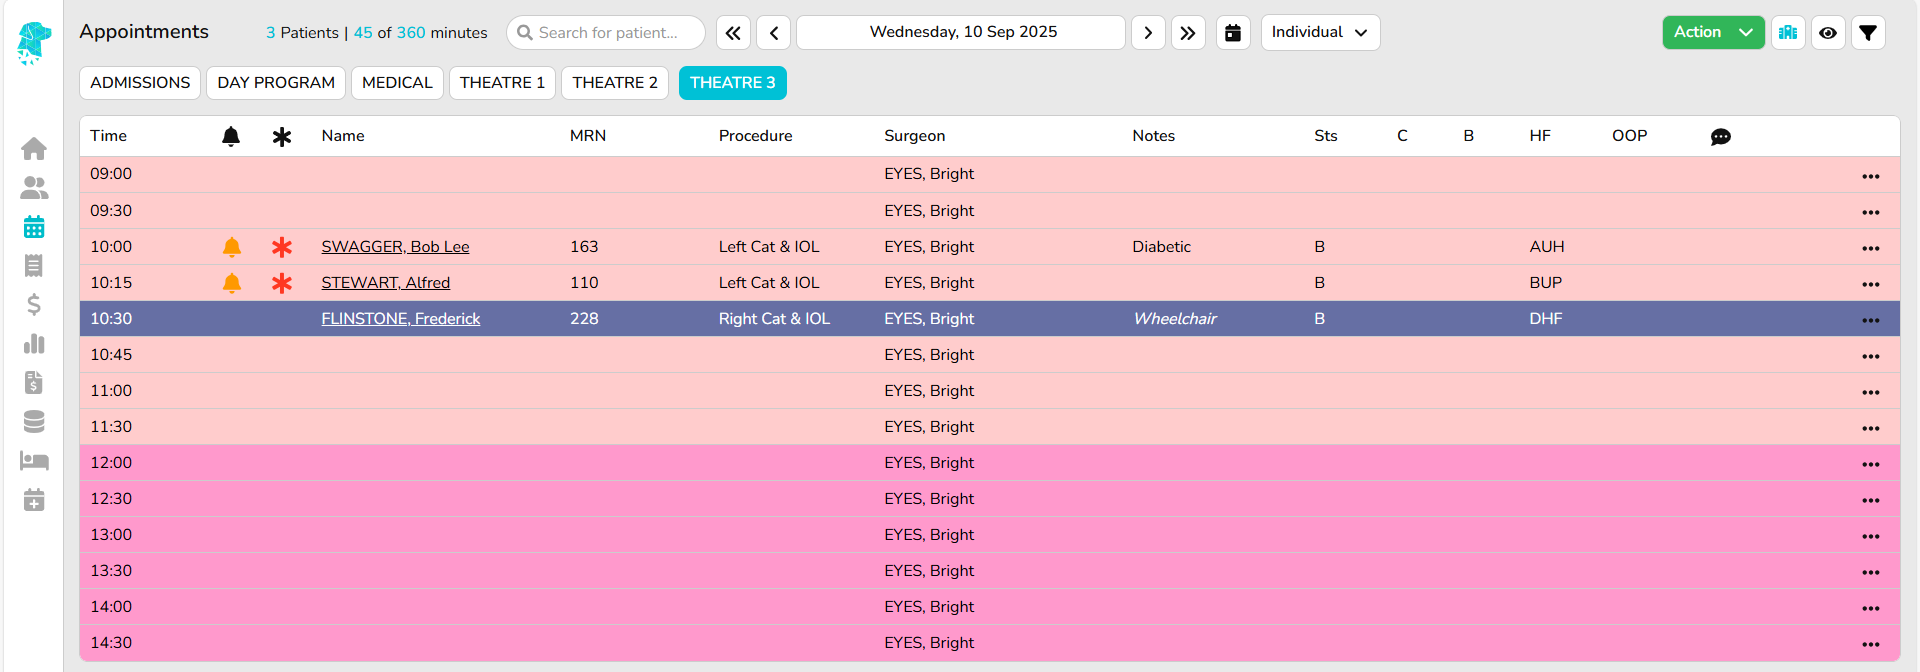
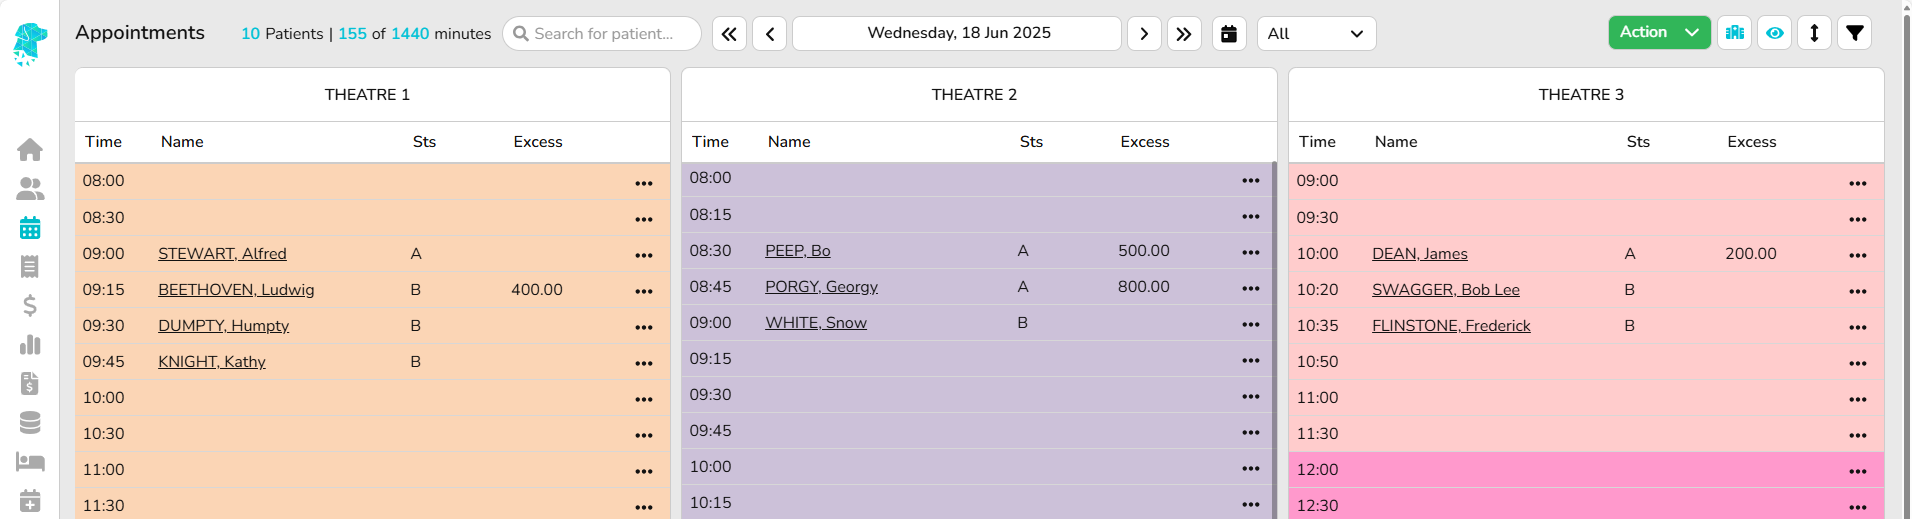
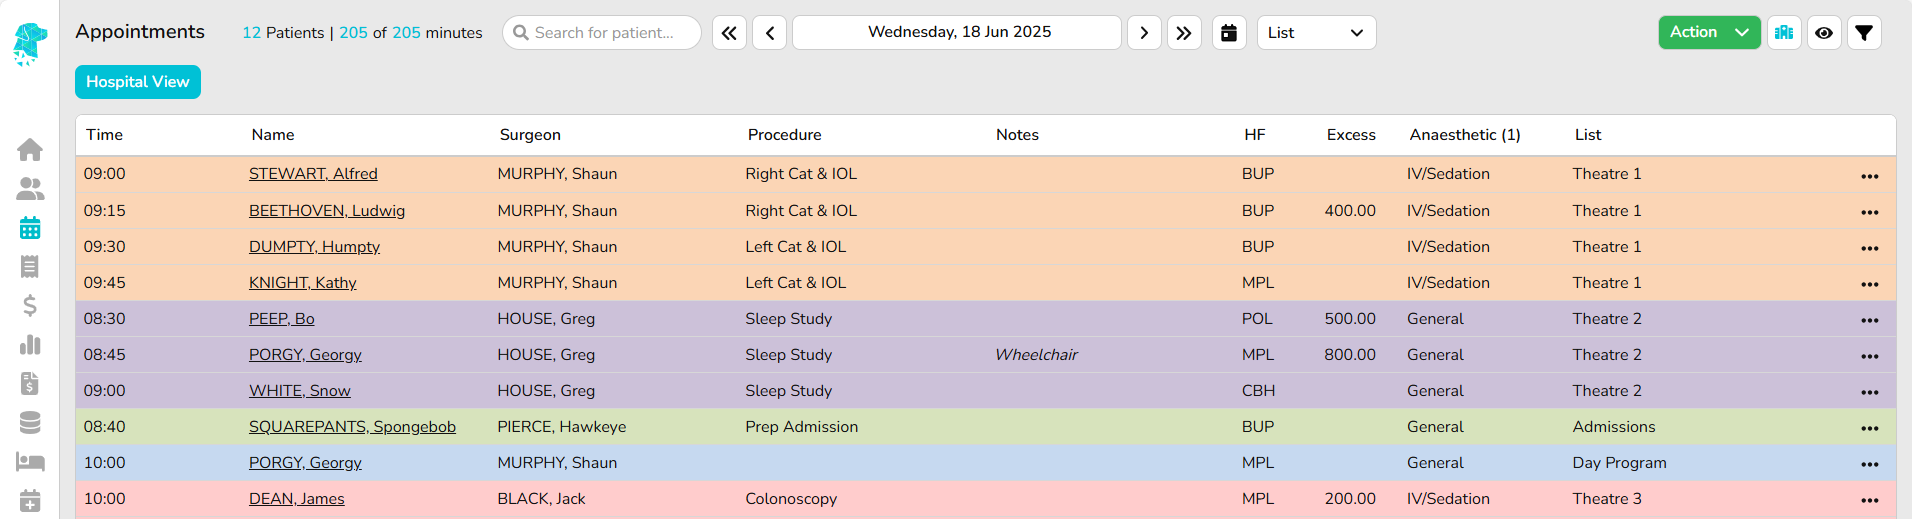
Appointment Screen Improvements
FYDO is continuously working behind the scenes to enhance functionality and streamline workflows. Below, you’ll find an overview of the new look Appointment Screen scheduled for implementation at the end of September.
This sleek new look has been designed to support efficient workflows and allow staff to easily access the features that are important to them. All actions previously in the sidebar have been relocated to allow for a wider view to display more information that is important to you.
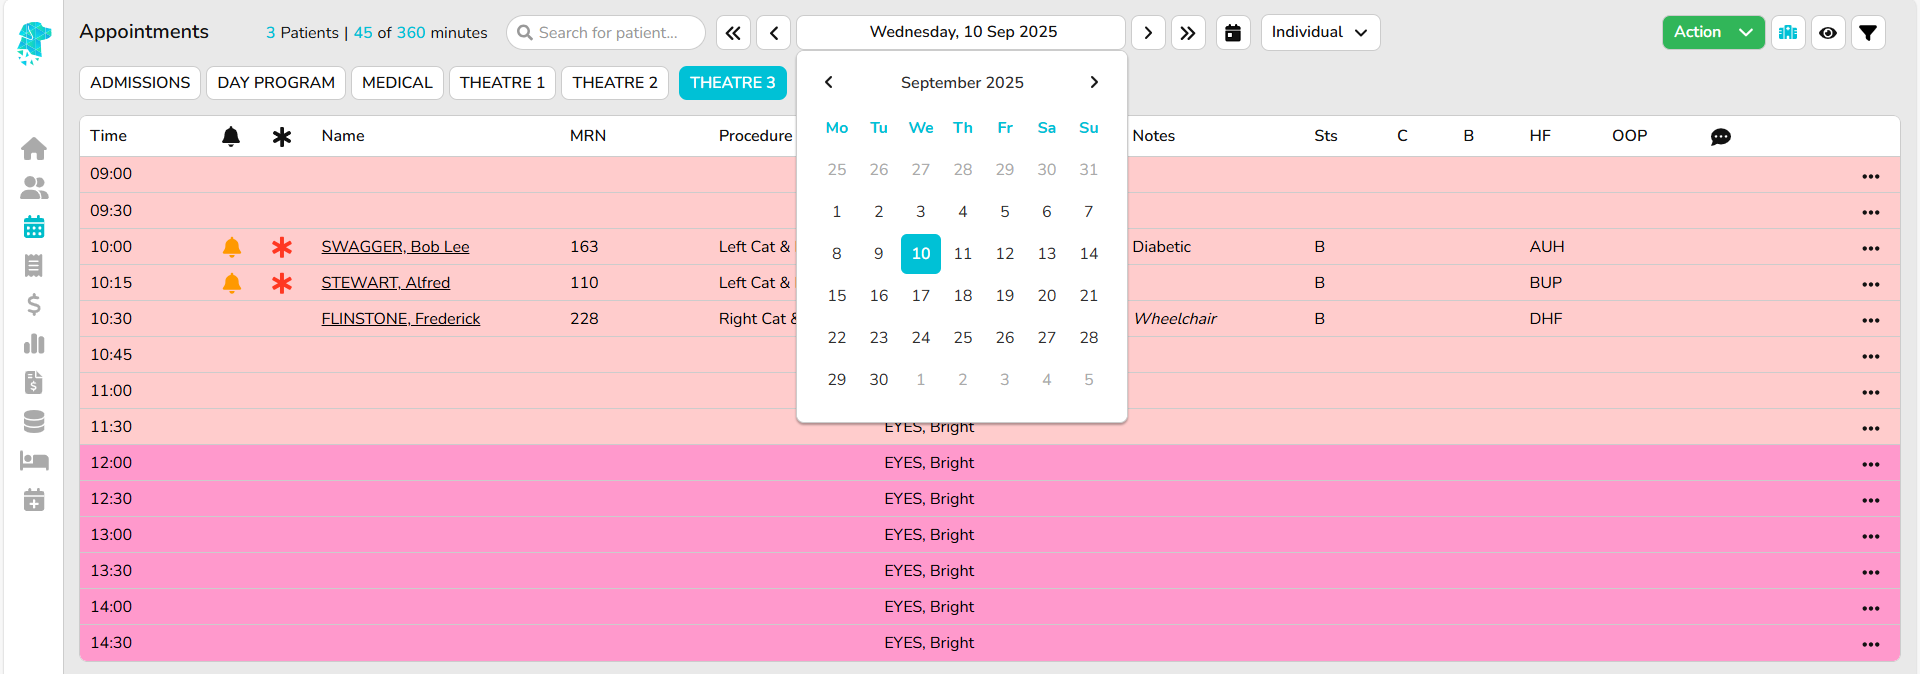
To choose your preferred view – All, Individual, Week, List, or Waitlist – use the dropdown menu located on the right-hand side of the date.
To view the calendar, click on the displayed date (e.g., Wednesday, 10 Sep 2025). The calendar will open, allowing you to easily select your desired date.
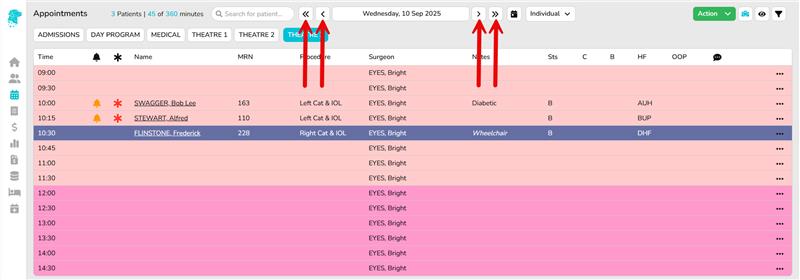
You can also use the arrows on either side of the displayed date to navigate forward or backward by one day or one week, making it easy to reach nearby dates.
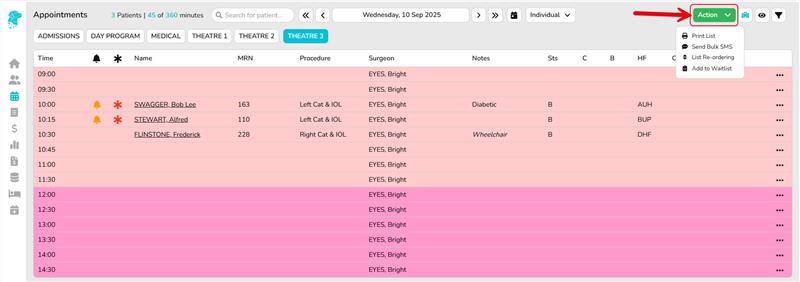
To manage your daily tasks – such as Printing Lists, Sending Bulk SMS Messages, List Re-ordering, or Adding Patients to the Waitlist, simply use the green dropdown menu labeled Action.
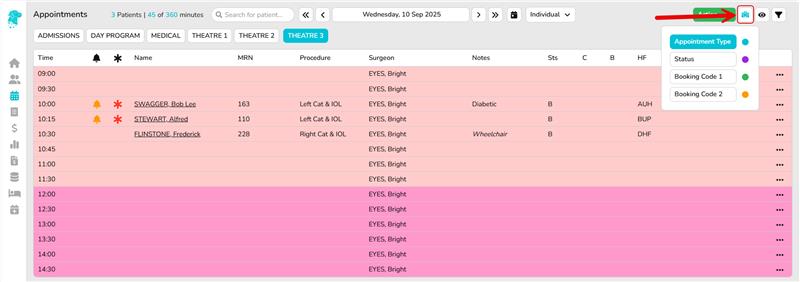
The next icon allows you to filter the view based on the specific hospital status.
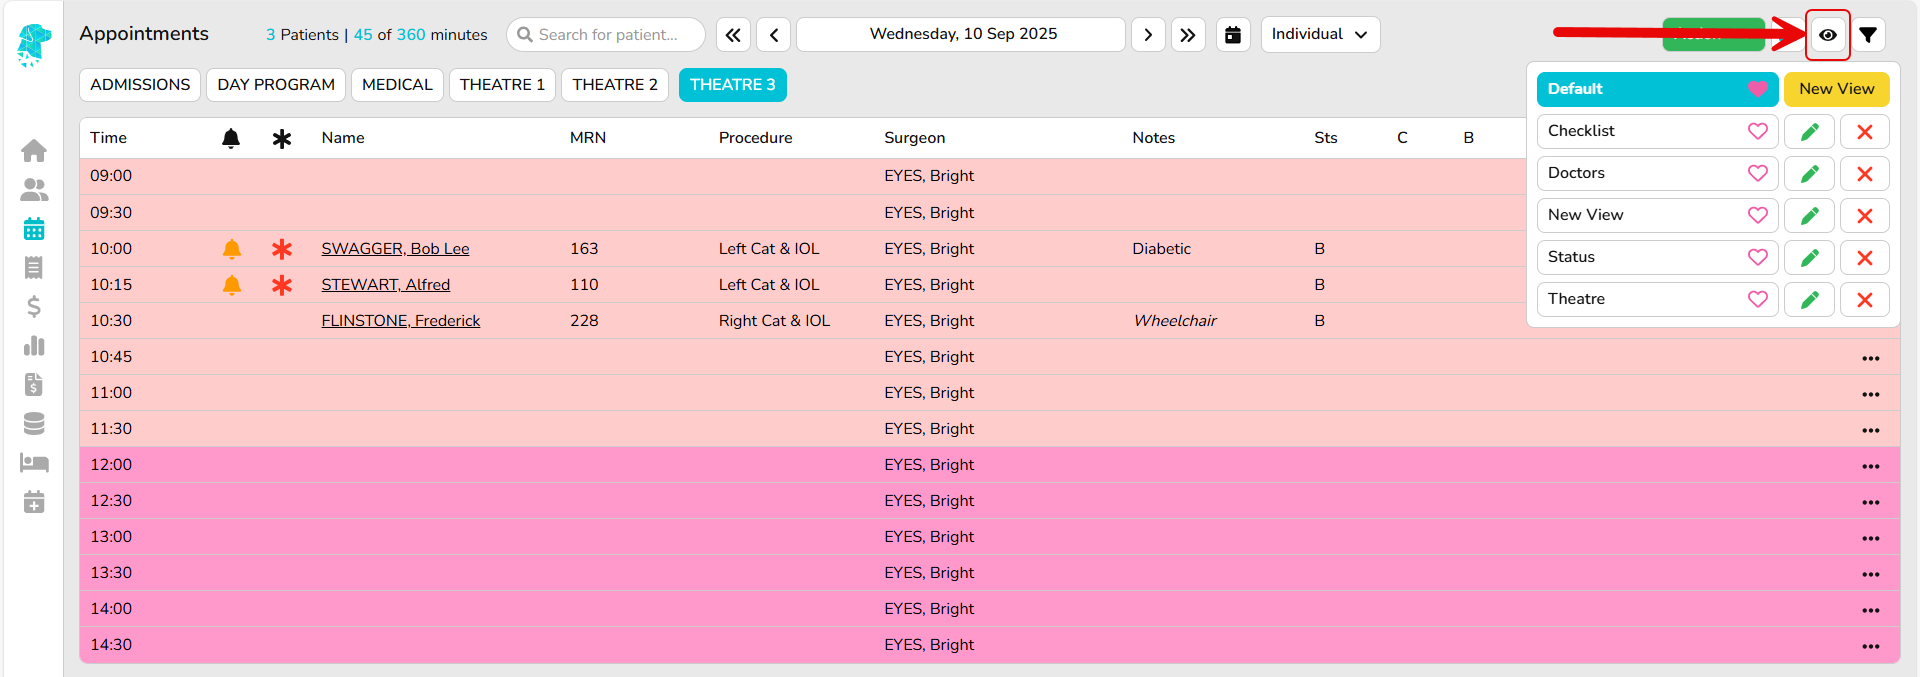
The eye icon allows you to customize the view to meet the specific requirements of each hospital’s department, displaying only the information relevant to you.
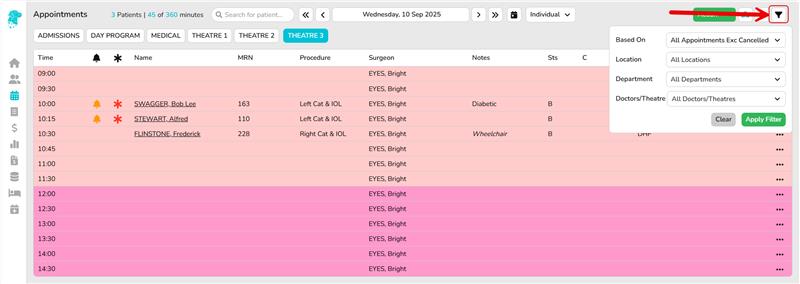
Finally, the filter option provides four categories – Based On, Location, Department, Doctors/Theatres, allowing you to customize the view accordingly.
My Health Record (MHR)
This page is designed to guide your team through the process of connecting to My Health Record (MHR) via your FYDO account. It outlines the key steps to ensure a seamless integration, helping your hospital streamline the process of uploading of Discharge Summaries.
It will assist you in having everything needed for a smooth transition, allowing both staff and patients to benefit from a more connected healthcare experience.
Explore the page to ensure your team is ready for this important integration, and feel free to contact us with any questions at (02) 9632 0026 or support@alturahealth.com.au
On the 28th of November 2023 we partnered with the Australian Digital Health Agency to present a webinar to our customers. This webinar provided essential information on the steps required for your hospital’s integration with MHR.
Click the link below to access the slideshow from this presentation. It offers step-by-step instructions on tasks like how to register a seed organisation, registering for PRODA, linking your Healthcare Identifiers to HPOS, registering your organisation for HPI-O, and more.
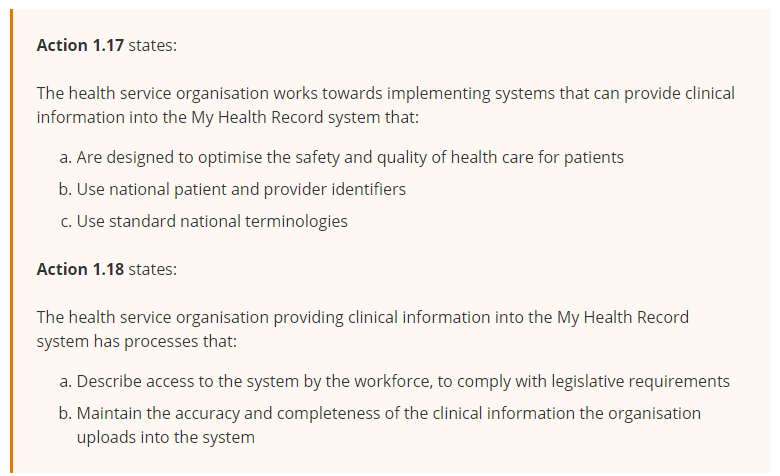
To comply with Actions 1.17 and 1.18, health service organisation must:
By June 2024, have developed a detailed plan that complies with: – all requirements of Part 5 of the Rule; – user of national patient and provider identifiers (IHIs, HPI-Os, HPI-Is); and, – user of standard national terminologies.
By December 2024, have ongoing monitoring and evaluation of compliance with the requirements of Action 1.17 and 1.18.
Accrediting agencies are required to:
Review evidence that: – From July 2024, the organisation has completed a gap analysis, has a detailed plan and the plan is being implemented – From January 2025, the organisation has as system to monitor and evaluate compliance with Action 1.17 and 1.18.
Rate Action 1.17 as met, only if the organisation demonstrates achievement of the specific requirements of the Action in the relevant year.
Rate Action 1.18 as met only if the organisation demonstrates embedded processes in accordance with the specific requirements of the Action in the relevant year.
Rate Actions 1.17 and 1.18 as met with recommendations if there is evidence of a gap analysis and finalised plan endorsed by executive and the plan is being implemented and monitored (NB. where these requirements are met, these actions may be rated ’met with recommendation’ for no more than one accreditation cycle).
The information above outlines that, from January 2025, the health service organisation are expected to works towardsimplementing systems capable of providing clinical information to MHR. Additionally, organisations must have processes that
describe access to the system and
maintain the accuracy and completeness of information the organisation uploads
What can you do to prepare for the MHR integration?
FYDO is now listed on the Australian Digital Health Agency’s My Health Record Conformance Register, that can be found here.
Facilities can now upload Discharge Summaries to MHR through FYDO, provided they have completed the following steps:
Registered their organisation and obtained their HPI-O. Added their HPI-O to FYDO by following the instructions found here.
Collecting the individual HPI-I’s of their doctors. Added the doctors HPI-I numbers to FYDO by following the instructions found here.
Review Advisory AS18/11 to conduct the required gap analysis and ensure a detailed plan, policies and procedures are in place and being implemented that align with the requirements.
Contact us here at Altura Health to obtain our CSPnumber so that you can link your HPI-O to it. Instructions on completing this can be found in slide 51 of the MHR Webinar information pack here.
Set required access levels for all staff to Upload and Remove Discharge Summaries from MHR. This can be done by an authorised staff member from your facility by navigating to Settings > User Groups.
Additional instructional pages to assist with the uploading of Discharge Summaries can be found below:
Once your hospital is set up to upload Discharge Summaries to My Health Record (MHR), users will be able to follow these instructions in order to complete that task. Removing Discharge Summaries will also be covered.
To upload a patient’s Discharge Summary, ensure the MHR Consent box is selected in the associated appointment.
If the MHR Consent box is ticked on the patient screen, it will automatically be selected when the appointment is scheduled.
If the patient withdraws their consent for the Discharge Summary to be uploaded for a particular episode, the box on the Edit Appointment Screen should be unticked.
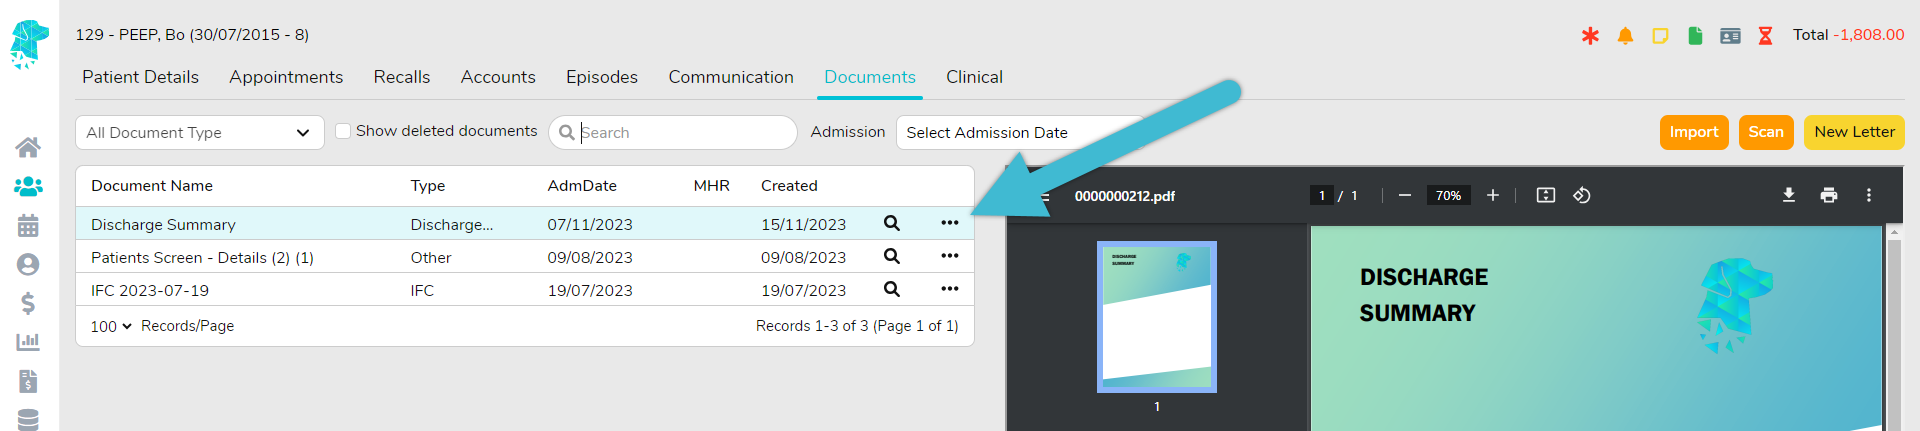
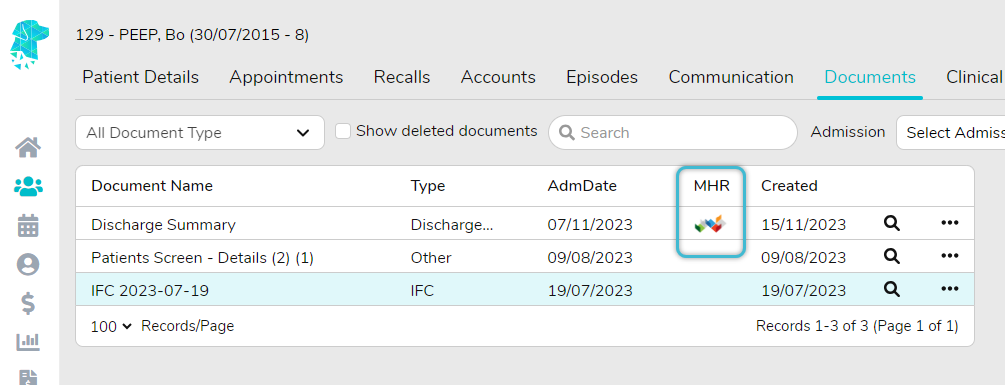
Once it is established that the MHR Consent box is ticked, navigate to the patient’s Documents.
Utilise the Import or Scan feature to import a document into FYDO:
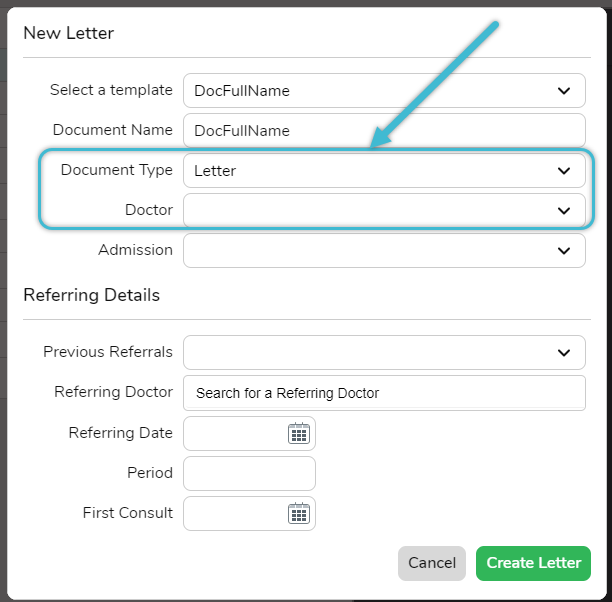
If you would like to use the Create Letter feature in FYDO to generate a Discharge Summary, do this from the Right-Click Menu on the Appointments Screen to ensure all episodic data is loaded into the document.
Ensure that the document is saved with a Document Type linked to MHR Template > Discharge Summary (DISSU). This may need to be set up for your facility in Documents > Documents Types. (Reach out to our support staff for assistance with this)
A Doctor with a successfully verified HPI-I will also need to be allocated.
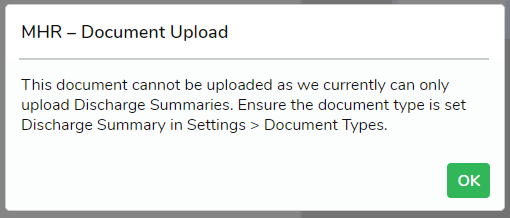
Attempting to upload a document that is not assigned a MHR Template type of ‘Discharge Summary’ will trigger an alert message. Only Discharge Summaries can be uploaded to MHR through FYDO.
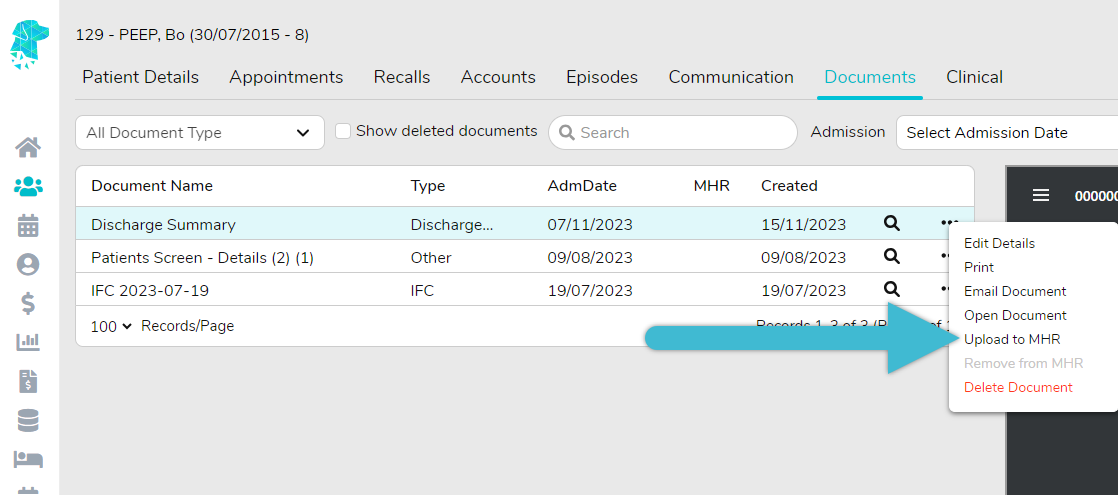
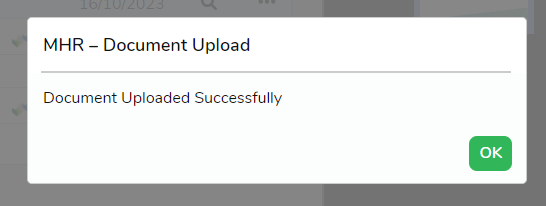
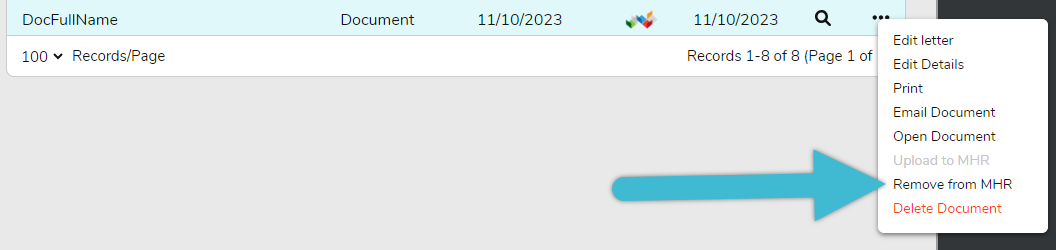
After the required document is uploaded, click the three dots to display the Menu.
Select Upload to MHR.
A confirmation message indicating a successful upload will be displayed.
Documents that have been uploaded can be identified by the MHR symbol.
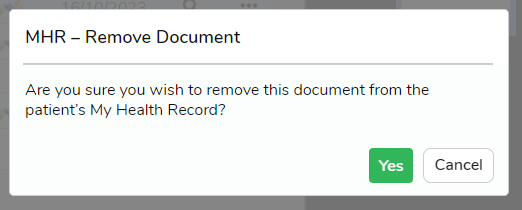
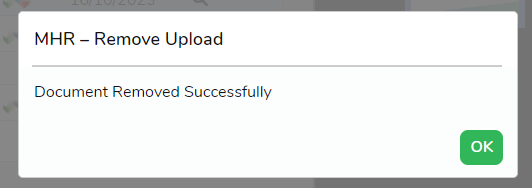
Documents can be removed from MHR by following the same process above and selecting Remove from MHR.
Confirm the removal by clicking Yes.
A confirmation of successful removal will be displayed.
For more helpful information related to My Health Record visit our associated wiki pages to:
Add your organisations HPI-O to FYDO here. Add your doctors HPI-I to FYDO here. Check a patients IHI in FYDO here.
Hospital Appointments Screen – Right Click Menu
Most functions available in the Appointments Screen can be accessed by selecting the required episode & using your mouse to right click. This menu can also be accessed with a single click on the appointment time which allows users on tablets to access the menu as well.
Make an Appointment allows users to add a booking
Create from Waitlist allows a booking to be made using a patient on the Waitlist
Edit Appointment allows users to amend an existing booking
Copy / Cut / Paste / Delete allows users to copy, cut or past an existing booking or delete
Episodes gives a list of all episodes for the selected patient, along with financial information
Documents displays all documents that have been generated in or scanned into FYDO
Chart Tracking allows for chart movement to be tracked
EMR will be displayed if the facility integrates with an external Electronic Medical Record system
OEC is where users will go to perform an Online Eligibility Check for the patient for that admission
IFC is where users will go to generate an Informed Financial Consent for the episode
Send SMS gives the user the option to send an SMS to the patient or to their pickup person
Confirmed gives users the option to make appointments as confirmed
Arrived / Unarrived gives users the ability to mark patients as arrived as they present to the facility
Admit is the page where the admission time & information is recorded
Excess/Deposit is where a receipt for a patient payment can be generated
Theatre is where all the theatre times, item numbers and other services etc. are recorded
Discharge is the page where the discharge time & information is recorded
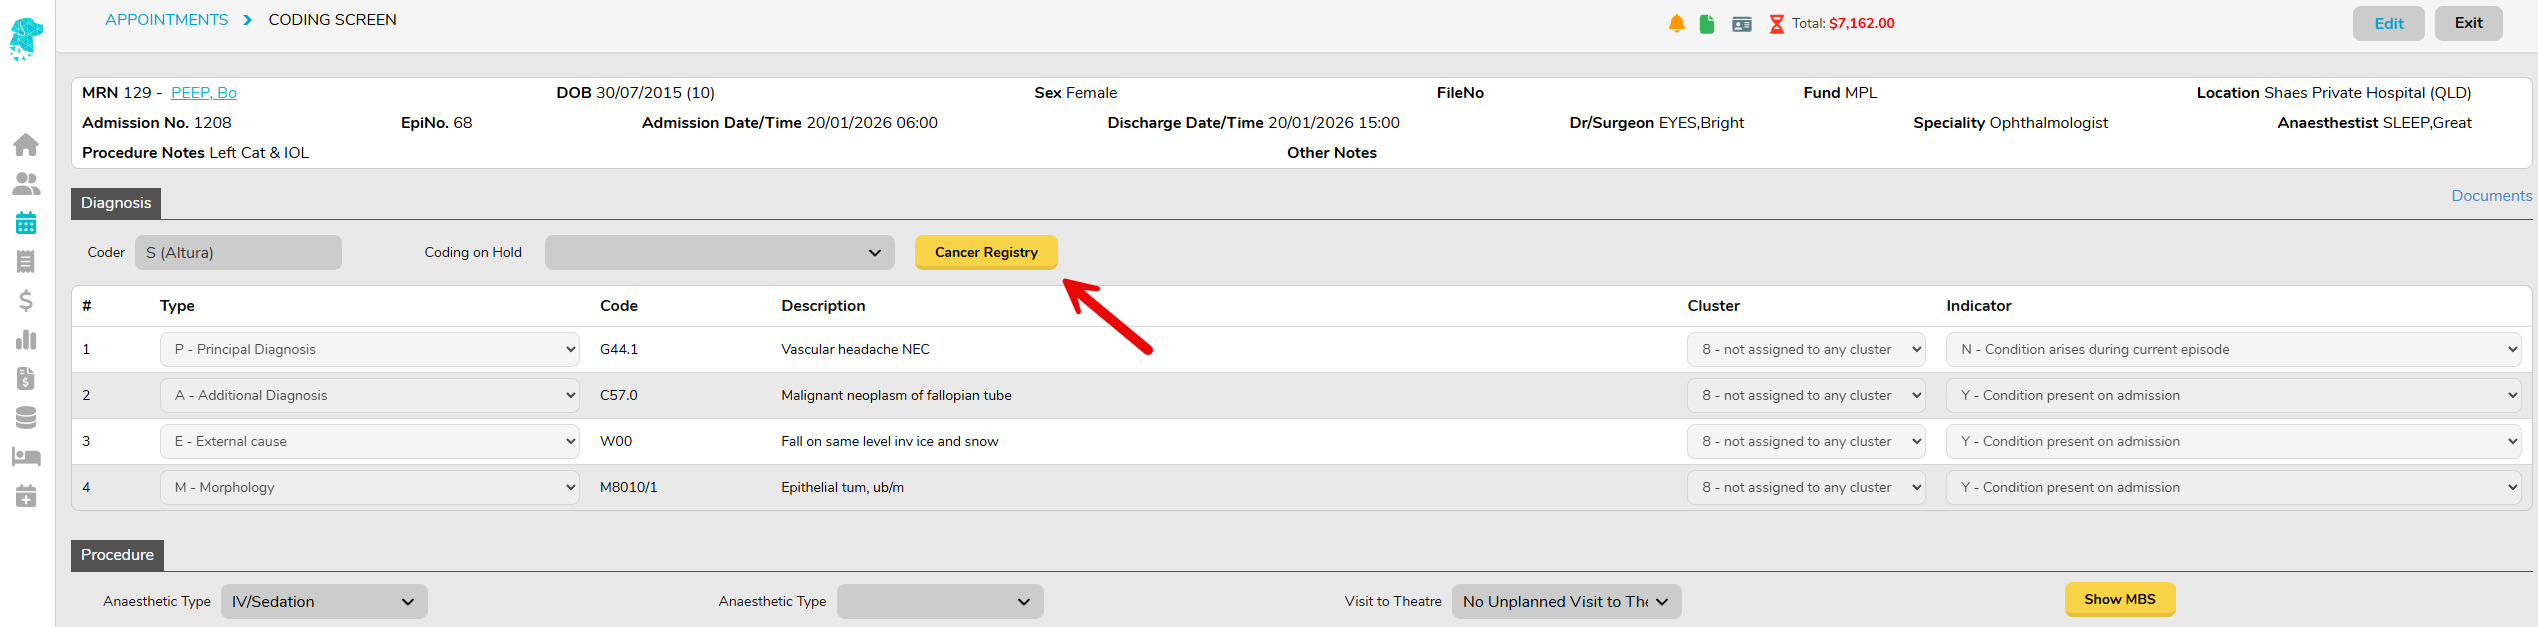
Coding is the page that the relevant diagnosis & procedure codes are entered & where the episode can be grouped
Create Invoice / Other Service Only Invoice is where users will go to invoice the episode
Rehab Screen is used for recording rehabilitation information
Check List allows users to mark off tasks easily & efficiently as they are complete e.g., OEC, IFC, Consent Form etc
Inpatient is where information regarding scheduled inpatient procedures, bed allocation & leave can be recorded
Certificate is where Type C, Type B, psychiatric etc certificates can be entered into FYDO to be transmitted electronically via ECLIPSE
Clinical Indicators is where certain indicators relating to the episode can be recorded. This feature allows for efficient collation of statistical data
Print Chart Label is where labels can be printed for the patient chart
Print Wristband is where a wristband label can be printed for the patient
Quick Form allows users to print other forms that have been loaded into the database. For example, Discharge Summaries
HC21 (Left, Right and Back) for the patient to sign (left), for the facility to complete and sign (right) and for the surgeon to complete if a certificate is required (back)
Create Letter allows users to create letters in FYDO from preloaded templates
Obtaining ATSI Statistical Data (Hospital)
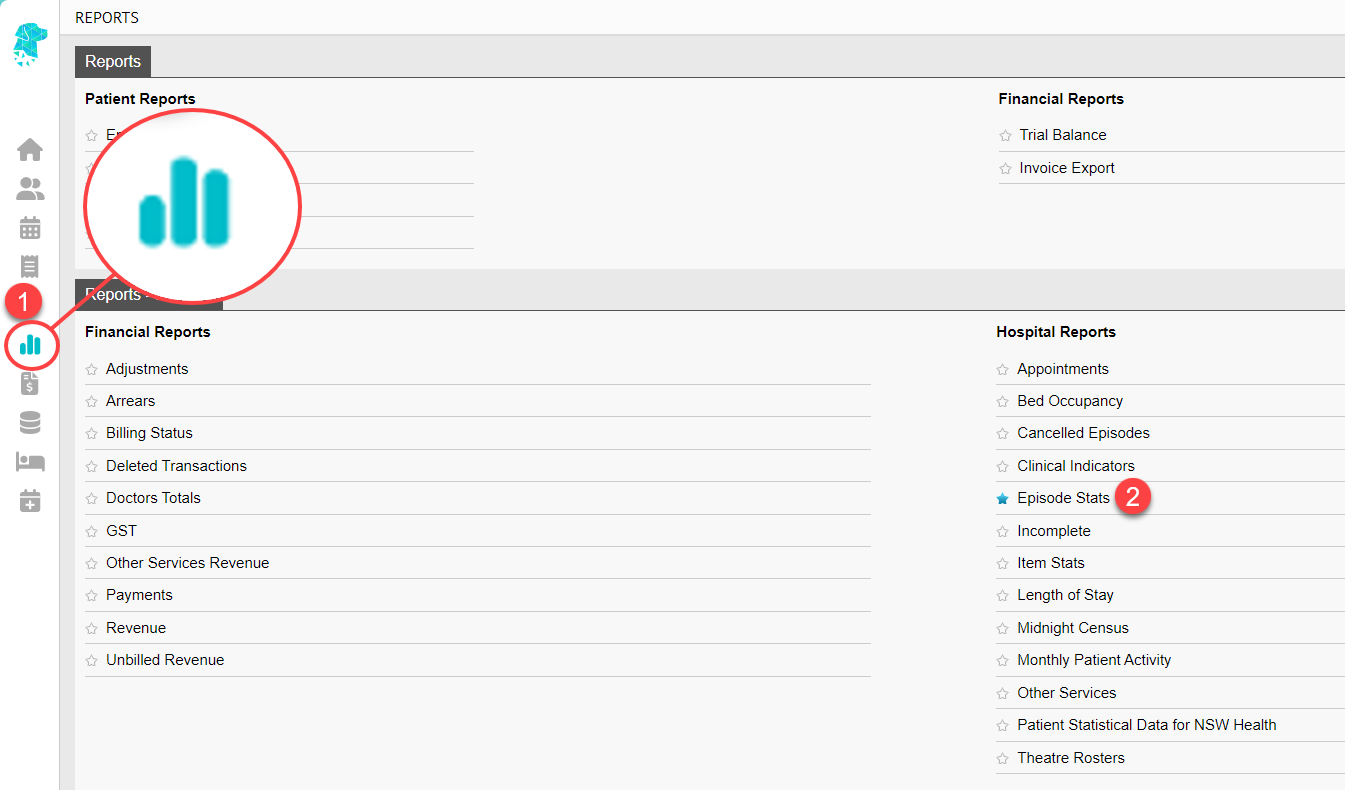
From time to time, it will be necessary to report on Aboriginal & Torres Strait Islander statistics. FYDO makes this extremely easy using the Episode Stats report.
Select Reports from the main menu
Select Episode Stats
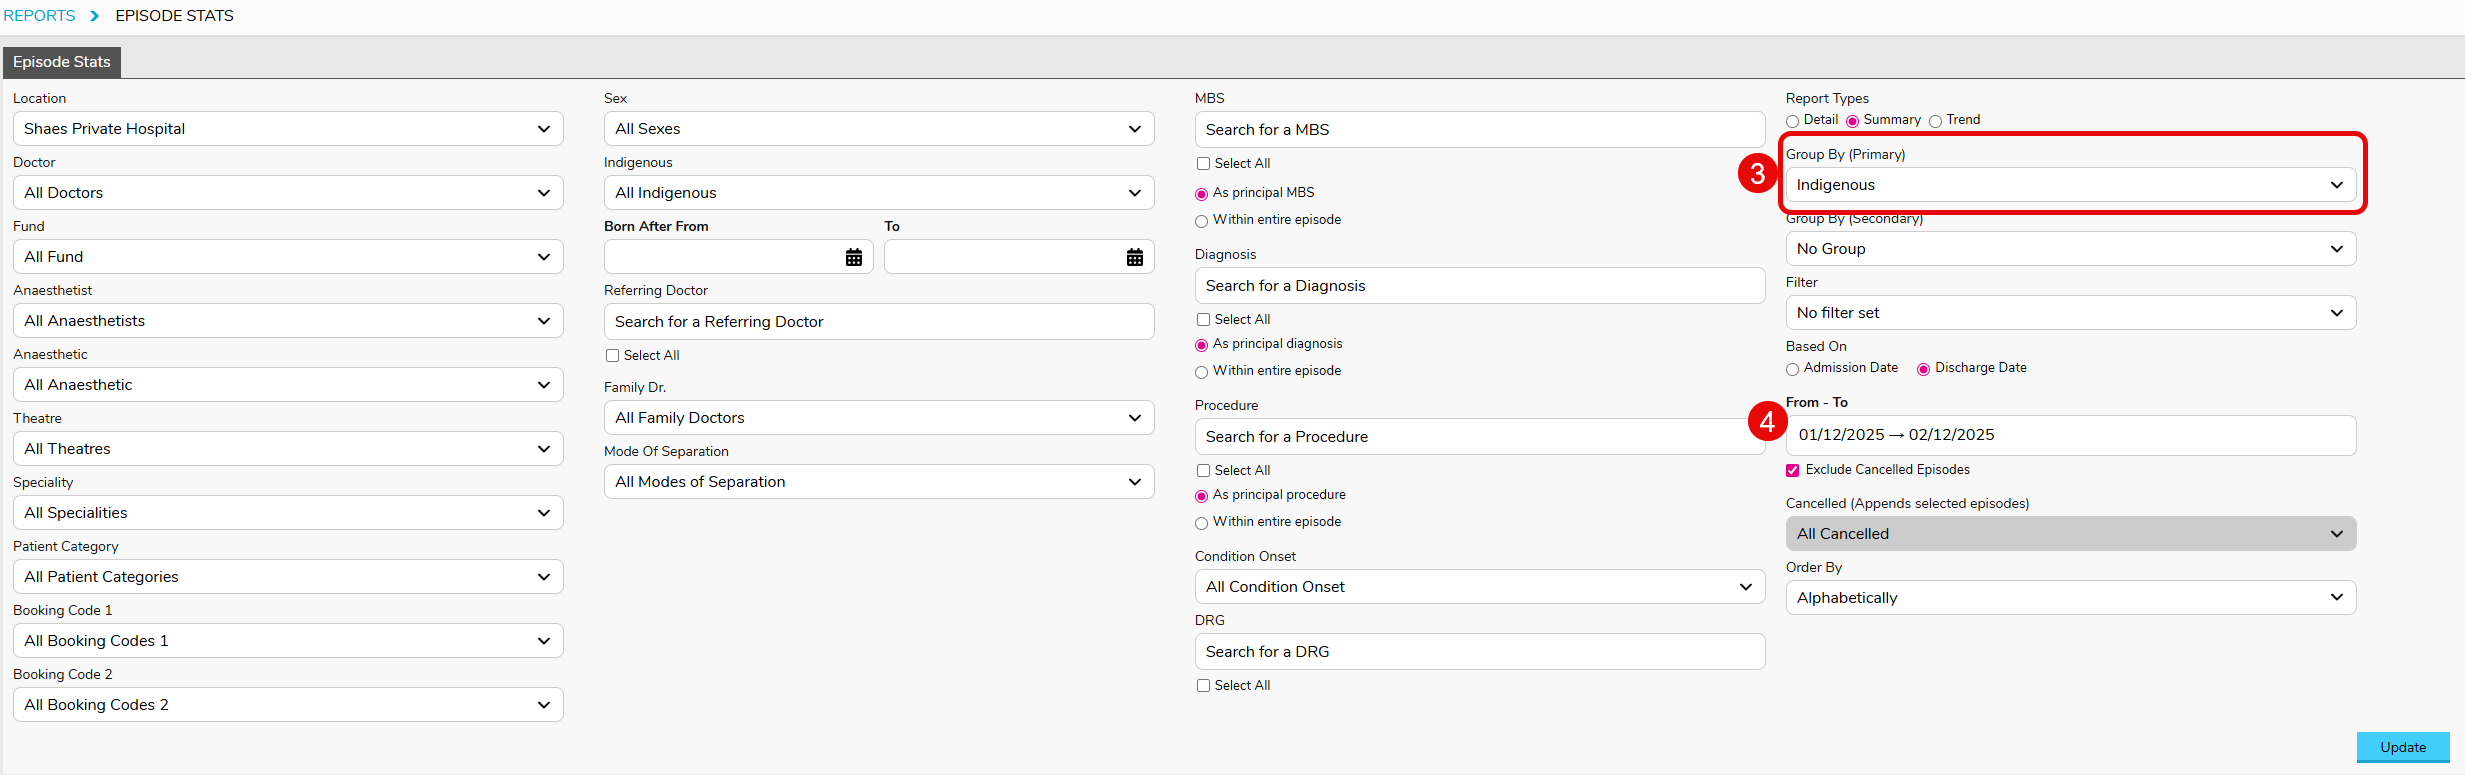
In the Group By (Primary) field select Indigenous
Select the date range required in the From & To fields
Click Update
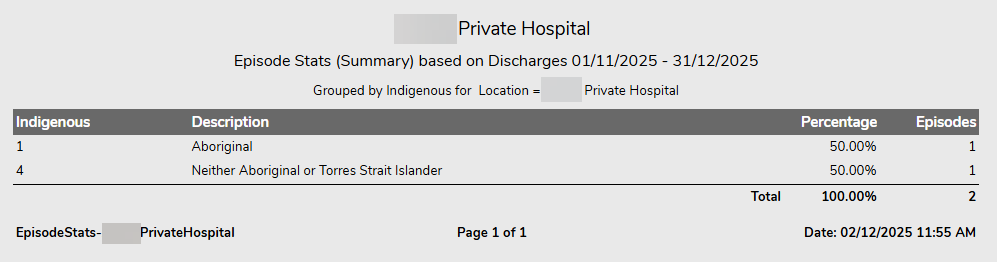
The report will give you the total number & percentage total of episodes that fall under each category.
Unadmit or Undischarge a Hospital Episode
If an episode is accidentally admitted or discharged, the user can Un-admit or Un-discharge following the steps below.
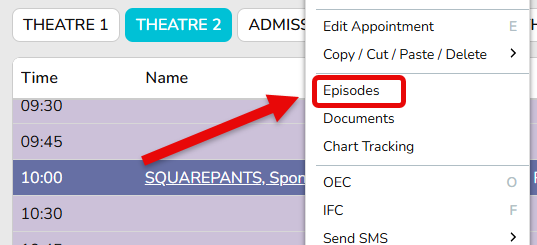
Navigate to the appointment that needs to be Un-admitted and/or Un-discharged
Use the Right Click Menu to select Episodes
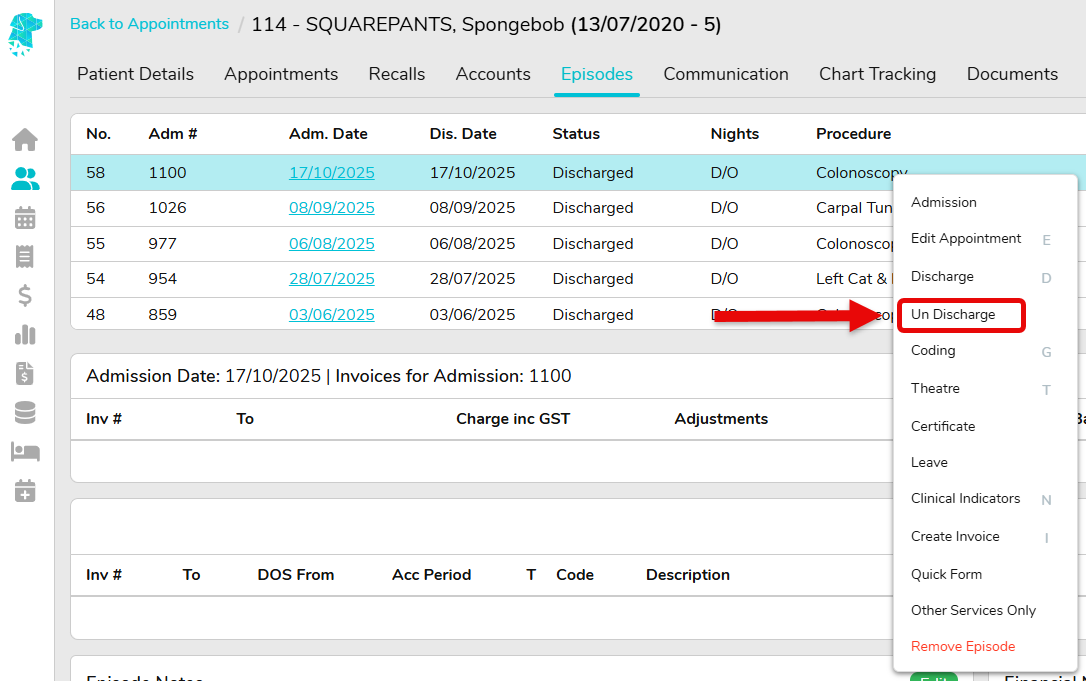
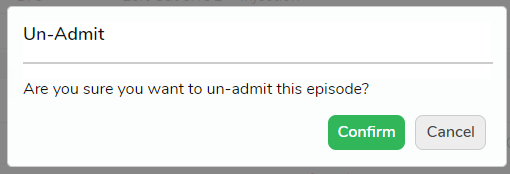
If the episode has been admitted, & discharged, Right Click on the required Episode and select Un-discharge
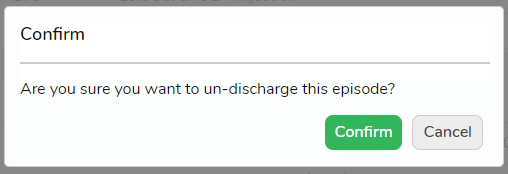
The user will be asked to Confirm that they are sure they want to un-discharge the episode.
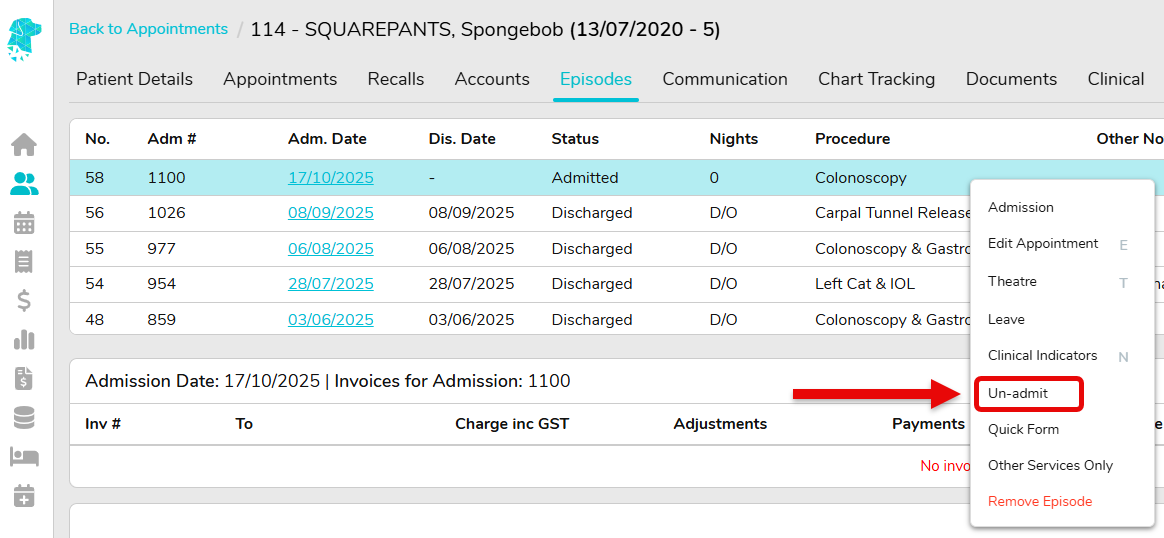
The Right Click process will need to be repeated to then Un-admit the episode.
The user will again be prompted to confirm that they want to un-admit the episode.
Once this process has been followed, click Back to Appointments and the episode will have been returned to the status of B for Booked
Hospital Cancer Registry Data
FYDO gives users the ability to enter Cancer Registry information & export the data for ease of submission.
Once the coding has been entered, by following the instructions on Hospital Coding, you are able to click on the Cancer Registry icon.
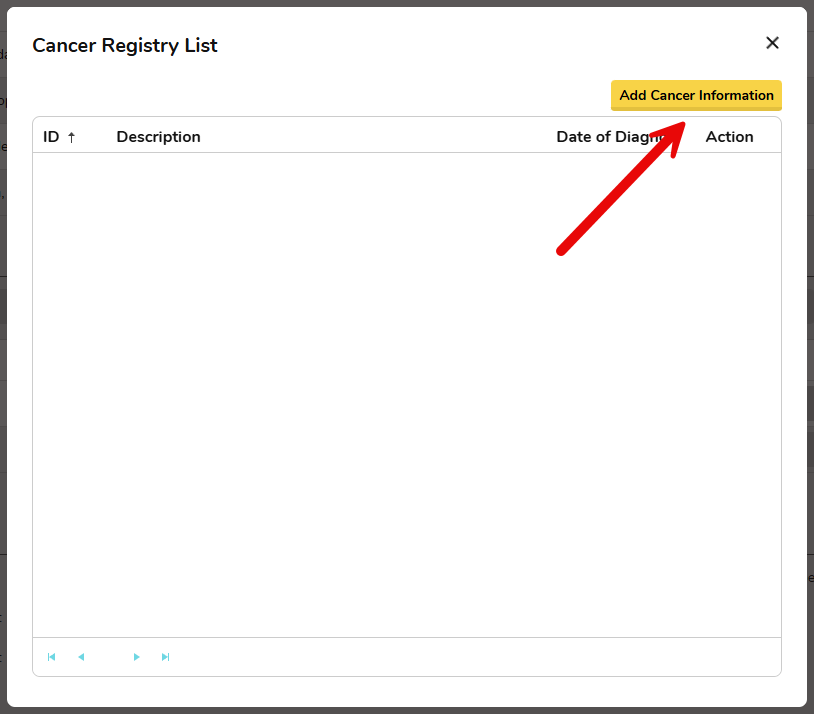
This will open up a screen that allows you to Add Cancer Information.
Once in the Cancer Registry screen, enter all relevant information for your state & click Save.
The Cancer Registry Data can then be exported in the same manner that you export all your monthly data.