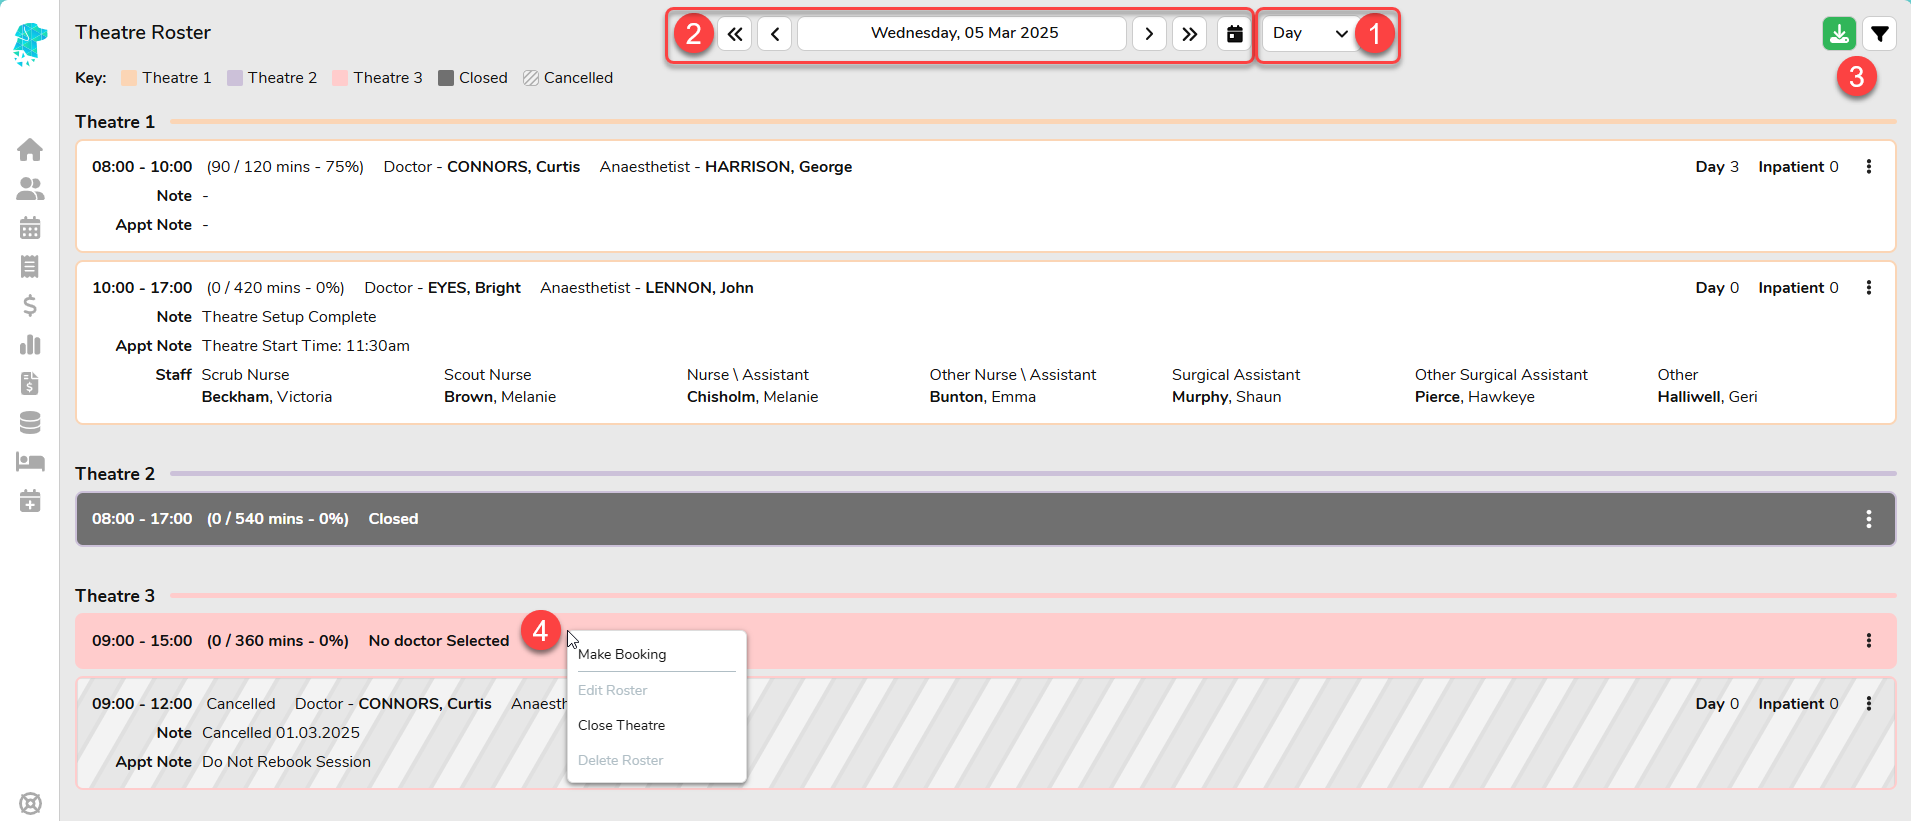
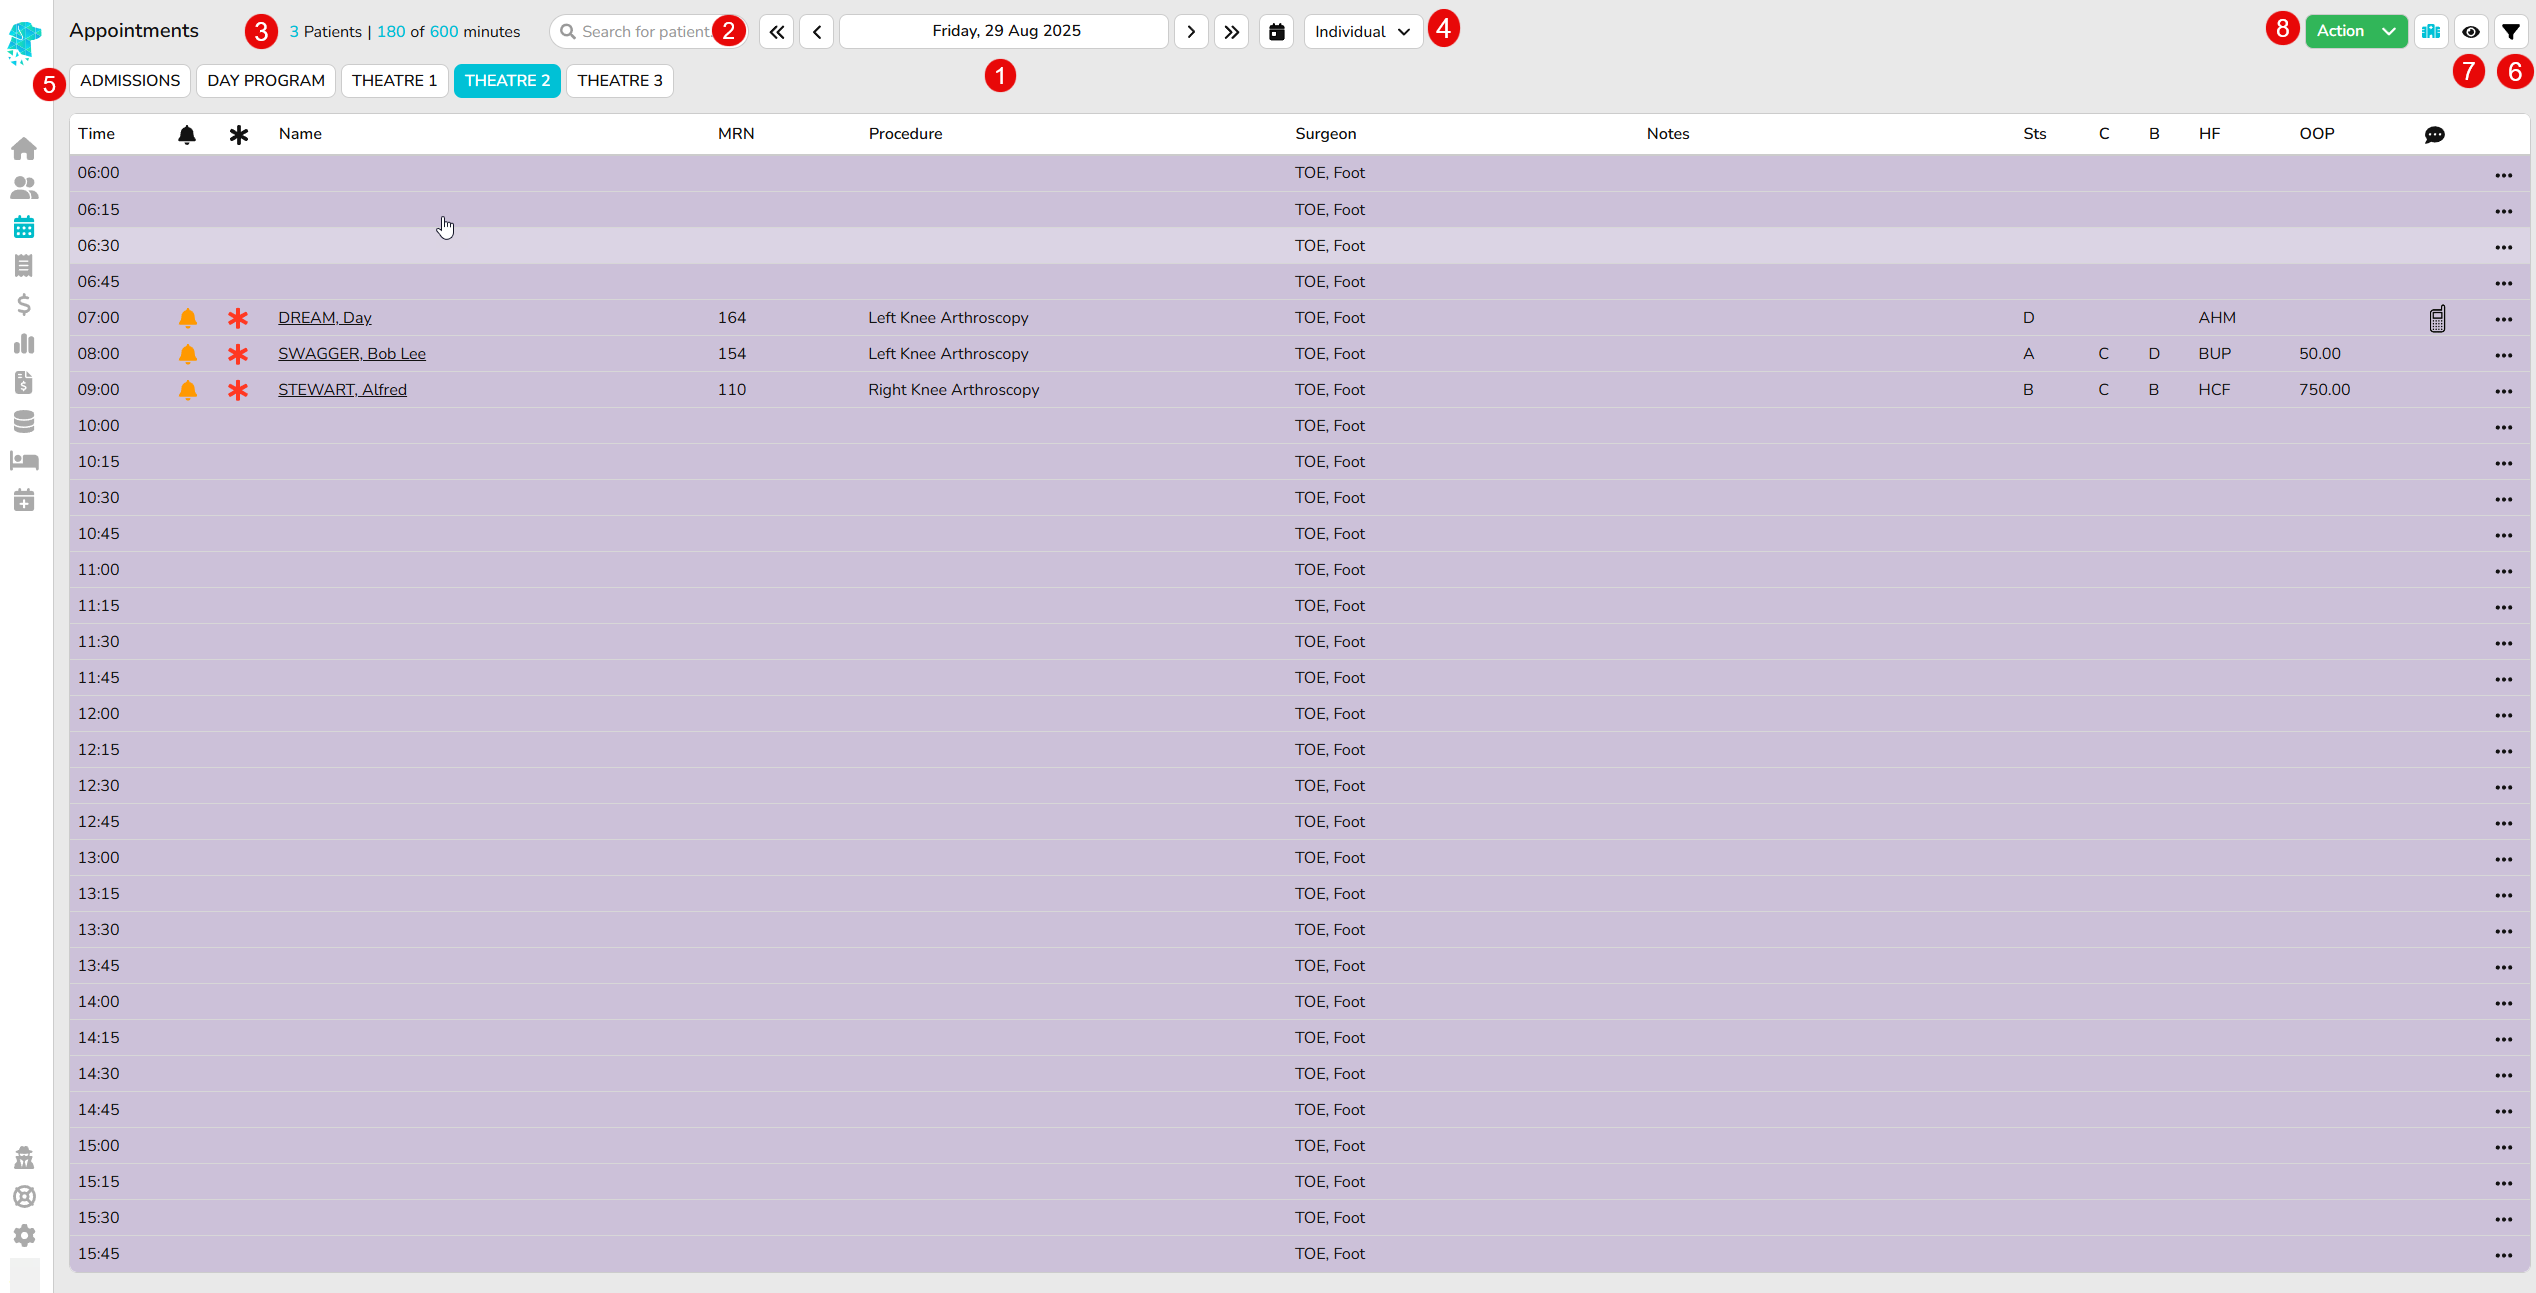
Navigate to the date that you require using the Next and Previous arrows, Calendar or Today
Utilise the Filter to customise the information on the screen Print allows for a screenshot of the current view to be converted to PDF for printing purposes
Find the correct theatre & Right-Click to expand the options menu
Select Make Booking
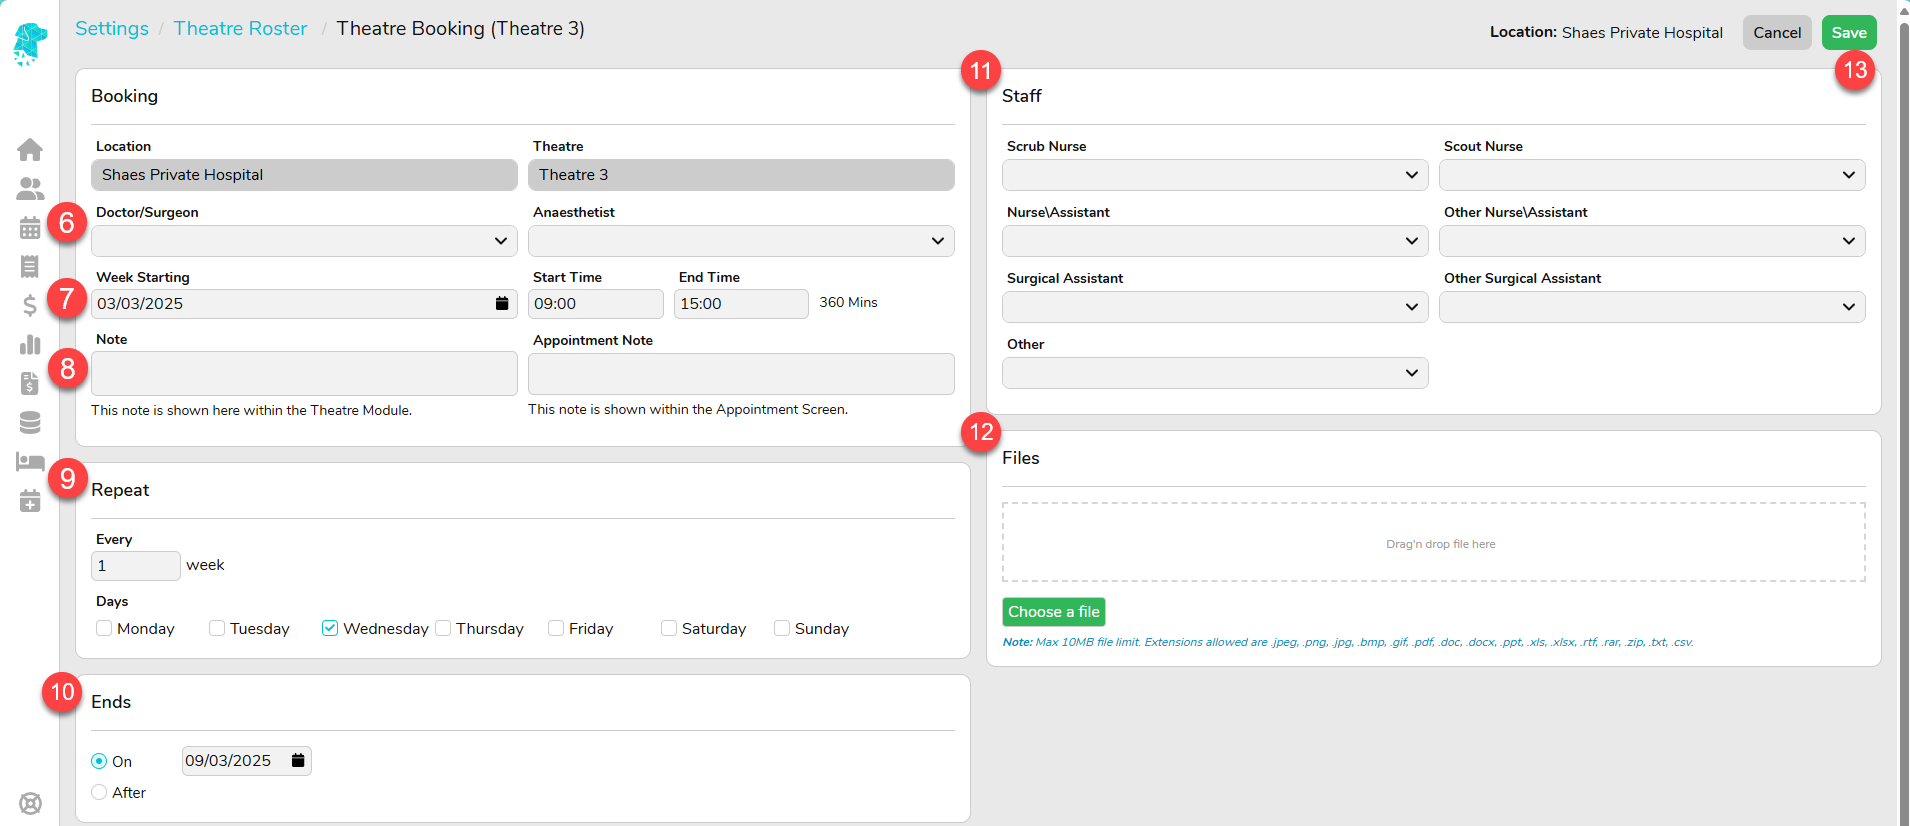
Select the required Doctor/Surgeon and Anaesthetist
Ensure correct Week Starting Date and Session Times are selected
Notes and Appointment Notes can be added to the booking if required
The Repeat feature gives the ability to produce a reoccurring booking for the selected surgeon
Use the Every ____ week option to enable weekly, fortnightly, monthly bookings etc.
Use the tick boxes to select the days of the week you require the booking to reoccur
Use the Ends field to set the date that the reoccurring booking will cease. NB. This feature will produce an individual booking on each of the selected days for that surgeon. If this booking changes, each individual booking will need to be amended. Hence, it is not recommended to reproduce the booking for extended periods of time
Add Theatre Staff (if your facility procedure requires)
Import Files that are related to the Theatre Booking
Click Save
This will create a theatre booking that can then be Edited, Cancelled or Deleted with a right-click (as per #4 in the above image).
There is a detailed Audit trail of changes made located inside the booking (right-click & Edit Roster)
FYDO Hospital Reports
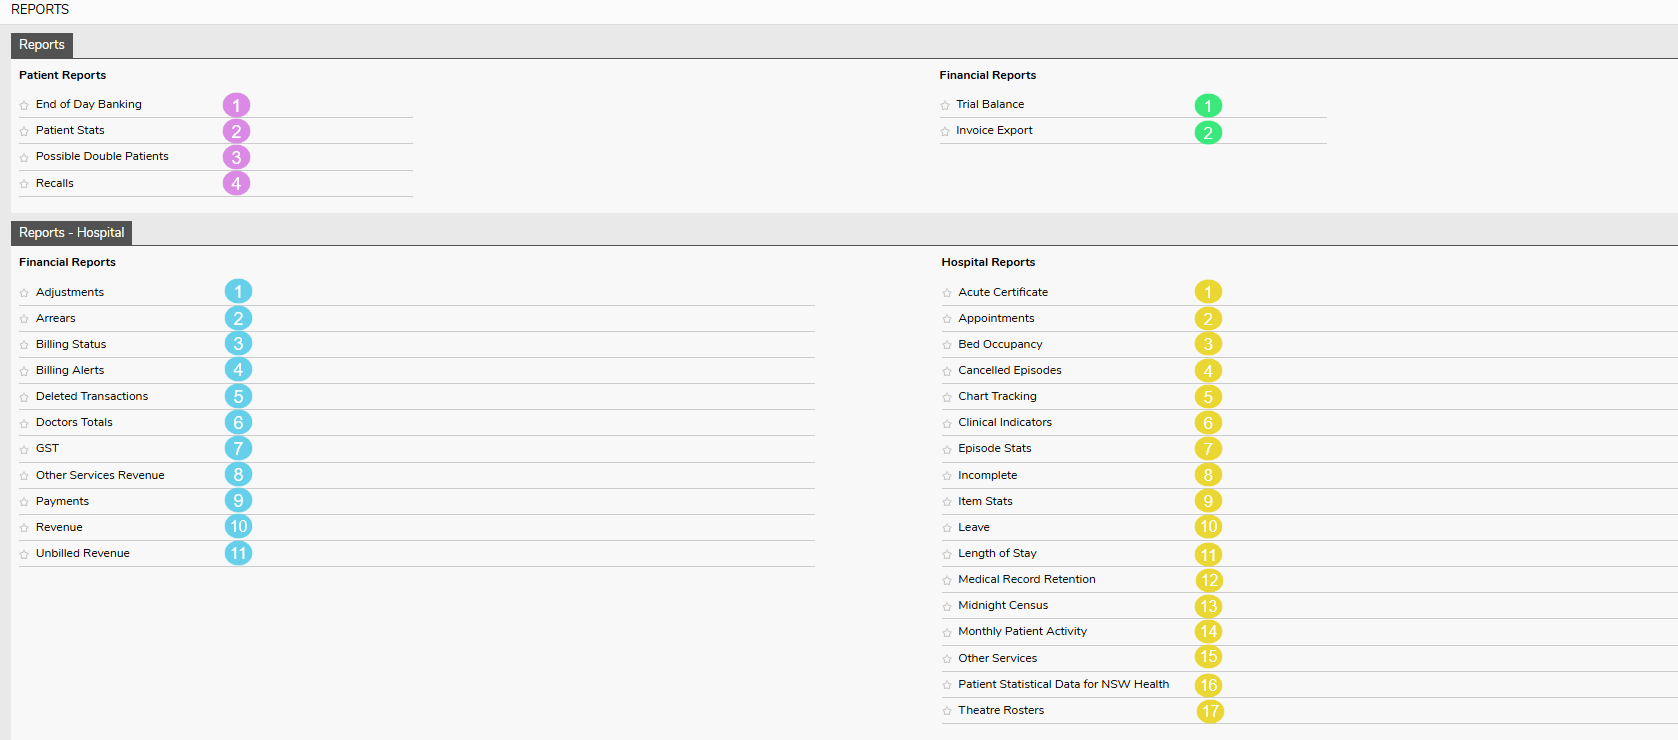
This document gives a description of all FYDO reports & information obtainable from them. Reports can all be printed directly from FYDO or exported to PDF, Excel Spreadsheet or Raw Data (which is the most detailed option in collating data). Reports also gives the option to Star ★ your favourite reports. The reports that you have identified as your favourite, by clicking the star next to them, will be available on a Quick Menu that opens when you simply hover over the Reports tab in the main menu.
For the full list of reports the user will need to click once on the Reports icon.
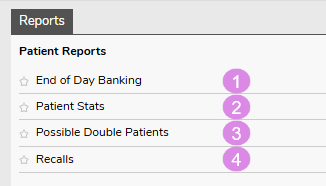
Patient Reports
End of Day Banking – Gives the ability to re-print any End of Day Banking Reports that have been previously completed. NB. To initially perform the End of Day Banking for the day go to Settings, End of Day Banking. Users are also able to reset the banking from this report, if they have made an error when initially processing the End of Day Banking.
Patient Stats – Gives the ability to obtain extensive patient demographics data. Including:
Medicare Eligibility Status
Deceased Patients
Archived Patients
DVA Patients
Indigenous Status
Referral Expired
Preferred Doctor
Health Fund
Gender
Surveys
Ability to stipulate birth date range
Ability to stipulate created range
Ability to stipulate post code range
Possible Double Patients – Provides a list of all patients that share similar information. There are several options to base the report on, enabling easy identification of patients that have been entered into FYDO more than once.
Recalls – Gives the ability to send bulk recalls to patients. Options to sort by recall date, gender, postcode etc. are all available.
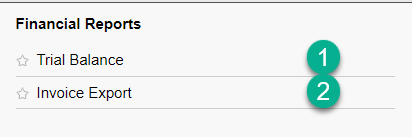
Financial Reports
Trial Balance – Shows a snapshot of the balances of all categories listed in FYDO for the date range selected.
Invoice Export – Enables an Excel spreadsheet to be created of all invoices raised for the selected date range and data type.
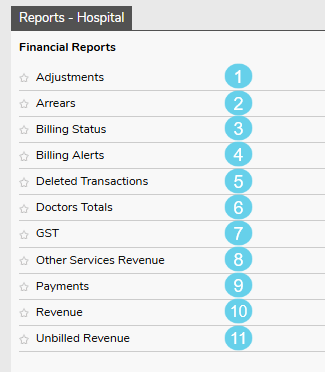
Hospital – Financial Reports
Adjustments – Shows a list of adjustments. Can be sorted by adjustment type, doctor & date range.
Arrears – Shows all invoices without a zero-dollar balance. It can be run by Doctor, Fund & Period that the account has been outstanding for (e.g., 30 days & over). It can be run as:
Detail – Showing every patient & the balance
Summary – Showing each health fund & the balance
Interactive – Enabling follow up dates & notes to be accessible, to facilitate efficient workflow in debt recovery
Minimum Balance – Allowing for a dollar value to be entered & report run to show accounts over that dollar value. (Handy to exclude accounts with credits from the report)
Show accounts requiring a refund only – Enables the ability to see only the accounts that are in credit, once they have been invoiced, & require a possible refund
Billing Status – Details information on all episodes billed & unbilled. Reports can be run by doctor & date range & can be filtered to show:
Show all – inv summary – Lists all patients that have been invoiced with a summary of charges
Show all – inv detail – Lists all patients that have been invoiced, documenting each line of the invoiced charges separately
Show not billed only – Is an interactive report that lists all episodes that have not been billed and allows the user to raise the invoice right from this screen! Showing details of the coding status & theatre complete status to assist with efficient workflow. Also providing a column for the Cancelled reason for users to decide if a charge needs to be raised for the episode. When ‘Show not billed only’ is selected, the user is given another option to Don’t show patients’ billed $0 if that is required, and to Exclude cancelled episodes if they wish to.
Not billed in same period – Shows invoices billed in the following accounting period
Billing Alerts – Will highlight any claims that have triggered one of the inbuilt billing rules. For example: Ophthalmic Procedure Missing Lens +/- Visco. If an ophthalmic procedure was billed without a lens, it will be highlighted here to crosscheck the billing is correct.
Deleted Transaction – Lists any transaction that has been deleted/voided from the selected period. Dates can be selected for deleted dates, accounting period or date of service.
Doctors Totals – gives a detailed view of revenue generated by each doctor. There is the ability to filter by doctor, or if all doctors are selected it will show a page per doctor. Clicking on the next page arrow > will show the next doctor in alphabetical order by surname.
GST Report – Allows users to obtain figures for GST on a Cash Basis or an Accrual Basis.
Other Services Revenue – Lists revenue from all other services that have been billed. E.g., prosthesis, surcharges etc. Report can be filtered by doctor, fund, theatre, type or patient category. Then there is the option to obtain data based on Accounting Period or Discharge Date for the date range selected.
Payments – Gives a list of all payments received in the selected date period either by Accounting Period, Audit Date or Date of Service. Filters are available by Doctor & payment type & data is able to be shown in formats such as Detailed, Summary, Audit date different to Accounting Period or Amount is negative.
Revenue – Retrieves revenue information by Accounting Period or Discharge Date. Can be displayed in Detail (shows revenue totals) or Summary (showing revenue generated by each category e.g., accommodation, theatre etc). Filters can be applied to show data for a particular doctor, fund, category, theatre etc. Information can then be grouped by various means also (Health fund, Indigenous Status, Postcode etc)
Unbilled Revenue – Generates a virtual invoice for all unbilled episodes, based on the item numbers entered in the theatre screen. Due to the nature of the information this report obtains, it can take a little longer to generate than other reports. It is designed to show all episodes that are not billing in real time. If the predicted item numbers are not entered in the Theatre Screen, at the time the report is run, it will be unable to calculate an accurate estimate of revenue for the episode. It will not look at dates that an invoice was billed if the “As at Date” is changed to a date prior to the current date, as it is designed to be a running tally.
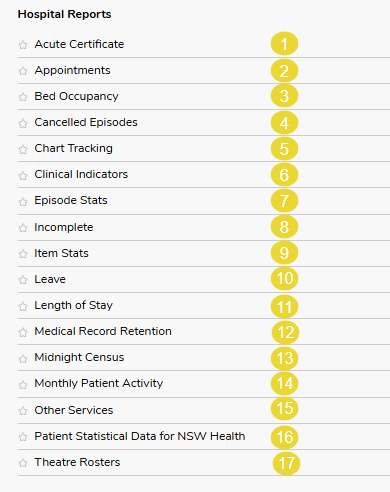
Hospital Reports
Acute Certificate – The Acute CertificateReport provides a comprehensive list of admitted inpatients, displaying exact dates when certificates are required based on the admission date. It includes key details such as Start Day, Adjusted Length of Stay and Length of Stay to help you stay on top of compliance.
Appointments – Gives a list of all bookings, including those that are yet to be admitted.
Bed Occupancy – Gives an overview of bed occupancy for the selected month. Also giving total number of beds, days, bed days available, bed days occupied & the percentage of occupancy.
Cancelled Episodes – Lists all episodes that have been cancelled with their corresponding reason. It can be filtered by Cancelled Reason to obtain more specific data for the date range selected. Cancelled Reasons can also be customised (Settings > Cancelled Reasons) to assist facilities in collating the data they require.
Chart Tracking -This helps facilities track the location of charts based on the information entered into the patient’s Chart Tracking tab. The report includes several useful filters, allowing users to organise information by chart location, status, and more
Clinical Indicators – Shows all indicators entered & the number that have been answered Yes or No during the date range selected. It can be filtered by Doctor or Theatre & is available in Summary & Detailed. Once the Detailed option is selected there are other fields that display, to ensure the exact information required is obtainable.
Episode Stats – Allows for an extremely broad range of information to be obtained. There is the option to show the data in a Detailed or Summary format & can filter by a range of options. The report can be generated by Admission Date or Discharge Date. Some examples of information that can be generated from this report, for the selected period, are:
All episodes
Episodes for a particular Health Fund
Episodes for a certain Anaesthetist
Episodes for a certain Anaesthetic Type
Episodes in a particular Theatre
Episodes for a particular Specialty
Episodes relating to a particular Booking Code
Episodes for a particular Sex
Indigenous Status or ATSI demographic report
Age Group selection available
Item numbers
Diagnosis codes
Procedure codes
DRG’s
Referring Doctor
Incomplete – Gives the option to show episodes, for a selected date range, that have not been coded, have not been discharged, have not had clinical indicators entered, have not been grouped etc. It also shows the Cancelled reason to enable the user to determine if the episode requires further attention. The Uncoded Episodes and Ungrouped Episodes reports are both Interactive, meaning the coder can easily and efficiently code all episodes from one screen!
Item Stats – Gives item number information for primary and subsequent procedures.
Leave – This will show the leave information for long stay patients who have left the facility for any period of time.
Length of Stay – gives statistical data regarding the time a patient spends in certain areas of the facility. It can be filtered by several different ways & is able to give the following data for the date range selected:
Pre-operative
Admission Time to Time in Theatre
Booking Time to Time in Theatre
Booking Time to Anaesthetic Start Time
Pre-Op Time to Time in Theatre
Admission Time to Pre-Op Time
Admission Time to Pre-Op time or Anaesthetic Start Time if pre-op time isn’t entered
Intra-Operative
Time in Theatre to Time out of Theatre
Procedure Start Time to Procedure Finish Time
Post-Operative
Time out of Theatre to Discharge Time
Total
Admission Time to Discharge Time
Admission Time to Ready for Discharge
Booking Time to Discharge Time
Booking Time to Ready for Discharge
Comparison
Planned Time in Theatre with Actual Time in Theatre
Booking Length with Actual Minutes in Theatre
Medical Record Retention – Gives a list of episodes where medical records could potentially be archived or destroyed. It can be generated using the Chart Tracking information entered for each individual patient, or simply by their Admission or Discharge date. Information such as minor status, DRG and Indigenous Status are all present to help the facility make an informed decision as to which episodes may need actioning.
Midnight Census – will show patients that were admitted, but not yet discharged at the “As At” date selected.
Monthly Patient Activity – Gives an overview of all admissions, broken down into each day of the month. Giving the number of Total Patient Days, resulting in percentage averages for bed occupancy.
Other Services – Gives a list of all the other services that have been entered into the episodes. It can be filtered by suppliers for any given date range.
Patient Statistical Data for NSW Health – assists New South Wales hospitals with submitting their statistical data with ease.
Theatre Rosters – shows all booked theatre sessions & all cancelled theatre sessions grouped by surgeon or theatre. Also shows theatre utilisation minutes and percentages.
Importing Visicode Data
After the data has been exported from Visicode
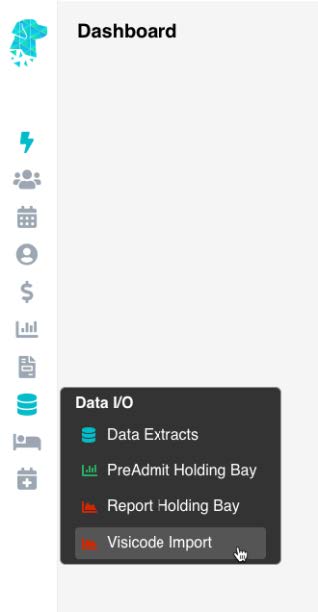
In the main menu go to Data I/O and select Visicode Import
Select the Location
Click Choose a file
NB. File must be in a .txt format to be imported. Other file formats will not work
This will produce a list of all the patient information found in the file
Click Import
This will automatically update the Coding & run the Grouper
There will be an Excel spreadsheet download for information purposes. This file will show if any of the data imported was unsuccessful.
End of Day Banking (Hospital)
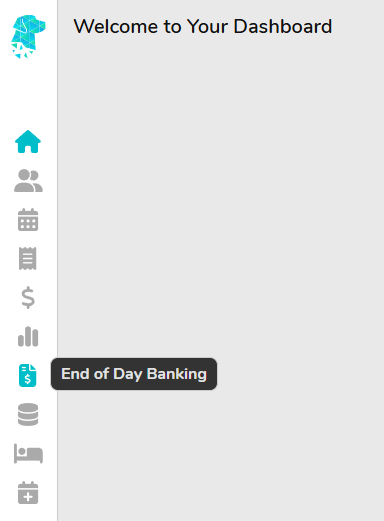
Select End of Day Banking from the main menu
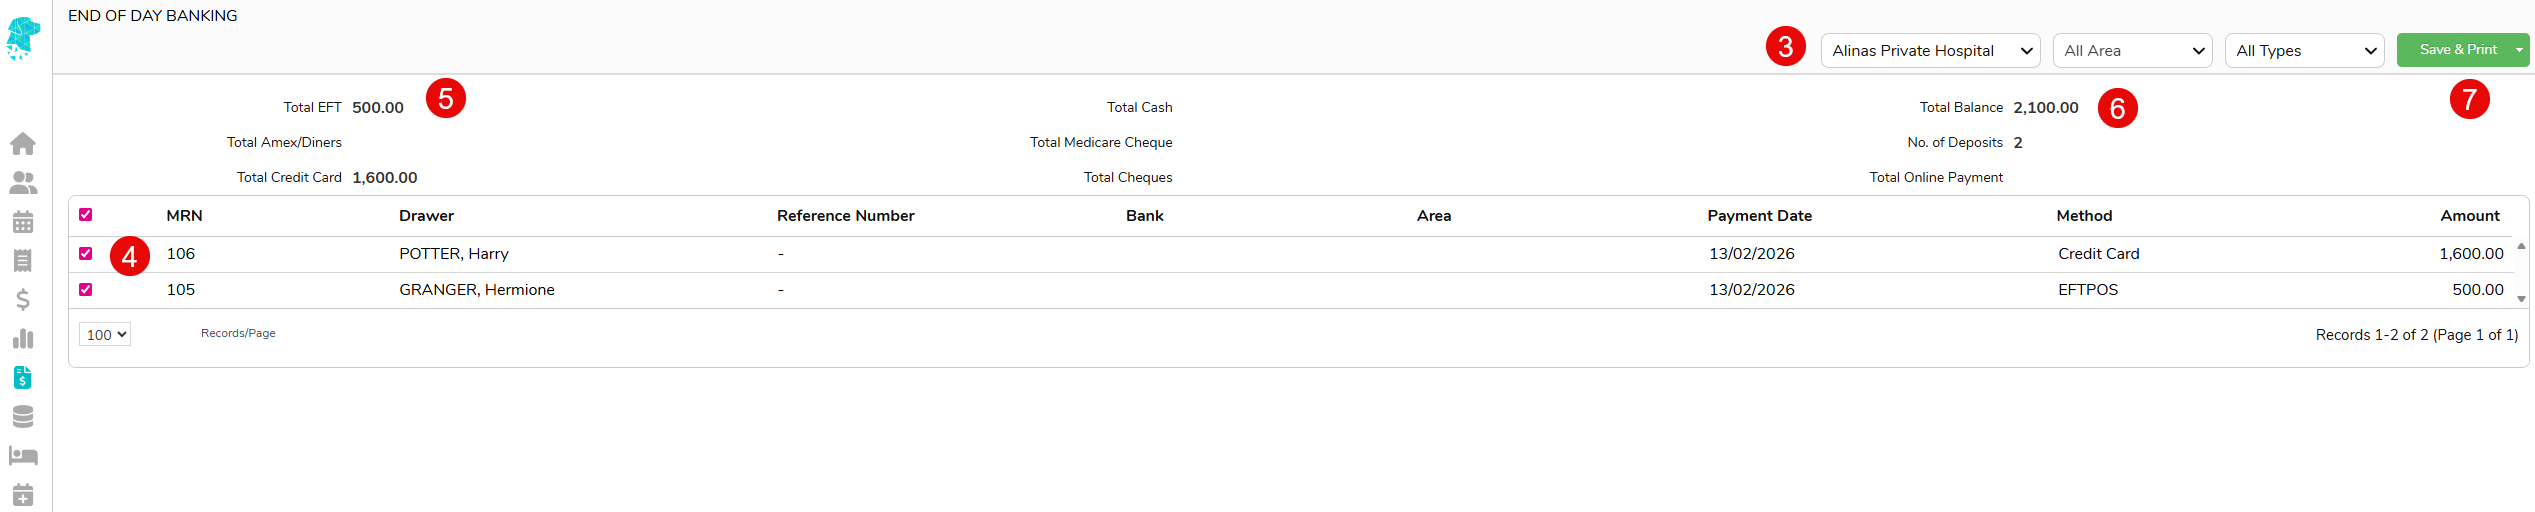
This will open the screen where the user can perform the End of Day Banking
For multi-location facilities, ensure the correct location is selected
Check each payment off as it is compared with corresponding data for accuracy
Ensure Totals match the EFTPOS settlement & cash/cheques taken
Total Balance of all revenue received will be shown
Click Save & Print
You will be prompted to confirm that you want to clear the transactions.
Once confirmed with Yes the End of Day Banking Report will be available for printing
Re-Printing End of Day Banking Report
Select Reports from the main menu
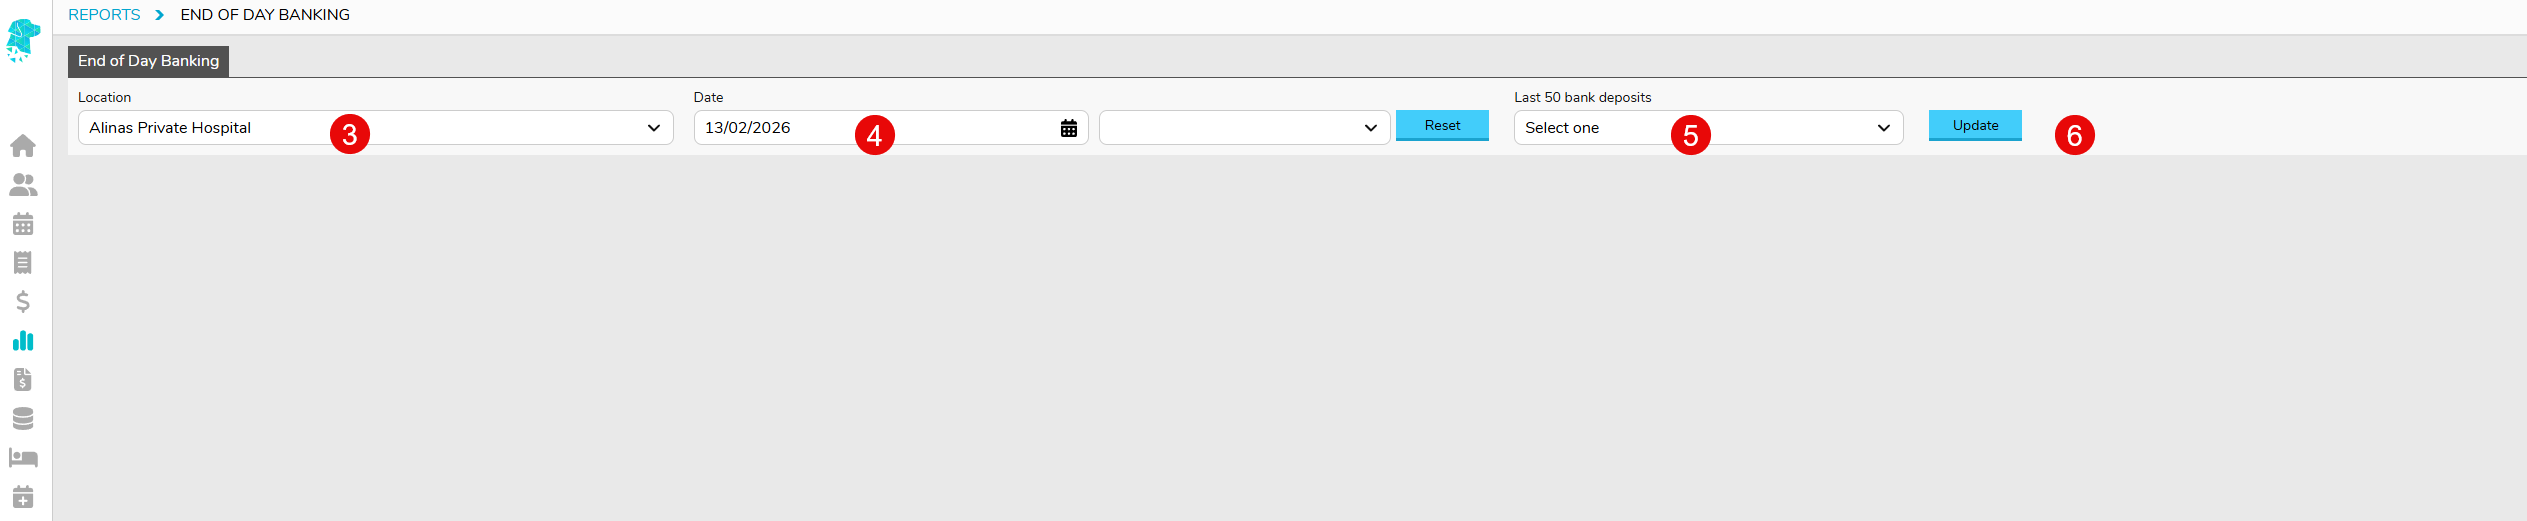
Select End of Day Banking
For multi-location facilities, ensure correct location is selected
Select the Date & Time for the required report OR
Select from the list of Last 50 bank deposits
Click Update and the selected report will be displayed on the screen
It can then be Printed or Exported using the corresponding blue buttons at the bottom right of the screen
Hospital Appointments Screen
Navigating the Appointments Screen
Date – Click on the date to display the calendar to select required date
Search – to locate a particular patient/booking
Info – will display the Number of patients booked & Minutes the theatre is being utilised
View – gives the ability to choose how the theatres are displayed
All – shows all theatres for 1 day
Individual – shows 1 theatre for 1 day
Weekly – shows 1 theatre for the whole week
List – shows all appointments in 1 list
Theatres – are able to be selected here
Filter – the patients viewed to include/exclude cancelled patients etc
Custom Views – Create and select Custom Views to displayed relevant information