Receipting a patient payment on admission e.g., Excess payment, payment of account etc
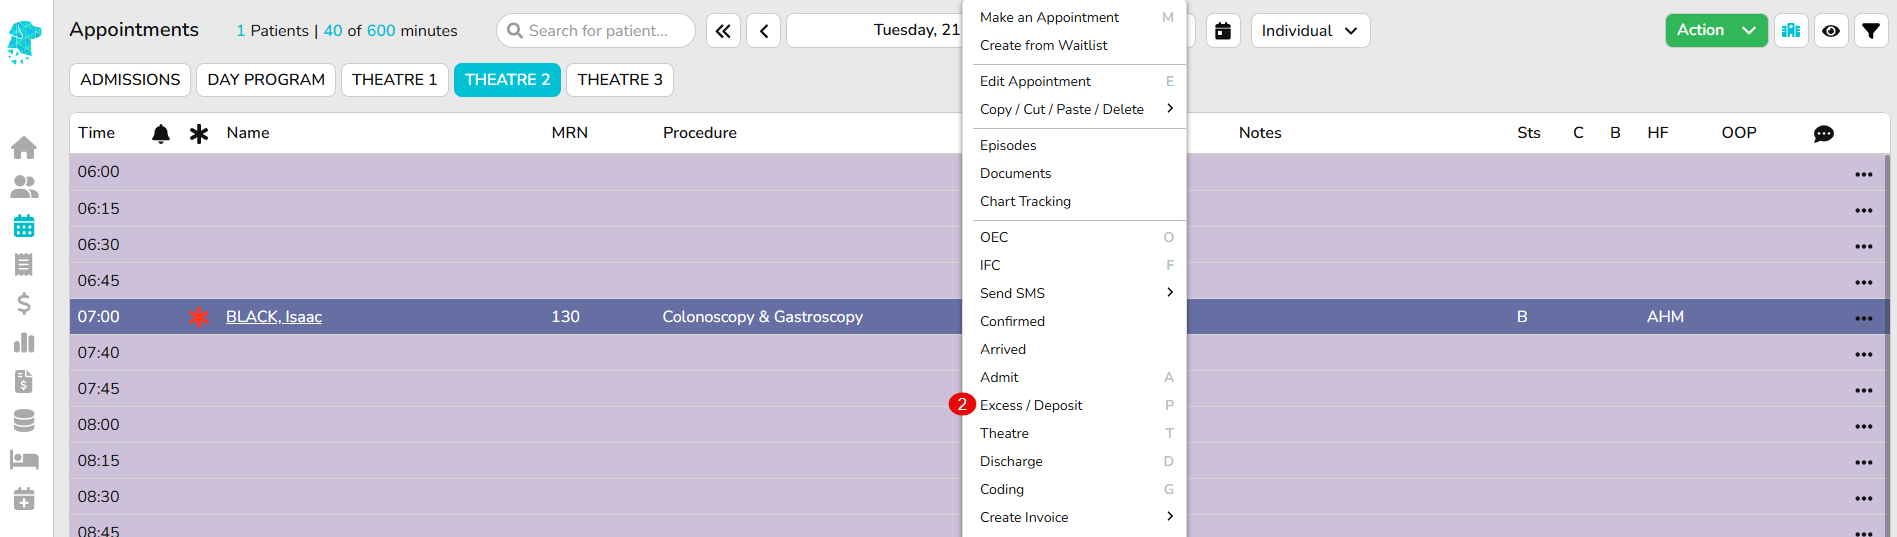
Select required patient & Right-Click to expand menu
Select Excess/Deposit
Complete required information
Deposit type a. Fund Excess for all excess payments or payments that are required to be applied to a health fund invoice b. Patient Account Deposit for all payments to go towards an uninsured invoice
Transaction Date will automatically populate with the current date
Select payment Type e.g., EFTPOS, Cash, Cheque etc
Enter the Amount that has been paid
Select the Payment Description relative to the payment being made. NB. These descriptions are fully customisable & can be amended to suit the facility. This can be done in Settings >Deposit Types
Complete Drawer, Reference, Bank & Branch when payment is made via Cheque
Select Save or Save & Print to produce a printed copy of the receipt
Both Fund Excess & Patient Account Deposit receipts can be processes simultaneously to save the user following the above process twice.
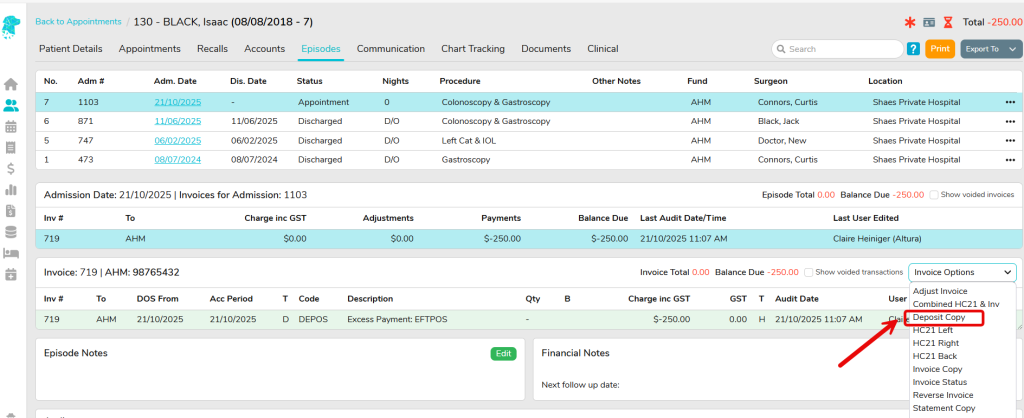
These transactions can be found by selecting the required patient & using the Right-Click to display the menu and selecting Episode.
Select the required episode date from the list at the top of the screen.
The receipt can then be re-printed by using the Invoice Options on the right of the Episode screen & selecting Deposit Copy.
Online Patient Verification – OPV (Hospital)
Performing an Online Patient Verification check with Medicare & the health fund helps to ensure the correct patient information is entered into the system & that the Online Eligibility Check (OEC) will be successfully transmitted
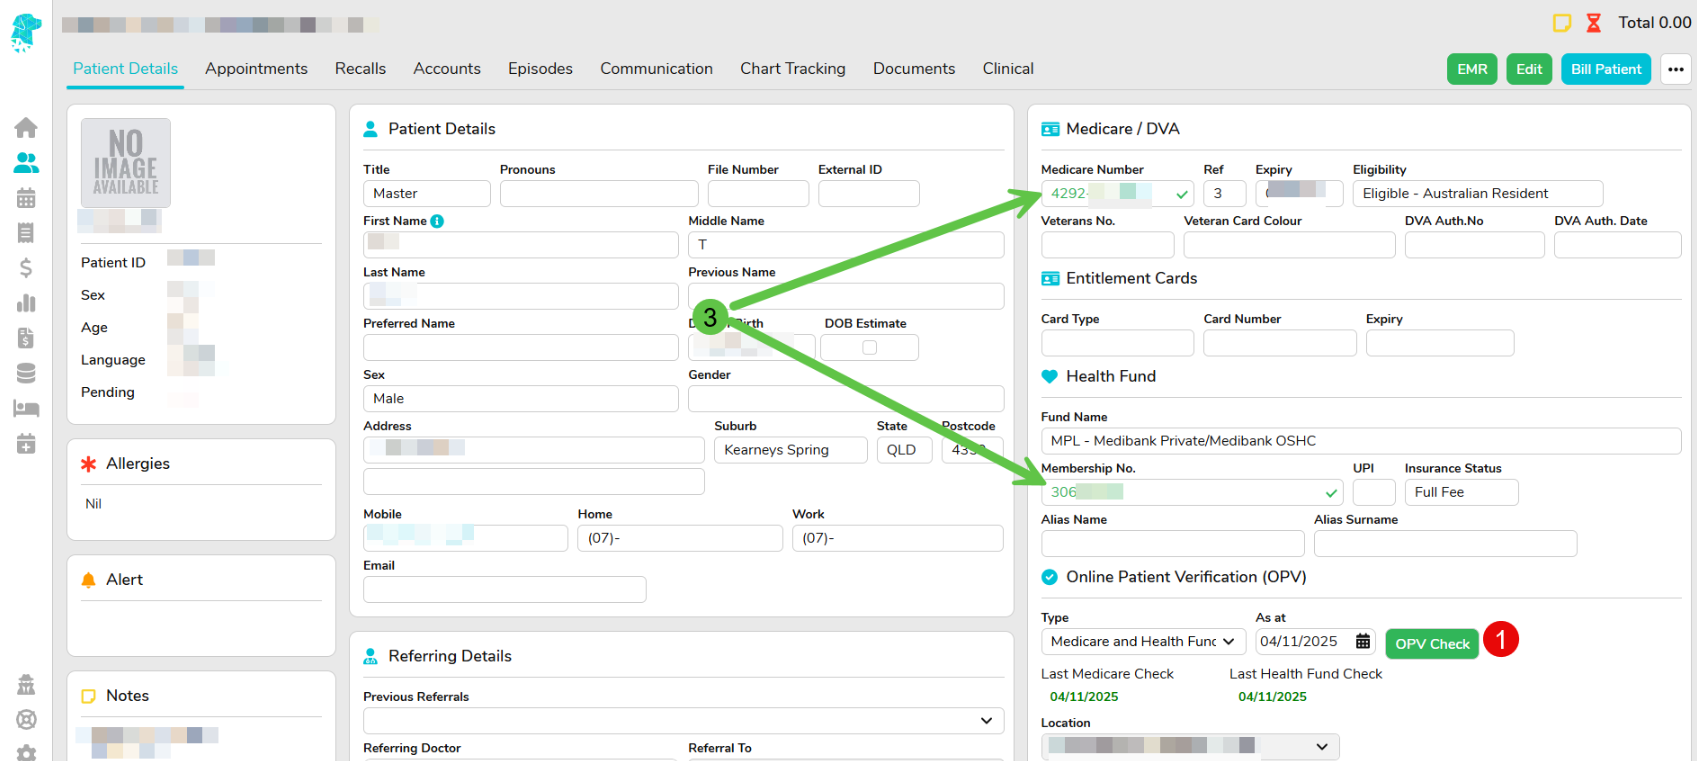
OPV checks can be performed from the Patient Screen, on the right-hand side in the Medicare/ health fund section, by clicking OPV Check
Before the OPV is successful, the Medicare Number field & the Health Fund Number field will appear in a red font with a cross.
Once the information has been successfully verified, it will appear with a Green Numbers and a tick, to indicate the information matches the records held by Medicare and/or the Health Fund
If the information isn’t able to be verified, a visual alert will be displayed, in the top right corner, of a red hourglass.
Hover over this icon to display a reason for the unsuccessful verification.
6. In some instances, the OPV will be able to identify the patient, even if the details are slightly incorrect. If this happens the Verification Issue icon will become visible & you will be able to hover over it for information regarding the check. Some examples of this would be: – Updating the patients’ first name. E.g. From Sam to SAMUEL – Updating the last digit of the Medicare Card. E.g. From 5 to 6 – Updating the Medicare Reference Number. E.g. From 1 to 4 This may result in needing to run the OPV Check a second time to verify the Health Fund details.
The OPV will automatically be performed when making a patient booking. As long as the relevant patient information is available, the check will run once you click Save, after completing the Appointment Screen
If the patients’ name varies from what Medicare has documented, to what the Health fund has, utilise the Alias Name field under the Health Fund section (as shown in image below). In order to successfully verify the details in this instance:
Enter the patients name, as it is shown on the Medicare Card, in the Patient Details section. FYDO has to have what Medicare has in this section.
Enter the patients name, as it is show on the Health Fund Card, in the Alias Name field
Run Checkagain
Online Eligibility Check – OEC (Hospital)
Performing an eligibility check with the patients’ health fund to ensure they will be covered for their admission
Running an OEC from a booking ensures that all the episode information is carried into the OEC (see “Making a Patient Booking” instructions to make an appointment). OEC’s can be done from the patient screen, however this will require more information to be entered & the excess & co-payment will not pre-populate as the OEC isn’t linked to a particular episode.
It is also advised that the Online Patient Verification (OPV) be performed before the OEC (see “OPV” instructions)
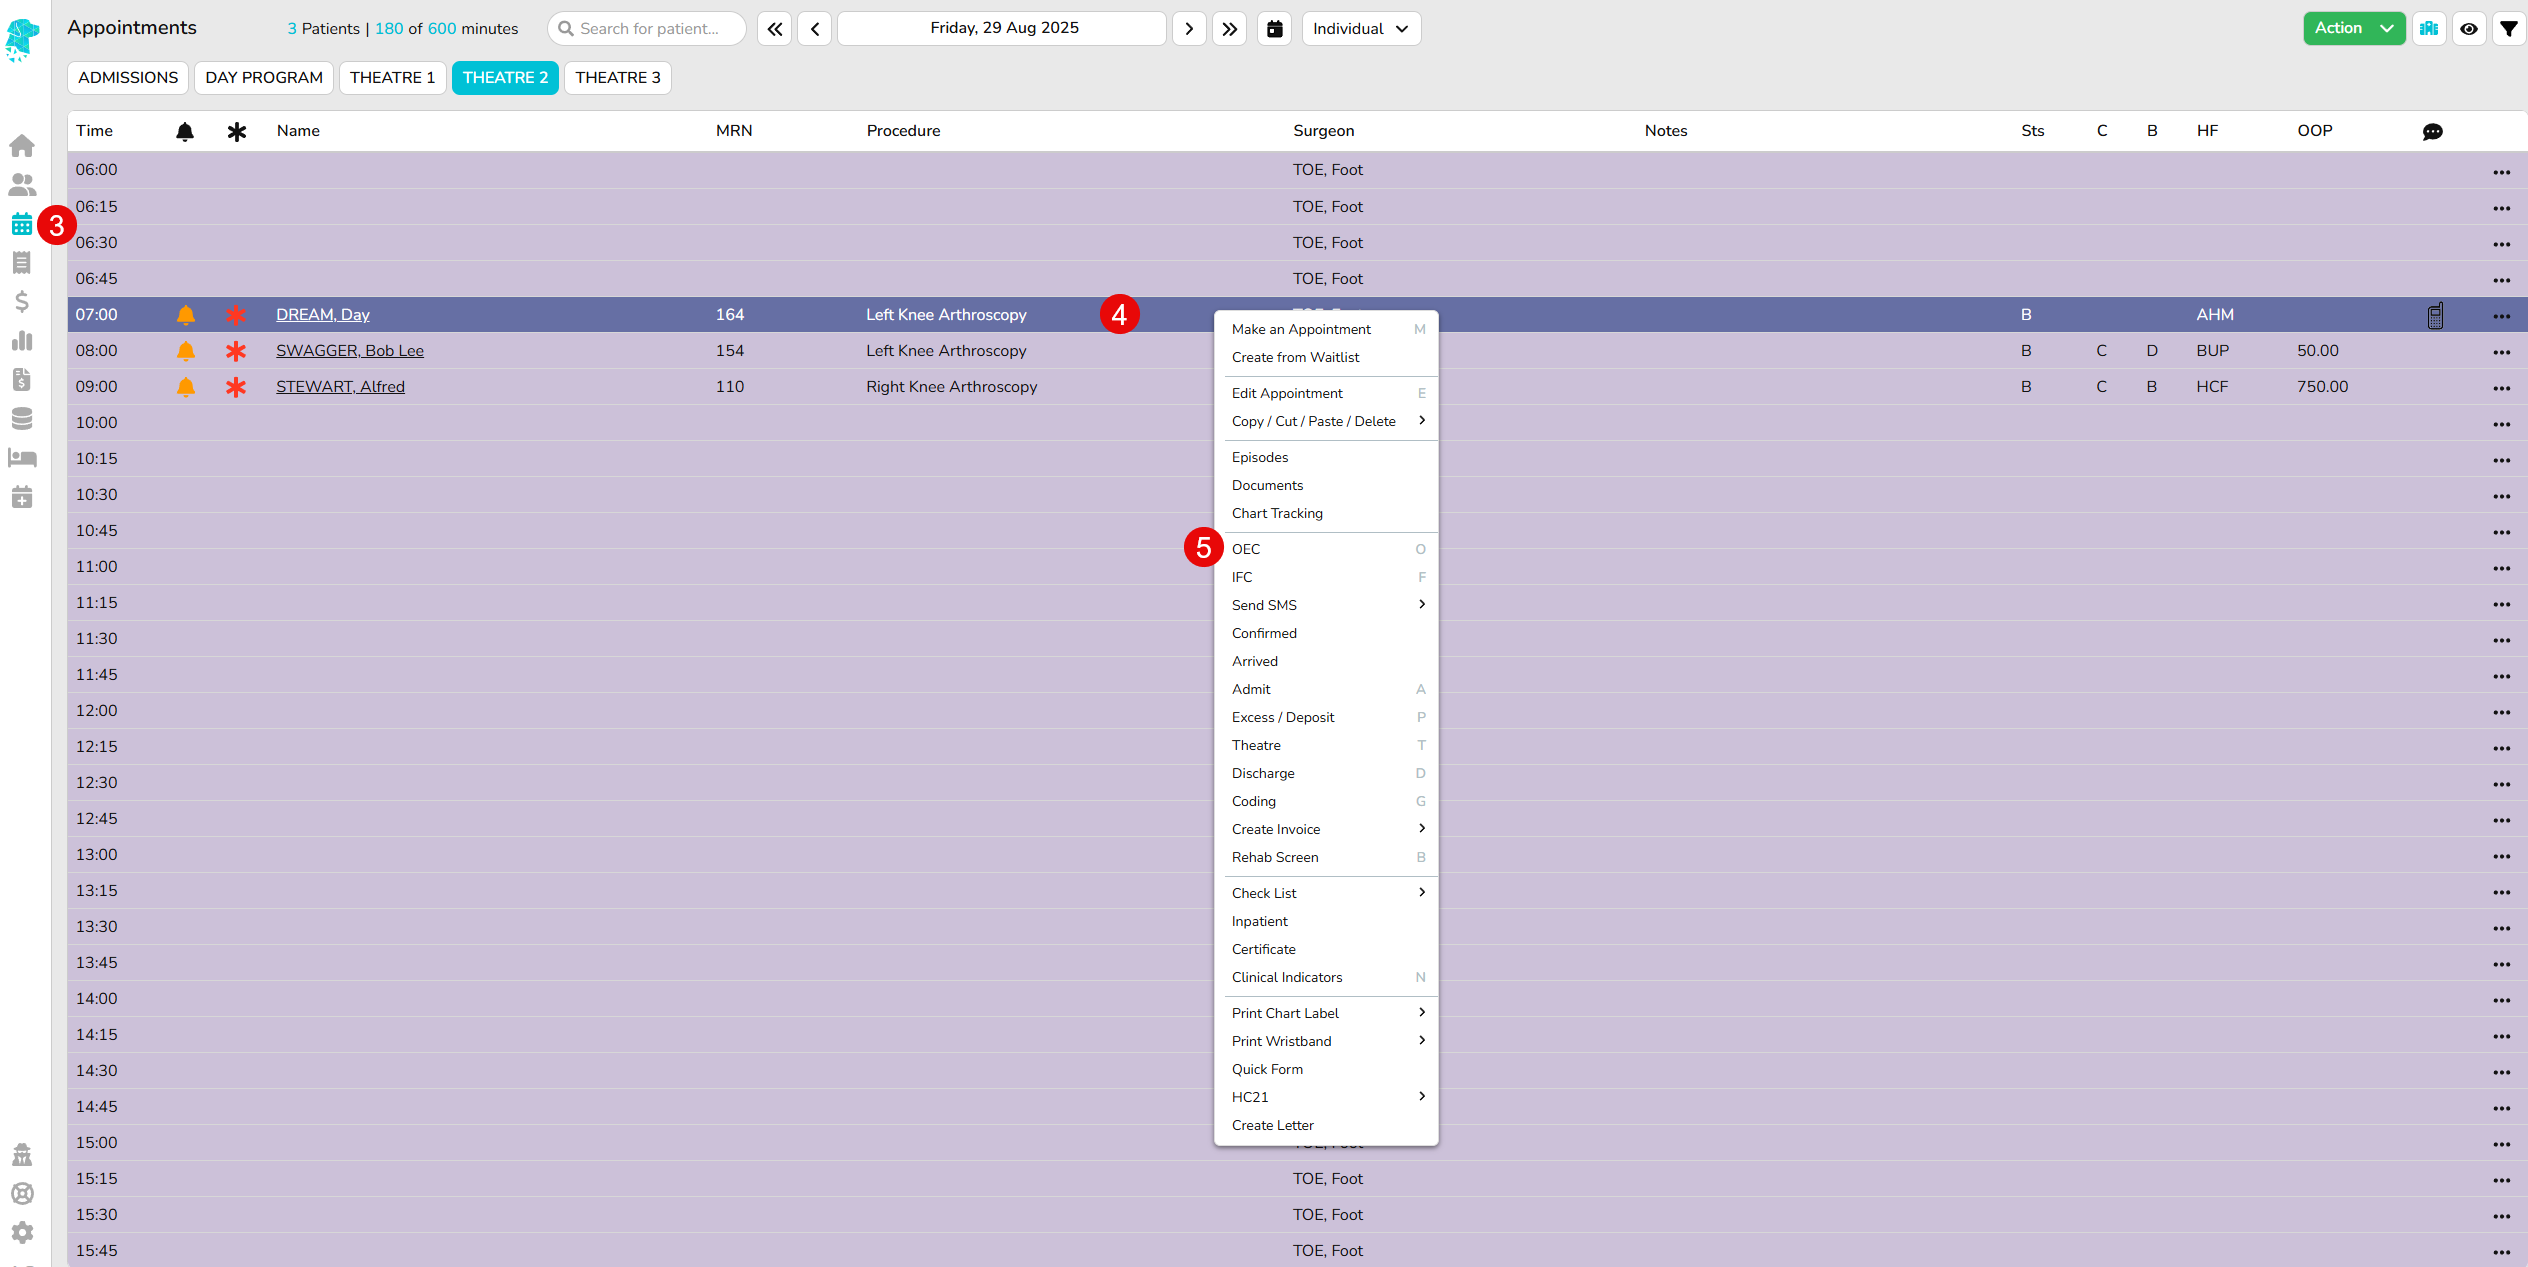
Navigate to the Appointments screen and locate the patient you wish to perform the eligibility check for
Right click on the patient to expand the menu
Select OEC
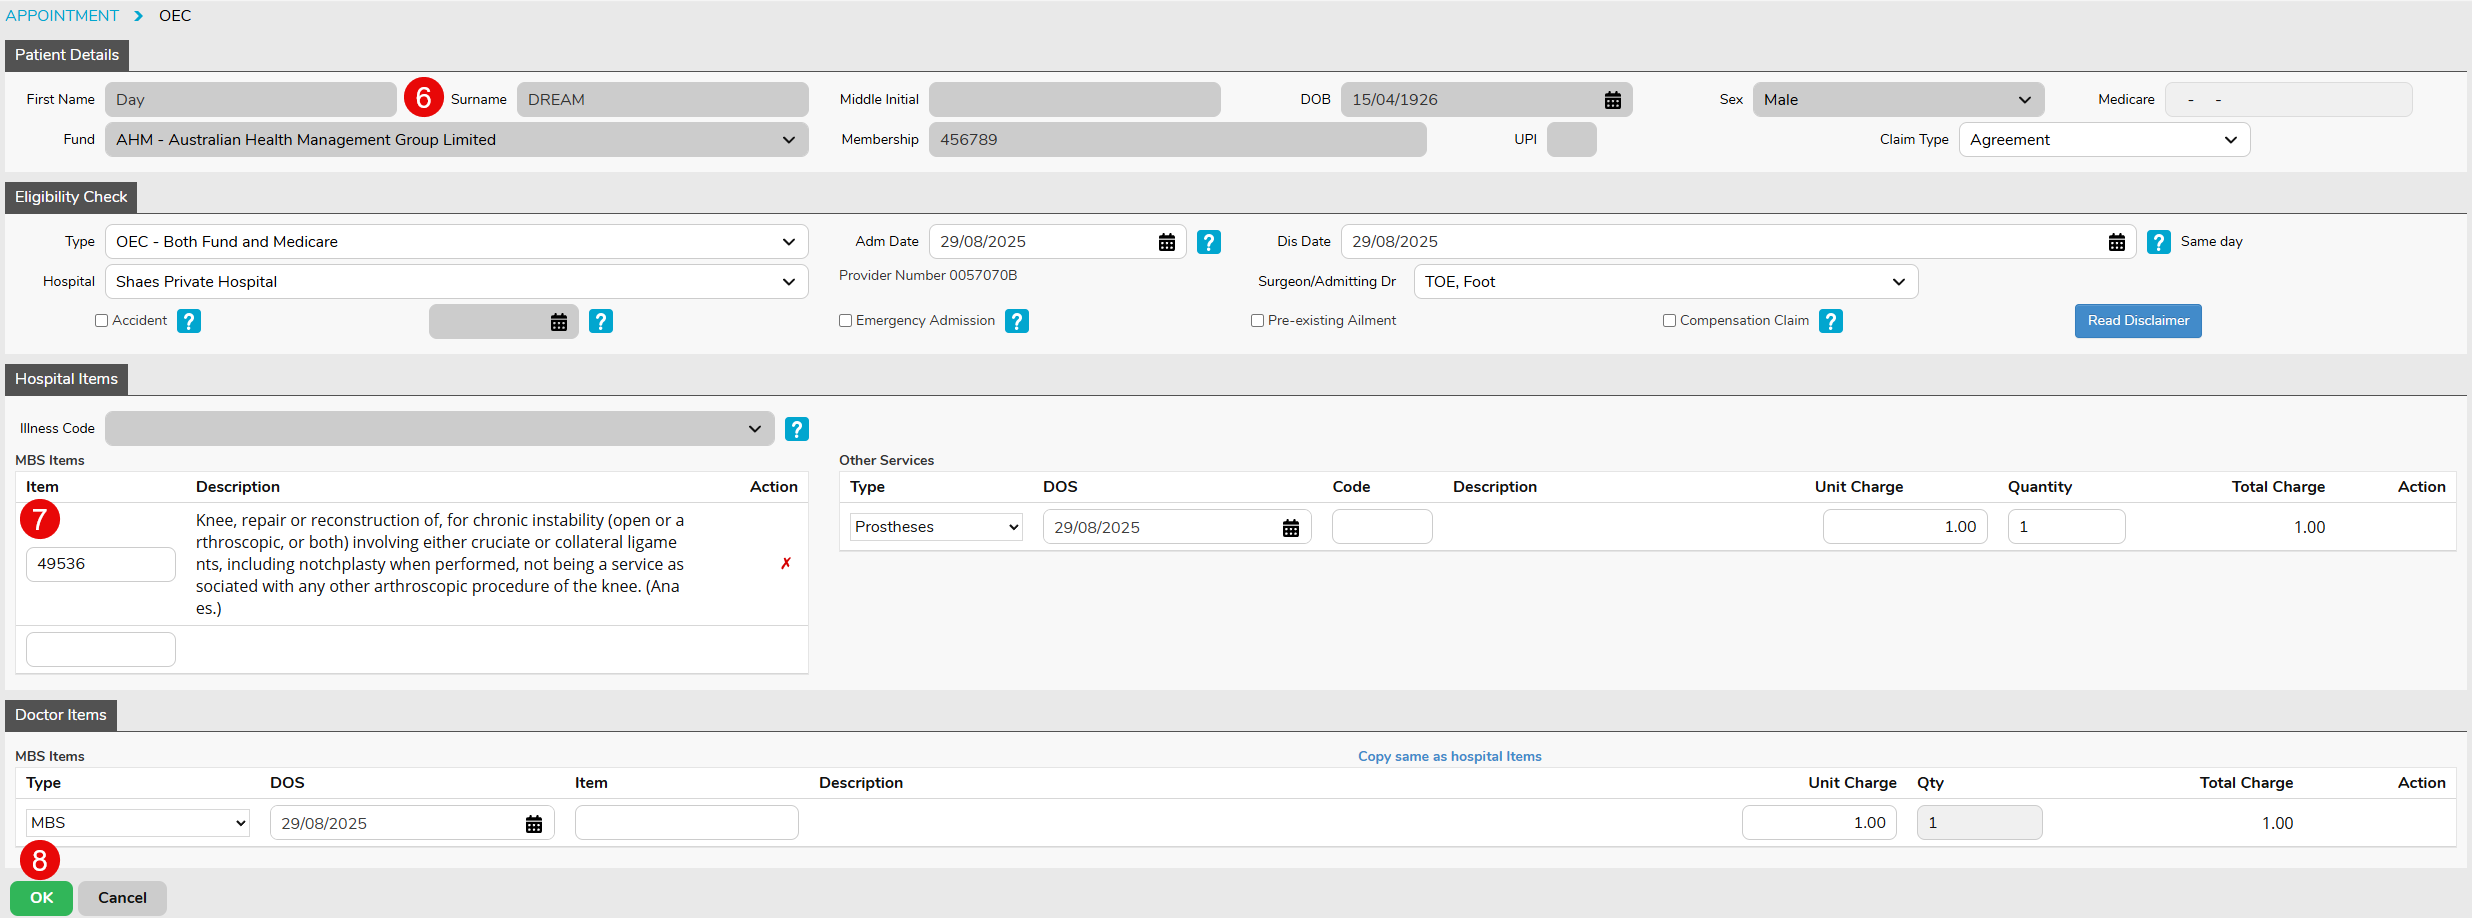
The OEC screen will open & the patient & appointment details will be populated with the information already entered into the system
If you have entered the predicted item numbers, when booking the patient, they will be carried over into the OEC screen & you will not need to enter them again. For procedures that do not have a specific MBS (e.g. dental procedures) ensure any fund specific items are removed, and the Illness Code field is then activated to allow checks to be performed for particular procedure types.
Click OKand a check will be performed on each item number that is entered. The check will be saved in the patient’s Documents, when it is returned by the health fund, where it can be previewed & printed if required
Click OK and Print to have the health fund check appear on the screen to preview straight away & print if required. (NB this function will only work if the health fund returns the information in a timely manner. Otherwise, it will be filed in the patients’ Documents when it is returned)
Information returned will include:
Patient Information
Assessment & Explanation
Admission details as entered to perform check
Financial Status of the cover
Pre-Existing status of the cover
Illness code/Item number that check was performed for
Excess amount
Co-Payment amount
Level of cover name
Level of cover description
Benefit limitations
Exclusions
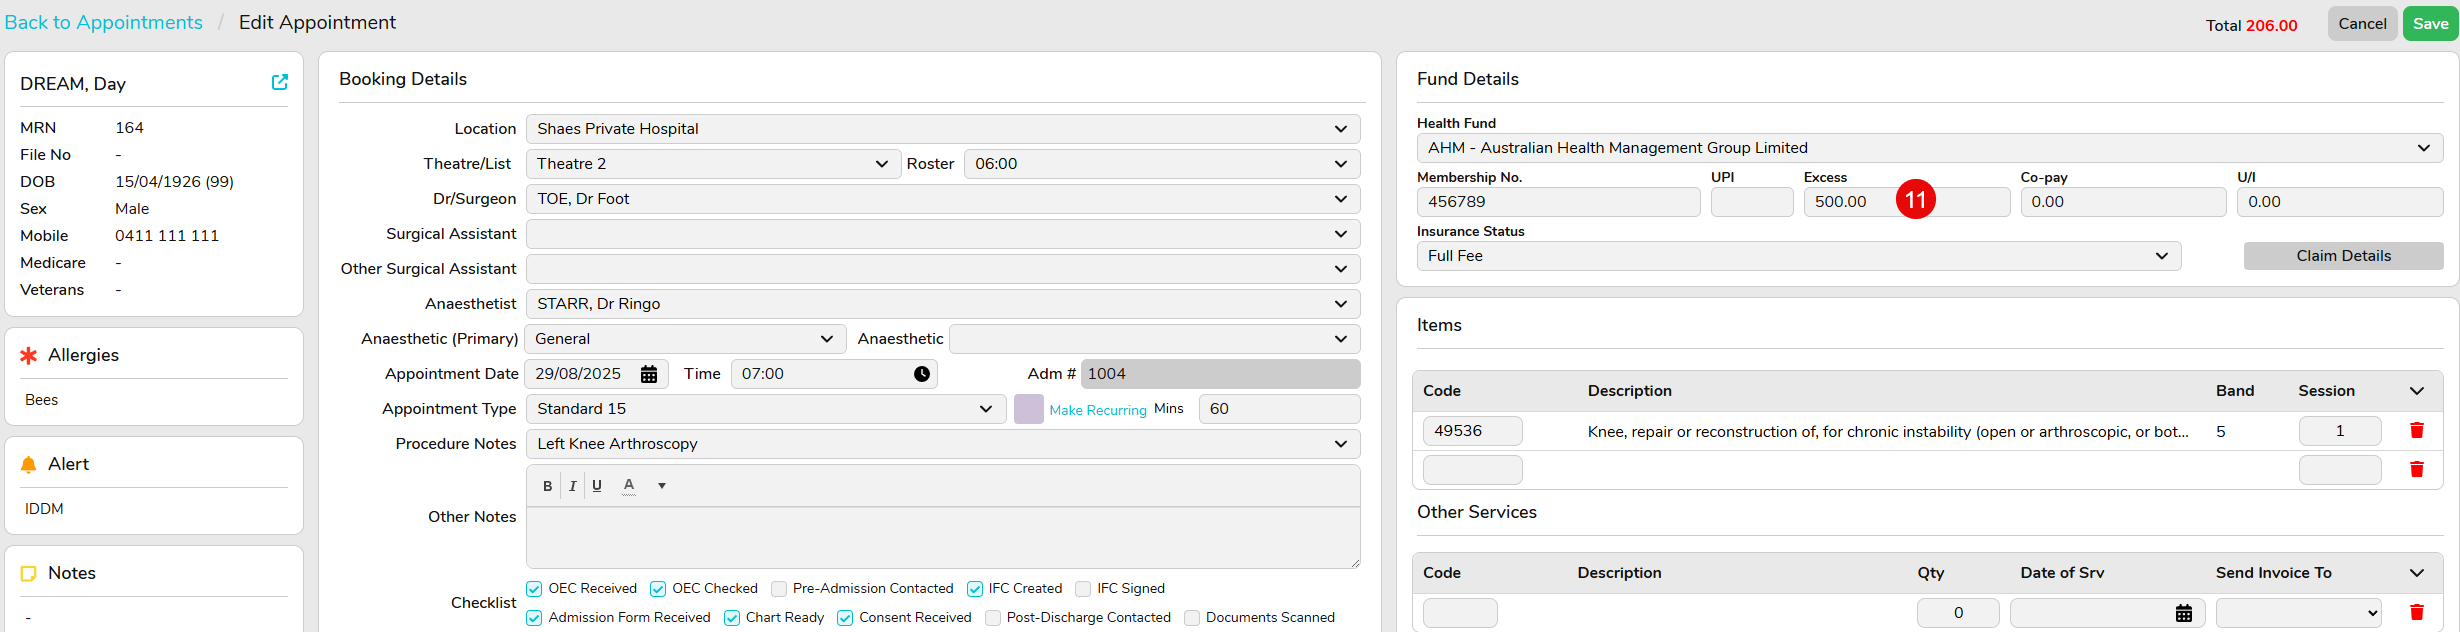
Excess amount & Co-Payment amount will automatically populate in the patient appointment, as long as it has been returned in the correct format from the health fund. If the information hasn’t automatically populated, & needs to be manually entered, this can be done by:
Selecting the required booking
Right click & select Edit Episode
Fill in the required amounts in the Excess & Co-Pay fields in the top right of the screen
Click Save
Carefully read all information returned by the fund to determine eligibility for admission. Including descriptions, benefit limitations & exclusions
Move a Patient Appointment Time (Hospital)
If a patients admission time changes, there are numerous ways to amend. Any one of the below options will work (you do not have to do ALL of these options in order)
Select the patient, click, hold & drag their booking to the new admission time
Right-Click and select Edit Appointment. Type the new appointment time in the Time field & click Save
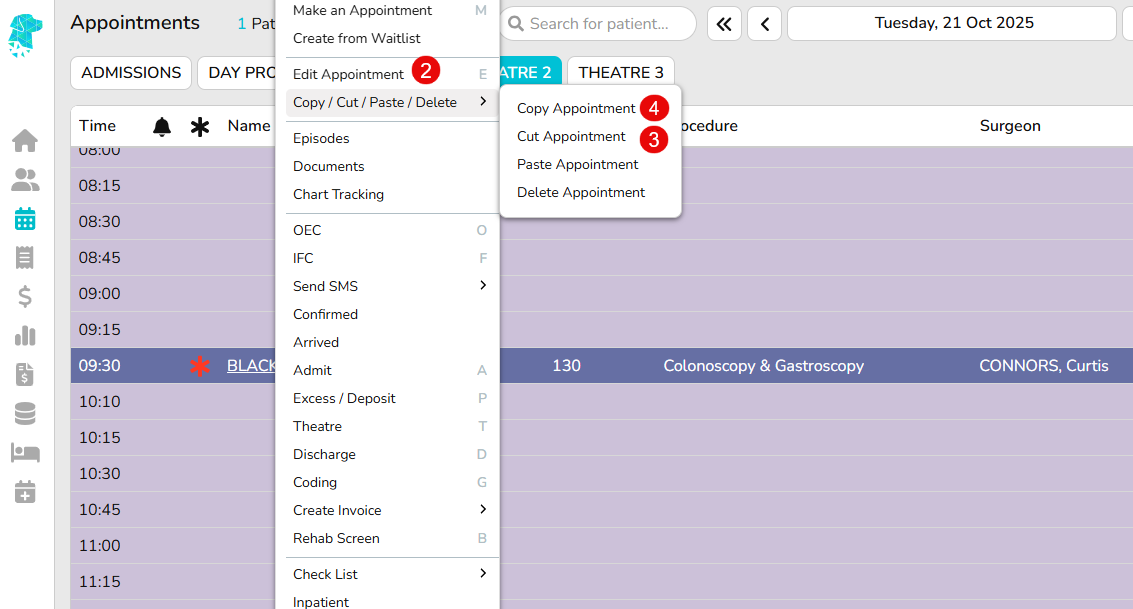
Right-Click and hover over Copy/Cut/Paste/Delete Select Cut Appointment Click on the new appointment time, Right-Click and hover over Copy/Cut/Paste/Delete Select Paste Appointment Once the Edit Appointment screen appears, select Save.
To copy a booking select the appropriate booking Right-Click and hover over Copy/Cut/Paste/Delete Select Copy Appointment Select the desired appointment date & time for the duplicate Right-Click and again hover over Copy/Cut/Paste/Delete Select Paste Appointment.
Making a Patient Hospital Booking
After creating a Theatre Roster patients can be booked.
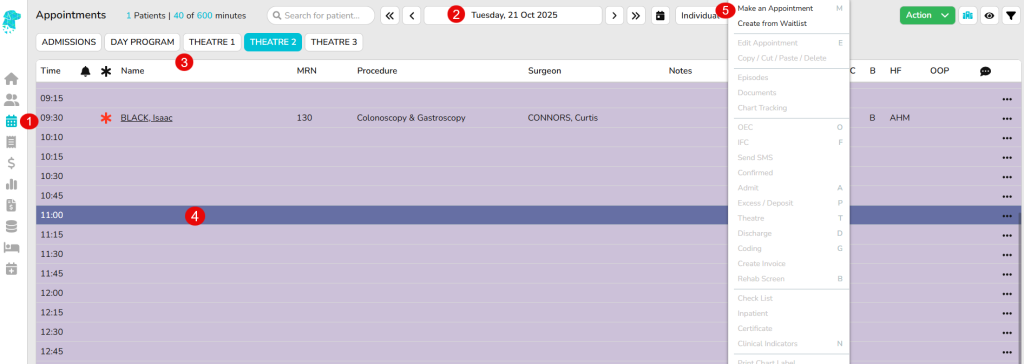
Select Appointments from the main menu
Select Date that the booking is required to be made
Select Theatre where booking will be made
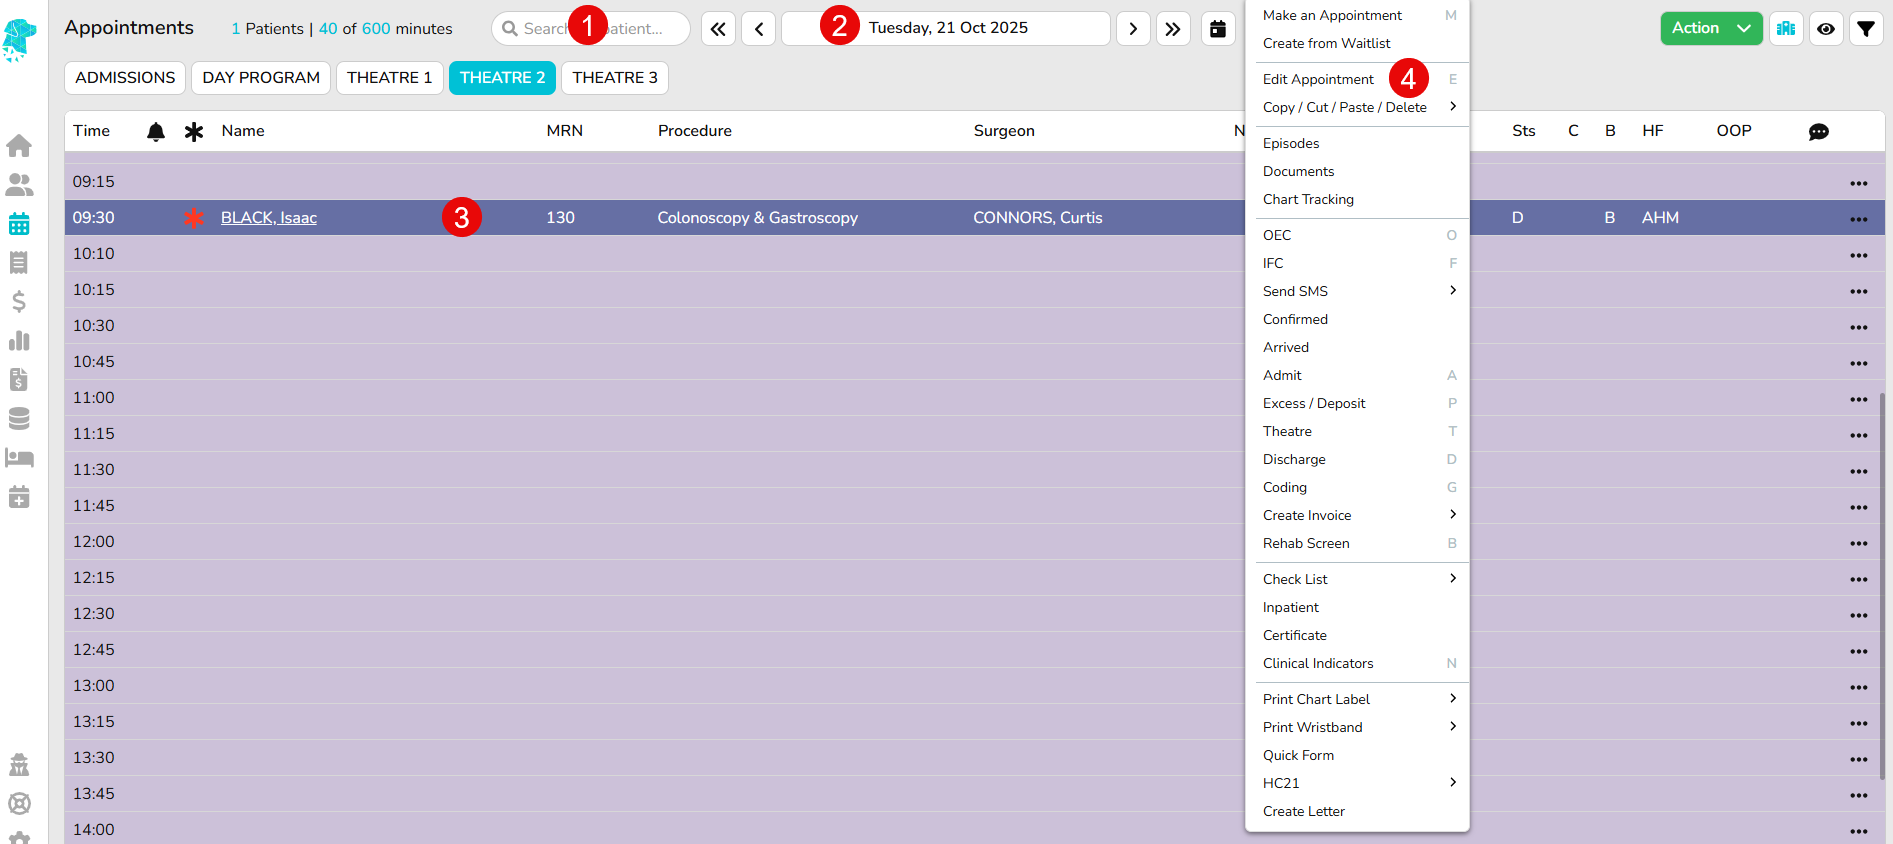
Select Time the booking will be made. Then Right-Click on this time slot to display options
Select Make an Appointment from the right-click menu
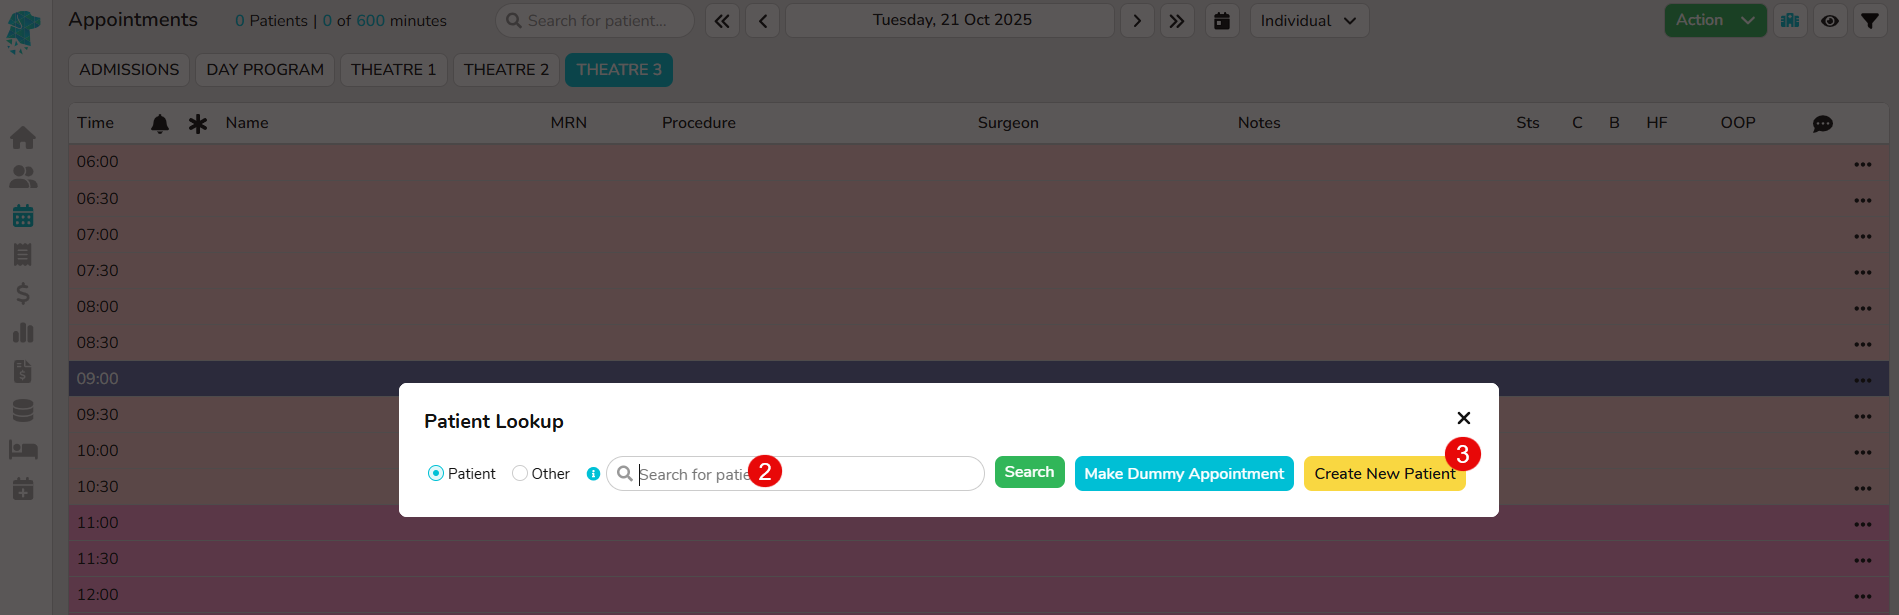
The Patient Lookup screen will be displayed to search for the required patient
Select a patient from the list displayed, or click Create New Patient if the patient isn’t shown
If Create New Patient was selected, input all known patient data & click Save
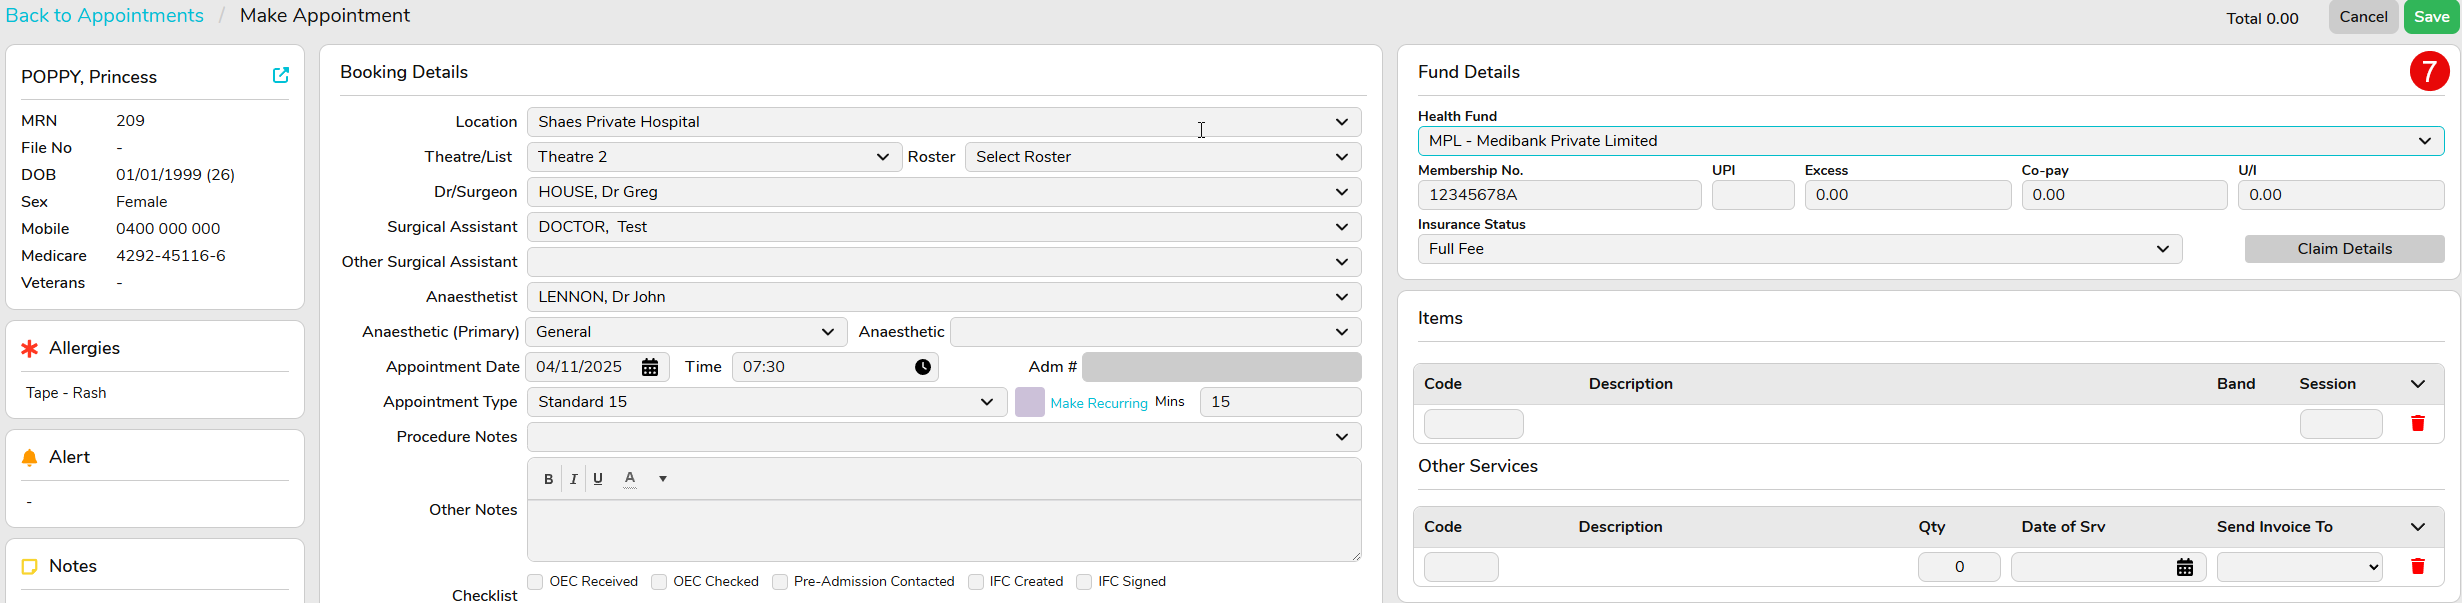
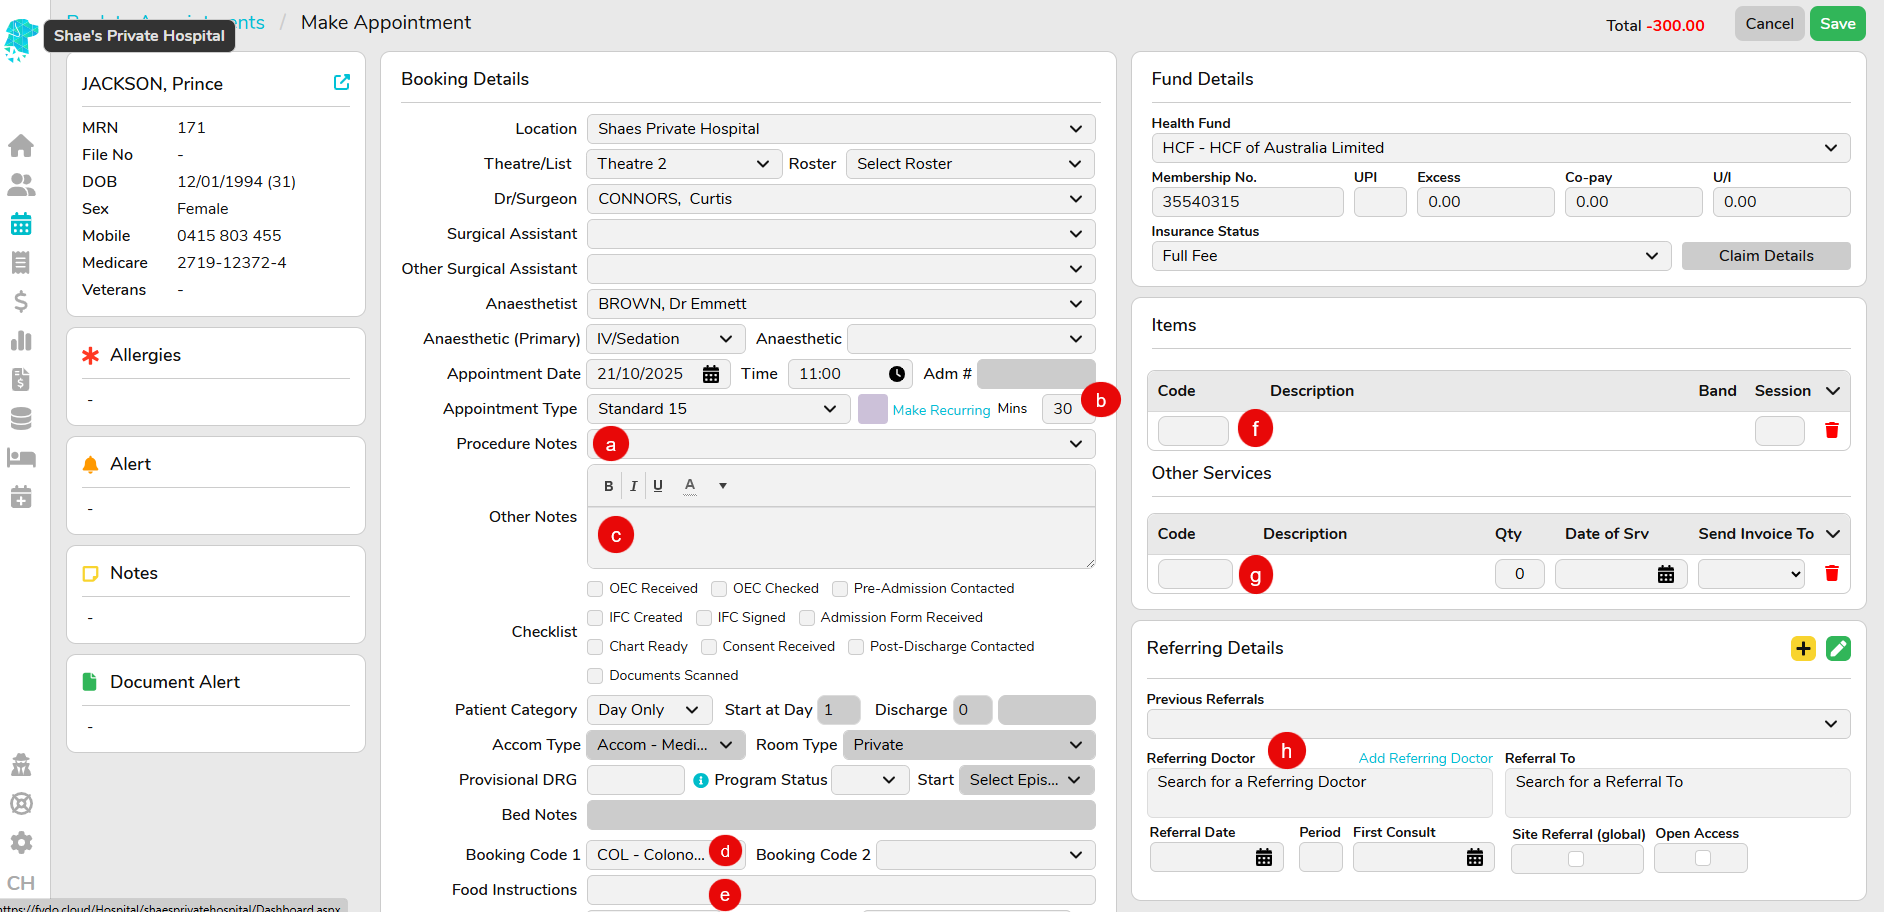
If a patient was selected in Step 7 (or after the new patient details have been saved) the Make Appointment screen will automatically open
Information relating to the theatre, surgeon, anaesthetist, appointment time etc will pre-populate if a Theatre Roster has already been entered into the system
Add information required according to your facility work instructions. For example:
Procedure Notes
Length of Booking
Other Notes
Booking Code 1
Food Instructions
Item Numbers
Other Services Codes
Referring Doctor
Click Save
Informed Financial Consent – IFC (Hospital)
To provide patients’ with information they can understand regarding the costs involved with their admission/episode
Before an IFC is generated it is advised to run an Online Eligibility Check (OEC) to obtain the out-of-pocket expense for the patient (see “OEC – Online Eligibility Check” instructions)
Once the out-of-pocket cost is known, the IFC can be generated from the Appointments Screen
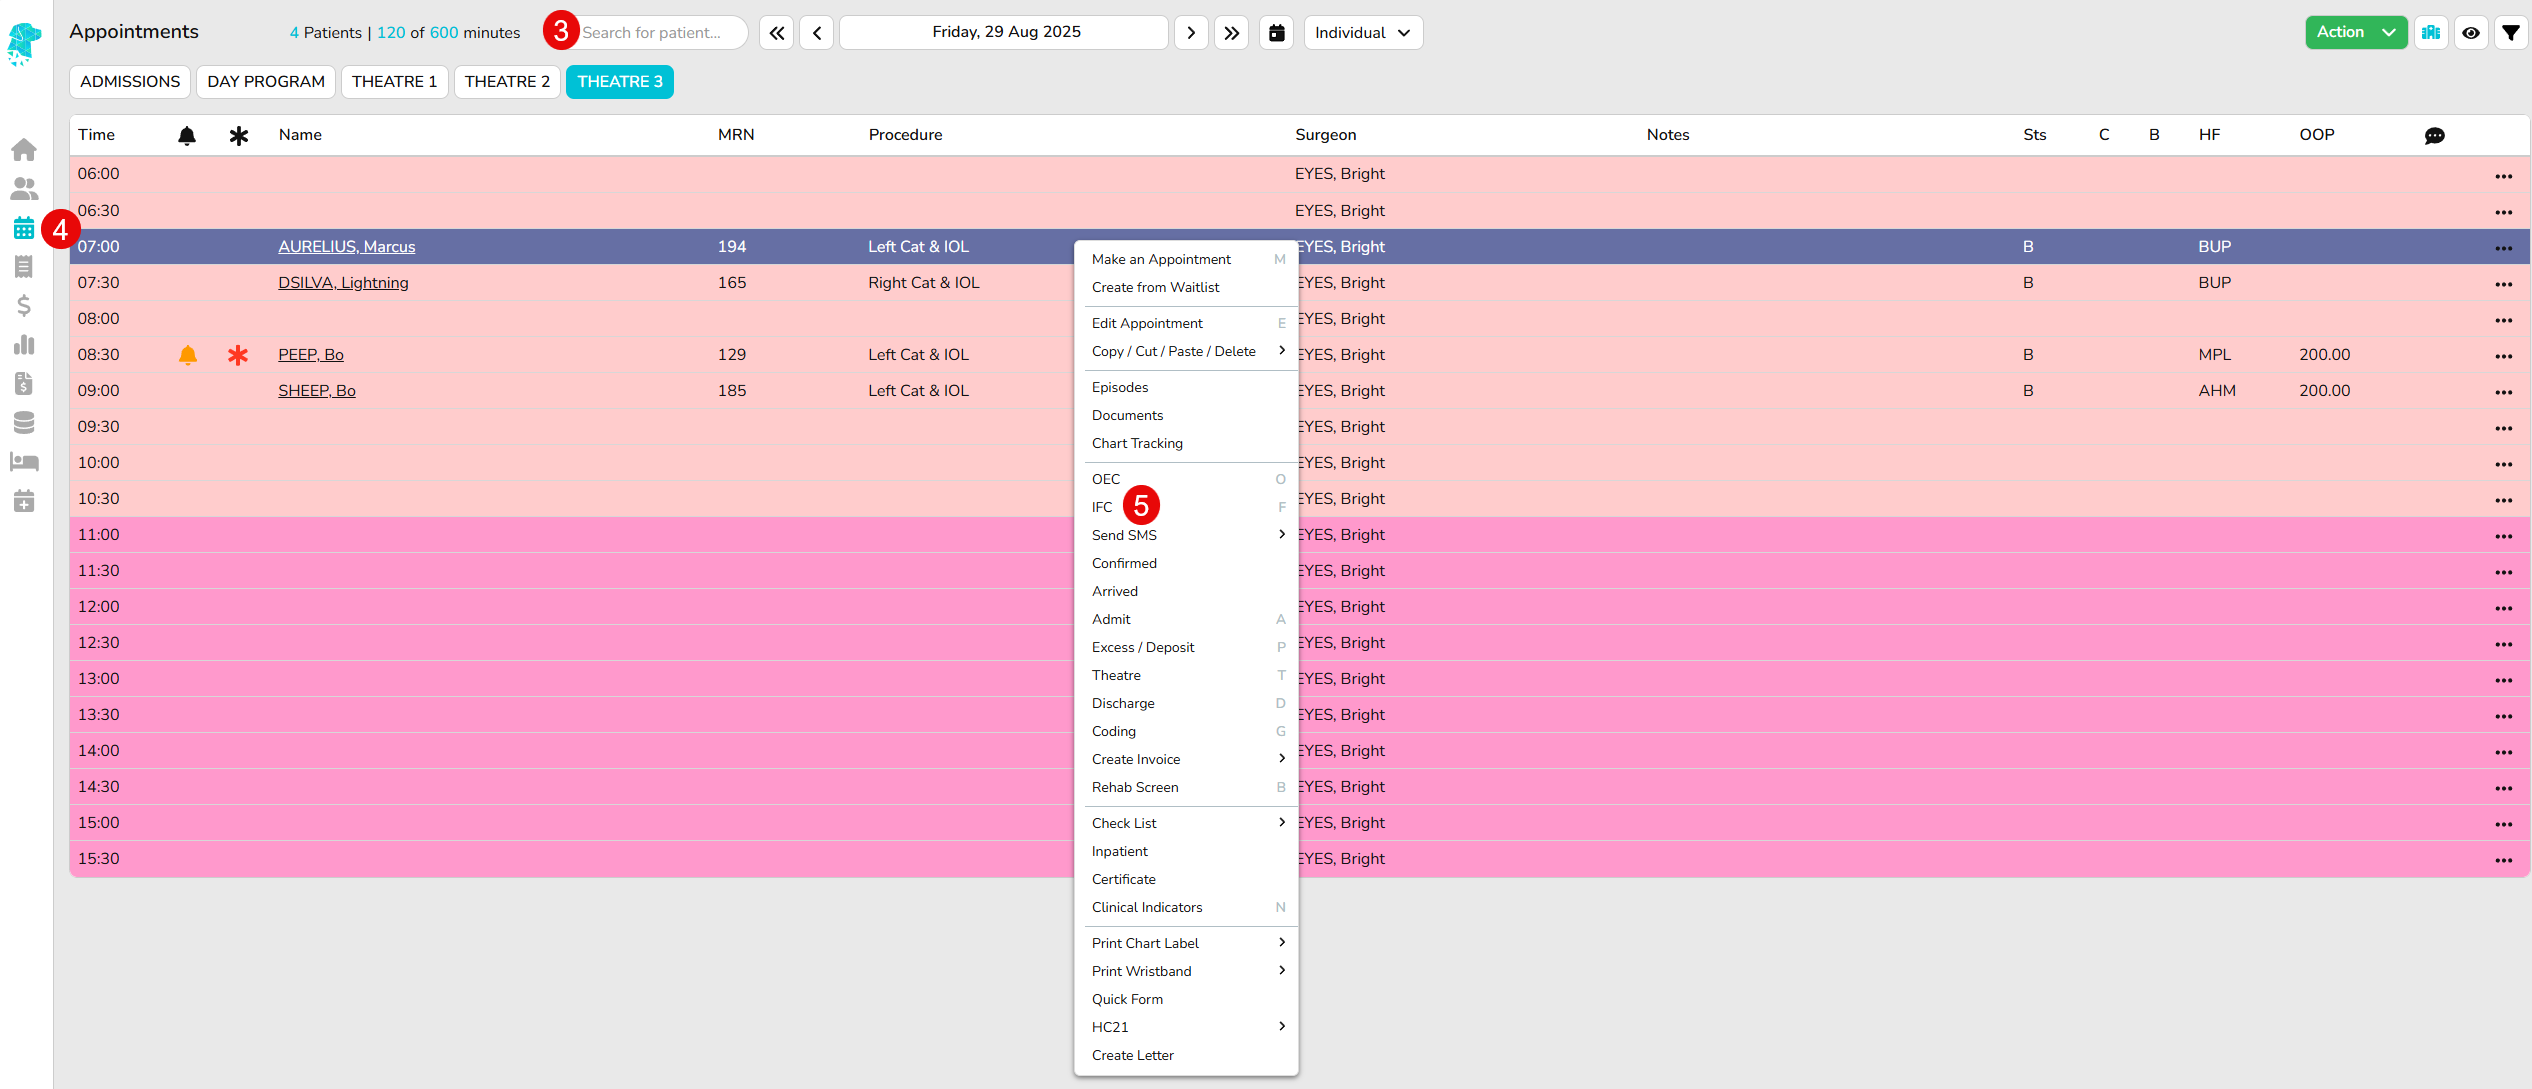
Search for the required patient or
Navigate to the admission date, theatre & time to locate
Right click to expand the options & select IFC
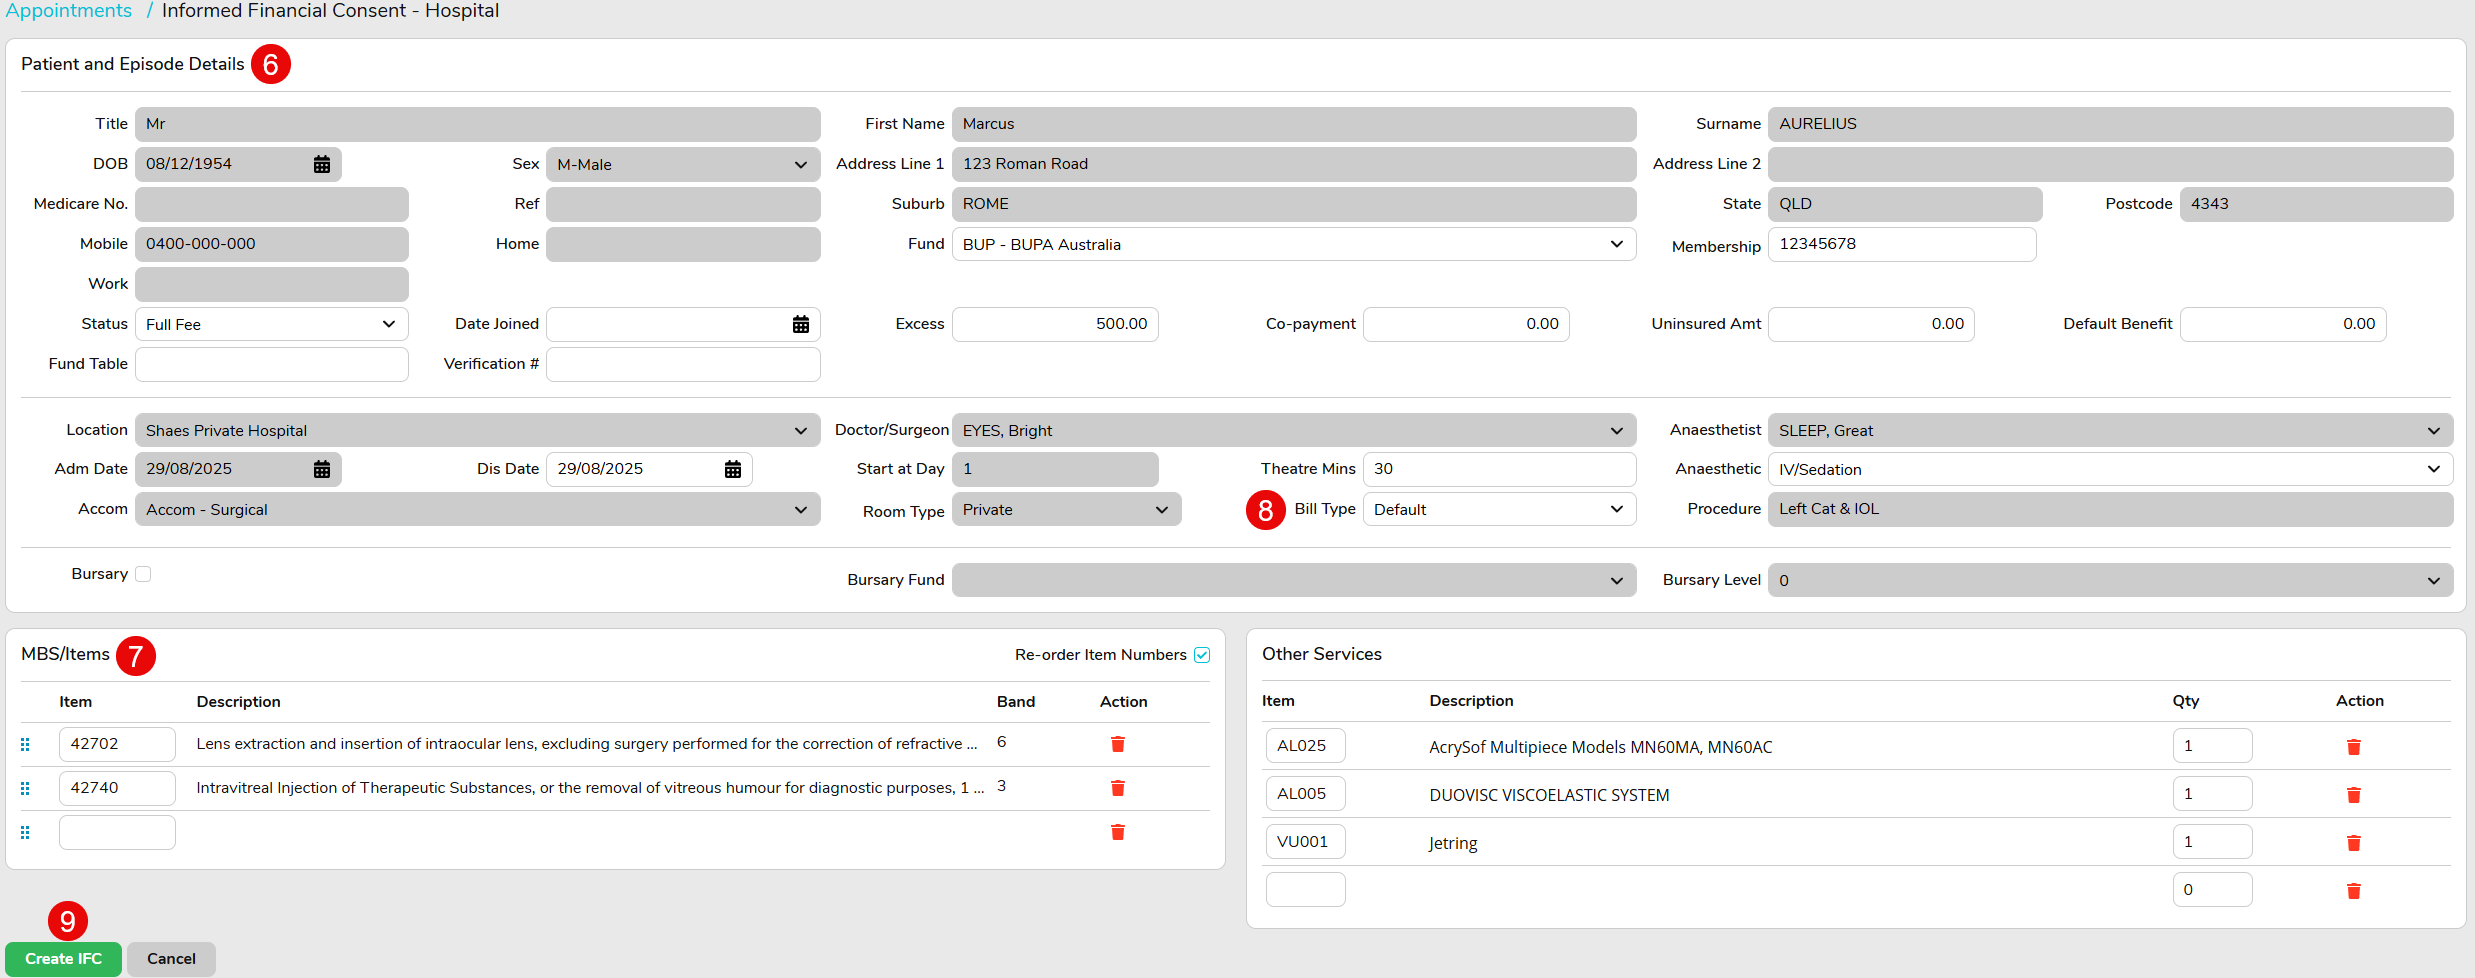
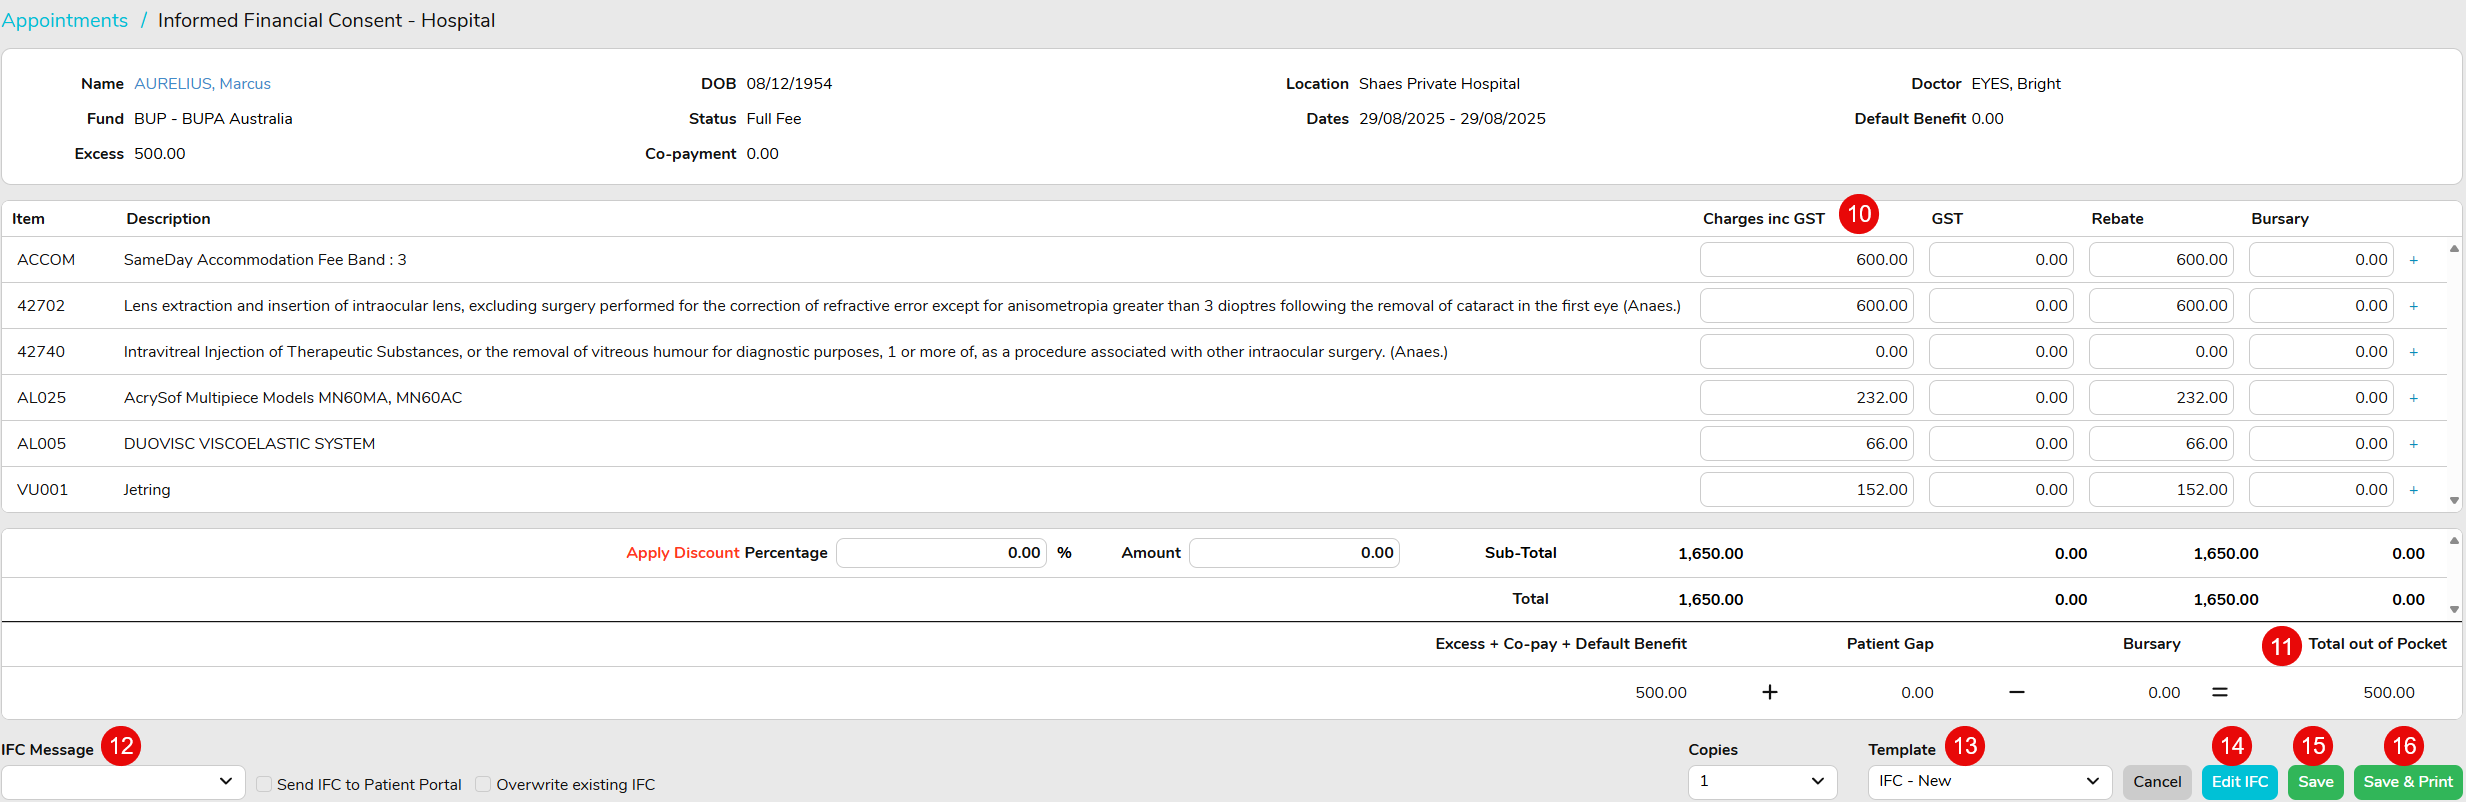
Patient & admission details will be pre-populated into the IFC screen
If Item numbers were entered at the time of booking, they will be pre-populated into the IFC screen. Otherwise add them under the MBS/Items heading
Leaving the Bill Type set to Default will allow FYDO to decide how the fees need to be raise, in accordance with the health fund contracts entered into the system
Click Create IFCto see the charges raised for each item
Contracted fees will be displayed
Patient out of pocket will be displayed
IFC Message gives the ability to add a customised message. Use the dropdown to select Custom Message & type the message in the field below
The Template field allows you to choose from the available IFC templates in your FYDO database. FYDO enables hospitals to set a default IFC template for both insured and uninsured admissions. AS a result, the Template dropdown will display options based on the patient’s health fund. – If the patient has a health fund, the Template dropdown will show the insured templates available in FYDO. – If the patient is uninsured – or if their health fund is categorised as uninsured in the FYDO database – the Template dropdown will display the uninsured templates added to FYDO.
Edit IFC allows you to return to the previous screen to make any changes require to the item numbers etc.
Savewill generate the IFC & save a copy in the patient Documents
Save & Print will generate the IFC & make it immediately available to view & print. This option will also save a copy in the patients’ Documents
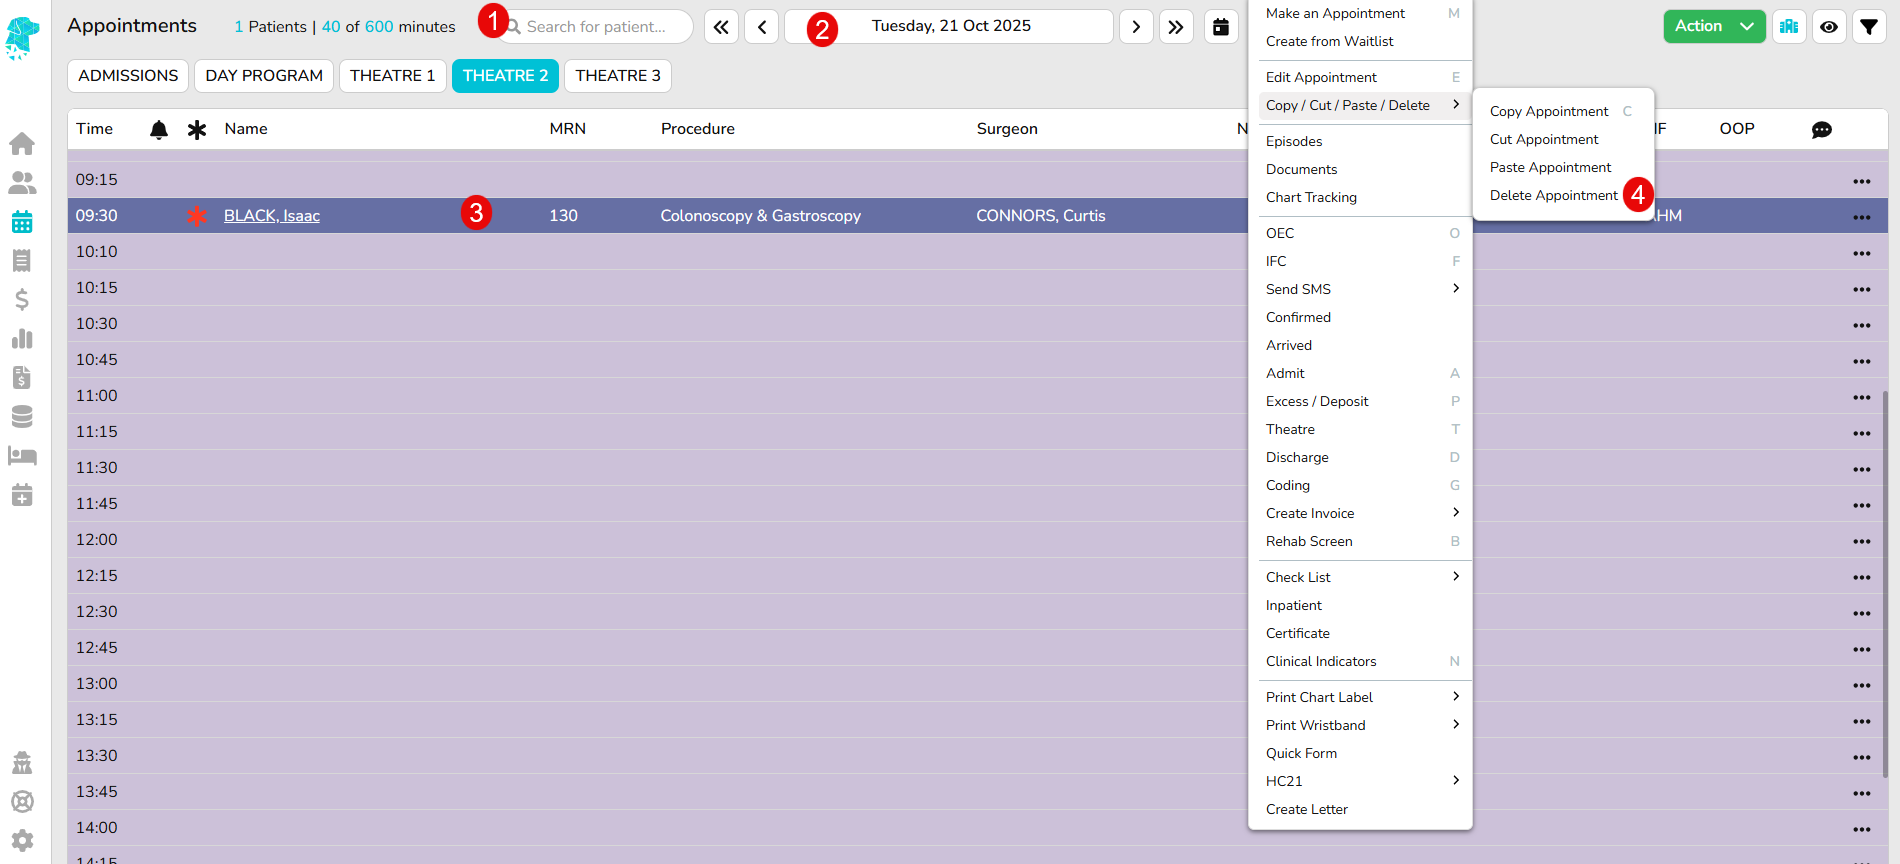
Delete a Hospital Booking
If an appointment is required to be removed from the system
Search for the patient OR
Navigate to the date & theatre that the patient is booked for
Select the patient & right click to open menu
Select Copy/Cut/Paste/Delete and then select Delete Appointment
You will be prompted to confirm that you are sure you want to delete the appointment
Click Yes
This action is permanent & is not advised if you are required to collate data on cancelled bookings. If statistical information on the cancellation is required, then please see instructions on how to Cancel a Booking at https://wiki.fydo.cloud/cancel-a-booking/
Create a New Patient (Hospital)
There are several ways to do this, but the most common method is during the appointment booking process.
Once you have navigated to the date & time for the appointment, right click & select Make an Appointment
This will open up the Patient Lookup box where you are able to search for the desired patient
If you are unable to locate the patient click the Create New Patient button
You are required to add a minimum of First & Last Name and all other fields are optional when initially adding a patient (but be aware that certain fields may be required, once the patient is admitted, for reporting purposes)
Once all desired information is entered click Save
The appointment screen will then open to add all required information for that particular booking
Patients are also able to be added without having an appointment scheduled.
Select the Patients tab from the left main menu
Search to see if the patient is already entered into the system
If they have not previously been added, click Create Patient
You are required to add a minimum of First & Last Name and all other fields are optional when initially adding a patient (but be aware that certain fields may be required, once the patient is admitted, for reporting purposes)
Once all desired information is entered click Save
Cancel a Hospital Booking
If a patient cancels their appointment
Search for the patient OR
Navigate to the date & theatre that the patient is booked for
Select the patient & right click to open menu
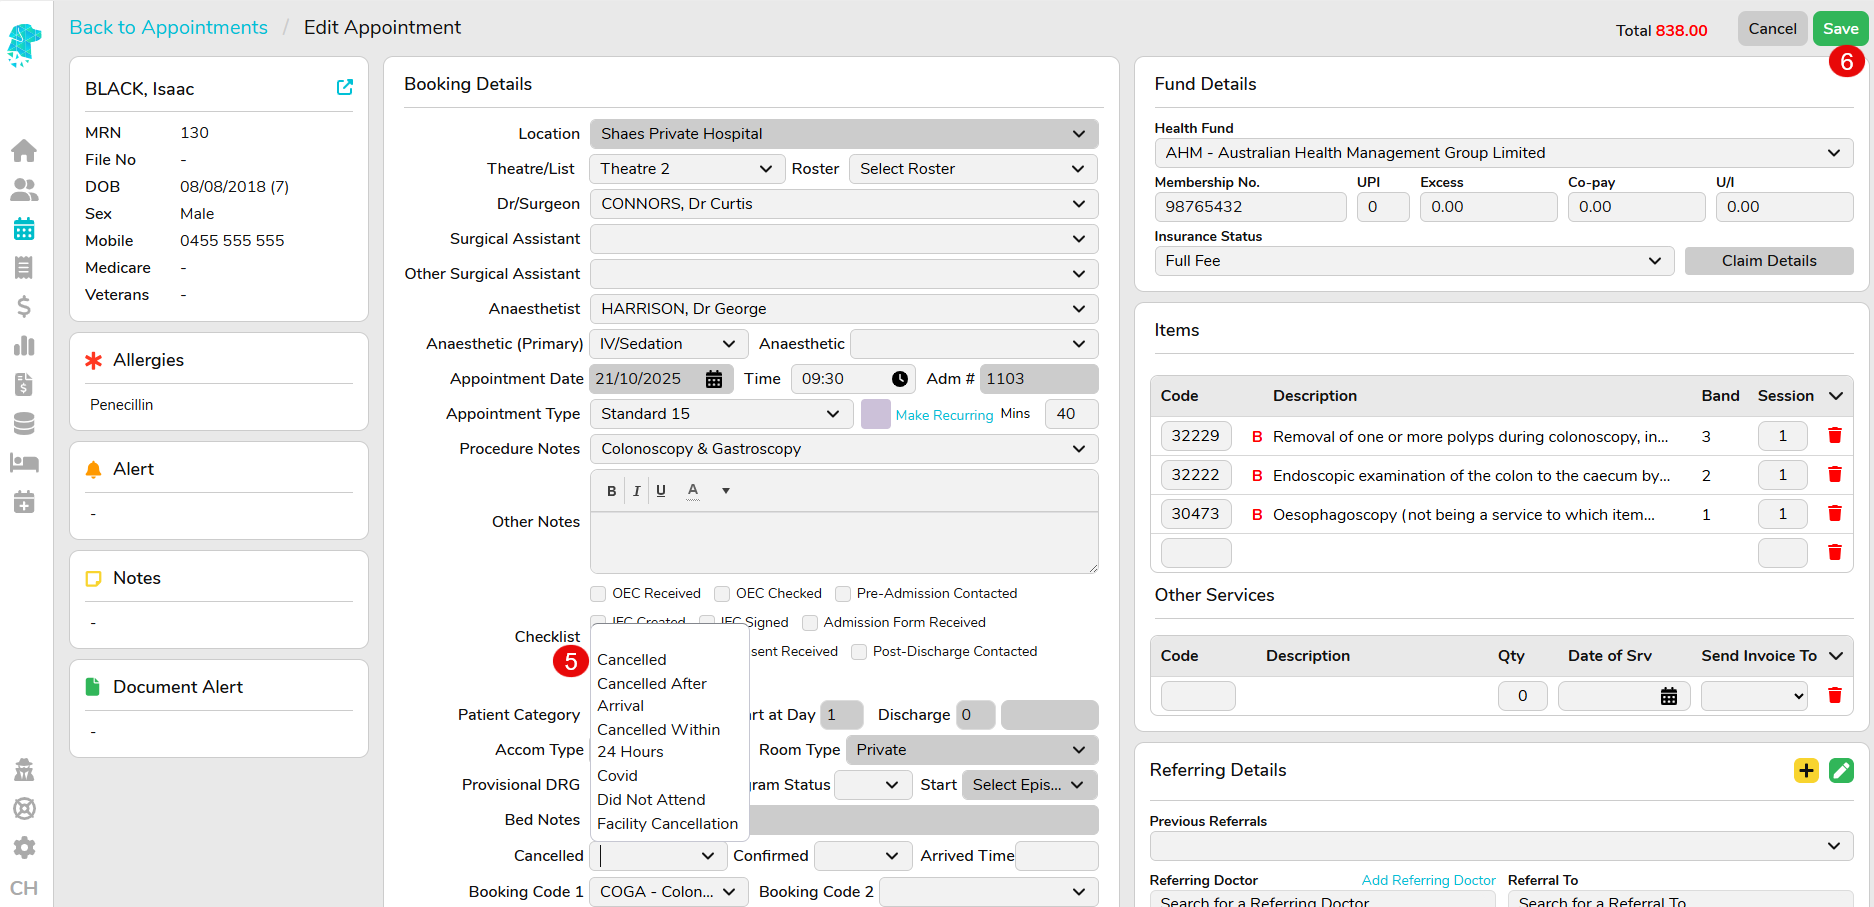
Select Edit Episode
Use the Cancelled drop down to select a reason for cancellation (N.B these cancelled reasons are fully customisable & can be added or edited in Setting under the Cancelled Reasons option to assist facilities obtain the cancellation data that they require)
Click Save
The patient will now be displayed with a strikethrough & the appointment time will be available to book another patient
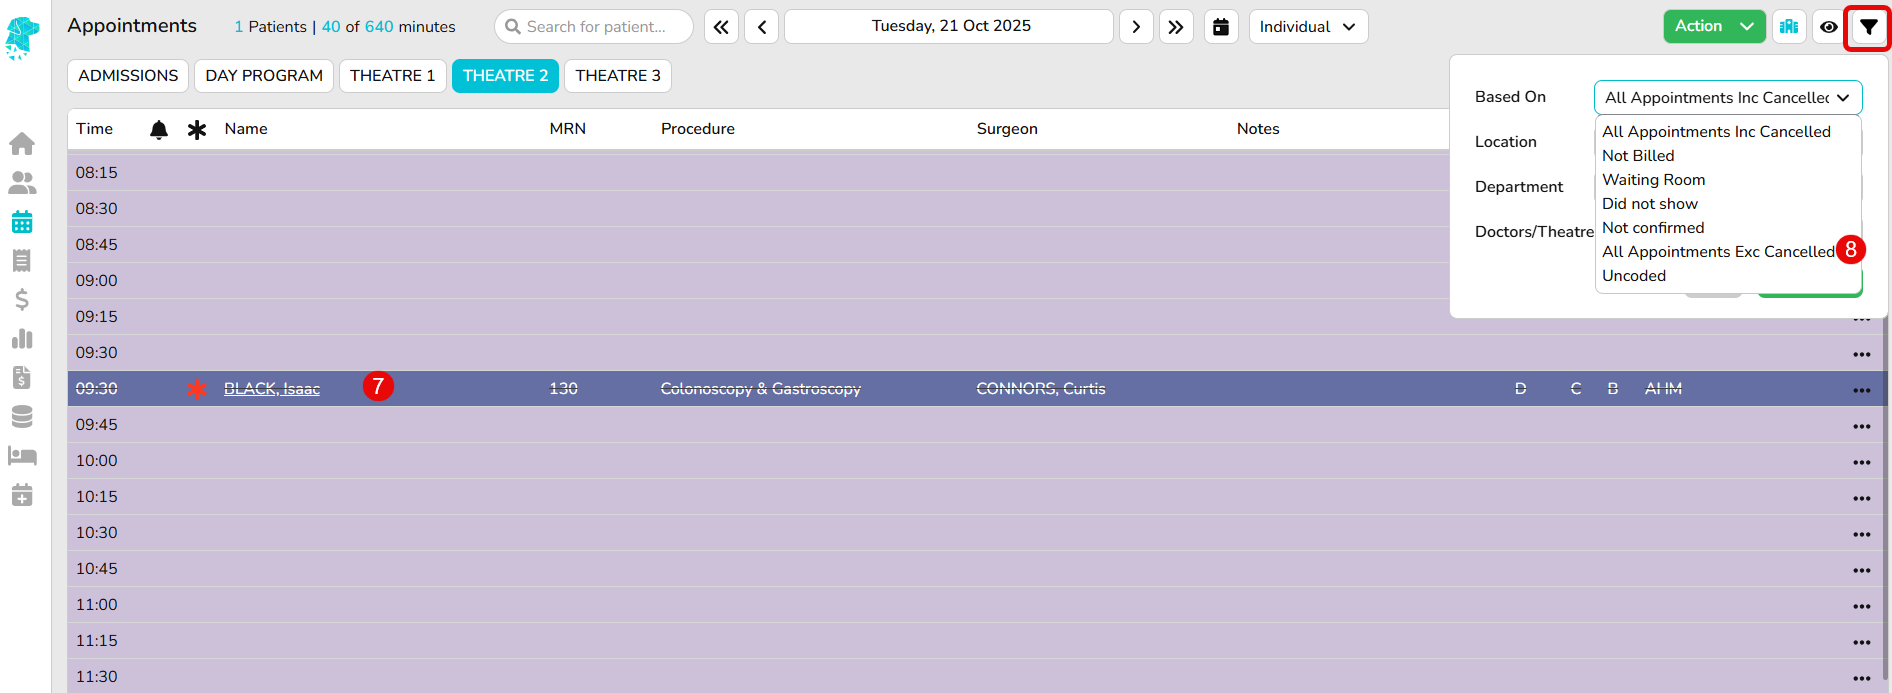
To view your screen without the cancelled patients, use the Filter Dropdown Based On and select All Appointments Exc Cancelled
To view the cancelled patients ensure you select All Appointments Inc Cancelled from the Filter Dropdown
To reinstate an appointment, follow the above steps 1 > 4 and remove the cancellation reason from the episode before clicking Save
Options for dealing with cancelled patients
Depending on how far a patient is along their journey, there are different ways to handle a cancelled episode. For example, a patient who cancels before arriving at the facility will need to be handled differently than one who cancelled after admission. The facility should determine the most appropriate option for each individual scenario. Below are a few options for processing these cases in FYDO:
Option 1 If the patient did not arrive at the facility and was not admitted, the standard cancellation instructions above will apply. The episode will not be admitted and will simply be cancelled.
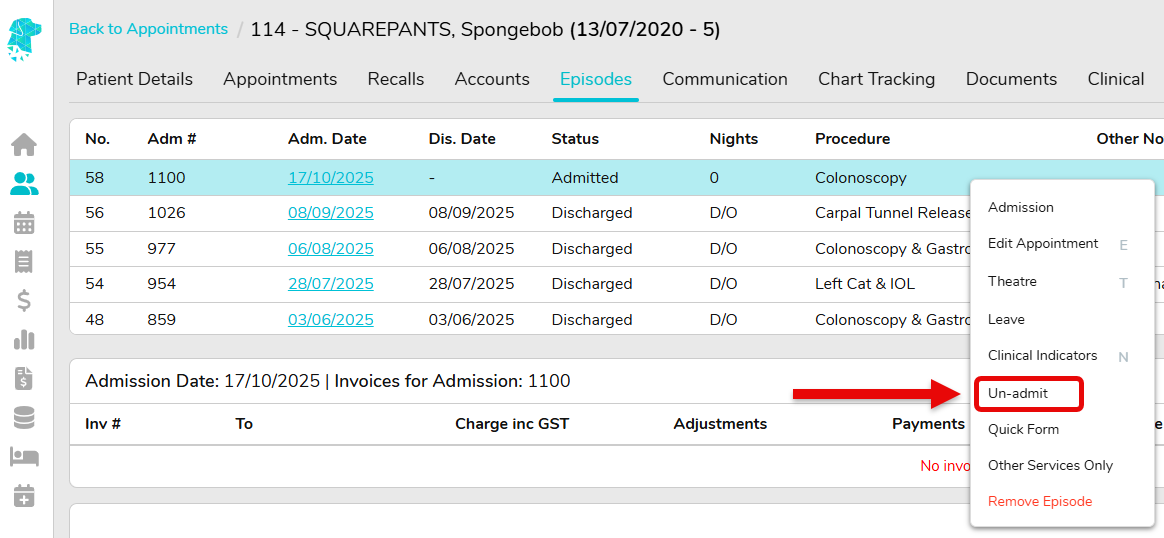
If the patient didarrive and was admitted but did not proceed, the facility can choose to revert the episode back to a booking by Un-discharging and Un-admitting the episode. Again, this will be up to the facility to decide if this is require depending on how far the patient journey progressed. This can be done via the Episodes Screen by utilising the Right-Click Menu.
The patient may need to be refunded any moneys paid, or the facility may choose to keep it and apply to another admission down the track.
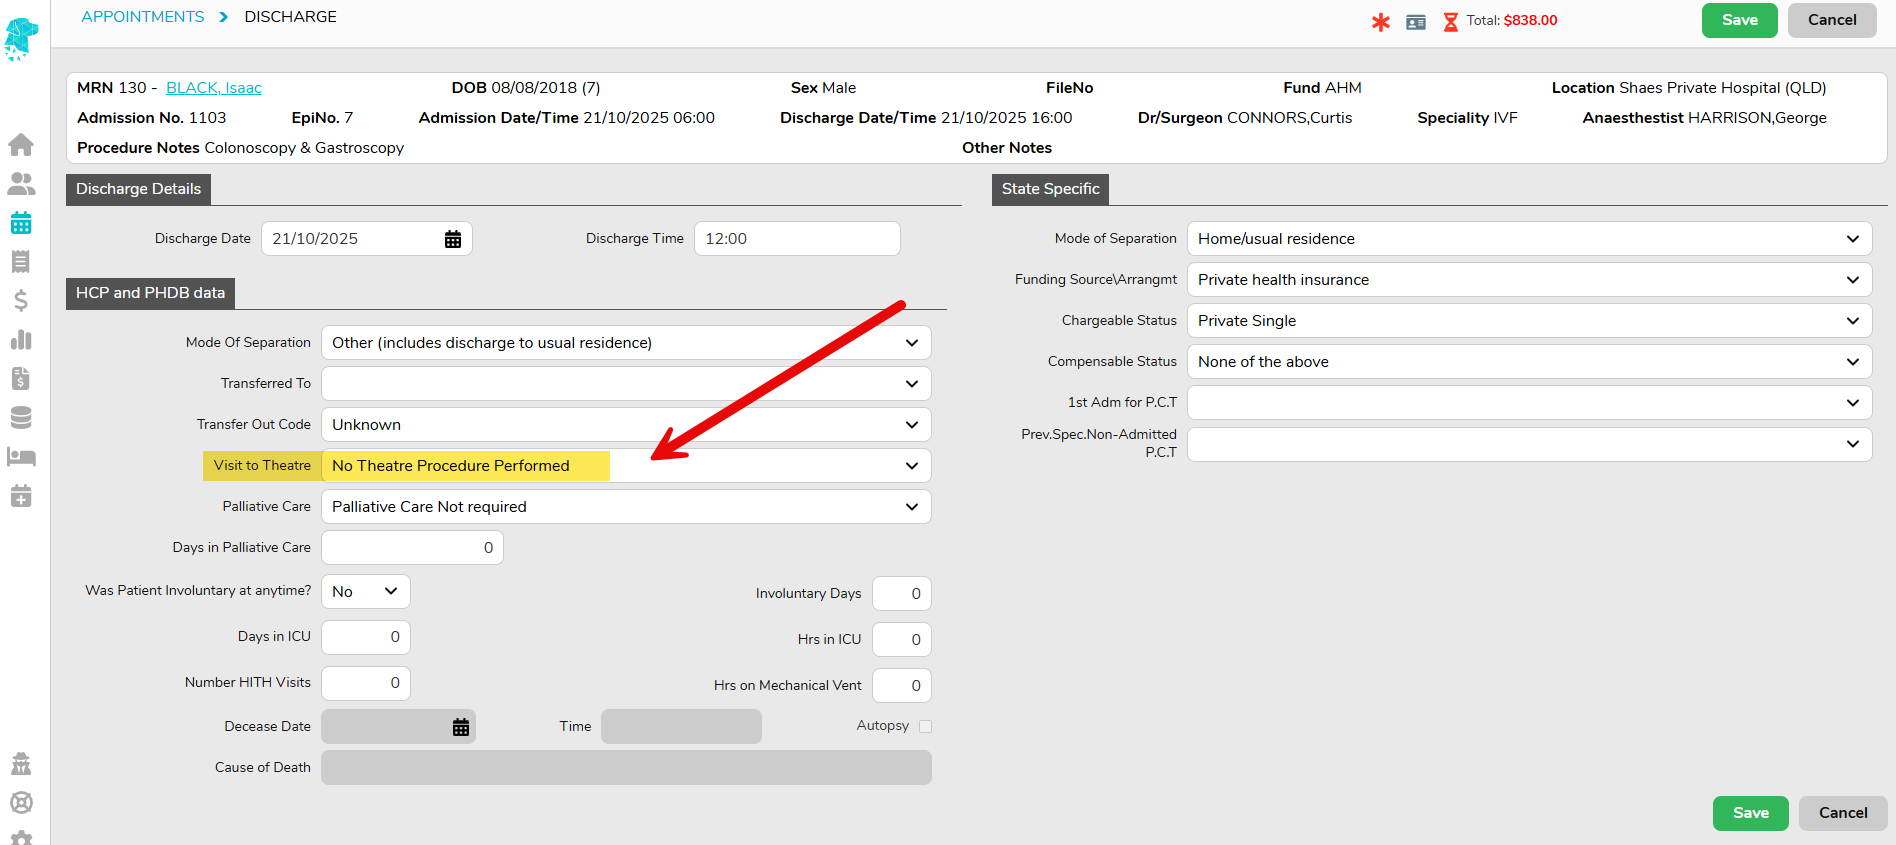
Option 2 If the patient was admitted and progressed partway through their journey, the more appropriate option may be to complete the episode by admitting and discharging them. Depending on how far they progressed, you may need to populate the Visit to Theatre field with No Theatre Procedure Performed when discharging the episode.
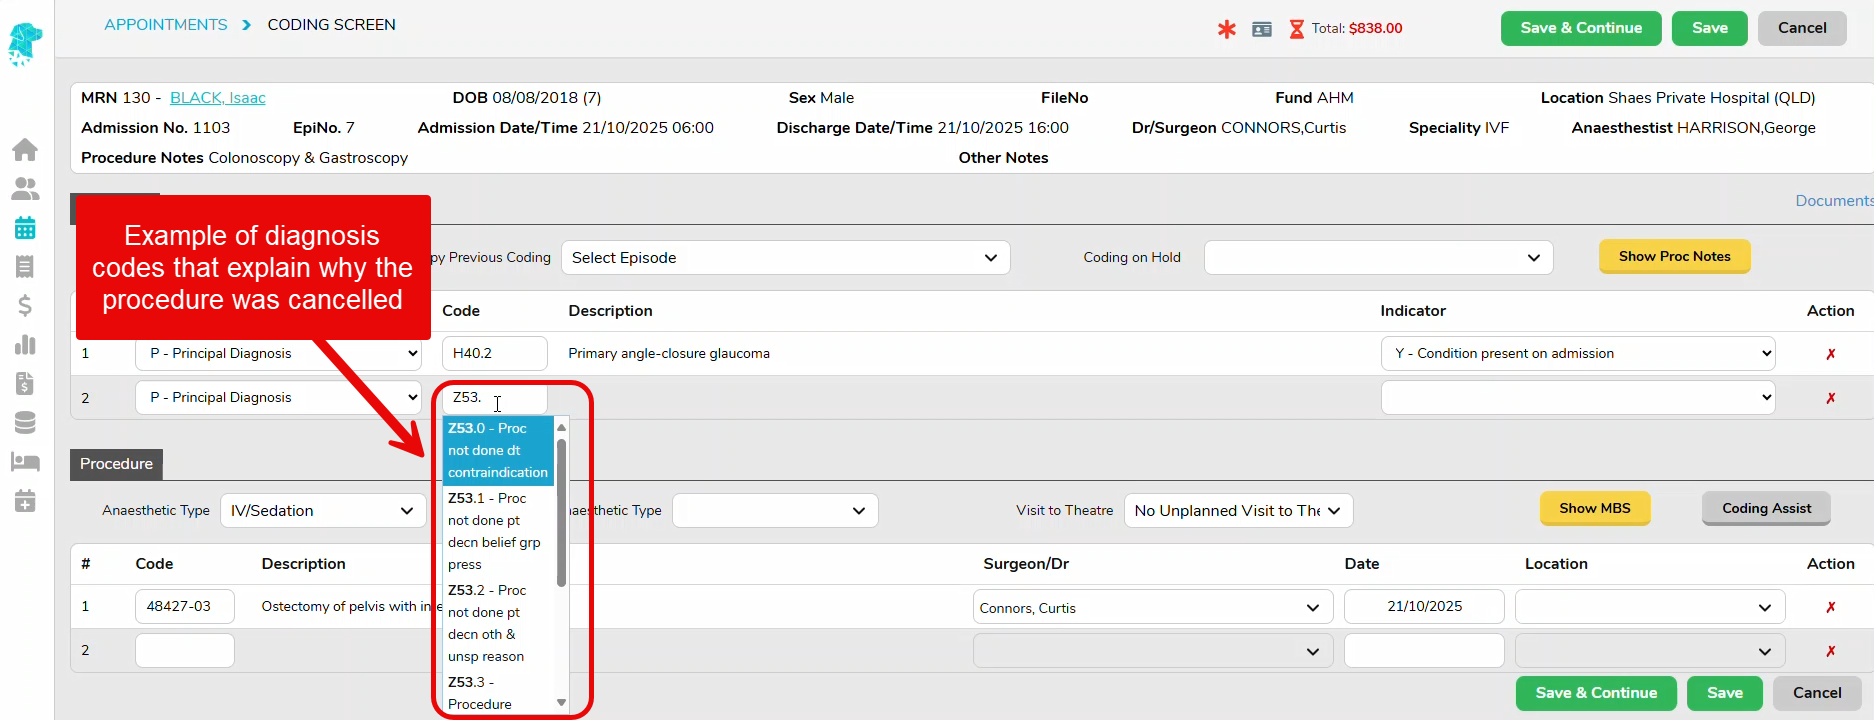
As every discharged patient is reported to the Department of Health, a principal diagnosis code is mandatory. If the facility opts to admit and discharge the episode, it will need to be coded. Please confirm the correct process with your coder. However, as an example, there would typically be a primary diagnosis code, and an additional diagnosis code explaining why the procedure was cancelled.
Other Notes When raising an invoice, please be aware that if an accommodation band is billed, it is implied to the health fund that the patient received an anaesthetic. In this instance, an anaesthetic procedure code must also be included in the coding screen. Facilities will need to check their individual health fund contracts in order to decide if they can raise a charge for the particular admission.
Cancellation Reasons
Facilities may be required to collect different cancellation information for benchmarking, auditing, accreditation, and reporting purposes. FYDO makes this easy through customisable Appointment Cancellation Reasons. Statistics such as Cancelled After Arrival, Cancelled Within 24 Hours, Facility Cancellation and other site-specific categories can all be configured as Cancelled Reasons (Appointments). Once configured, these reasons can be utilised in reporting to provide visibility into why appointments are being cancelled and identify trends over time. To ensure accurate reporting, your facility should configure the cancellation reasons required for your workflows and educate staff on when each cancellation reason should be used. Follow the instructions below to set this up.
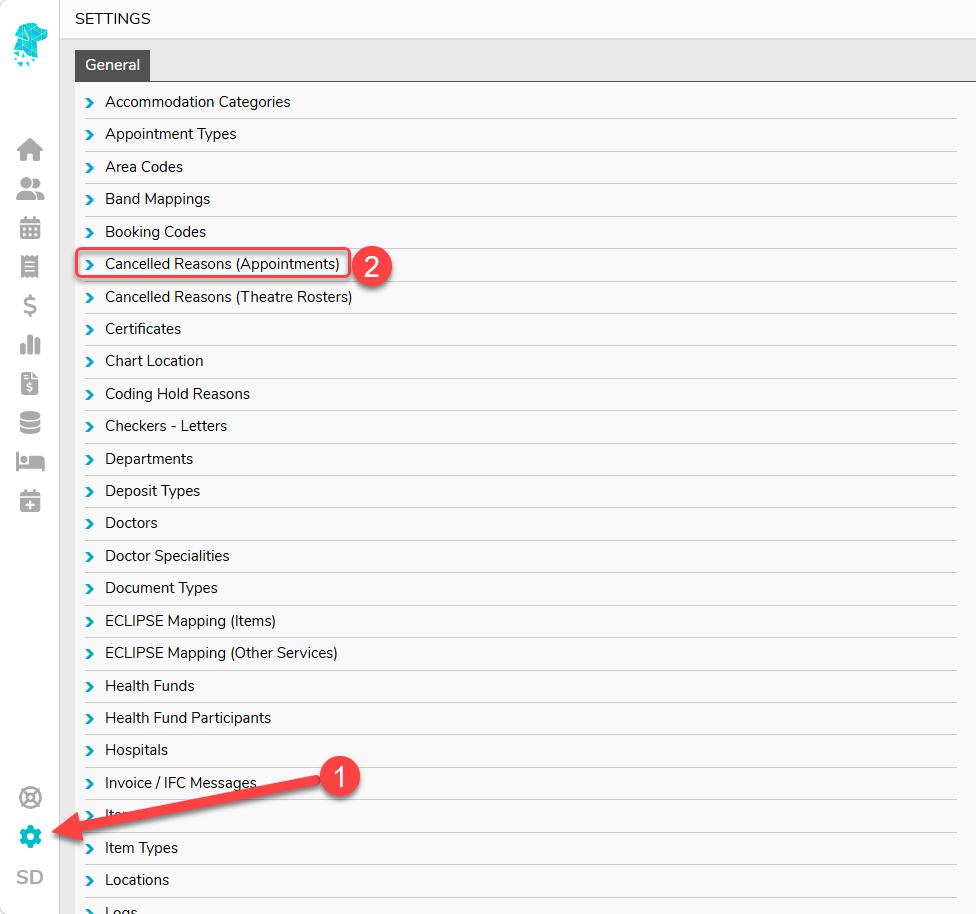
Navigate to Settings
Select Cancelled Reasons (Appointments)
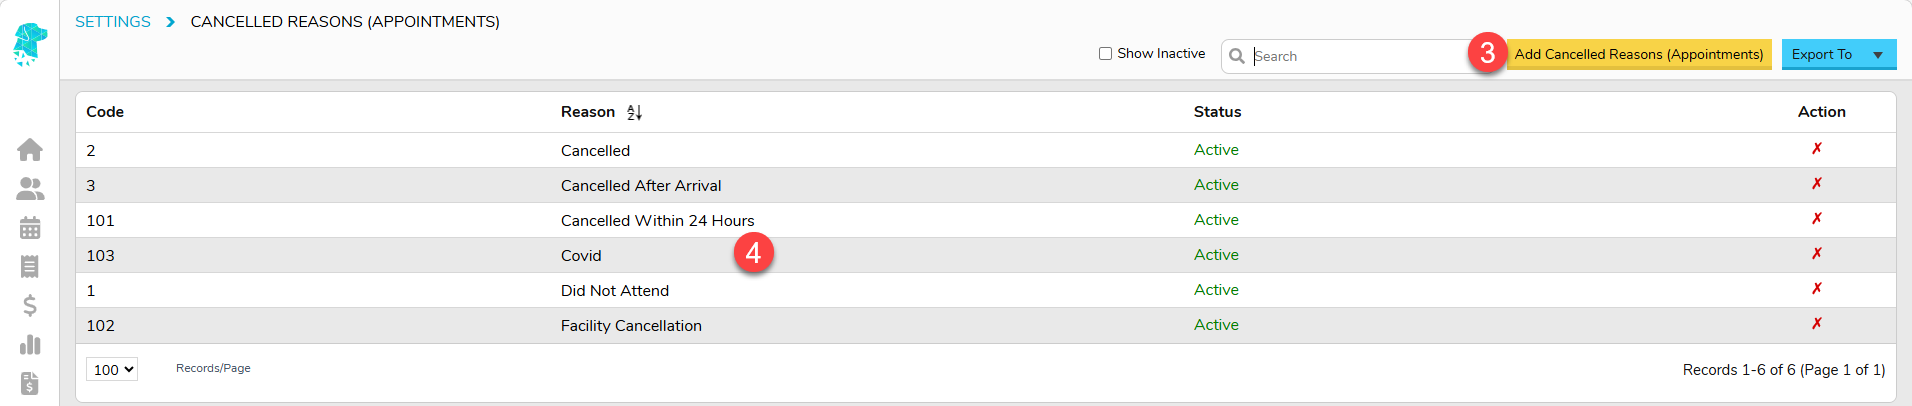
Click Add Cancelled Reasons (Appointments) to add new cancellation reasons
Double click on an existing cancellation reason to amend it
Utilise the correct Cancellation Reason when cancelling bookings, as per the instructions at the start of this page, and statistics than then be obtained from Reports.
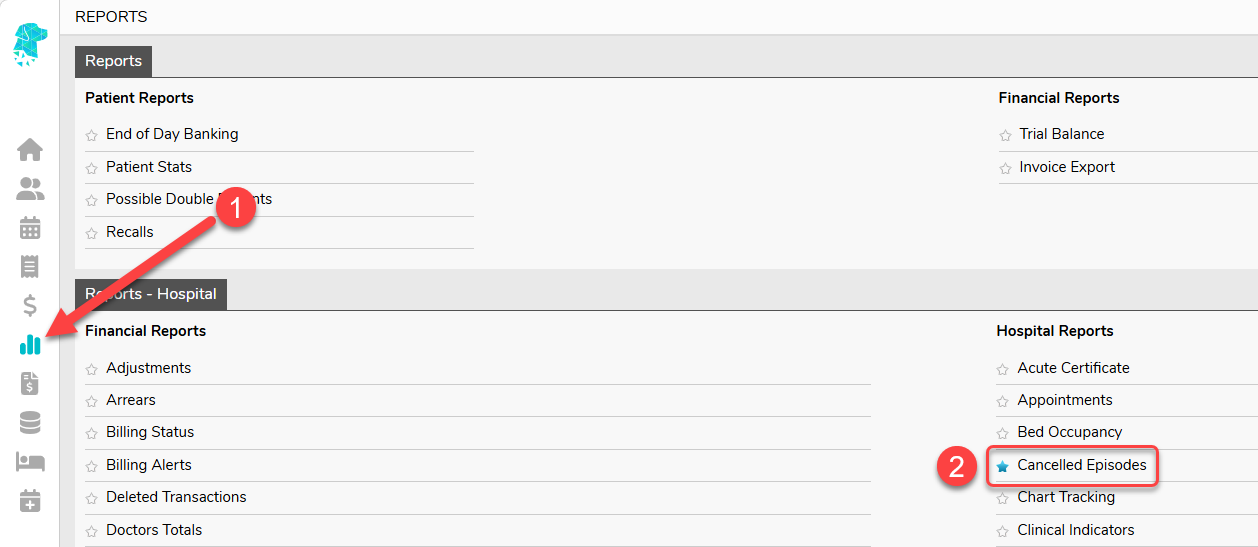
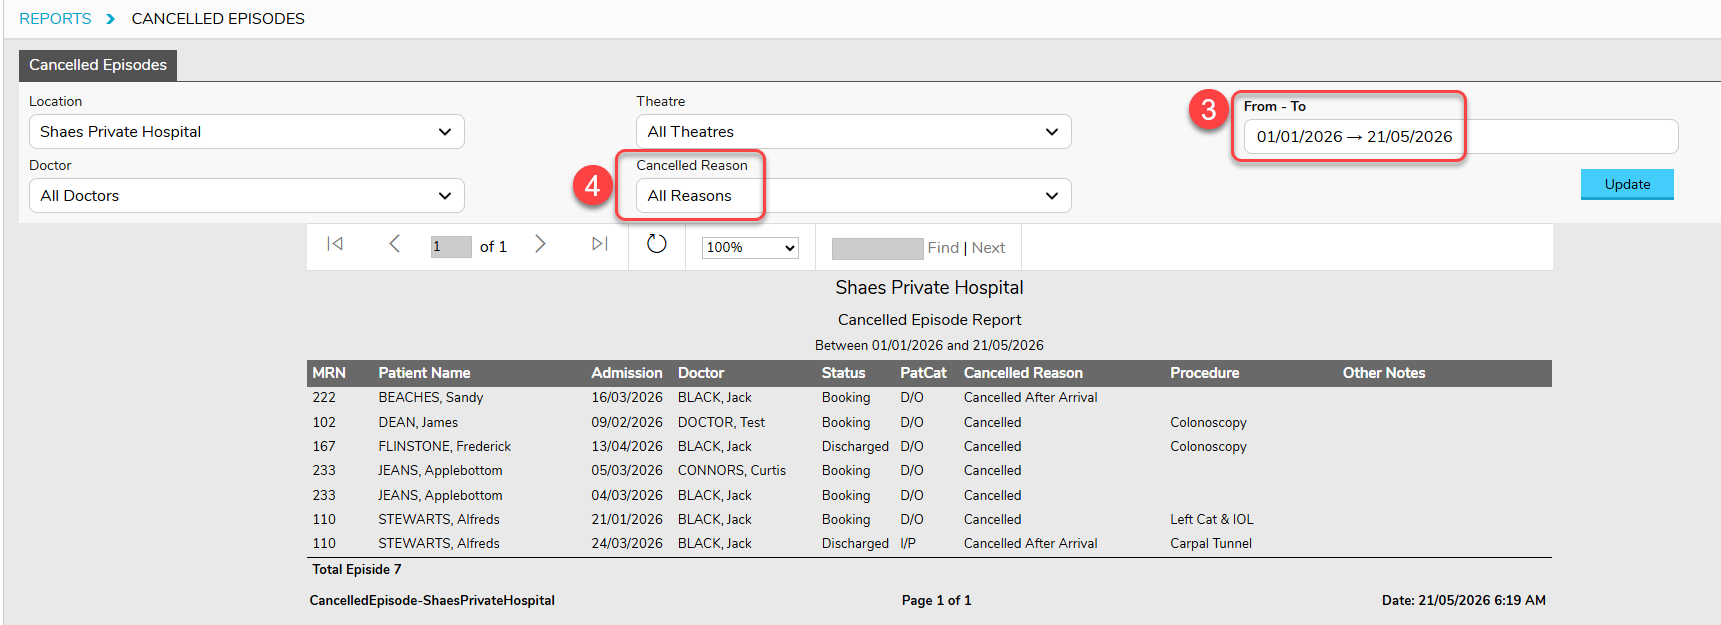
Navigate to Reports
Select Cancelled Episodes
Simply run the report for the date range required for a comprehensive list of all cancelled procedures, or
Utilise the Cancelled Reason filter to obtain statistics on specific cancellation types
Editing, deleting, and inactivating referrals
Made a mistake when creating the referral? No problem. Read on to see how to edit or delete referrals.
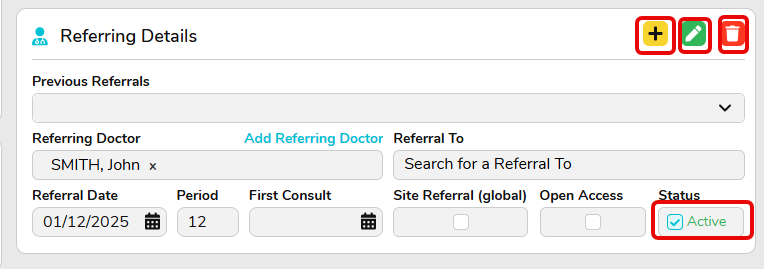
Start off by opening a patient’s record. Below is an example of the referral section of a patient’s record.
Add another referral: FYDO allows you to have multiple referrals for a given patient. Use this button to add another referral
Edit referral: this button allows you to make changes to any of the data fields of a given referral
Delete this referral: this button will remove the referral
Active: untick this checkbox to make the referral inactive