In some instances, a facility will need to change a claim from ECLIPSE to Paper Base. This may occur if they are required to send it manually, rather than electronically, to the fund.
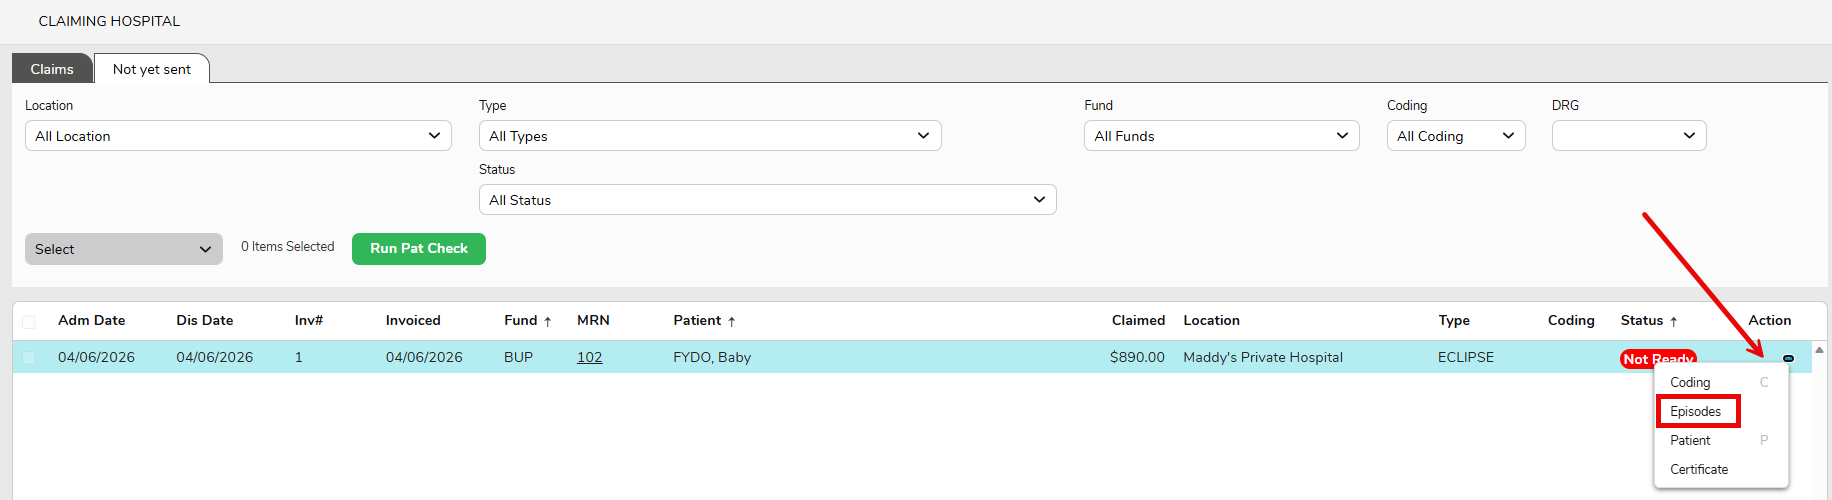
1.In Claiming Hospital > Not Yet Sent, ensure the required claim is highlighted blue & then right-click on the line
2. Select Episodes
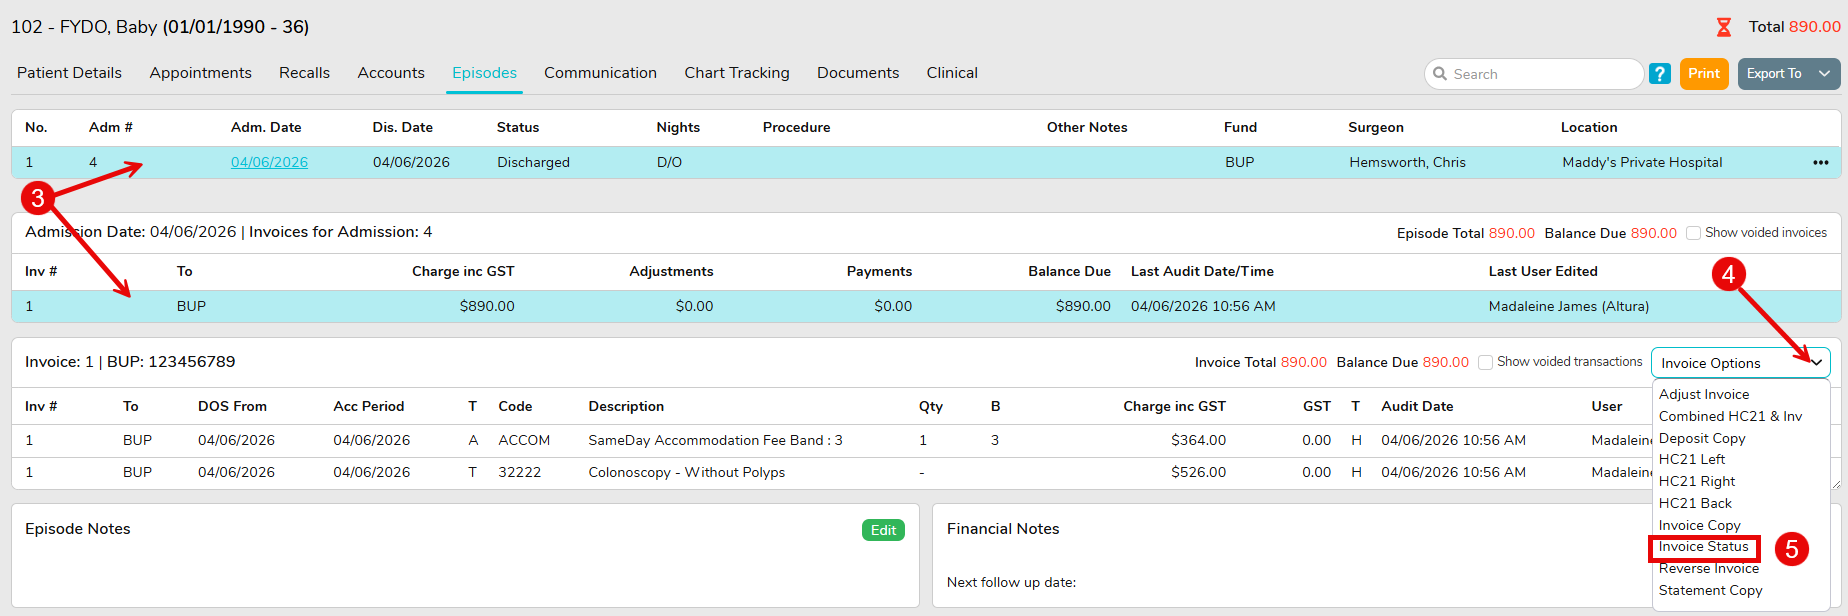
3. Ensure a line from the required invoice is selected & shaded light blue
4. Click on the Invoice Options dropdown
5. Select Invoice Status
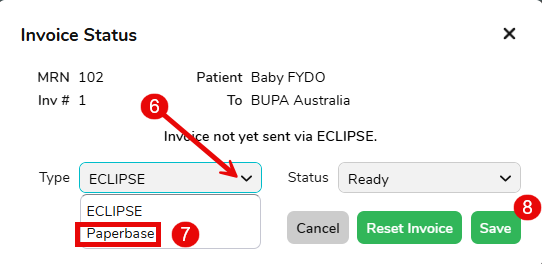
6. Use the Type dropdown
7. Select Paperbase
8. Click Save
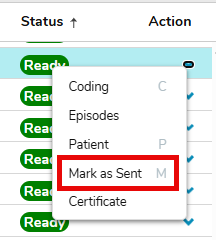
9. When returning to Not Yet Sent the claim should now show as Paperbase and the user will be able to Mark as Sent.
Processing Admissions with Multiple Treating Doctors
As ECLIPSE does not support admissions under multiple doctors, FYDO must be configured and used in the same way.
Patients must therefore be admitted under the primary admitting doctor only, with all admission details recorded within the same episode.
Where multiple procedures are performed by different doctors in different theatre visits, these should be managed using multiple theatre admissions within the episodes Theatre Screen.
The doctor who performed each individual procedure can then be recorded within the Coding screen, which is the only area where procedure-level doctor allocation is supported.
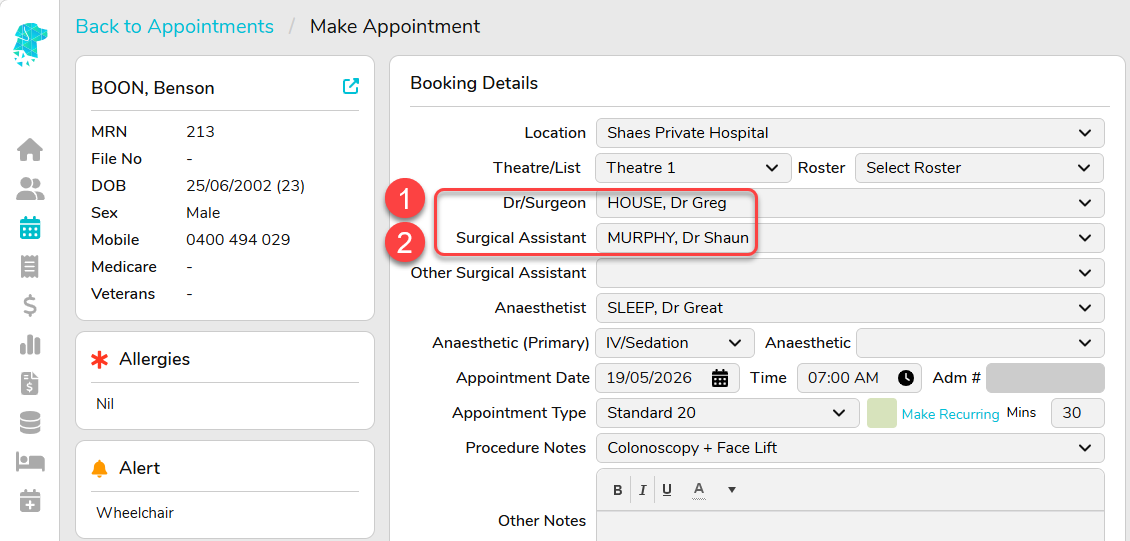
Book the patient into FYDO with the Primary Admitting Doctor listed in the Dr/Surgeon field
If you’d like to document the Secondary Surgeon for completeness of records, they can be entered into the Surgical Assistant field. N.B this field isn’t transmitted electronically via ECLIPSE, and the secondary surgeon cannot be identified in the electronic claim in any way as that isn’t supported.
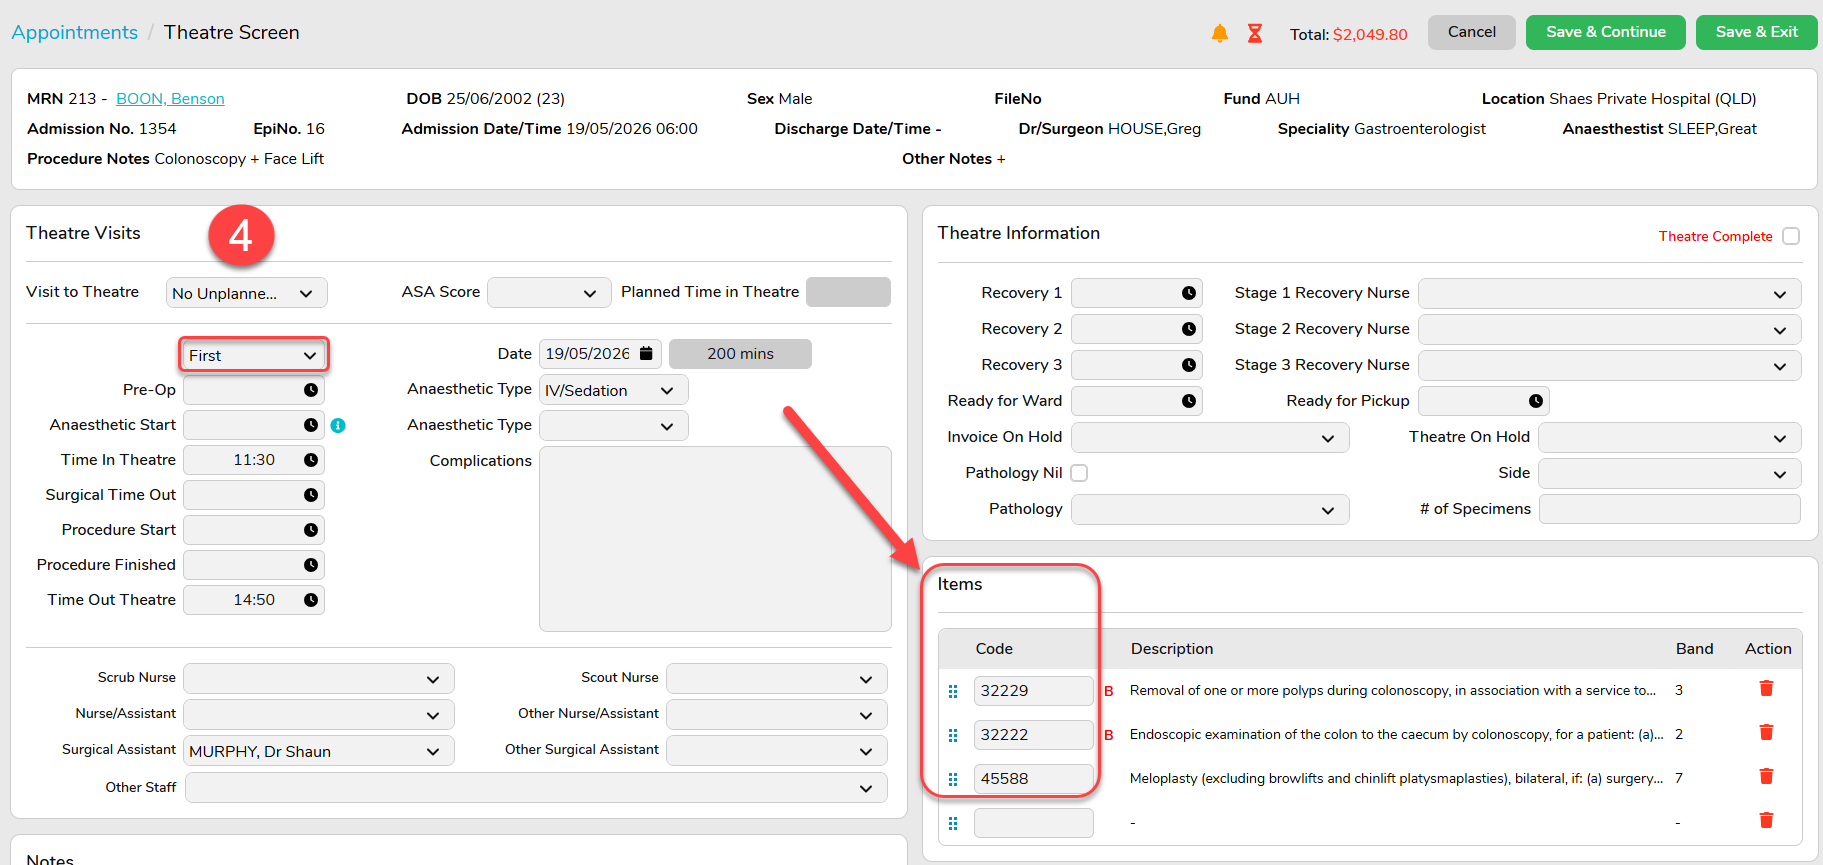
Patient is Admitted as usual under the Primary Admitting Doctor
If all procedures are performed in the one theatre visit, all Items can be entered together under the First visit to theatre
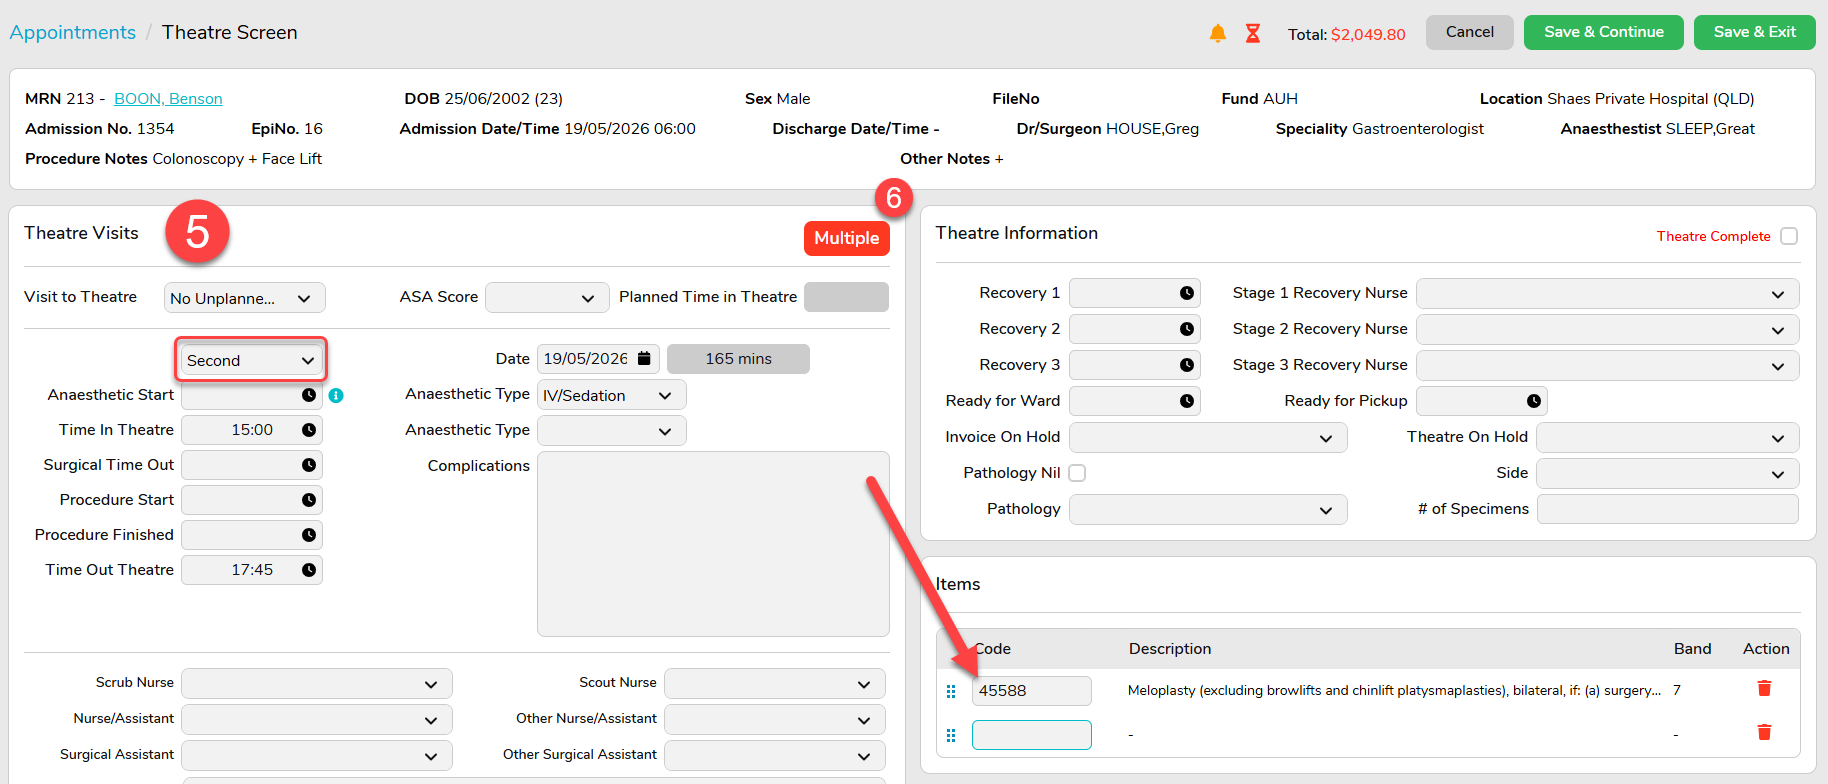
If the patient requires two visits to theatre to have each procedure performed separately, the Multiple Visit to Theatre dropdown can be utilised to enter the additional visits
Multiple Visits to Theatre will be identified with the Multiple icon
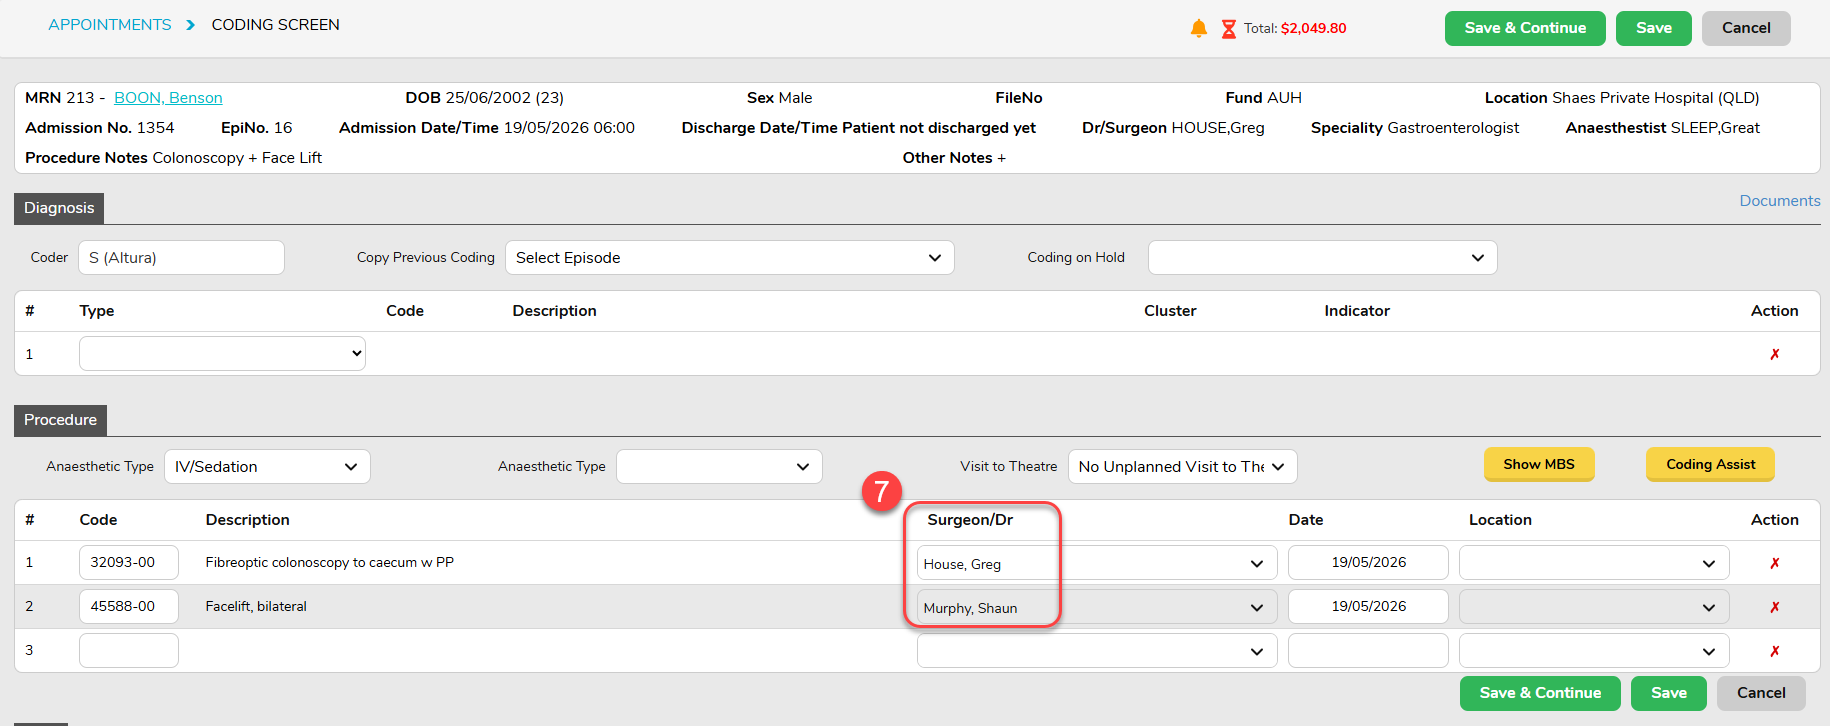
7. The Coding Screen allows for each Procedure Code to be assigned to a specific Surgeon/Dr. This is the only place in FYDO that allows for each doctor to be documented against the procedure code they performed.
All other discharge and billing processes for this episode will function as normal.
Creating a Hospital Quote (IFC)
FYDO allows you to produce an Informed Financial Consent (IFC) for a patient that is not entered into your database.
This feature is particularly helpful in enabling the facility to provide patients with quotes prior to them scheduling their appointment.
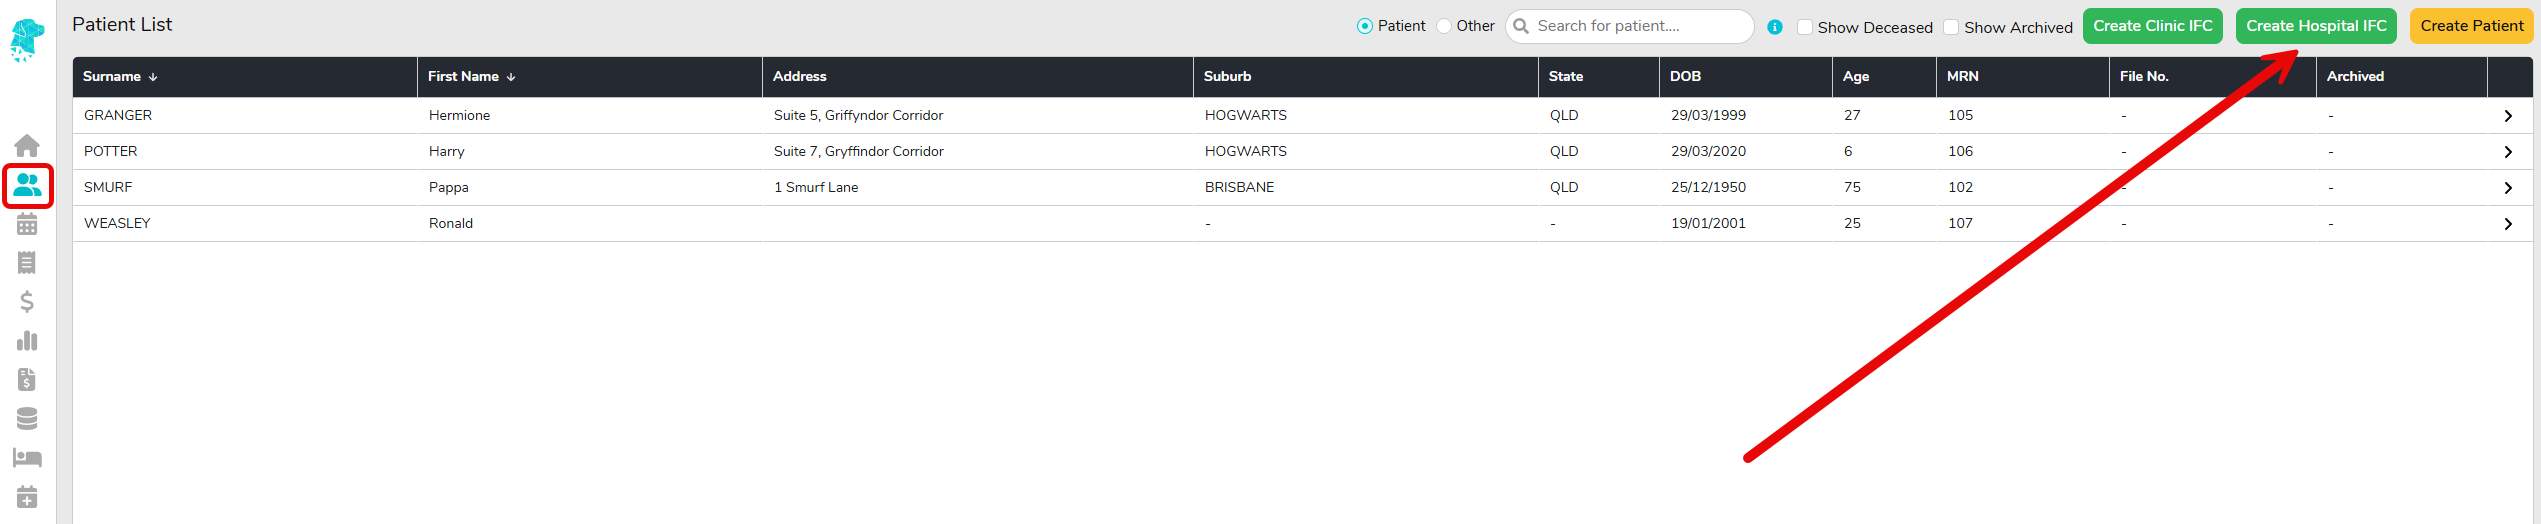
To create a hospital quote for a new patient that does not already have an appointment booked in FYDO, navigate to the Patient List screen, selecting Create Hospital IFC
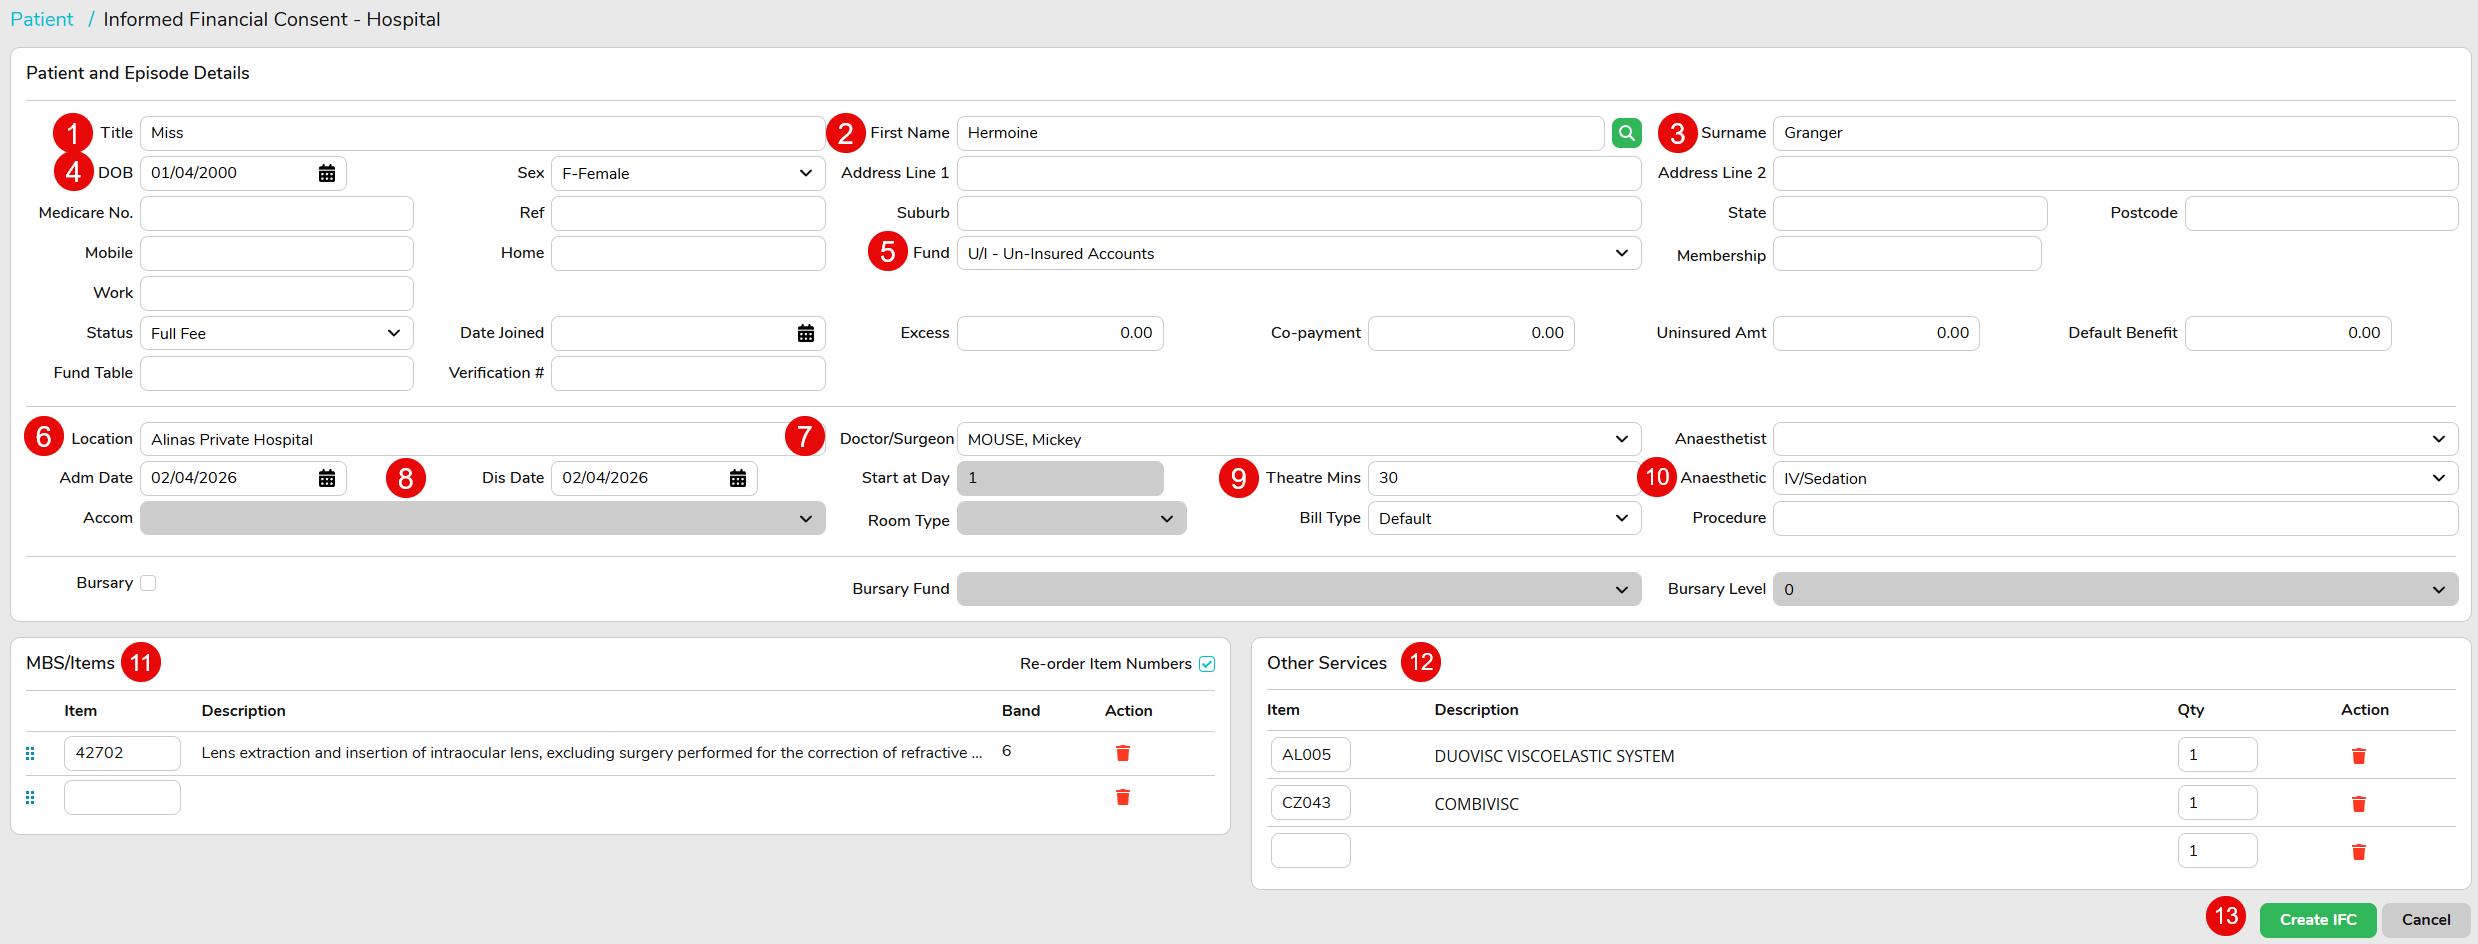
Here, you will need to input the patient and procedure details:
Title
First Name
Surname
Date of birth
Select the patients funding source
Confirm the correct hospital location
Doctor/ surgeon
Date of admission and discharge
Length of time the procedure will be
The type of anesthetic to be used
Enter all required MBS item numbers/ items
Enter all required prosthetics, consumables or other services
Create IFC
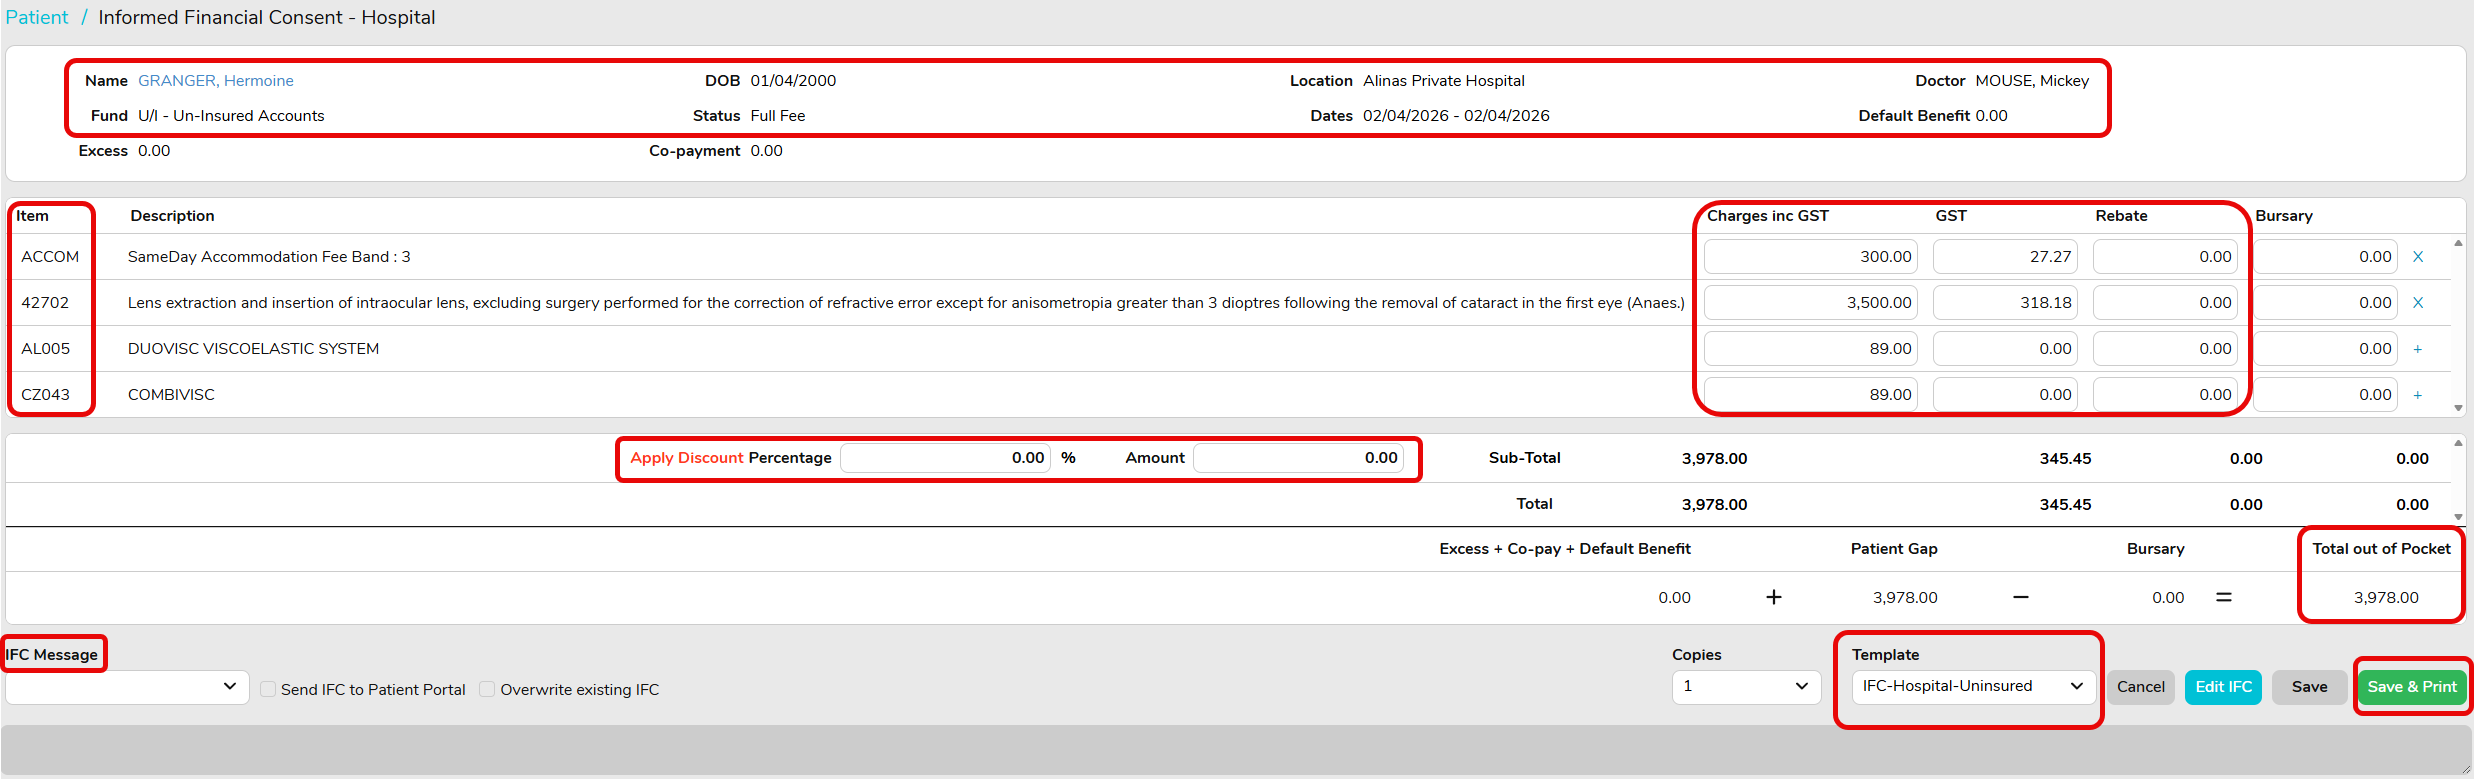
Now you have created the IFC, check the patient details and items are correct.
The charges will be populated from the contract fees entered to FYDO for the funding source chosen for this quote.
If you need to add a discount to the hospital fee, you can do this here by entering a % or amount you would like to discount the total fee by.
You can also add a message to the quote by selecting the IFC Message dropdown to select a preset message, or you can create your own by choosing Custom Message.
If there is any information you would like to amend, select Edit IFC.
Once all the information is confirmed as correct, ensure you have the correct Template selected and Save & Print
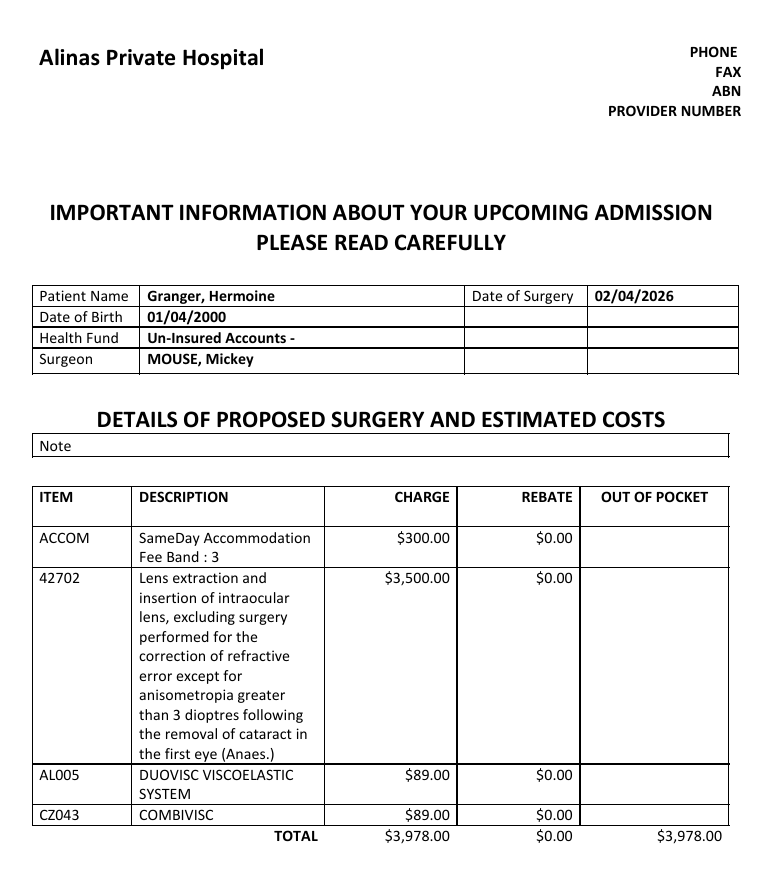
Your quote will then download ready for you to provide to the patient.
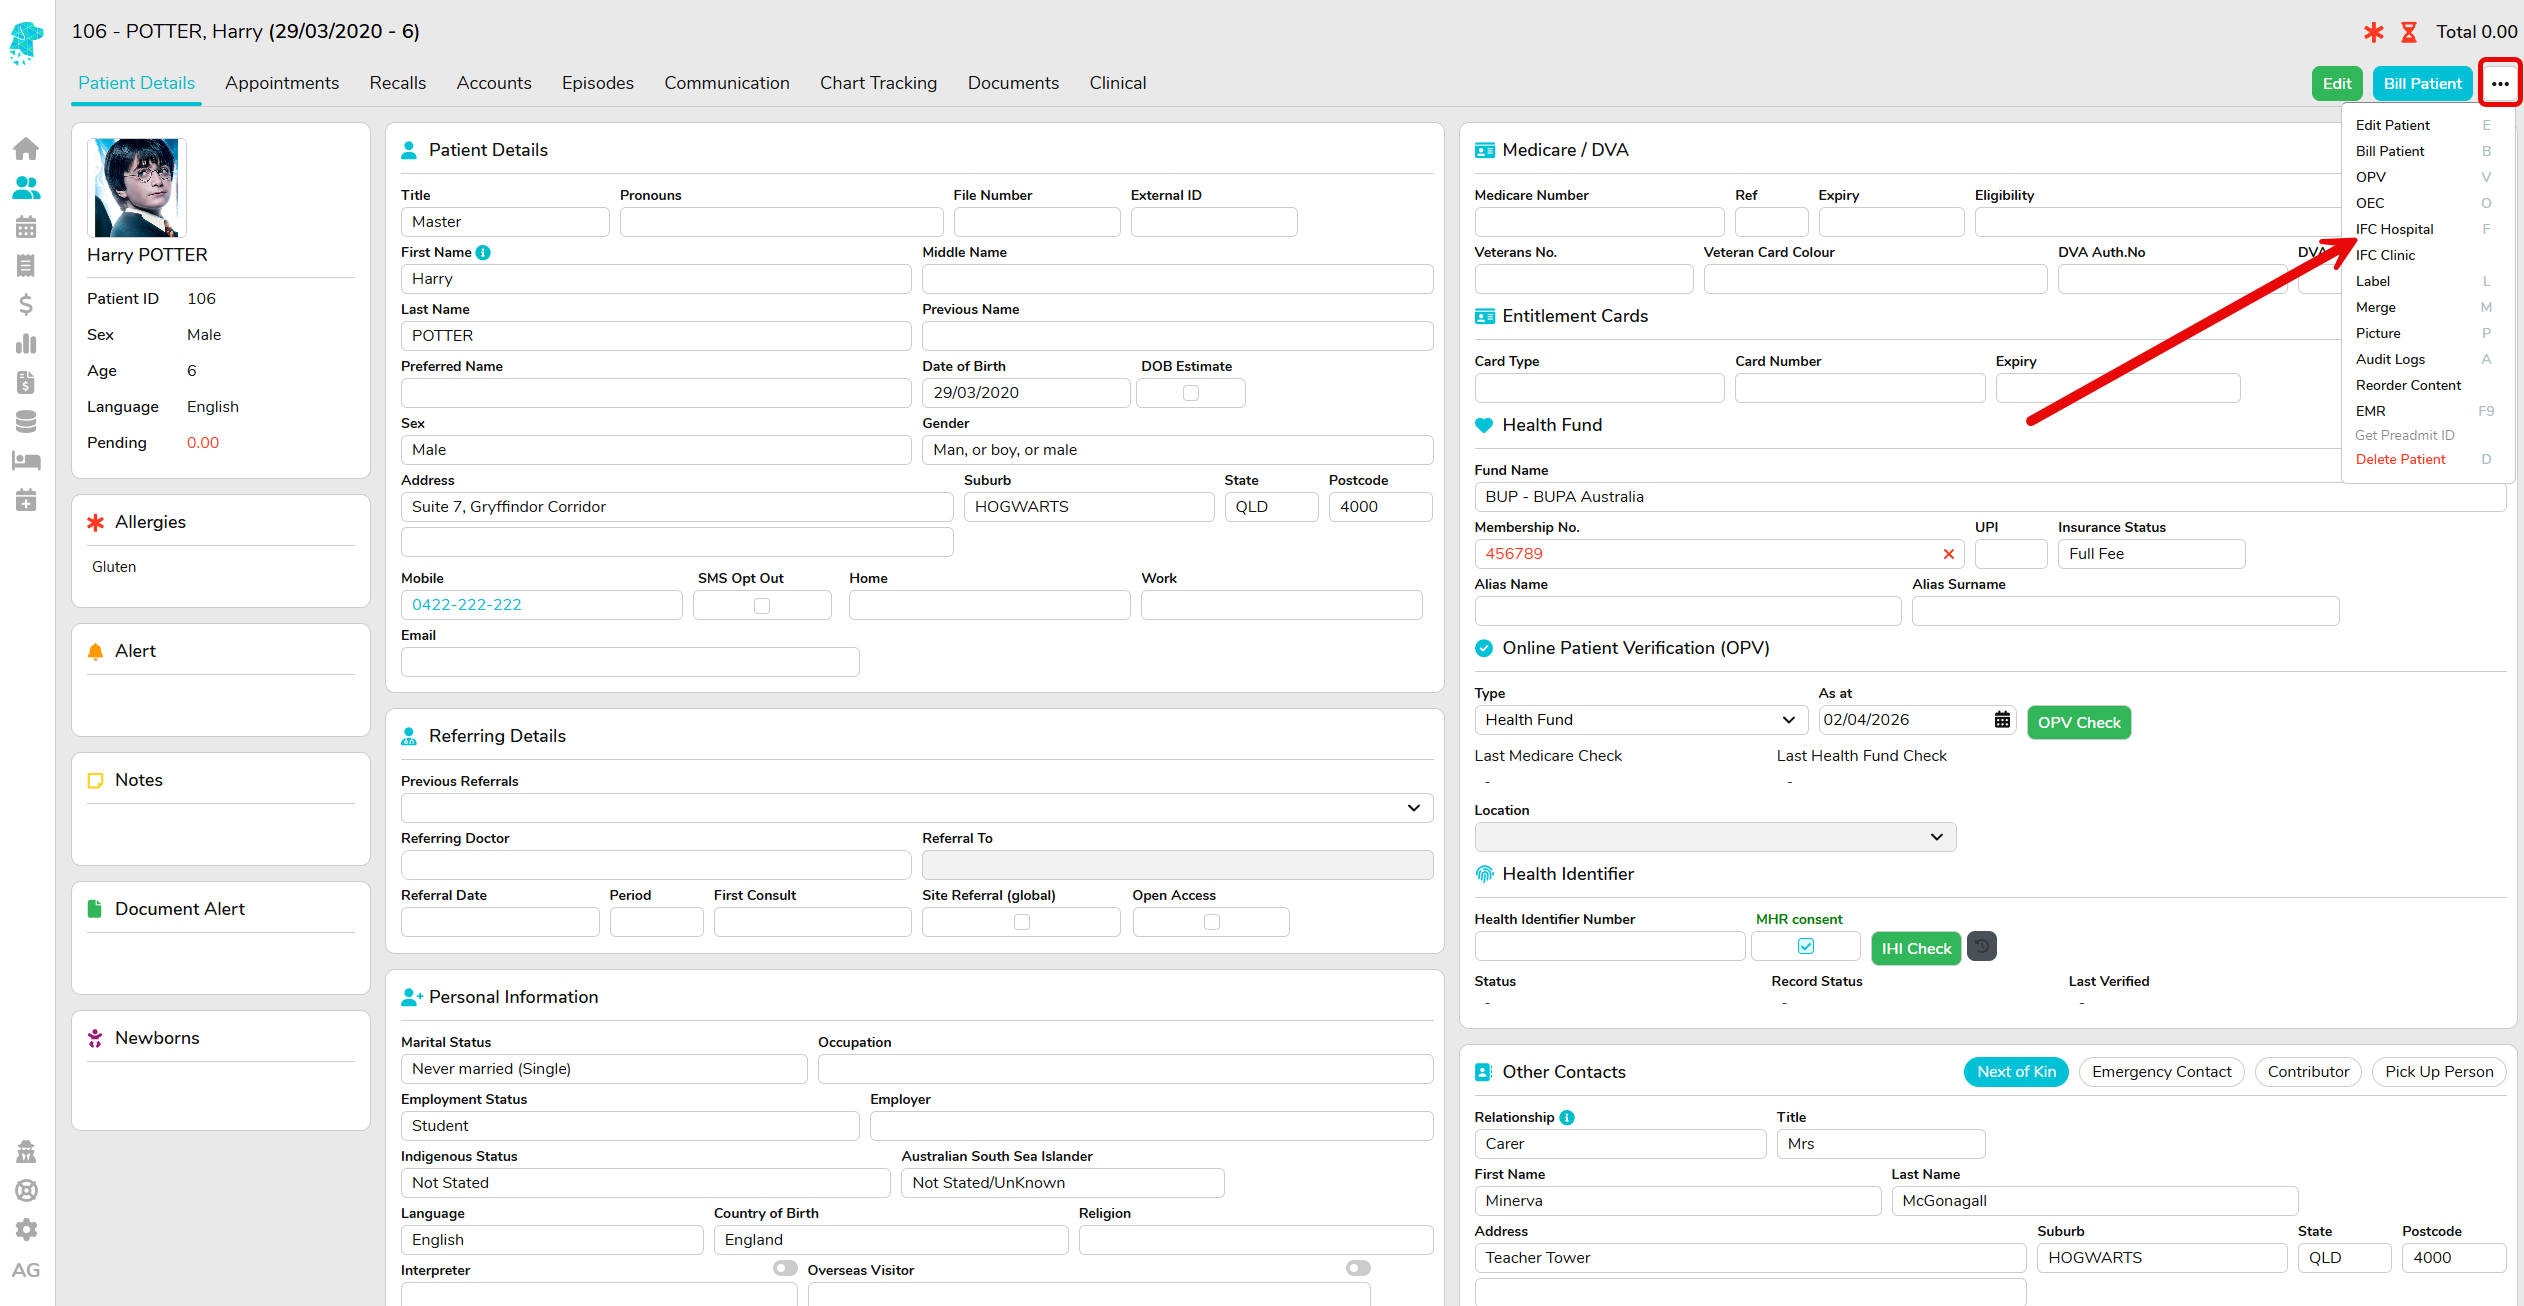
If you need to create a quote for a patient who has a medical record in FYDO but does not have an appointment booked yet, you can do this from the Patient Details screen by selecting the three dots on the top right-hand side of the screen, then selecting IFC Hospital.
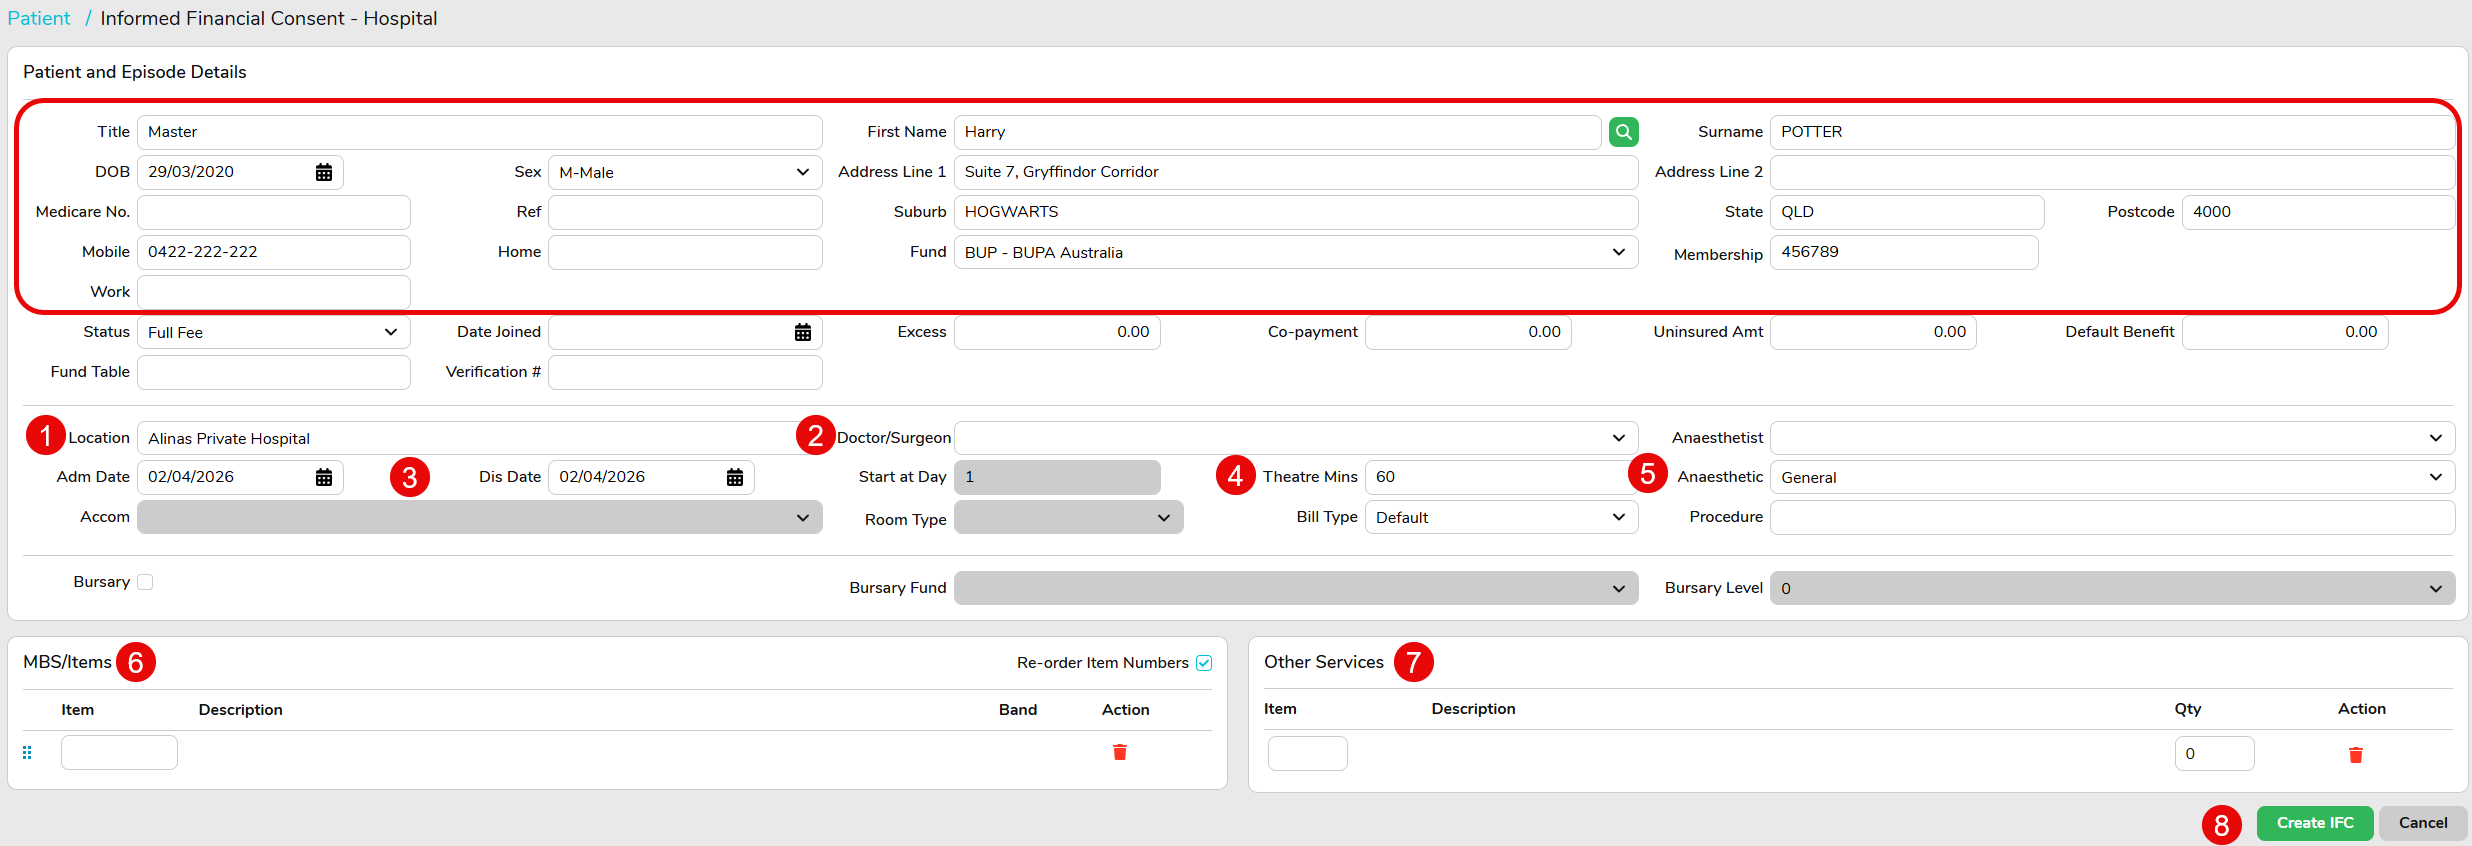
This will prepopulate the patients personal and fund details requiring you to only input the planned procedure details:
Confirm the correct hospital location
Doctor/ surgeon
Date of admission and discharge
Length of time the procedure will be
The type of anesthetic to be used
Enter all required MBS item numbers/ items
Enter all required prosthetics, consumables or other services
Create IFC
Once you have confirmed the details are correct, select Save to save this directly to the patients Documents tab, or Save & Print to save directly to the patients Document tab as well as make it available immediately to view and print.
NIB Type C Billing (SDEX)
The process of billing NIB Type C procedures, to accommodate the SDEX item, has been simplified in FYDO.
To accommodate the easier workflow, development work has been completed to restructure how FYDO processes these claims, ensuring they can continue to be transmitted electronically and paid successfully via ECLIPSE.
As part of this update: – It will no longer be necessary to manually add SDEX as an item number to each claim – FYDO will automatically populate and transmit the required information in the correct segments in line with NIB’s updated requirements
Please see the updated requirements below for billing NIB procedures with a Type C Certificate:
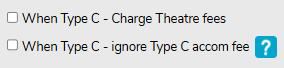
Settings > Health Fund Fees > Fund: NIB > Other Settings tab. Review the two options below to ensure the setting aligns with your NIB contract stipulations: – When Type C – Charge Theatre fees is to be selected if your contract allows theatre fees for the Type C item number. – When Type C – ignore Type C accom fee is to be selected if the contract allows for the regular accommodation band (1 to 4) to be billed, instead of the specific Type C Accommodate Fee.
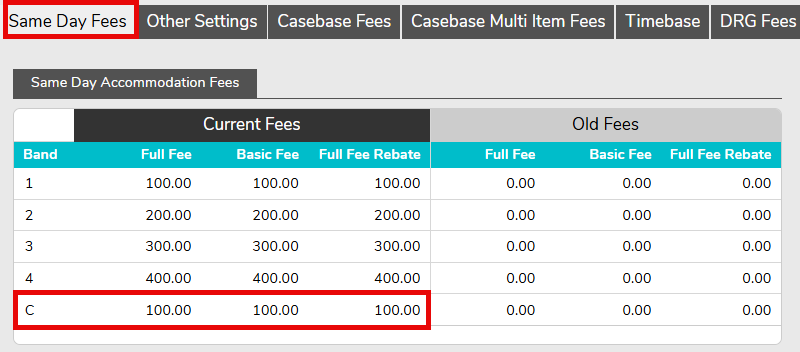
2. The Type C Accommodation Fee must be configured, as it will be used and reported within the Single Value Benefit (Casebase Fee) segment. This can be found in the Same Day Fees tab.
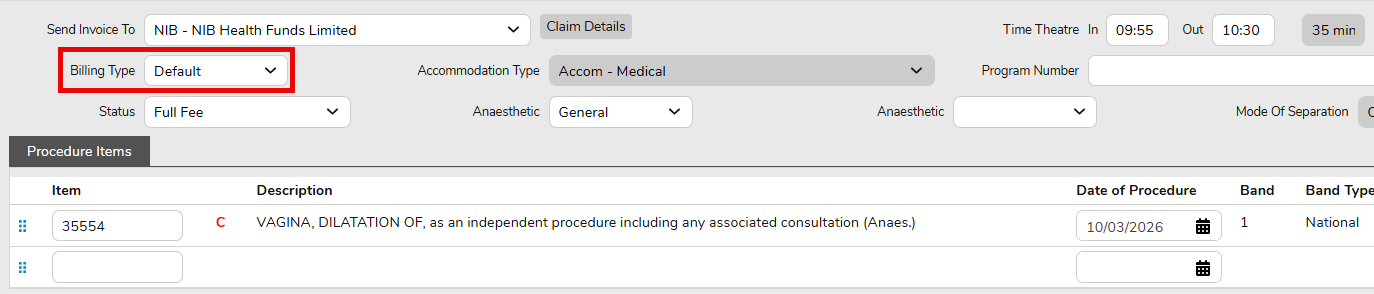
3. NIB Type C procedures are now required to be billed on a per diem basis. When using the Create Invoice screen, please ensure that the billing type is set to Default or Per Diem. FYDO will convert the per diem Type C bed fee into the required Single Value Benefit (Casebase Fee) segment, applying the appropriate mapping code.
If you require any further clarification, please don’t hesitate to reach out.
Combine Invoice & HC21 in One PDF
Have you ever needed to produce a single PDF for a health fund that includes the Invoice, HC21 Left signed by the patient AND HC21 Right signed by the hospital representative?
Maybe you even need to add a Type C Certificate into the file!
FYDO has made this process easy, with a feature that does it all for you! Follow the steps below to learn how.
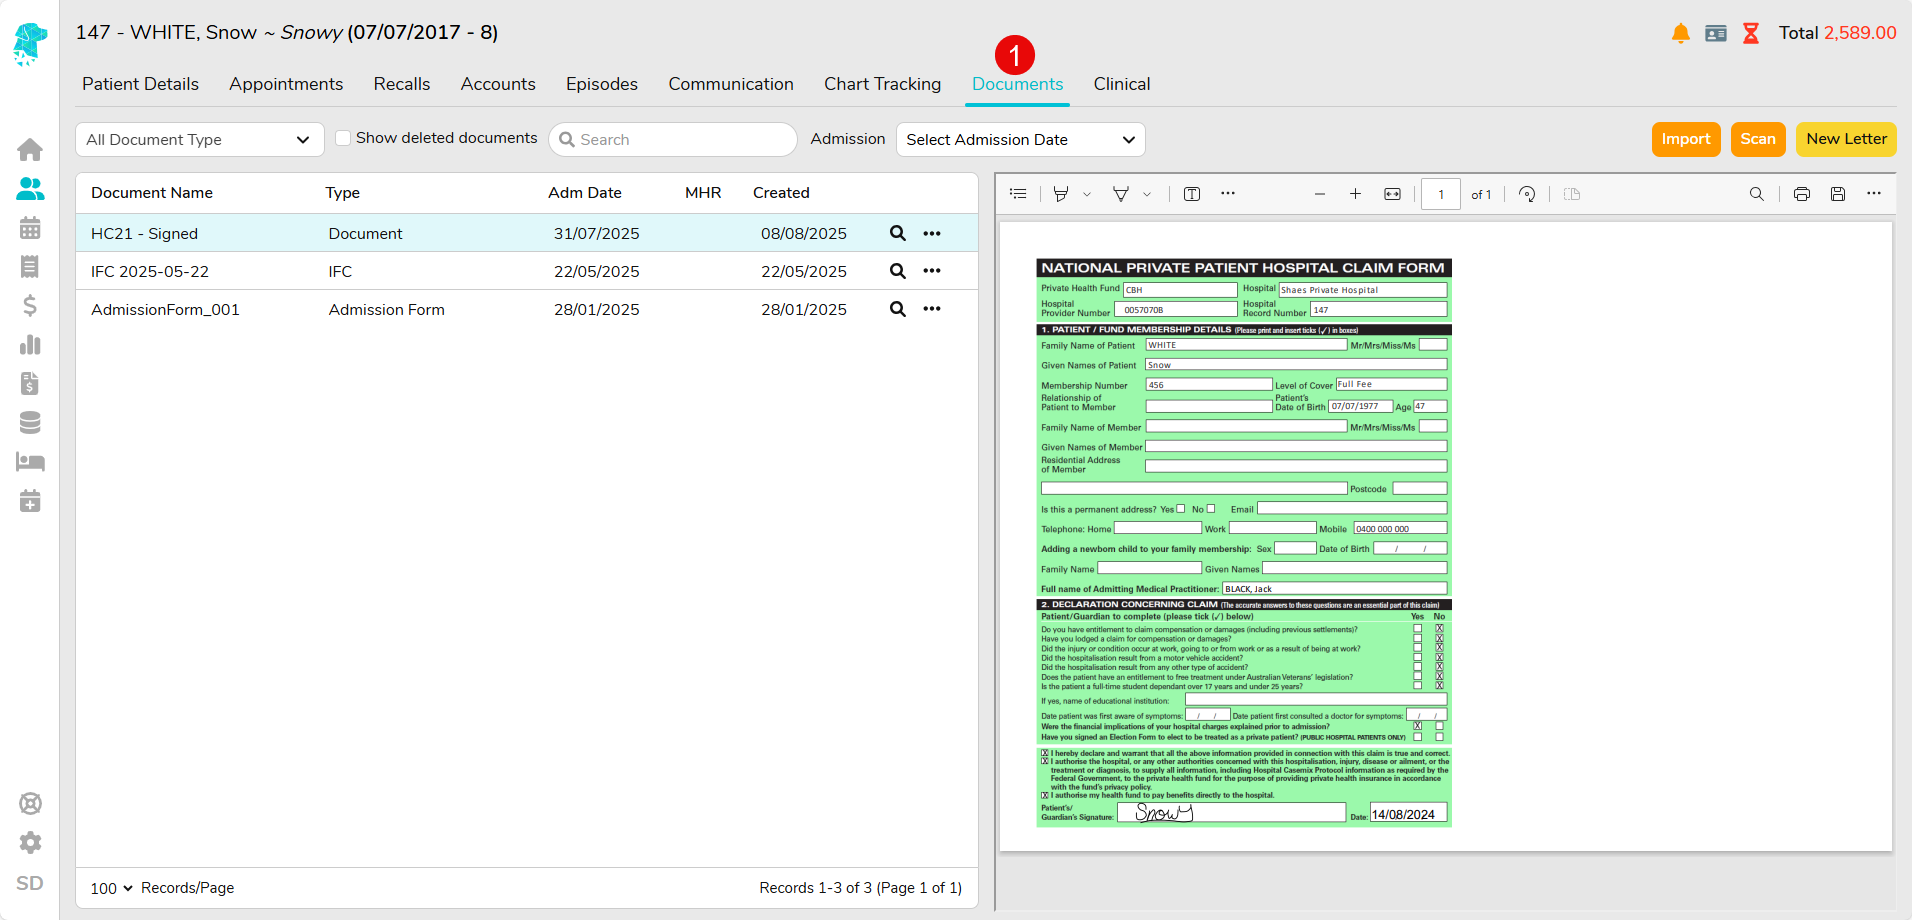
Upload a completed HC21 Left document to the patients Documents(or any document that needs to be included. e.g. Type C or Acute Care Certificate)
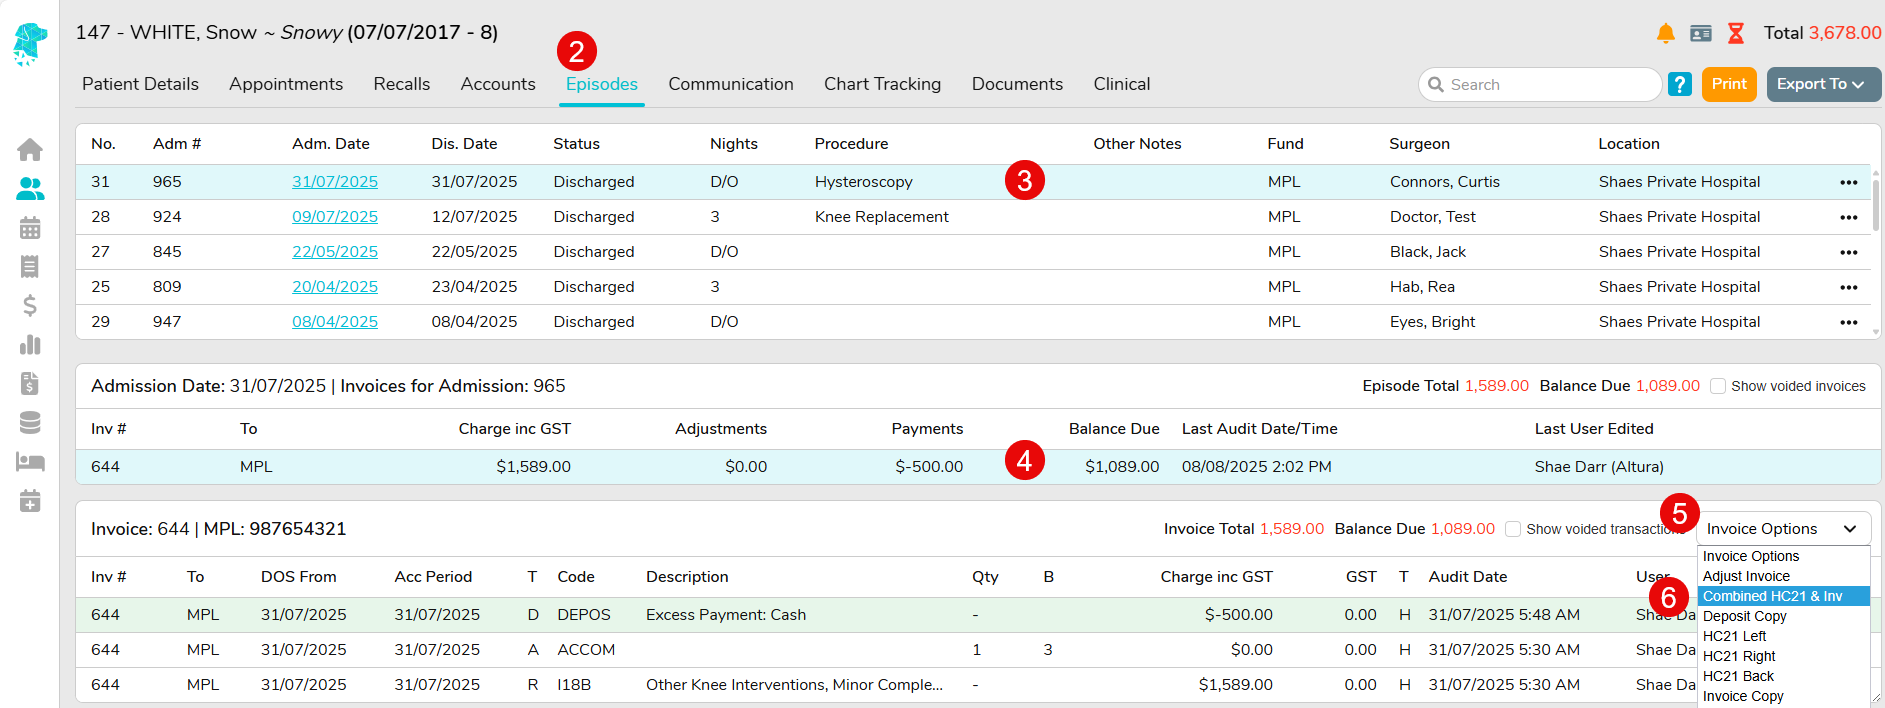
2. Navigate to Episodes 3. Ensure the correct Episode is selected 4. Ensure the correct Invoice is selected 5. Utilise the Invoice Options dropdown 6. Select Combined HC21 & Inv
7. Select the HC21 Left document that you had previously loaded into the patients Documents in step 1. And any certificate that also need to be included in the single PDF file. 8. Click Print Invoice
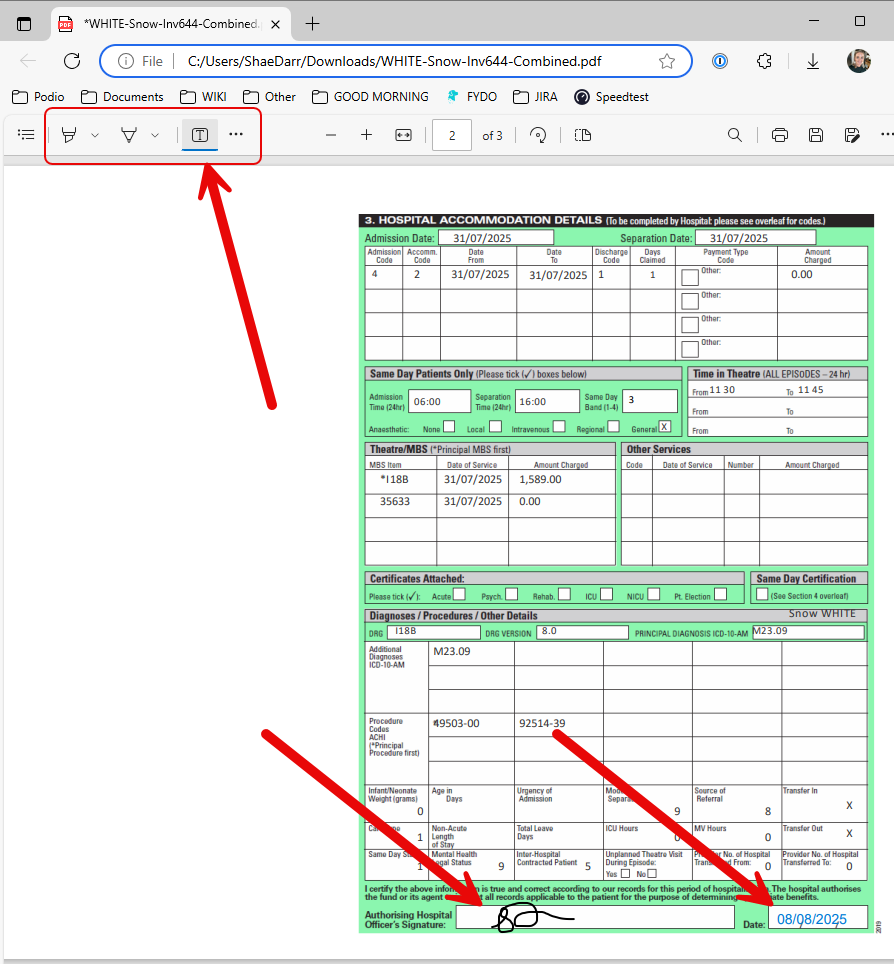
FYDO will produce a single PDF that includes: – Invoice – HC21 Right – Documents that were selected
The HC21 Right will need to have the Authorising Hospital Officer’s Signature and Date added. Most PDF programs will allow this electronically.
Save the document and submit to the health fund.
Receipt a Manual Hospital Remittance
When health funds or companies pay for accounts with a manual remittance (I.E it isn’t electronic through ECLIPSE) the payment still needs to be receipted in FYDO. These instructions will explain how to do that:
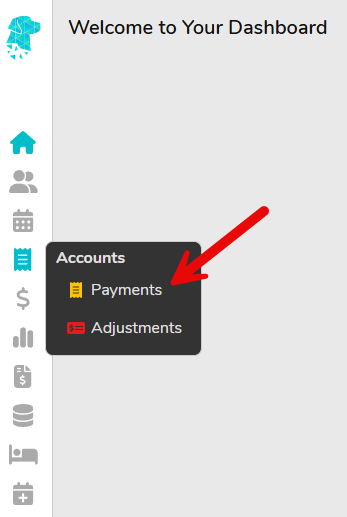
From the Accounts Tab, select Payments
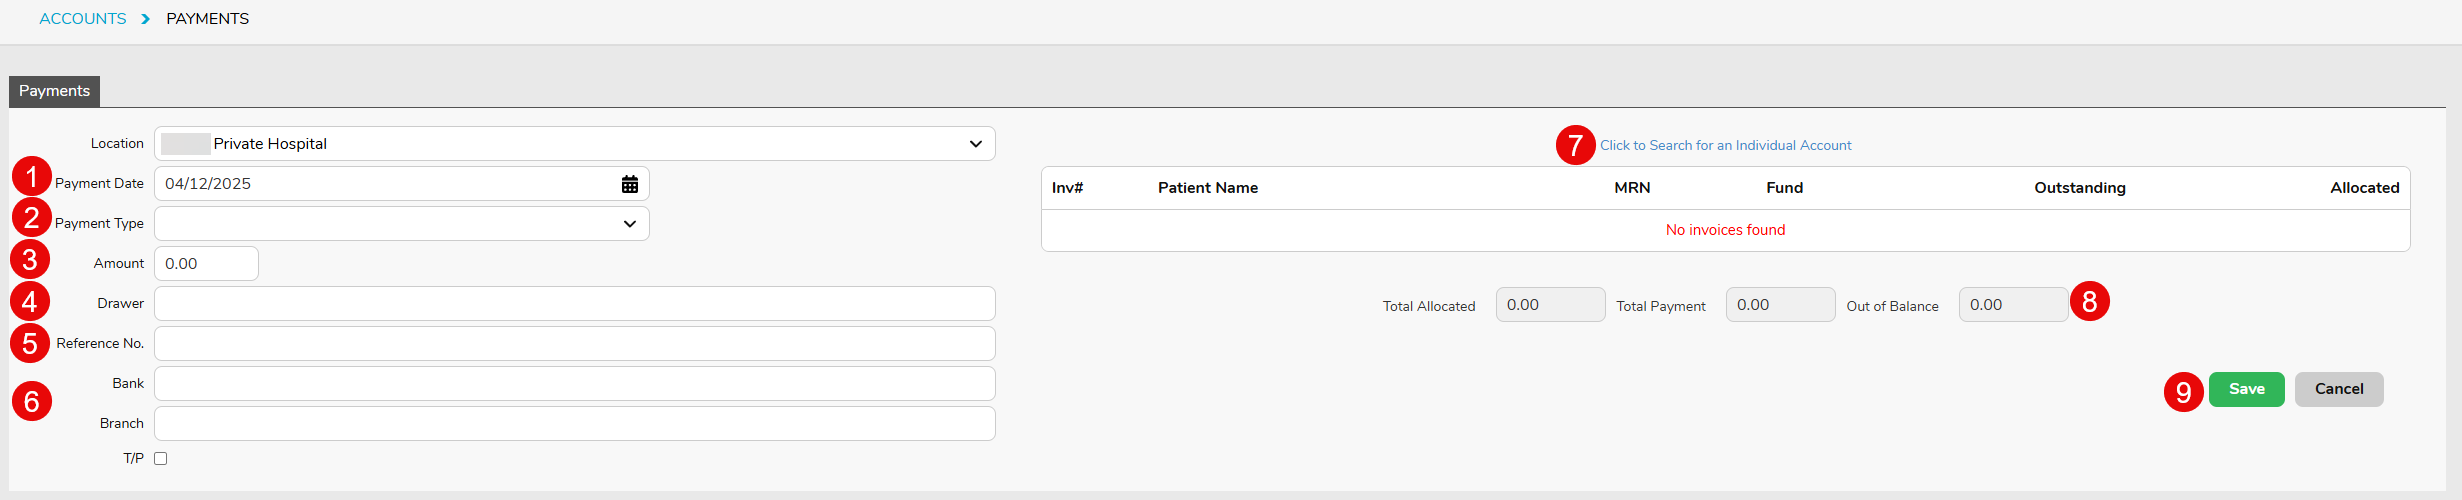
Populate all required fields as per below:
Ensure Payment Date is correct
Add Payment Type
Type Amount received
Document the Drawer who made the payment
Add a Reference No. if required
If payment is made via Cheque, add the Bank and Branch
Utilise Click to Search for an Individual Account to search for patients and manually add them to the payment. Continue to use this feature to add multiple patients.
Once all entries have been added, ensure the payment isn’t Out of Balance
Click Save
Split Transaction/Payment (Hospital)
If a payment has been receipted in one transaction but needs to be allocated to two separate invoice numbers or episodes, you can follow these instructions to “split” the payment into the two required amounts:
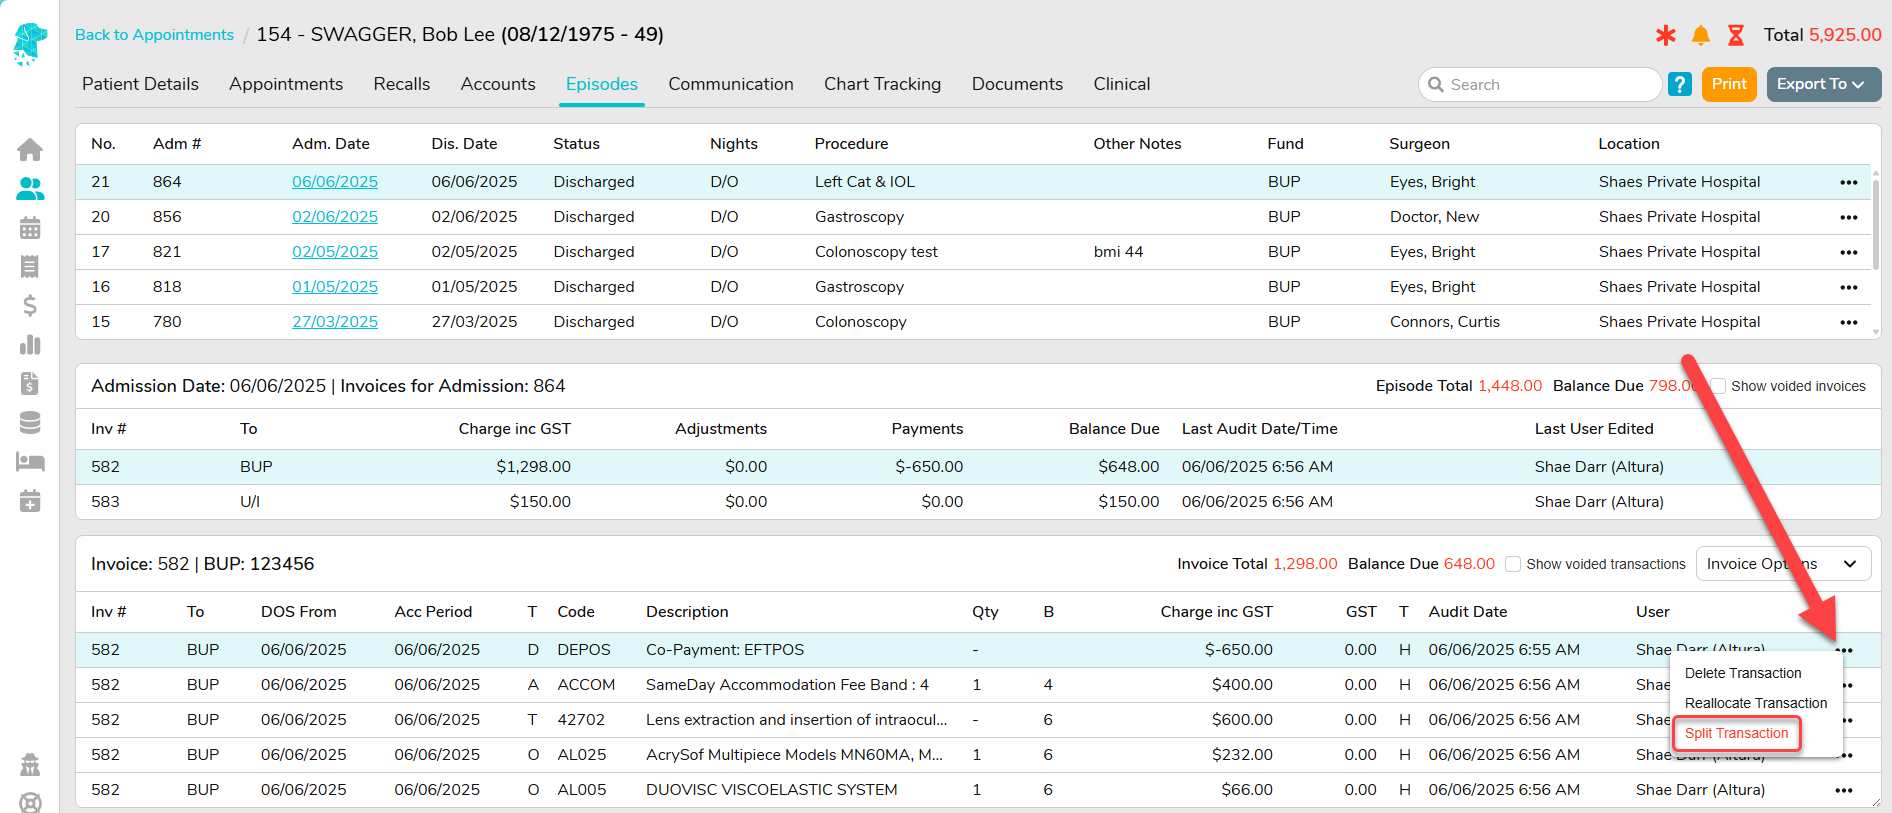
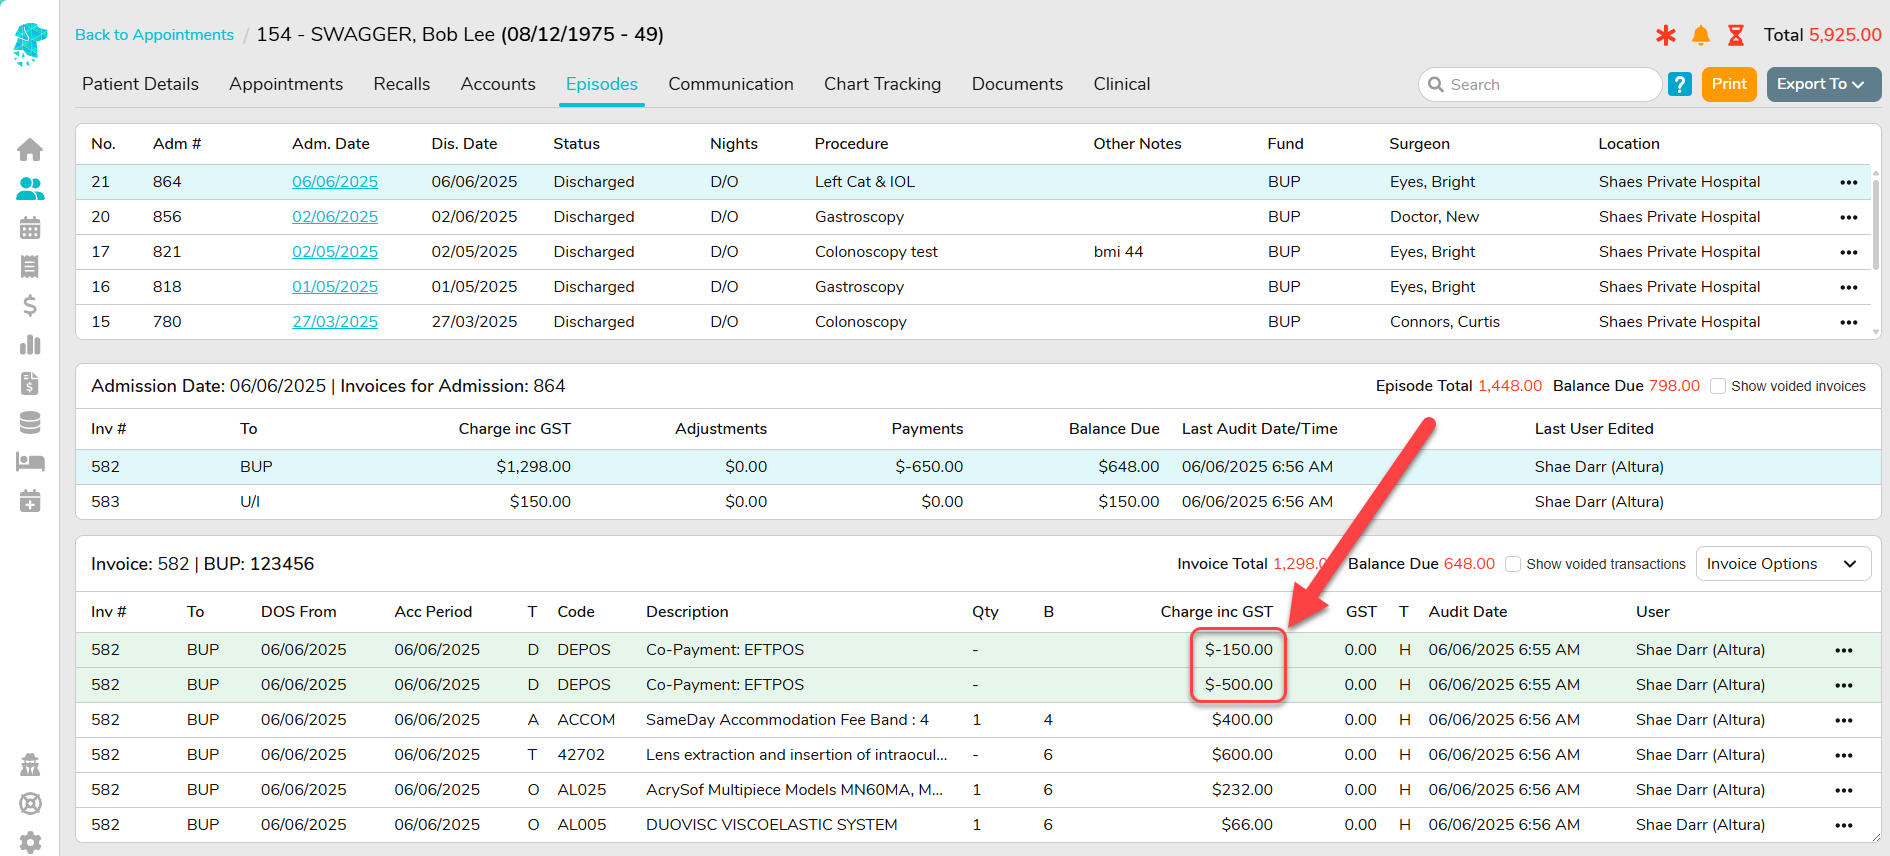
Navigate to the Episodes Screen and locate the payment that needs to be amended. Utilise the menu icon (three dots on the transaction line) to select Split Transaction.
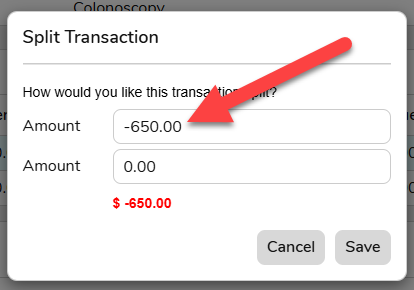
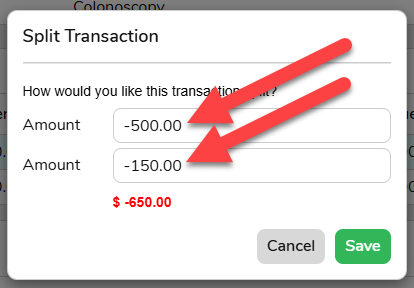
A pop-up will appear, displaying the total amount of the original transaction in the top line.
Enter the amount you wish to allocate to the first receipt in the top line. The second Amountfield will automatically populate with the remaining balance.
Click Save.
The original transaction will now appear as two separate lines.
Please see our wiki page for instructions on how to Reallocate the Transaction to another invoice or episode for this patient.
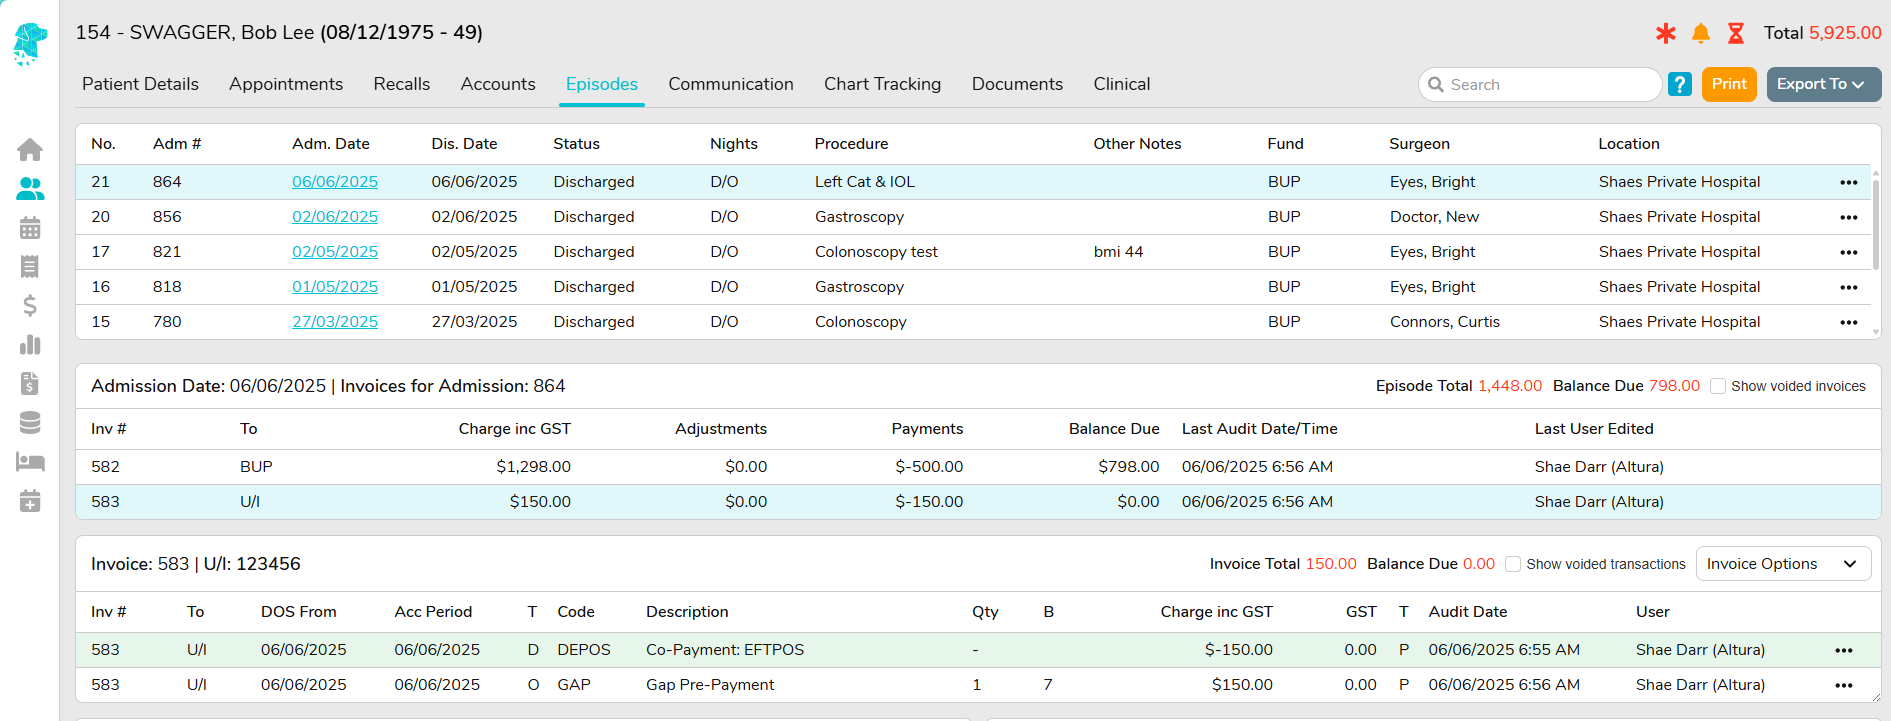
In some instances, a payment may need to be reallocated to another invoice or episode for the patient.
If the transaction needs to be split into two amounts before reallocation, please refer to our wiki page for instructions on how to Split Transaction/Payment (Hospital).
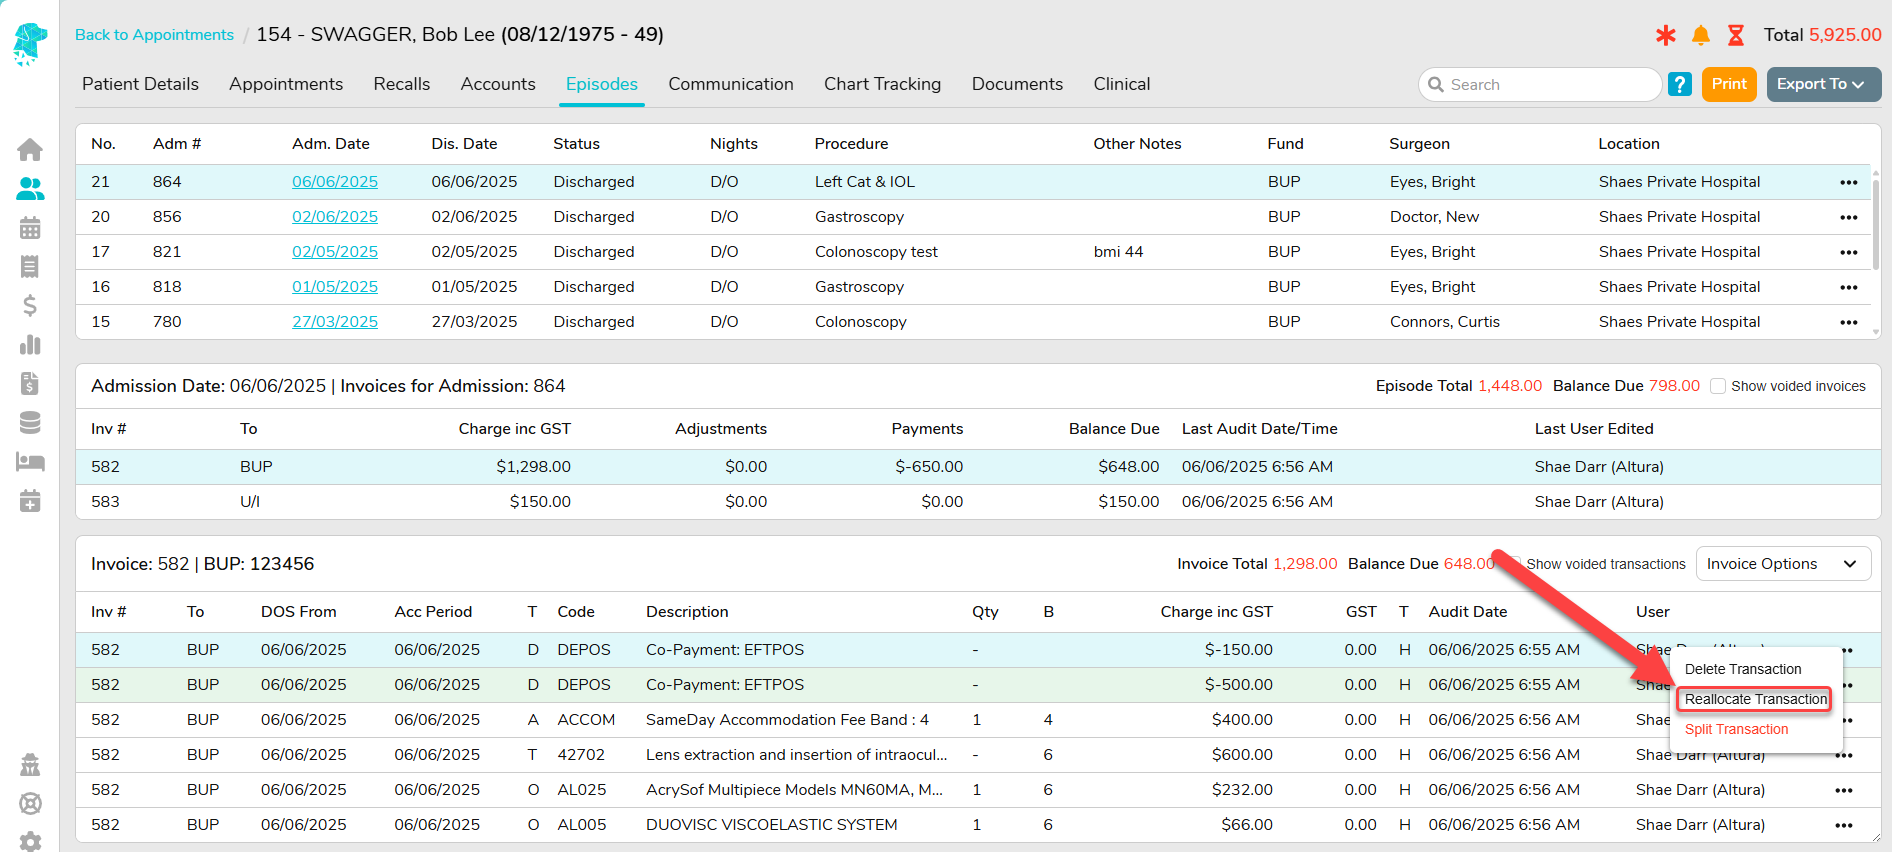
To reallocate a payment, navigating to the EpisodesScreen and locating the relevant payment. Utilise the menu icon (three dots on the transaction line) to select Reallocate Transaction.
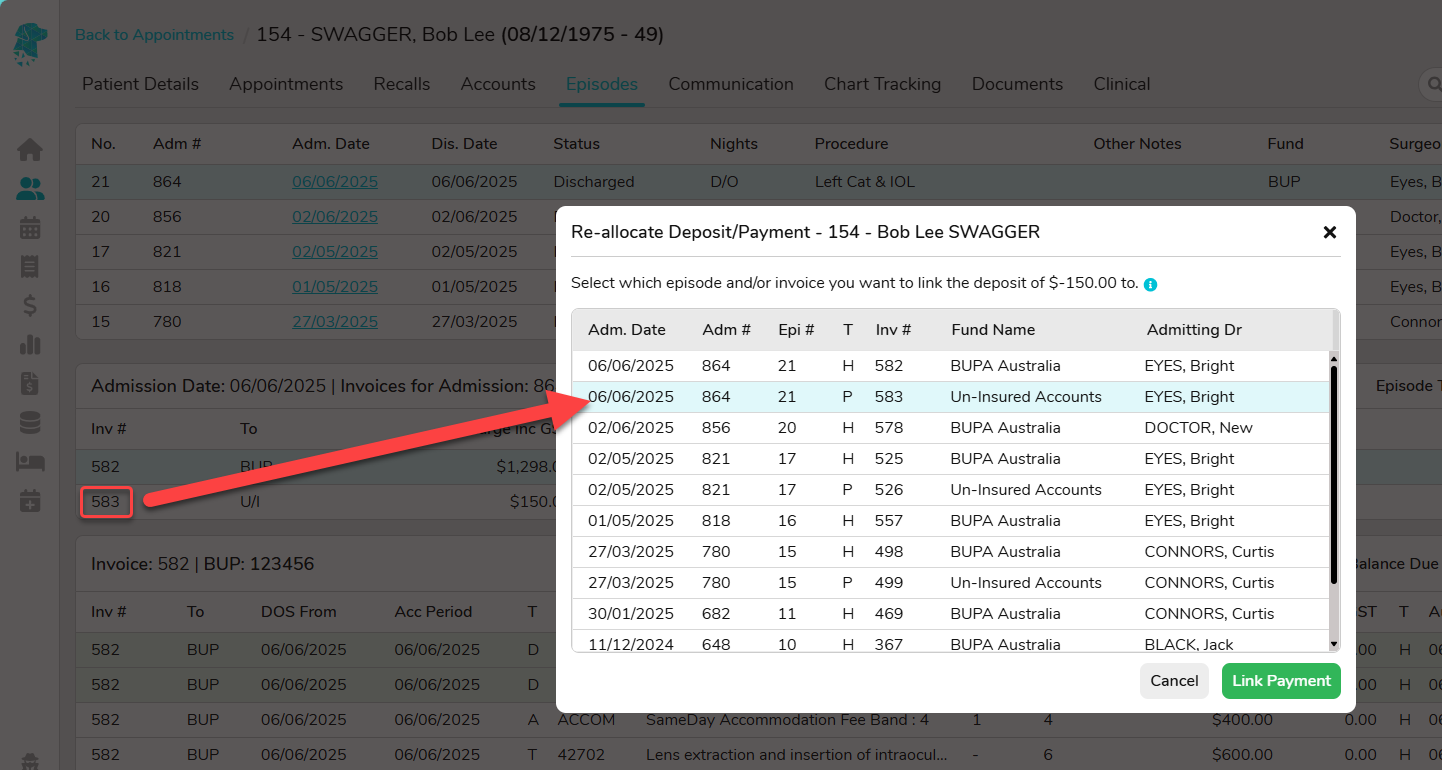
A pop-up will appear displaying all of the patient’s other invoices across all admissions. This is particularly useful when reallocating a deposit from one episode to another – for example, in the case of a cancelled procedure.
Once the appropriate invoice is selected, click Link Payment.
In the example below, the $150 deposit has been reallocated from Invoice 582 to Invoice 583.
Refund Adjustment via Episodes Screen (Hospital)
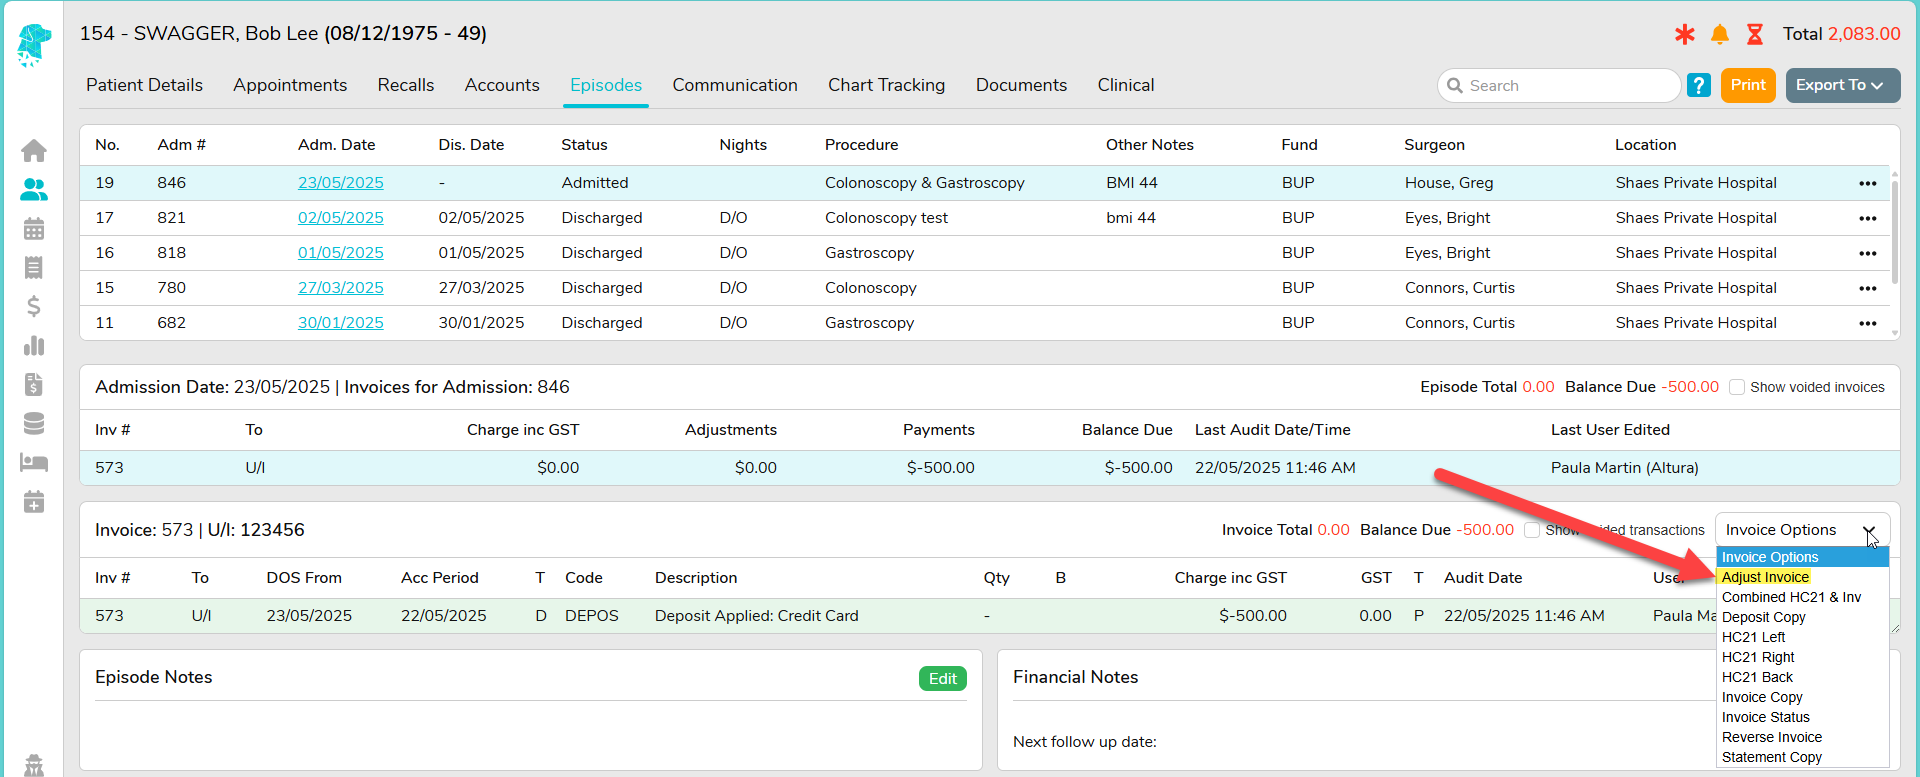
Navigate to the Episodes Screen and select the invoice that requires the refund. Utilise the Invoice Options dropdown to select Adjust Invoice.
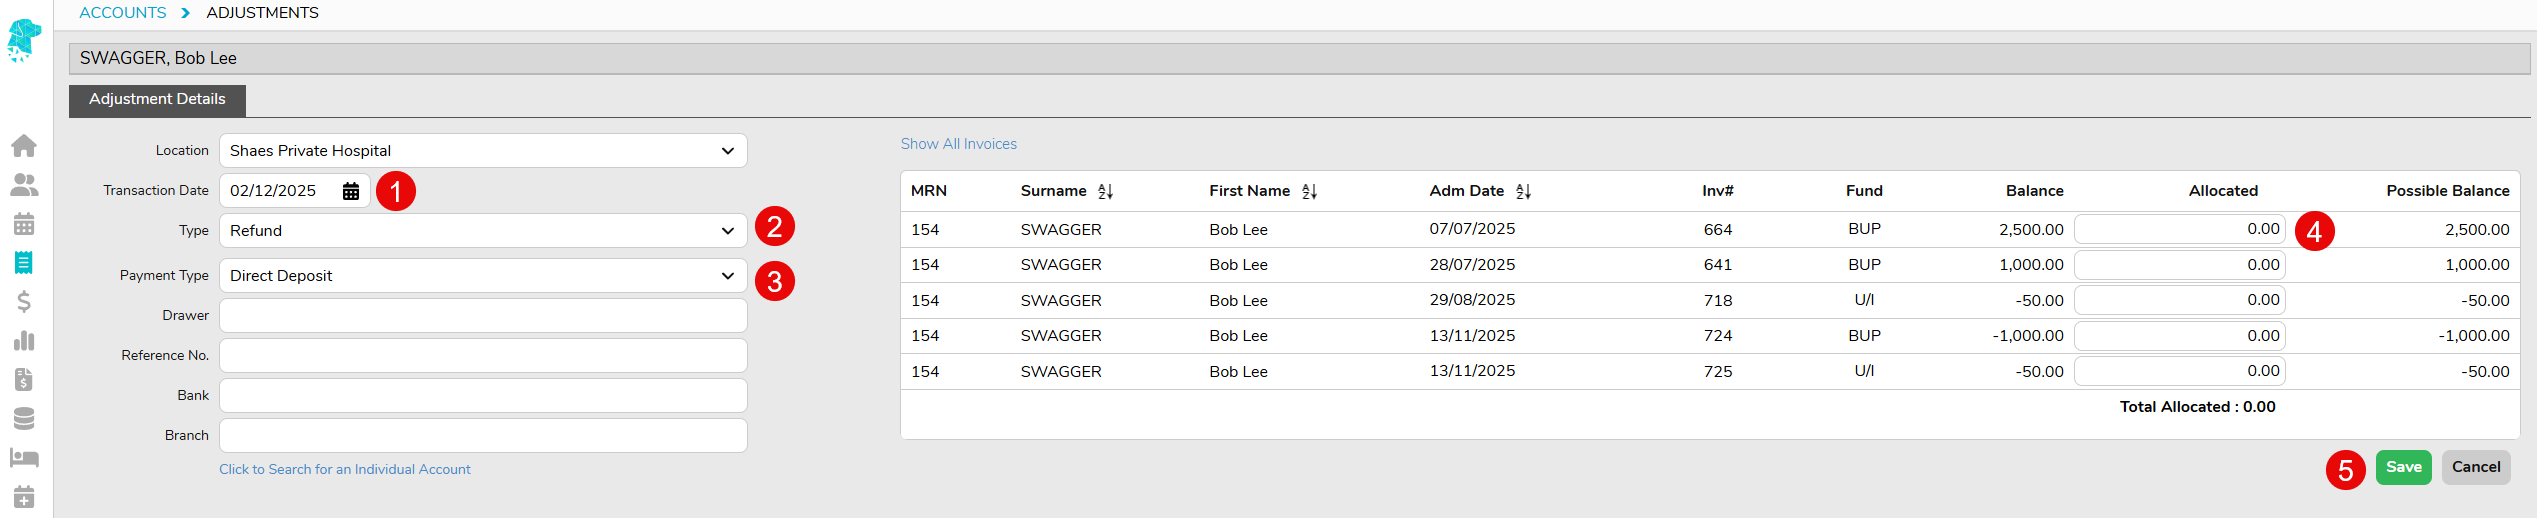
The Transaction Date will populate as the current date but can be amended if required to reflect the actual date the refund was processed.
Select Refund in the Type field.
The Payment Type field is displayed allowing the facility to record how the refund was processed.
Add the refund amount to the corresponding Allocated field.
Click Save
Hospital Health Fund Fees – Importing Casebase Fees
FYDO now has the option to import Casebase Fees from an Excel file. It is important to note that the file must be an Excel file and must be set out in the same way as the sample template below. There is also a link below to download a blank template:
Use the same column titles as can be seen in this spreadsheet example.
Column headings need to be: A – MBS B – Casebase C – Procedure D – Type E – DVA F – OutlierDays G – OutlierRate H – GST I – ExclOS J – IgnoreStepDown K – ExcludePrivateRoom
The above layout reflects the content, and order of information, that is displayed on the Casebase Fees tab in FYDO.
If the file is not formatted in this way, with the exact column titles, the data will not be able to be imported into FYDO or will upload into the wrong fields.
How to Format an Excel File for Casebase Fee Upload
Data from a Health Fund contract can be transferred into the relevant columns of the template, or a copy of a contract can be modified using the following steps:
Save a copy of the contract (do not edit the master copy)
Go to Casebase Fee tab or section in the contract
Remove any lines above the header table so that there is only one header row
Delete any columns that do not contain the required information as per the images above
Ensure the names and order of all columns and the header row match the template exactly
How to Upload Casebase Fee File into FYDO
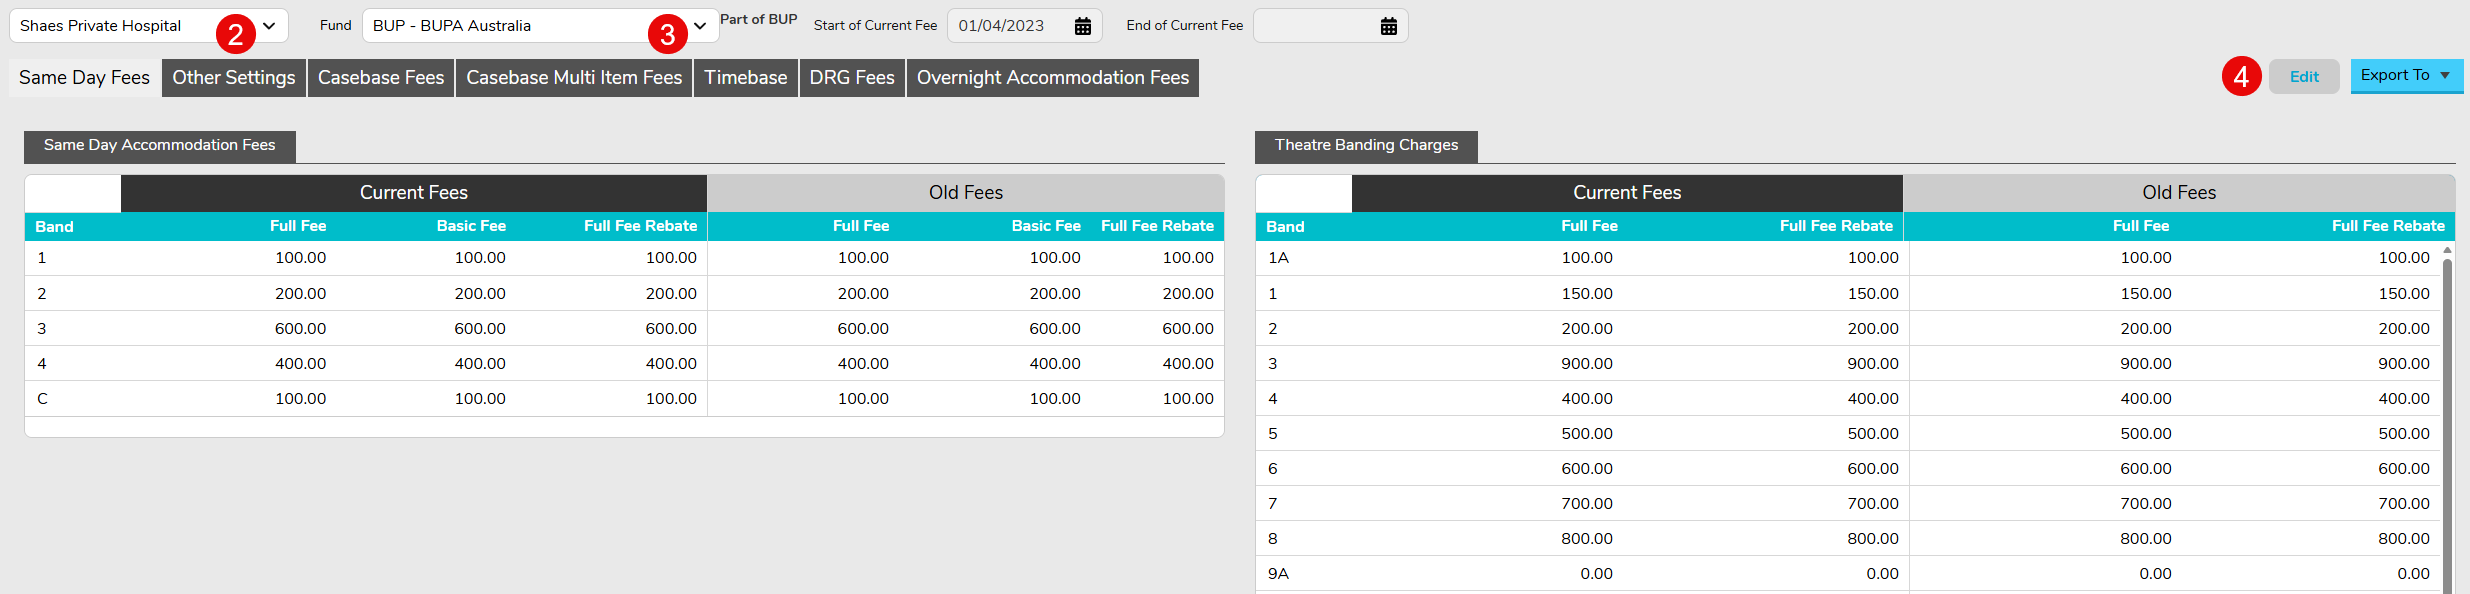
Go to Settings & select Fees Setup
Choose your location from the dropdown menu (only applicable to multi-site users)
Select required Fund
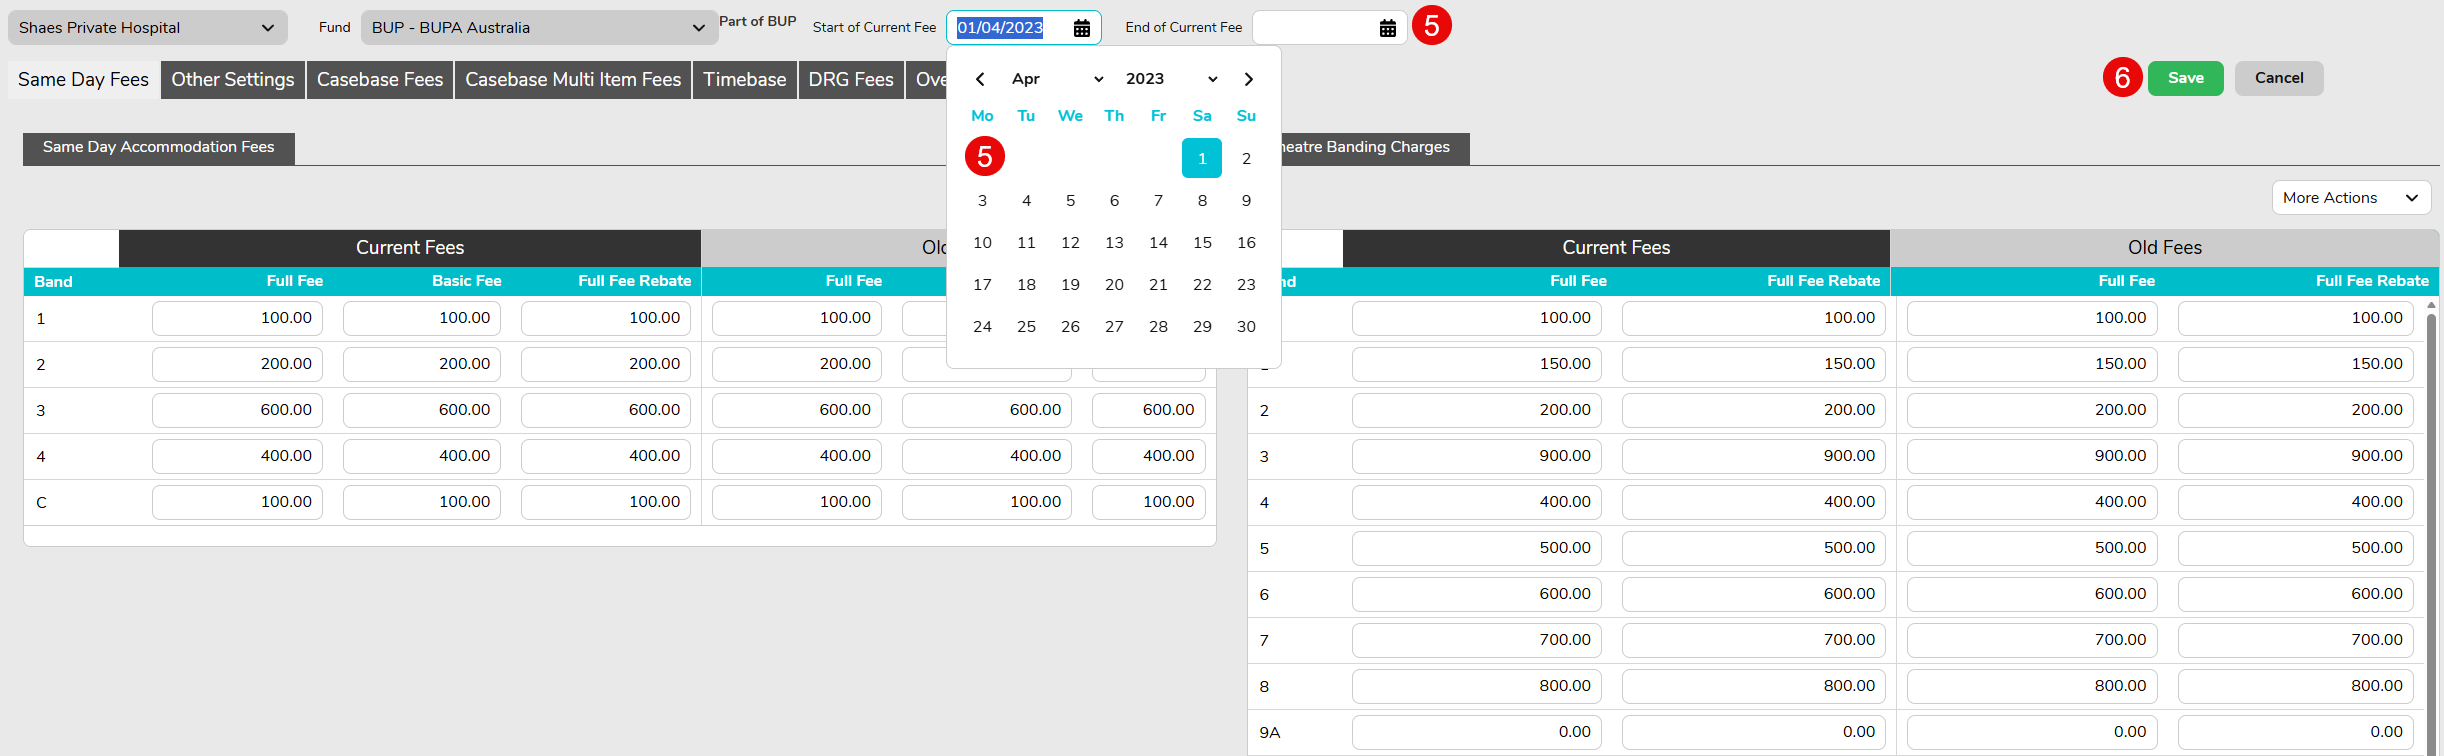
Ensure Same Day Fees tab is selected and Click Edit
Update Start of Current Fee and End of Current Fee dates
Click Save
Click Casebase Fees tab
Select Edit
Open the Actions dropdown and select Move to Old Charges – this step is optional, however it is recommended as it ensures that episodes prior to the new contract dates are billed at the appropriate rates, otherwise all unbilled episodes will be billed at the newly loaded rates
Click Save
Click Edit again
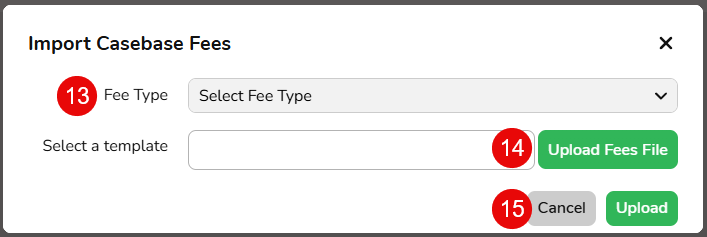
Utilise the Actions dropdown again to select Import Fees
Click Fee Type and select Current File
Click Upload Fees File and locate the relevant Excel file to be uploaded
Click Upload
Casebase items and fees will populate into the Casebase Fees tab
Click Save
Select Print to print or download, then conduct a spot check with the contract to ensure fees have populated correctly
Note: If a Casebase item no longer exists in the new fees, but there was an old rate, the line will remain in the fees screen and Current will show as $0 (Old will show the previous rate). If a DRG has a zero-dollar balance under the Current fees AND the Old fees, FYDO will automatically remove this line from the fees page, as it is no longer required.