Claiming Hospital – Not Yet Sent

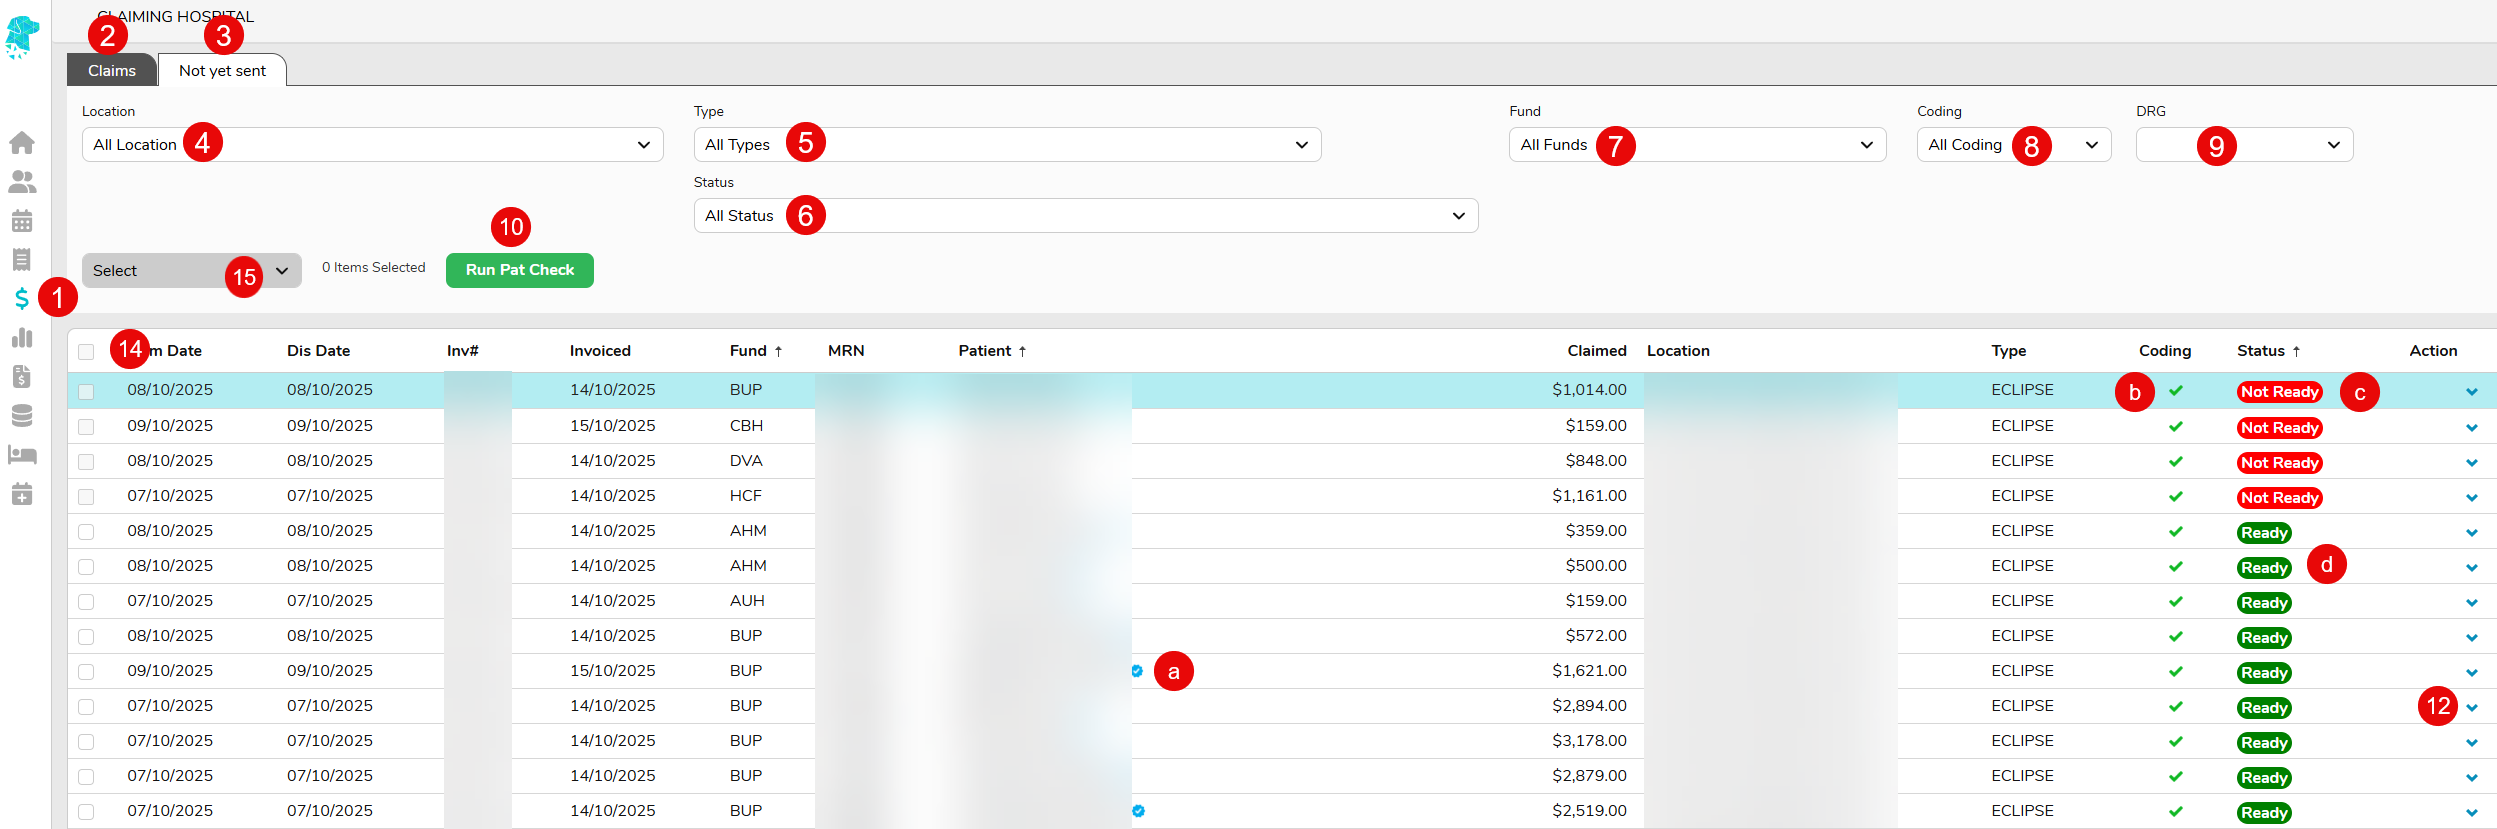
Claiming Hospital is used to transmit the invoiced episodes to the health funds via ECLIPSE. It consists of 2 tabs, Claims & Not Yet Sent.
These instructions will cover the Not Yet Sent Tab.
For information regarding the Claims Tab see our instructions on Claiming Hospital – Claims

  1. The Claiming Hospital section can be opened by hovering over theand selecting Claiming Hospital
  2. This will open to display the Claims Tab. (Click on this link to view the Claiming Hospital – Claims instructions)
  3. The Not yet sent tab displays all claims that have been invoiced & will include claims that can be sent via ECLIPSE & also Paperbase claims that need to be sent manually
  4. For multi-location databases, use the Location dropdown to select the desired facility
  5. Use the Type dropdown to select Eclipse or Paperbase claims
  6. Use the Status dropdown to display, or omit, claims that are Ready, Not Ready or On Hold
  7. Use the Fund dropdown to display, or omit, certain funds
  8. Use the Coding dropdown to display, or omit, claims that are Completed or Pending coding
  9. Use the DRG dropdown to show claims with a DRG or with an Empty DRG.  Using the Empty DRG option will identify claims that still require to be grouped
  10. Use the Run Pat Check button to run an OPV Check for all the patients on the list. This function will only work if the patients’ Medicare card & health fund cards are entered correctly. Sometimes this may need to be run twice as the Medicare card might be updated the first time, therefore running it a second time will enable the system to check the fund details
  11. For a claim to be ready to be sent it requires:
    a. A blue tick to confirm the OPV check has been successfully performed
    b.   A green tick to confirm that the coding has been completed
    c.  If it is still showing as Not Ready it will need to be grouped, in the coding screen
    d.   Once it is showing as Ready it is able to be transmitted via eclipse
  12. Use the Blue Arrow , or select the claim (so that it is purple) and Right Click to display a menu that allows you to navigate to: – The Coding Screen to check coding & grouper
    – The Patient History Screen to view the invoice details
    – The Patient Record Screen to complete the OPV check
    This feature assists in getting the claims ready to transmit via eclipse
  13. When an ECLIPSE claim is ready to be sent another option will be available in the menu called Send Invoice via ECLIPSE which will then send the invoice to the fund
  14. Once all claims are ready to be sent (or filters have been applied to only show Ready ECLIPSE claims) the select all function will be available to select & send multiple claims at once
  15. After all desired claims have been selected, use the Select dropdown to Send selected via ECLIPSE
  16. The claims will then be transmitted to the fund & will display on the Claims tab with their status. It is a great idea to check the Claims Tab straight away to make sure claims have been successfully transmitted
  17. Paperbase claims will also appear on the Not yet sent Tab. This is to remind the user to send the claim away manually.
  18. Paperbase claims will require the coding to be done & the episode to be grouped before it will show as Ready
  19. Once it is ready, the blue arrow on the right, or the right-click function, will display the option to Mark as Sent. Using this function, only after the invoice has been manually sent, is a great way to ensure no claims are missed. Once the claim is marked as sent it will no longer display on the Not yet sent tab. There will also be an audit in the Patient Episode Screen to state who marked the claim as sent & when.


Adding Fees to Other Services Codes (Hospital)

These instructions will assist users in adding or amending the fees associated with Other Service Codes / Prosthesis Codes.
Prostheses list updates will be automatically loaded into FYDO and any new items will be added with all new fees will be imported. However descriptions will not be updated, as some facilities prefer their own descriptions & do not what them overridden.
After following the instructions for Adding Other Services Codes the user will be able to add the correlating fees by following the steps below.

  1. Go to Settings
  2. Scroll down to Hospital > Fees Management & select Other Services
  3. Use the Search field to find the desired code / other service
  4. Double click on the item to display the information that has been entered, along with the table to enter the relevant fees

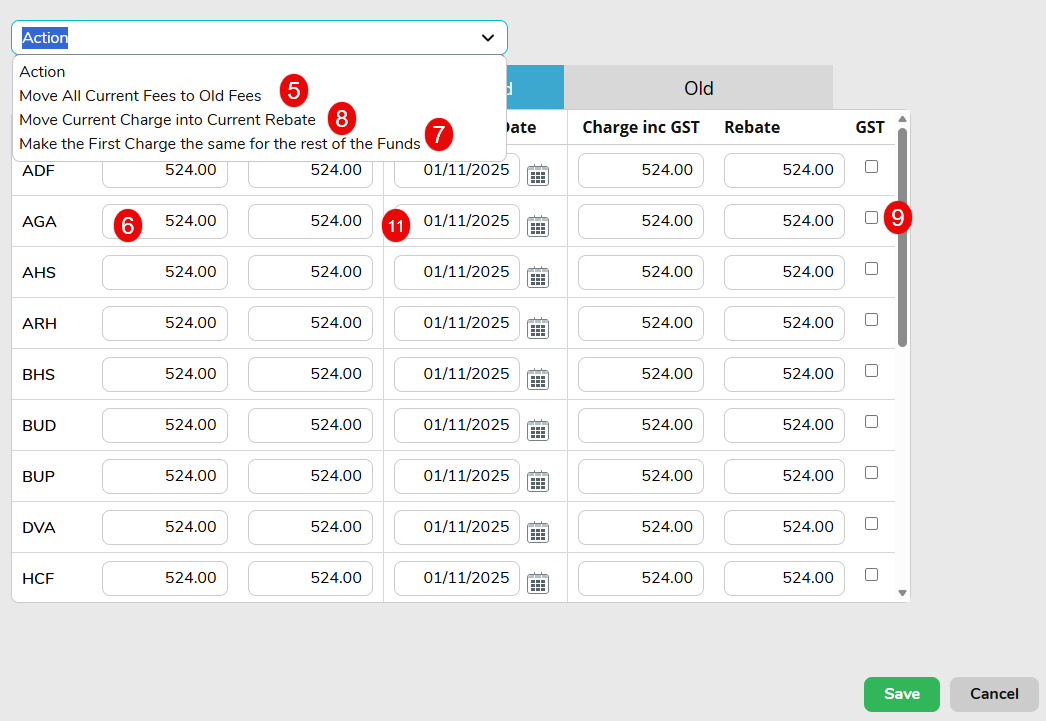
  1. If replacing fees that have already been entered, use the Action dropdown & select Move all Current Fees to Old Fees. This will copy the Current fees to the Old fees to allow the new fees to be entered, without losing the previous fee schedule or needing to type them in again
  2. If the cost of the item will be the same for each health fund, enter the charge for the first fund under the Charge inc GST column
  3. Then use the Action dropdown & select Make the First Charge the same for the rest of the Funds. This will replicate the fee added for the rest of the funds
  4. Then use the Action dropdown & select Move Current Charge into Current Rebate. This will replicate all the Charge inc GST fees in the Rebate column. You may then need to remove some of the fees listed in the Rebate column (or override them to $0) if the ‘fund’ doesn’t attract a rebate (e.g., Uninsured)
  5. Use the GST tick box column if the fee entered is inclusive of GST
  6. If the cost of the item is for a particular ‘fund’ (e.g., a gap fee for an uninsured patient), add the fee to the desired fund, instead of following the above steps to add to all funds
  7. Lastly enter the Threshold Date (start date) 
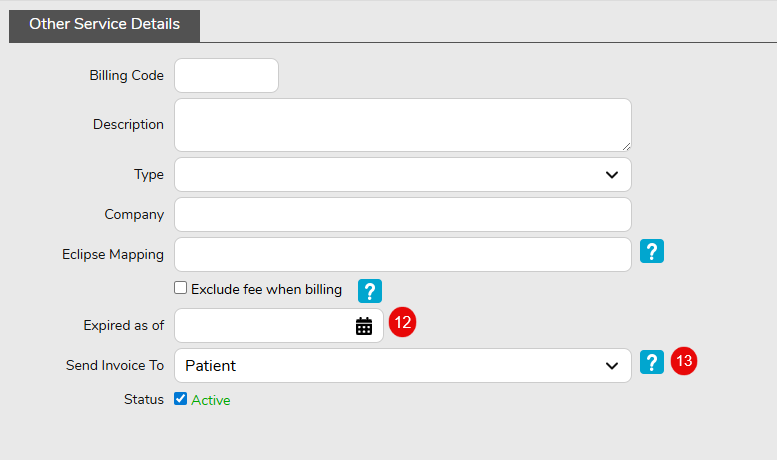
  8. If an Other Service item can no longer be used for billing/claiming, you can allocate an Expiry Date
  9. If the item should always be billed to the patient, you can set this as the default by selecting Patient in the Send Invoice To dropdown.

  1. Once all desired information has been entered click SAVE


Adding Other Services Codes (Hospital)

These instructions will assist users in Adding or amending an Other Service Code / Prosthesis Code for the purpose of updating the description or information related to the item.
Prostheses list updates will be automatically loaded into FYDO. Any new items will be added & all new fees will be imported. Descriptions will not be updated, as some facilities prefer their own descriptions & do not what them overridden.
  1. Go to Settings
  2. Scroll down to Hospital > Fees Management & select Other Services


  3. Use the Hospital Drop Down box to select the facility if it is a multi-location database
  4. Use the All Services Drop Down box to select a specific service type, if necessary
  5. Use the Search field to determine if the code is already in the system. The search fields can be used to search codes, descriptions or companies etc to allow the user to search any part of the other service information
  6. If the code appears, double click to display the information. If it doesn’t appear, use the Show Inactive tick box to be sure that the code isn’t in the system as Inactive
  7. If the code needs to be added, click Add Other Service


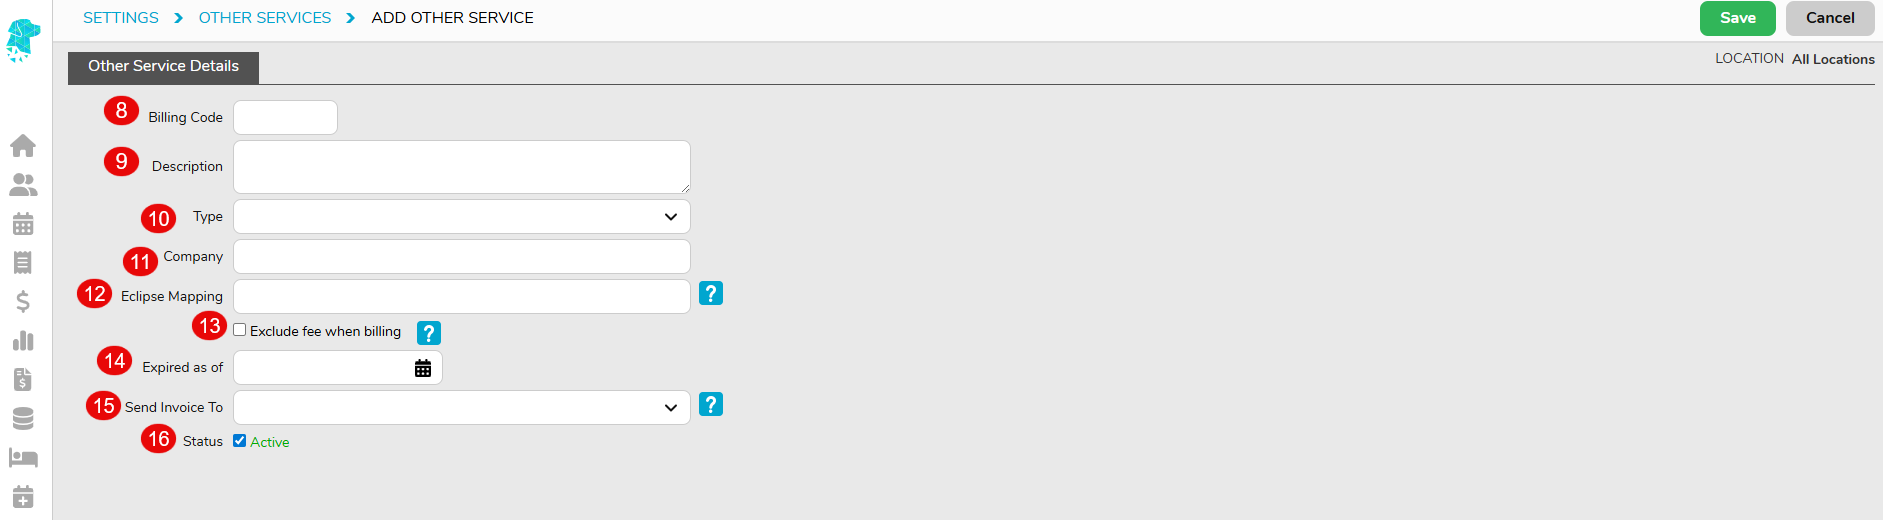
  8. Enter the Billing Code. (This is the only information that will not be editable once the item is saved)
  9. Enter the Description (Mandatory Field)
  10. Use the Type dropdown to categories the item:
    a. Allied Health Services
    b. Disposables
    c. Labour Ward
    d. Nursing Fee
    e. Other
    f. Pharmaceuticals
    g. Prostheses
    h. Theatre Fee
  11. Enter the Company that supplies the product. (This can assist with reporting on prosthesis etc, as the other services reports can be run by suppliers)
  12. Enter Eclipse Mapping if the Other Services code that is being entered requires a prefix before the code itself. (Only add the prefix to this field, not the prefix & the code)
  13. Use the Exclude fee when billing tick box if this Other Service is excluded from certain Casebase contracts. For example, if the contract lists an all-inclusive fee for a procedure, that also includes prosthesis, this tick box would ensure there is no fee raised for this particular prosthesis when billed in conjunction with the particular Casebase item. For this feature to work the tick box in the Casebase Fee Set up called Exclude Other Services also needs to be ticked. When these two tick boxes marry up there will be no charge raised for the other serviced when billed with that item. For any other Casebase or per diem fee, without this Exclude Other Services tick box marked, there will still be a fee raised for the other service
  14. If an Other Service item can no longer be used for billing/claiming, you can allocate an Expiry Date
    1. If the item should always be billed to the patient, you can set this as the default by selecting Patient in the Send Invoice To dropdown

    2. Use the Status to mark a code as Active or Inactive
    3. Once all desired information has been entered click Save
    4. The Export to Excel option allows for the other services, along with the fees for each fund, to be exported to an excel spreadsheet. Use the Search field to filter down to a particular company or description etc to export more specific data (e.g., Search Alcon to export a list of all prosthesis in the system with the company listed as Alcon)
    5. To Delete an item, use the cross in the Action column to delete. You will then be asked to confirm that you are sure you want to delete the other service.

    The Other Service / Prosthesis Code has now been added to your FYDO database.

    For information on how to add the associated fees to this new item please see instructions Adding Fees to Other Services Codes (Hospital).


    Reversing a Hospital Invoice

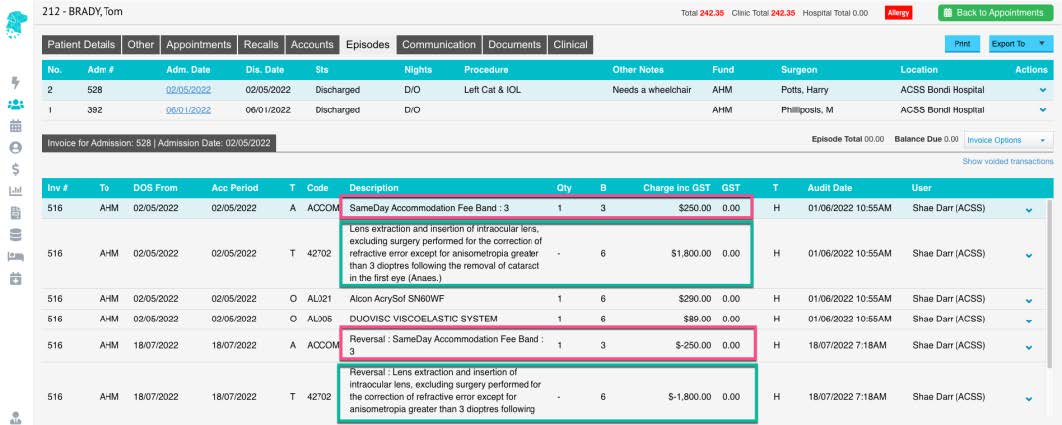
    For an invoice that has been incorrectly billed or needs to be reversed by way of a journal entry. Navigate to the required patient using number 1 or 2 below

    1.Select the Patient icon on the left-hand menu
    a. Search for the required patient using the field in the top right
    b. Double click on required patient
    c. Navigate to the Episodes tab across the top of the patient record

    2. Select the Appointments icon on the left-hand menu
    a. Search for the required patient using the field in the centre at the top or
    b. Use the calendar to navigate to the episode date
    c. Once the patient has been located, right-click on their appointment and select Episode

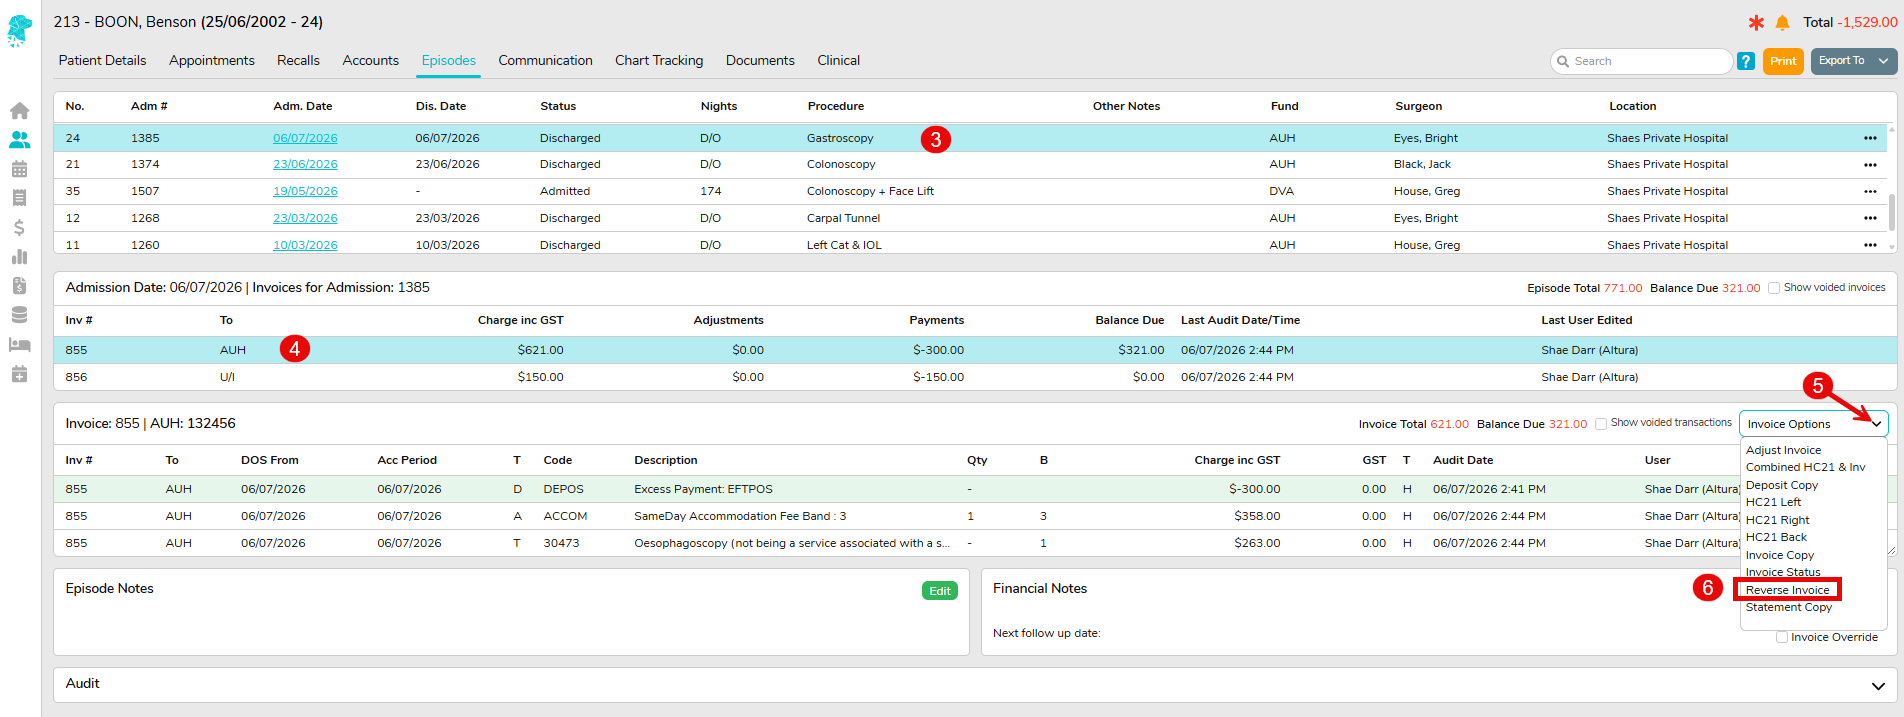
    3. Ensure that the correct episode is selected from the list at the top
    4. Ensure that the correct invoice is selected from the information for that admission (NB this is important if there are multiple invoices for the one episode)
    5. Use the Invoice Options drop-down on the left of the screen
    6. Select Reverse Invoice

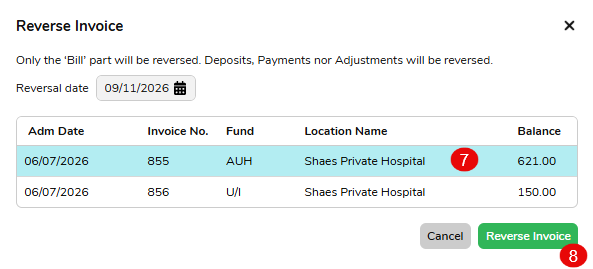
    7. The Reverse Invoice window will appear. Click on the invoice that you wish to reverse & it will turn a light shade of blue
    8. Click the Reverse Invoice option

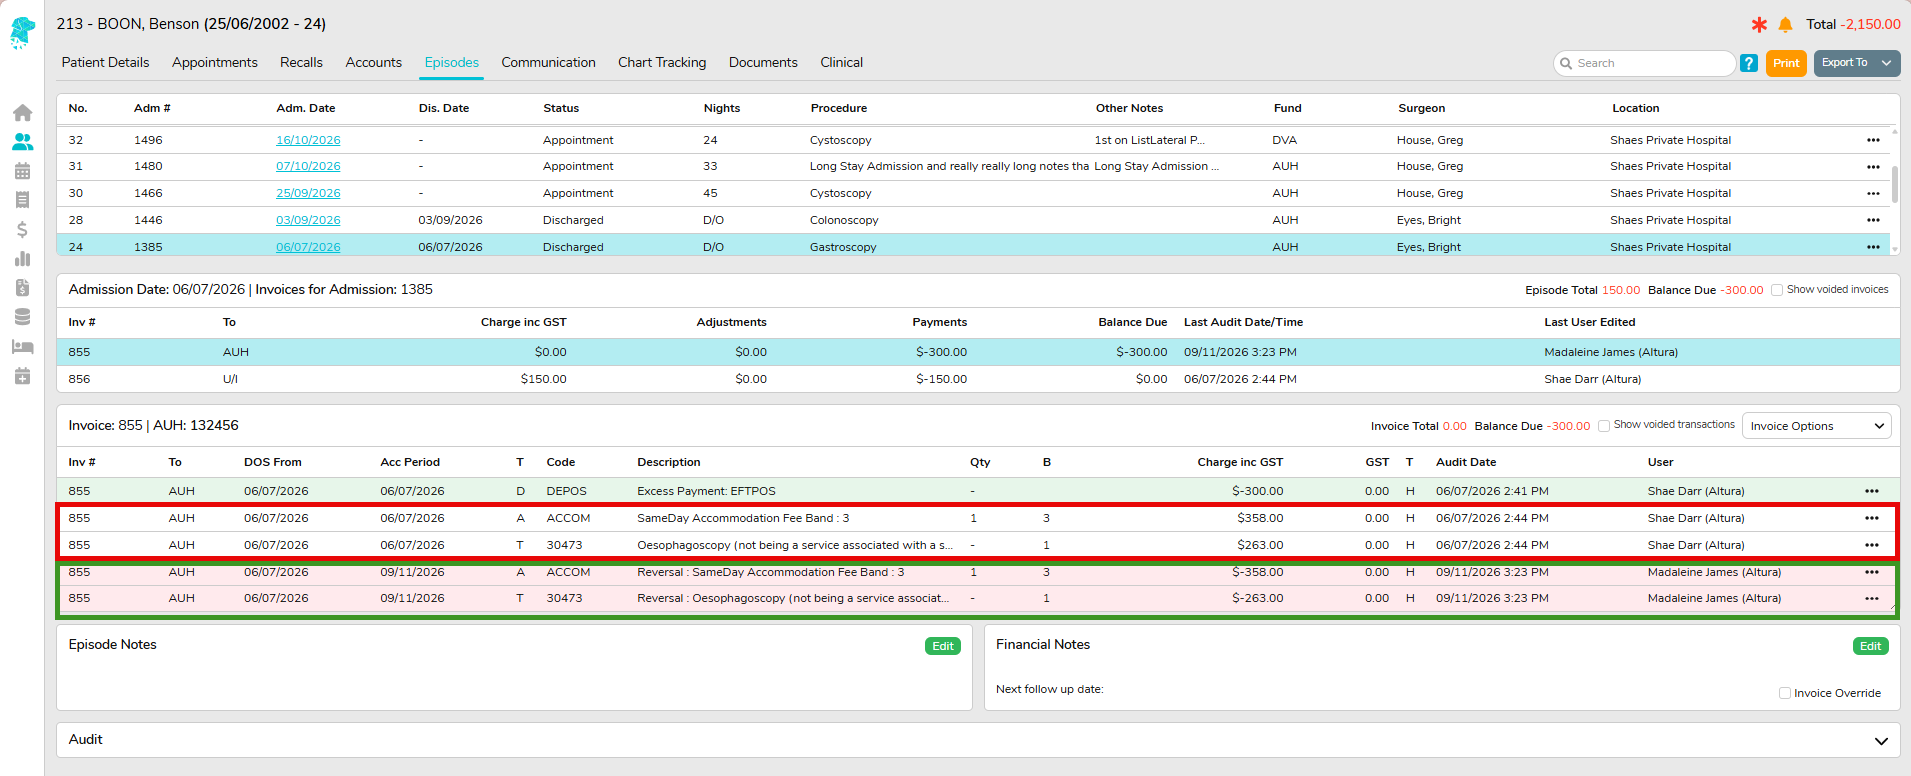
    9. The invoice will continue to show in the episode; however it will now be followed by the journal adjustments that have just been performed to revers it & zero it out


    Refund Journal via the Adjustments Screen (Hospital)

    If a patient or health fund is required to be refunded the system will reflect this transaction by following these steps.

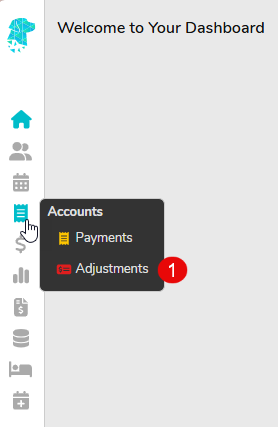
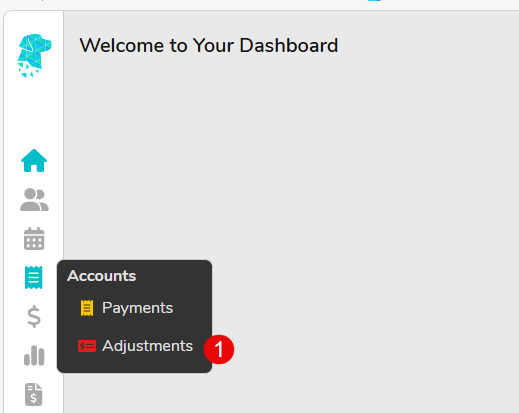
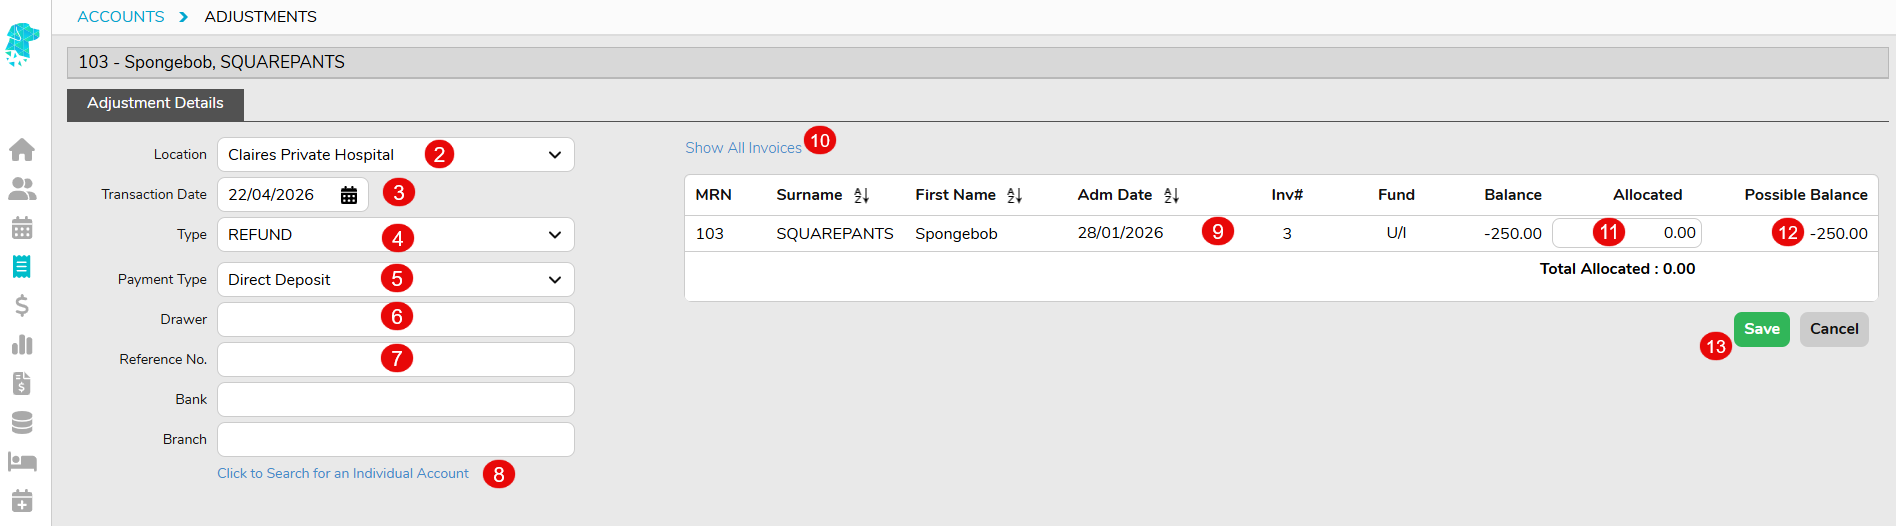
    1. Go to Accounts in the main menu & select Adjustments

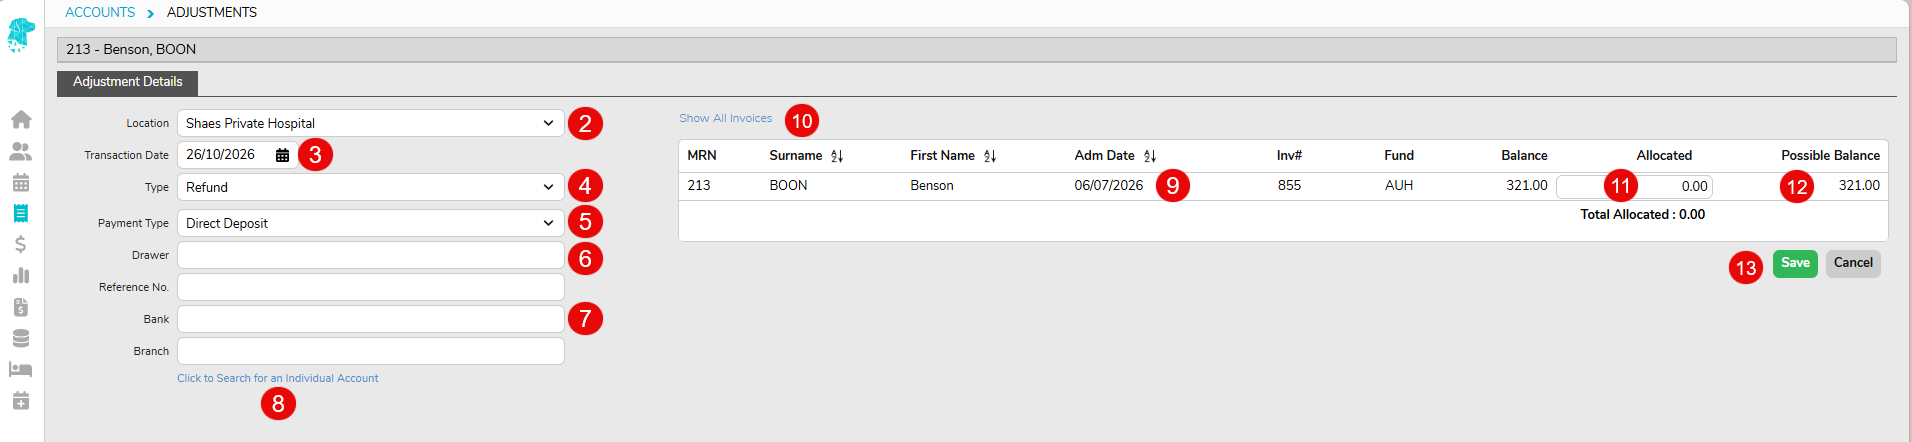
    2. For multi-location systems, use the drop down to select the relevant Location
    3. Enter the required Transaction Date if it differs from the current date
    4. Use the Type dropdown to select Refund
    5. Once Refund is selected for the Type, the Payment Type field will be displayed so the method of the transaction can be documented
    6. Type the required information in the Drawer field
    7. Use the Reference No., Bank & Branch fields, if the facility work instructions require, to document additional information regarding a bank cheque etc
    8. Click “Click to Search for an individual Account” and the search box will be displayed to find the required patient
    9. Once a patient is selected, the invoices with an outstanding amount will be displayed
    10. Use the Show All Invoices option to display invoices that don’t currently have an outstanding balance
    11. Once you have moved from the Allocated field the system will show you the Possible Balance of the invoice, following the adjustment
    12 +13. Once all details have been confirmed and are correct, click Save


    Hospital Adjustments

    Adjustments via the Adjustments Screen

    If an adjustment is required for refund, write off, incorrect billing purposes etc it can be done using the Adjustments Screen or from the Patient History / Episode screen. Both options are explained below.

    Making the entry from the Adjustments Screen

    1. Go to Accounts in the main menu & select Adjustments

    1. For multi-location systems, use the drop down to select the relevant Location
    2. Enter the required Transaction Date if it differs from the current date
    3. Use the Type dropdown to select the required transaction type e.g., write off, incorrect billing, discount, refund etc.
    4. If Refund is selected as the Type, the Payment Type field will be displayed so the method of the transaction can be documented. For all other journal / adjustment Types this field will not be necessary & won’t be displayed
    5. Type the required information in the Drawer field
    6. Use the Reference No., Bank & Branch fields, if the facility work instructions require, to document additional information regarding a bank cheque for refunds etc
    7. Click “Click to Search for an individual Account” and the search box will be displayed to find the required patient. (If processing this adjustment from the Episodes Screen any outstanding invoices will automatically be displayed)
    8. Once a patient is selected, the invoices with an outstanding amount will be displayed
    9. Use the Show All Invoices option to display invoices that don’t currently have an outstanding balance
    10. Type the amount to be refunded in the Allocated column
    11. Once you have moved from the Allocated field the system will show you the Possible Balance of the invoice, following the adjustment
    12. Once all details have been confirmed & are correct click Save
    Making the entry from the Episode Screen:

    1. Search for the patient using the Search field or by selecting the required admission date & theatre
    2. Right-click on the appointment & select Episodes
    3. Once in the Episodes screen ensure that the correct date of admission is selected
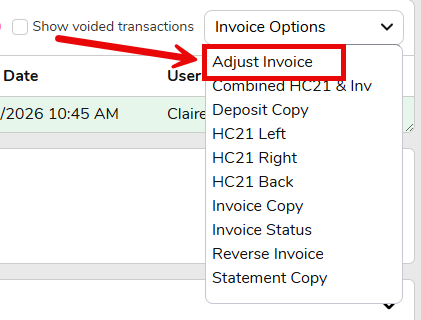
    4. Then use the Invoice Options drop down on the right of the screen to select Adjust Invoice

    1. You will be redirected to the Adjustments screen where you can follow the instructions above from step 2.


    Medicare and Fund Contacts – Dealing with Rejections

    Medicare & DVA

    Organisation Phone/ Email
    Medicare P: 1800 700 199F: 02 9895 3190
    MBS Interpretation P: 13 21 50E: askMBS@health.gov.au
    DVA P: 1300 550 017

    Health Funds

    Fund name Contact for clinics Contact for hospitals
    ACA Health
    ECLIPSE code: ACA
    HCP code: ACA
    P: 1300 368 390
    acahealthit@acahealth.com.au
    P: 1300 368 390
    acahealthit@acahealth.com.au
    Alliance (AHSA) P: 03 9813 4088
    access@ahsa.com.au
     
    AHM
    ECLIPSE code: AHM

    HCP code: AHM

    P: 1300 524 456
    Eclipse@medibank.com.au
    P: 1300 560 680
    Eclipse@medibank.com.au

    AHM and Medibank have the same support team

    Australian Unity
    ECLIPSE code: AUH

    HCP code: AUF

    P: 1800 035 360 P: 1800 035 360
    dgilder@australianunity.com.au
    BUPAE
    CLIPSE code: BUP

    HCP code: BUP

    P: 134 135F: 1300 130 623 for sending claims manuallydr.billing@bupa.com.au

    Only for sending claims with Problems / Rejections

    gapscheme@bupa.com.au

    Only for if you are unable to fax

    P: 134 135
    gordon.barrett@bupa.com.au
    CBHS Corporate Health & CBHS Health Fund
    ECLIPSE code: CBC & CBH

    HCP code: CBC & CBH

    P: 1300 654 123
    providers@cbhs.com.au
    P: 1300 654 123
    access@cbhs.com.au

    Alternatively
    julie.mckinnon@cbhs.com.au

    Hunter Health Insurance
    (Formally known as ‘Cessnock’ or ‘CDHBF Health’)

    ECLIPSE code: CDH

    HCP code: CDH

    P: 02 4990 1385
    enquiries@hunterhi.com.au
    P: 02 4990 1385
    CDH.BenefitsFund@Hunterhi.com.au
    CUA Health Limited
    ECLIPSE code: CHF

    HCP code: CPS

    P: 1300 499 260 cuahealth@cuahealth.com.au P: 1300 499 260 
    cuahealth@cuahealth.com.au

    Alternatively
    karen.coventry@cua.com.au

    Defence Health
    ECLIPSE code: DHF

    HCP code: AHB

    P: 1800 656 329 P: 1800 656 329
    providerrelations@defencehealth.com.au
    Doctors Health Fund
    ECLIPSE code: AMA

    HCP code: AMA

    P: 1800 226 586 P: 1800 226 586
    lesley.rutter@doctorshealthfund.com.au 
    Emergency Services Health (also managed by Police Health)

    ECLIPSE code: ESH

    HCP code: SPE

    P: 1300 703 703 
    F: 1300 151 152
    P: 1300 703 703 
    providerenquiries@eshealth.com.au
    GMHBA
    ECLIPSE code: GMH

    HCP code: GMH

    P: 1300 446 422
    F: (03) 5222 7478
    P: 1300 446 422
    Jamie-LeeGardham@gmhba.com.au

    joannesheldon@gmhba.com.au

    GU Health (FAI)
    ECLIPSE code: FAI

    HCP code: FAI

    P: 1800 249 966
    corporate@guhealth.com.au
    providers@honeysucklehealth.com.au
    HBF
    ECLIPSE code: HBF

    HCP code: HBF

    P: 1300 810 475
    expresspayqueries@hbf.com.au
    P: 1300 810 475
    lorraine.hort@hbf.com.au
    HIF(Health Insurance Fund of Australia Limited)

    ECLIPSE code: HIF

    HCP code: HIF

    P: 1300 134 060
    claims@hif.com.au
    P: 1300 134 060
    michelle.peacock@hif.com.au
    HCF
    ECLIPSE code: HCF

    HCP code: HCF

    P: 1800 670 302
    medicoverenquiry@hcf.com.au
    P: 1800 670 302
    MFarlow@hcf.com.au (Maria) 

    Alternatively

    dfernandez@hcf.com.au (David)

    Health Care Insurance
    ECLIPSE code: HCI

    HCP code: HCI

    P: 1800 804 950 P: 1800 804 950
    jamie.gillam@hciltd.com.au
    Health Partners
    ECLIPSE code: SPS

    HCP code: SPS

    P: 1300 113 113 P: 1300 113 113
    hospitalclaims@healthpartners.com.au

    davids@healthpartners.com.au

    Health.com.au
    ECLIPSE code: HEA

    HCP code: HEA

    P: 1300 199 802 P: 1300 199 802
    hospitalteam@health.com.au 

    Alternatively

    Catherine.Ngo@health.com.au 

    Gemma.Oliver@health.com.au

    Latrobe
    ECLIPSE code: LHS

    HCP code: LHS

    P: 1300 362 144
    E: info@lhs.com.au
    P: 1300 362 144
    tan@lhs.com.au
    Medibank
    ECLIPSE code: MPL

    HCP code: MPL

    P: 1300 130 460 P: 1300 130 460
    medibankhospital.network@medibank.com.au
    Mildura
    ECLIPSE code: MDH

    HCP code: MDH

    P: 03 5023 0269
    providers@mildurahealthfund.com.au 
    P: 03 5023 0269
    eclipse@mildurahealthfund.com.au
    MO Health
    ECLIPSE code: MYO

    HCP code: MYO

    P: 1800 333 004 P: 1800 333 004
    Vaibhav.Makin@aia.com
    Navy Health
    ECLIPSE code: NHB

    HCP code: NHB

    P: 1300 217 736
    query@navyhealth.com.au
    query@navyhealth.com.au
    NIB
    ECLIPSE code: NIB

    HCP code: NIB

    P: 1300 853 530
    medigap@nib.com.au
    Overseas Claims: internationalclaims@nib.com.au
    P: 1300 853 530
    hospitaleclipse@nib.com.au

    provrel@nib.com.au

    Nurse and Midwives
    ECLIPSE code: NMW

    HCP code: NMW

    P: 1300 344 000
    submit.claim@nmhealth.com.au
    P: 1300 344 000
    EclipseClaims@nmhealth.com.au 

    Alternatively

    George.Drakakis@nmhealth.com.au dianne.roe@teachershealth.com.au

    OneMediFund
    ECLIPSE code: OMF

    HCP code: OMF

    P: 1800 148 626
    F: 1300 673 406
    P: 1800 148 626
    info@onemedifund.com.au
    Peoplecare Health Insurance
    ECLIPSE code: LHM

    HCP code: LHM

    P: 1800 808 690 P: 1800 808 690
    info@peoplecare.com.au
    Phoenix Health
    ECLIPSE code: PHF

    HCP code: PWA

    P: 1800 028 817 P: 1800 028 817
    enquiries@phoenixhealthfund.com.au

    info@peoplecare.com.au

    Police Health (also managed by Emergency Services Health)

    ECLIPSE code: POL

    HCP code: SPE

    P: 1800 603 603
    F: 1800 008 554
    P: 1800 603 603
    providerenquiries@policehealth.com.au
    Queensland Country
    ECLIPSE code: QCH

    HCP code: QCH

    P: 1800 813 415 P: 1800 813 415
    rharding@qccu.com.au 
    TUH(Queensland Teachers)

    ECLIPSE code: QTU

    HCP code: QTU

    P: 1300 360 701 P: 1300 360 701
    alice.caldwell@tuh.com.au
    Reserve Bank health
    ECLIPSE code: RBH

    HCP code: RBH

    P: 1800 027 299
    F: 1300 309 704
    P: 1800 027 299
    info@myrbhs.com.au
    RT Health
    ECLIPSE code: RTH

    HCP code: RTE

    P: 1300 886 123 (option 5)
    access@rthealthfund.com.au
    P: 1300 886 123
    hospitals@rthealthfund.com.au
    St Lukes
    ECLIPSE code: SLM

    HCP code: SLM

    P: 1300 651 988 P: 1300 651 988
    general@stlukes.com.au
    Teachers Federation
    ECLIPSE code: TFH

    HCP code: NTF

    P: 1300 728 188 P: 1300 728 188
    elizabeth.cashman@teachershealth.com.au 

    Alternatively, try: 

    EclipseClaims@teachershealth.com.au 

    George.Drakakis@nmhealth.com.au 

    dianne.roe@teachershealth.com.au

    Transport Health
    ECLIPSE code: TFS

    HCP code: TFS

    P: 1300 806 808 P: 1300 806 808
    hospitals@transporthealth.com.au
    Westfund
    ECLIPSE code: WFD

    HCP code: WFD

    P: 1300 937 838
    medicalbenefits@westfund.com.au
    P: 1300 937 838
    sharpg@westfund.com.au


    Closing the Accounting Period

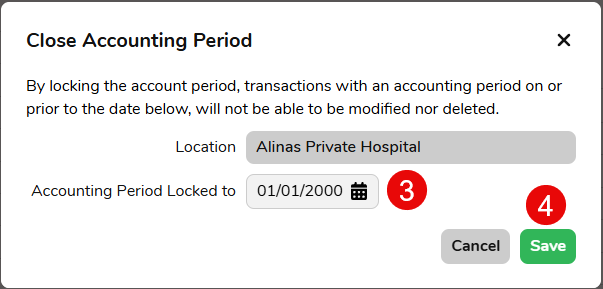
    Closing the ‘Accounting Period’ refers to locking down your financial figures up to a given date (usually the end of the month) so that they cannot be changed. 

    We do not recommend closing the accounting period for the last month, on the first day of the current month. Rather, give yourself seven to ten days to get your figures to a point where you are happy. That is, after all rejections and adjustments are made. 

    In other words, it ensures that the figures seen on your revenue report run out of FYDO match the figures seen on your bank account, to the cent. And that those figures then cannot be amended in FYDO. 

    So let’s see where the accounting period is closed.

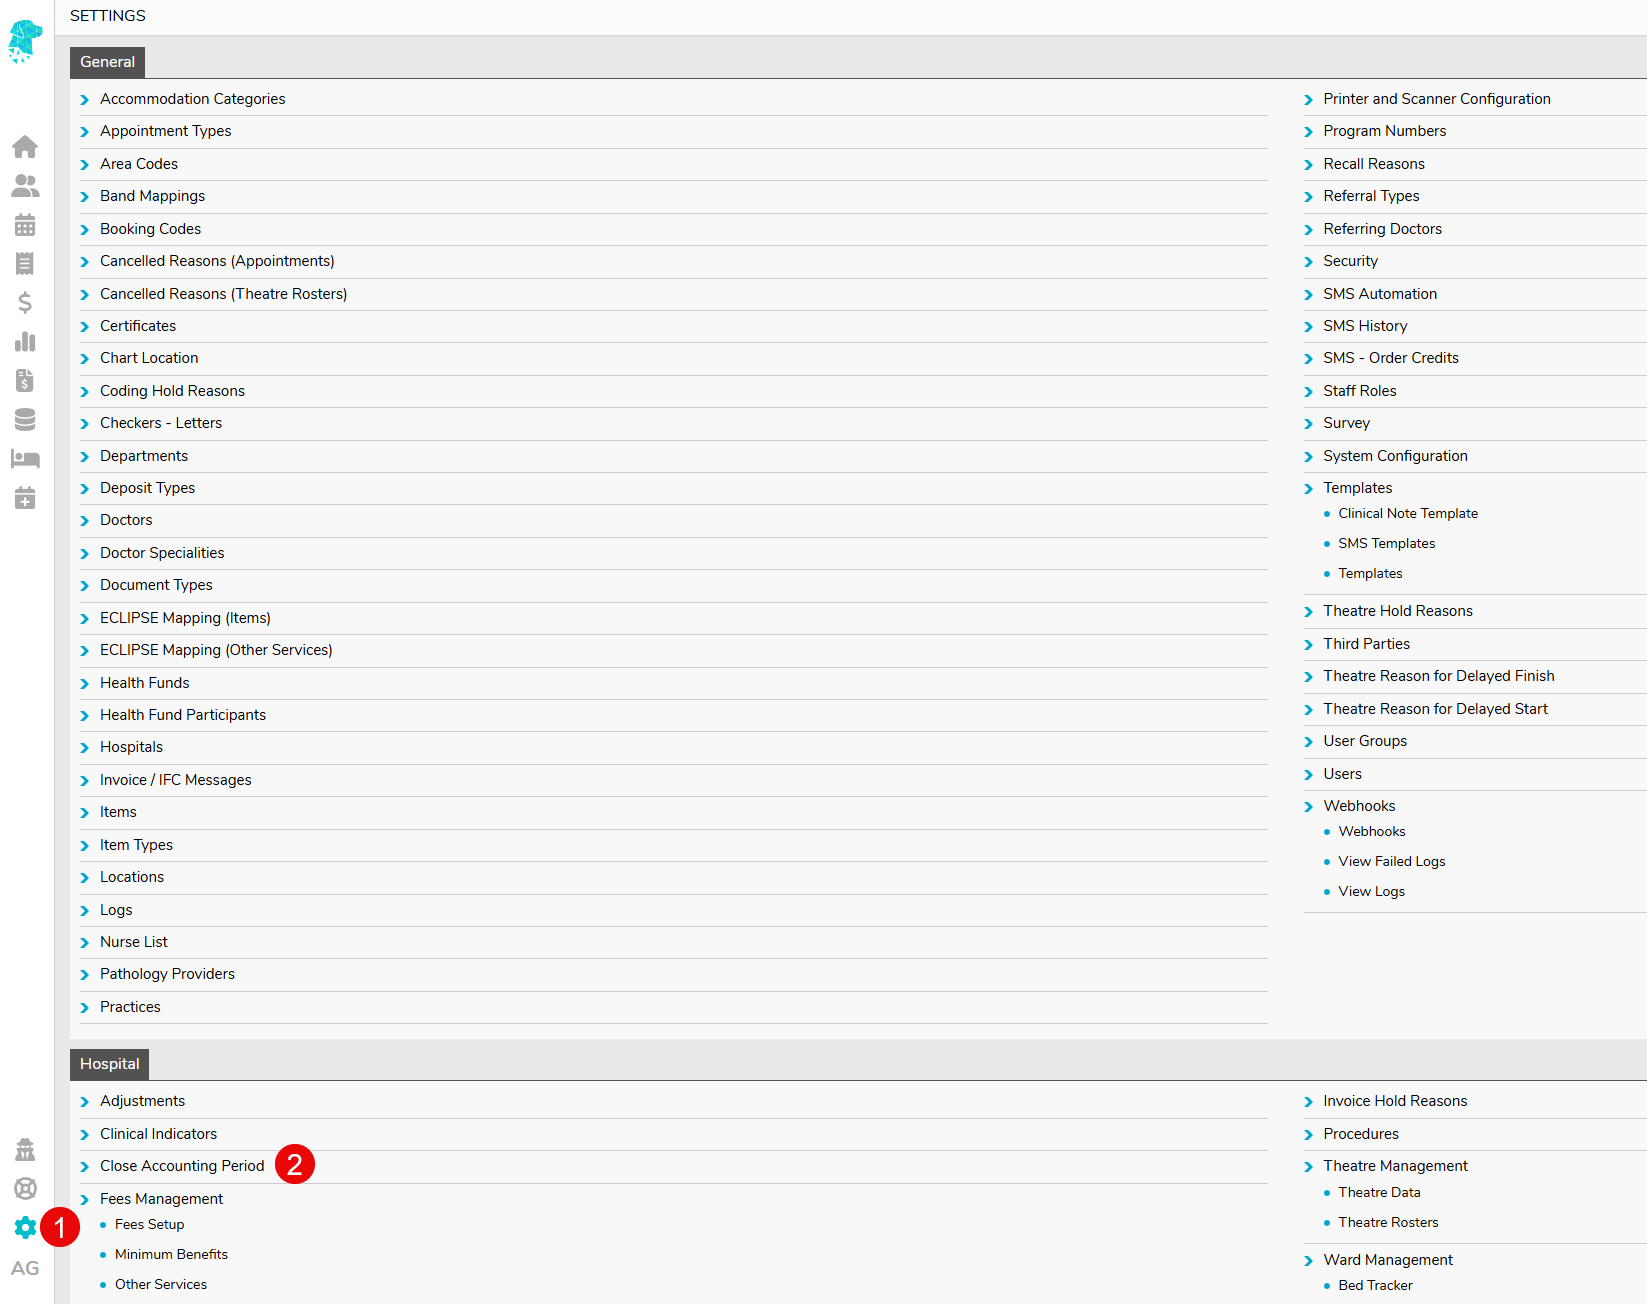
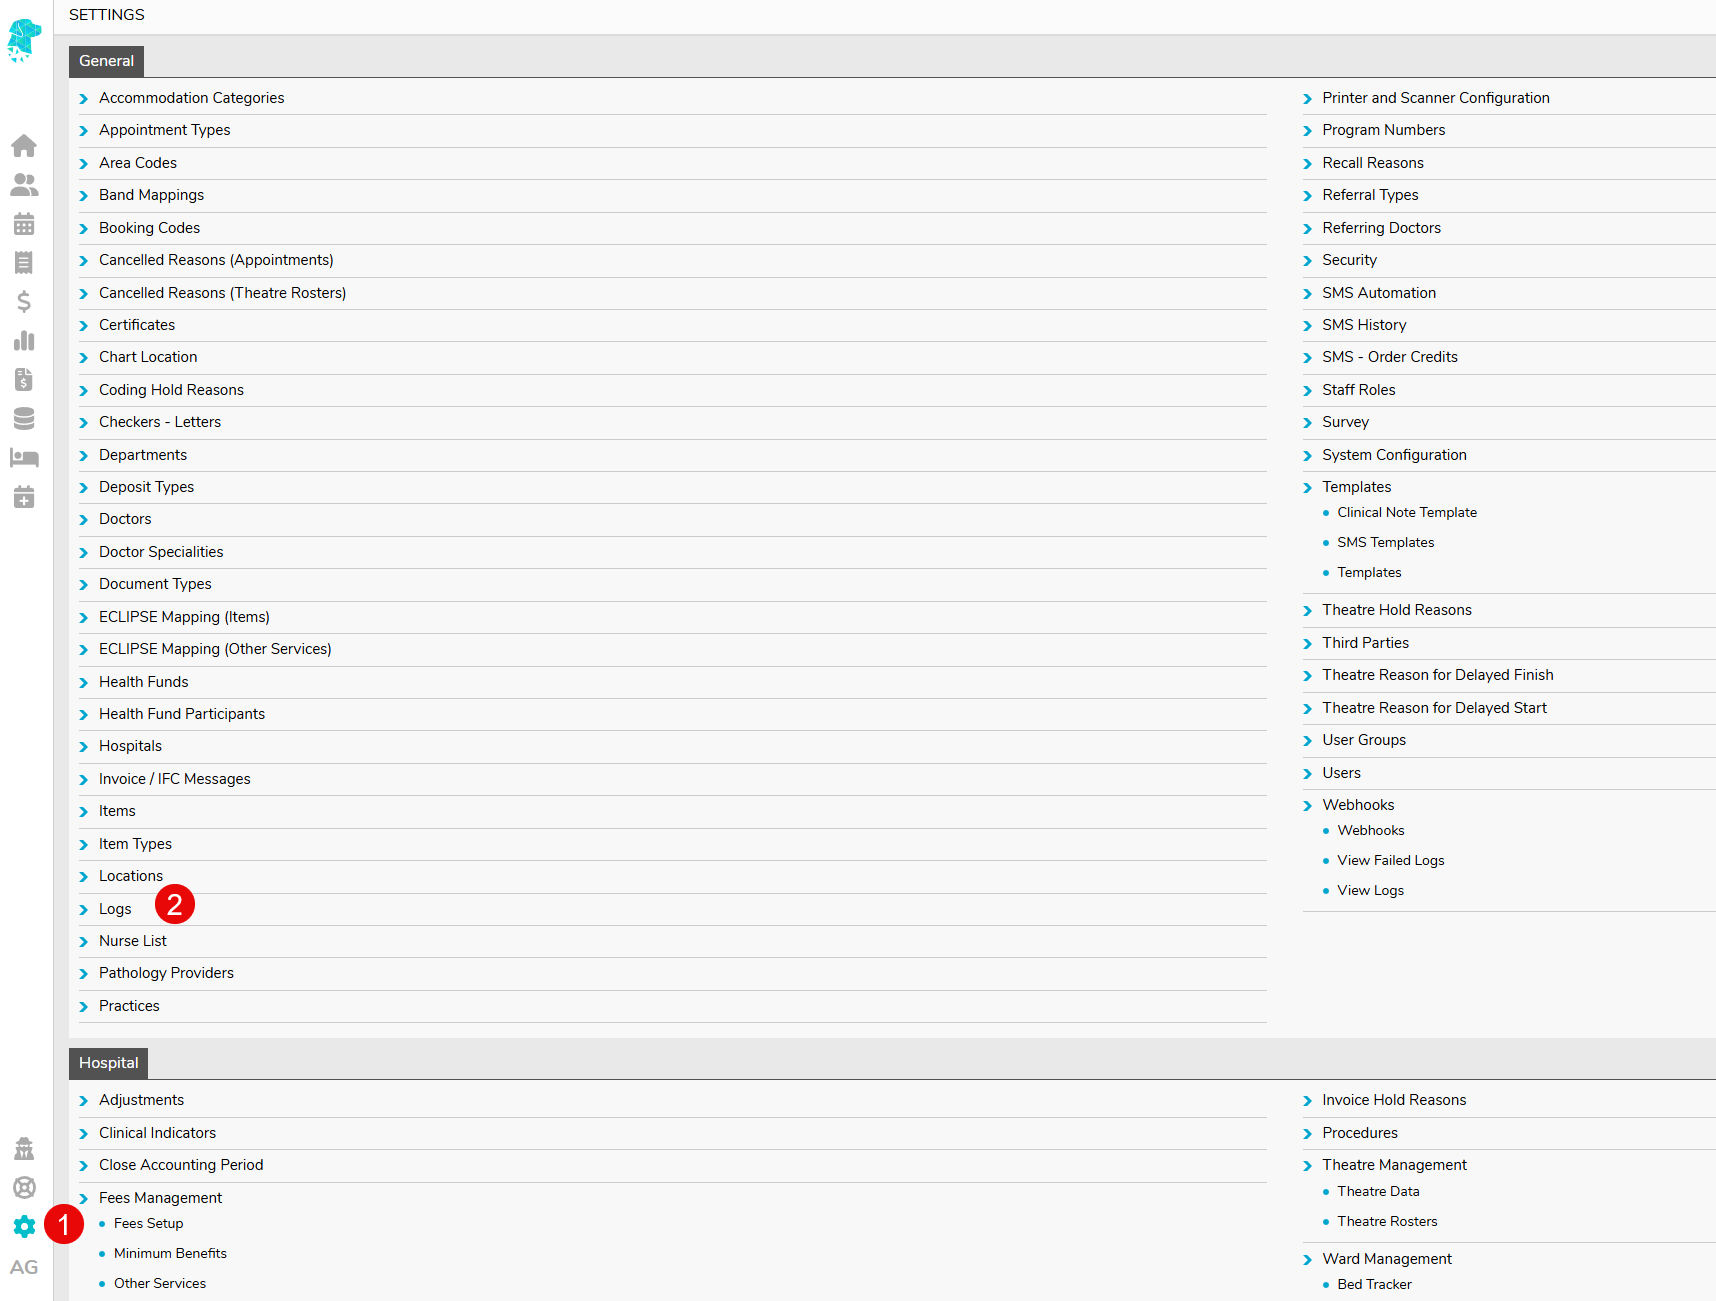
    Start off by going over to settings.

    Then, click Close Accounting Period.

     Enter the date you wish to lock your figures to and click Save.

    This action is recorded in FYDO’s audit log, so you can see who closed the accounting period and when.

    To view the audit log, go to Settings, then click on Logs.

    You will see the log showing when the accounting period was closed.