This will open the screen where the user can perform the End of Day Banking
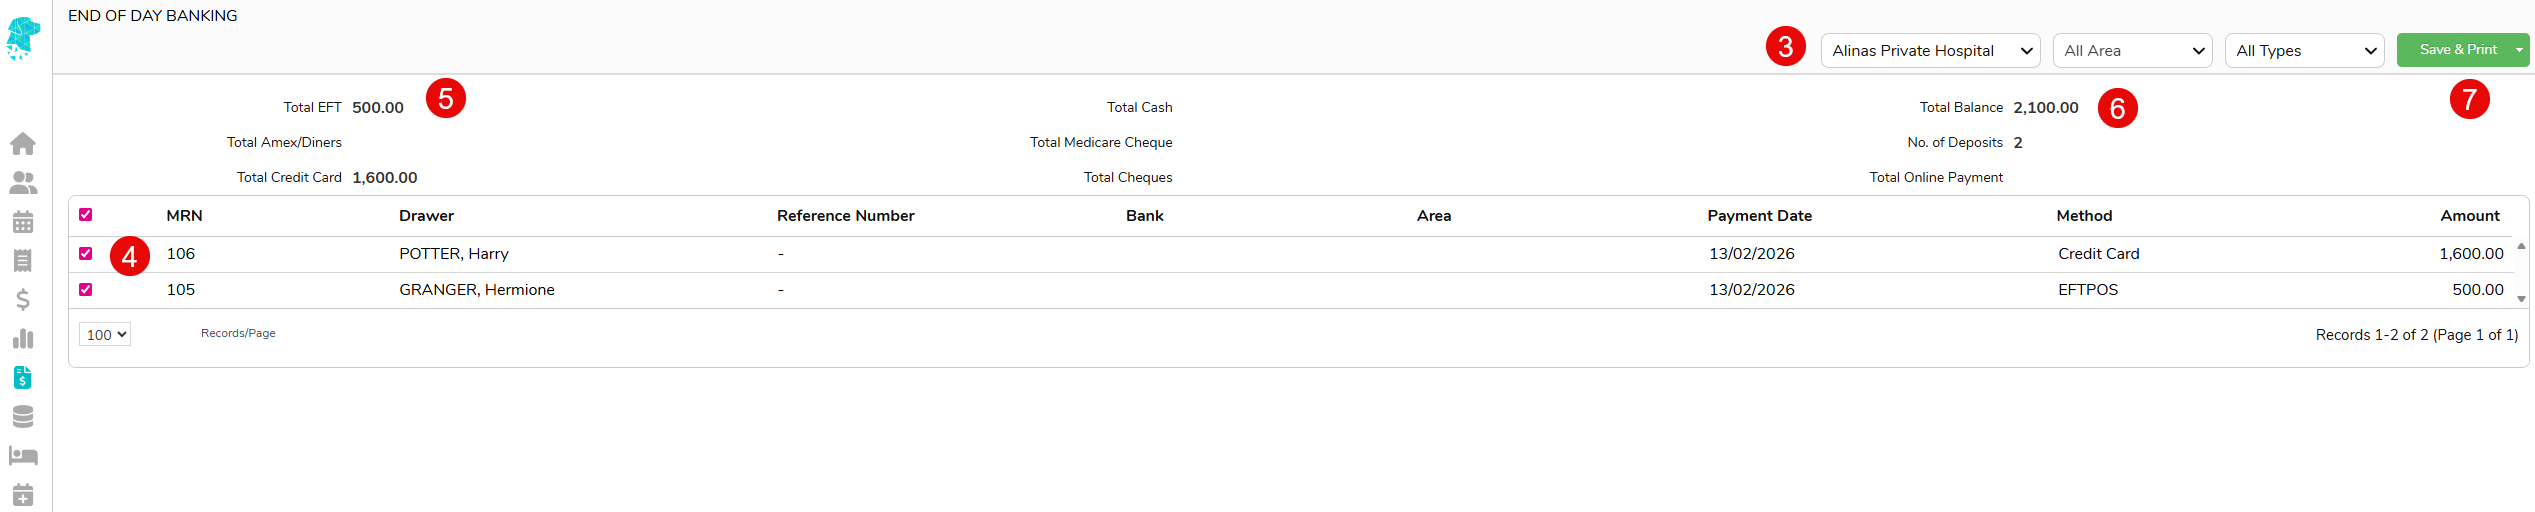
For multi-location facilities, ensure the correct location is selected
Check each payment off as it is compared with corresponding data for accuracy
Ensure Totals match the EFTPOS settlement & cash/cheques taken
Total Balance of all revenue received will be shown
Click Save & Print
You will be prompted to confirm that you want to clear the transactions.
Once confirmed with Yes the End of Day Banking Report will be available for printing
Re-Printing End of Day Banking Report
Select Reports from the main menu
Select End of Day Banking
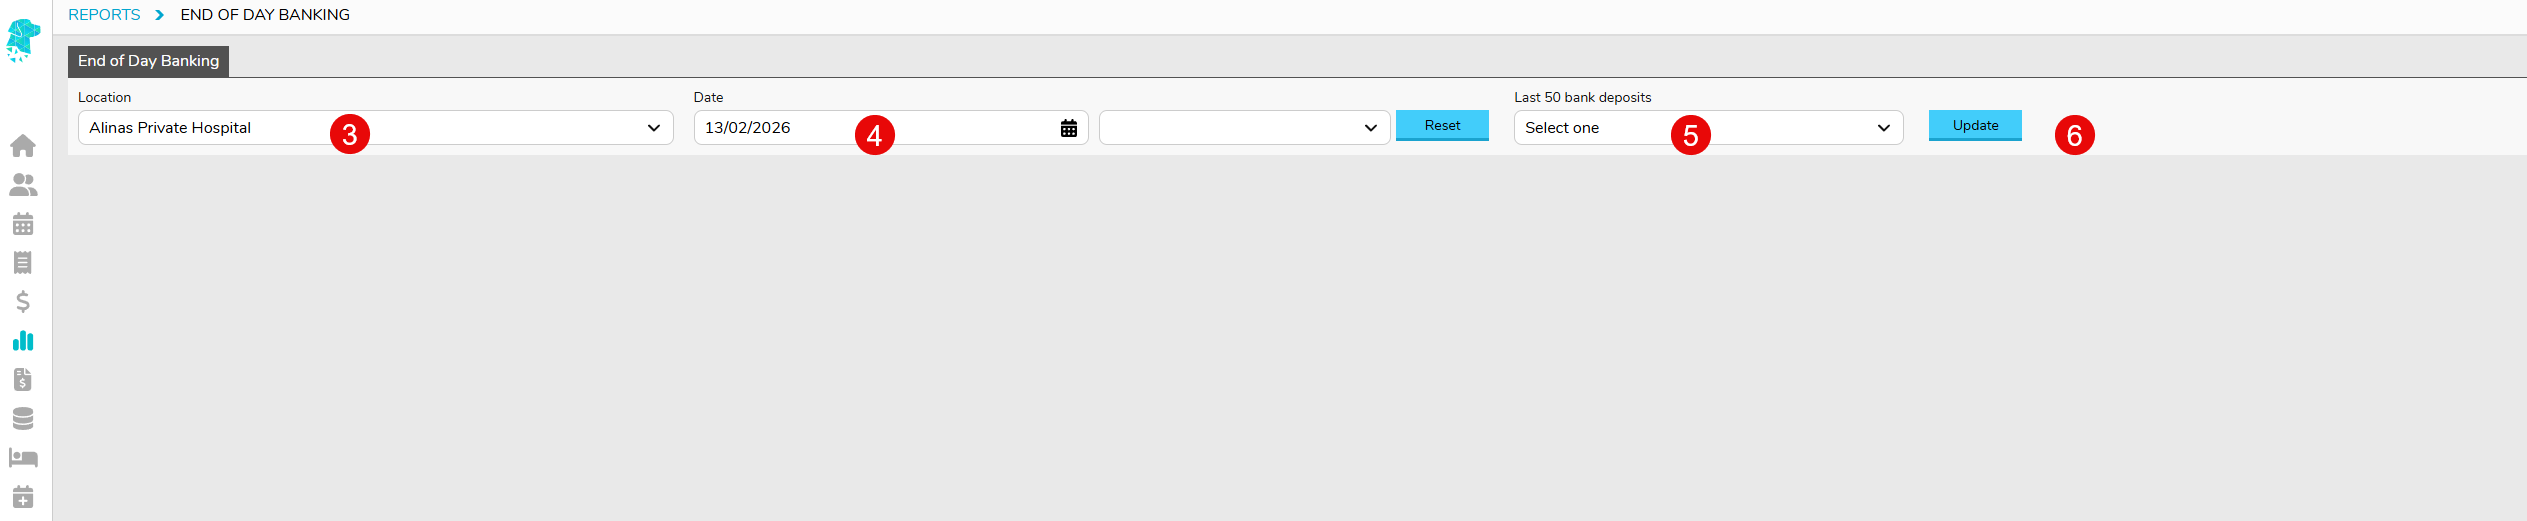
For multi-location facilities, ensure correct location is selected
Select the Date & Time for the required report OR
Select from the list of Last 50 bank deposits
Click Update and the selected report will be displayed on the screen
It can then be Printed or Exported using the corresponding blue buttons at the bottom right of the screen
Delete a Hospital Booking
If an appointment is required to be removed from the system
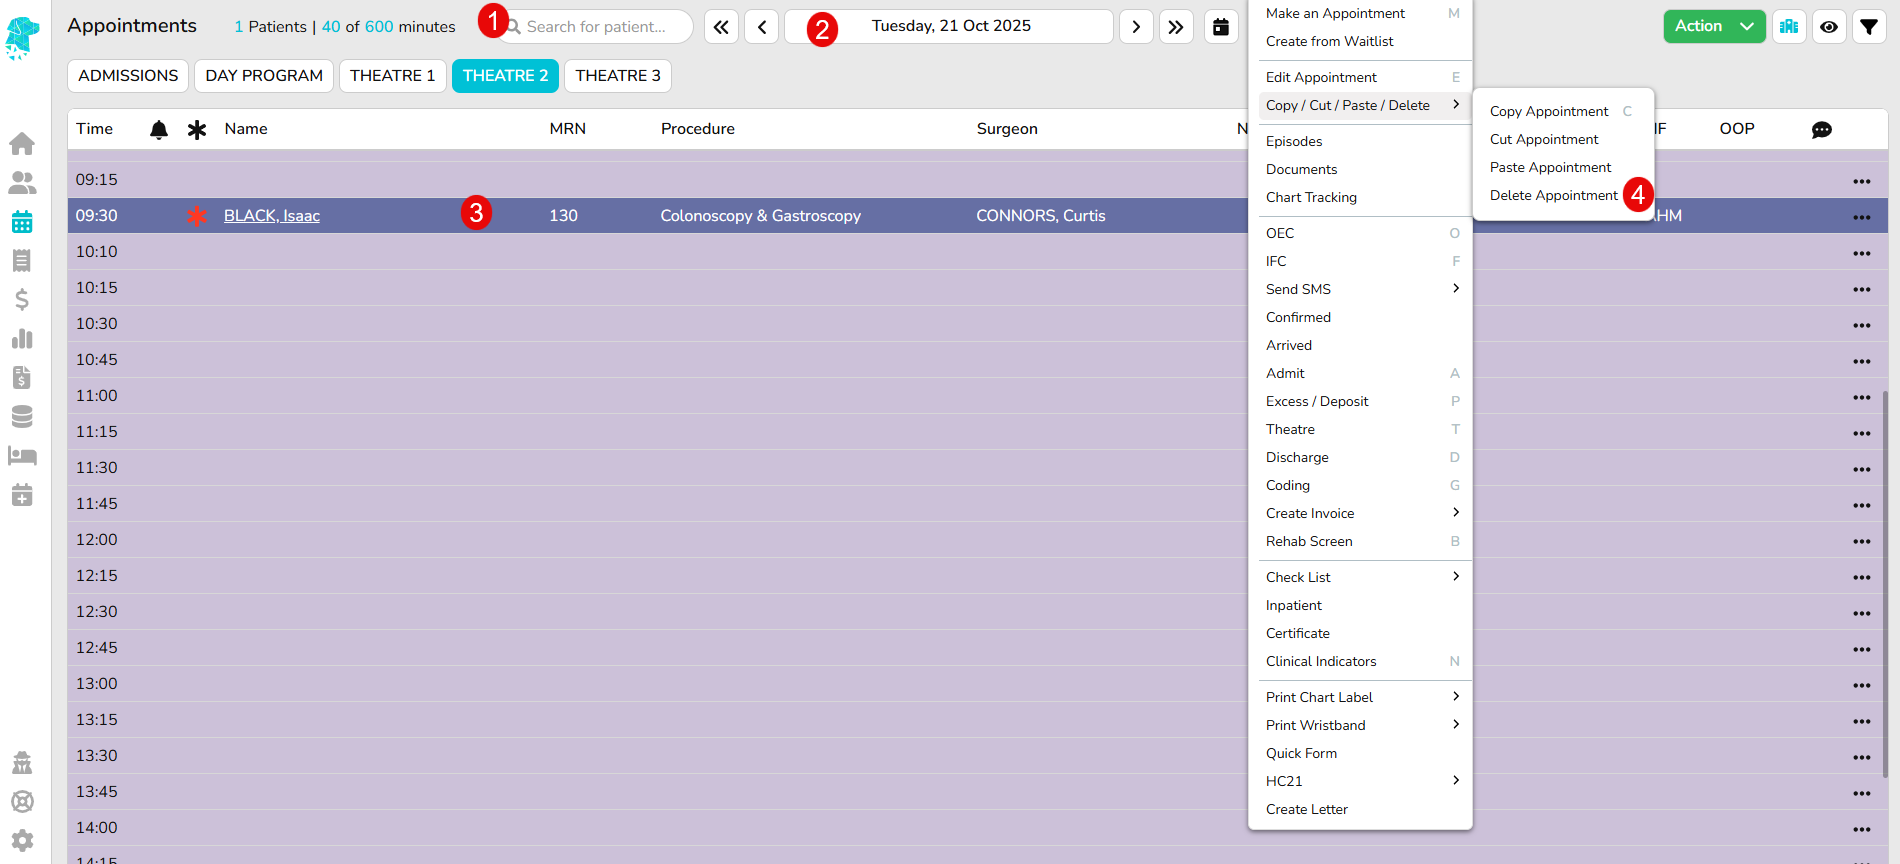
Search for the patient OR
Navigate to the date & theatre that the patient is booked for
Select the patient & right click to open menu
Select Copy/Cut/Paste/Delete and then select Delete Appointment
You will be prompted to confirm that you are sure you want to delete the appointment
Click Yes
This action is permanent & is not advised if you are required to collate data on cancelled bookings. If statistical information on the cancellation is required, then please see instructions on how to Cancel a Booking at https://wiki.fydo.cloud/cancel-a-booking/
Hospital Data Extraction
Exporting Reportable Data (PHDB/HCP/State specific/Cancer Registry)
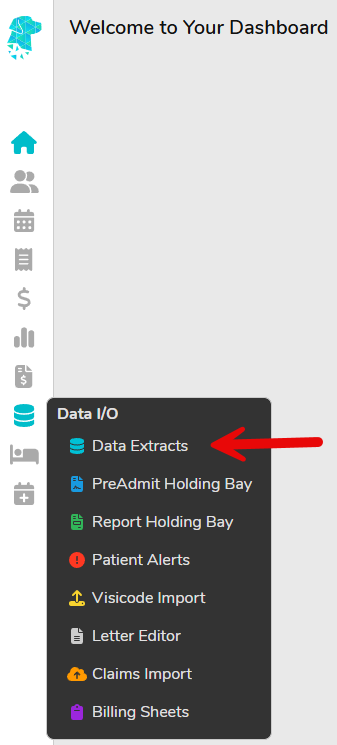
Select Data I/O from the left-hand menu
Select Data Extracts
Ensure correct location is selected (for facilities with multiple locations)
Select the month you need to extract
Select the type of data you need to extract
Select Prepare Extract
You will be shown:
Total Number of Episodes for the period
Number of Episodes Ready to be exported
Number of Episodes with Errors that require attention
A list of the episodes that need amendments in order to have your data ready for submission
An option to print the list of errors, or export it for further action
Navigate to the screen that is identified as Where to fix and amend the information that is required. This can be done with a Right Click on the line or using the Patient Name Hyperlink to navigate to the require screen.
Once all errors have been rectified, follow the above steps again to check that the data is ready to export
Data is ready to export once there are no more errors documented in the list.
Once all errors are rectified the Print & Export To options in the top right corner (e. in the above image) will change to a Submit button. Click Submit
Your data files will be saved in FYDO
You can download this file by using the down arrow ⇓ under the Action column with a normal mouse click (not a Right Click)
You can upload these files directly into the appropriate portal. (Ensuring the file name for BUPA does not contain any symbols)
Once uploaded there is no need to keep a copy of the file on your computer, as you are able to access & download again if required from FYDO.
There are several ways to do this, but the most common method is during the appointment booking process.
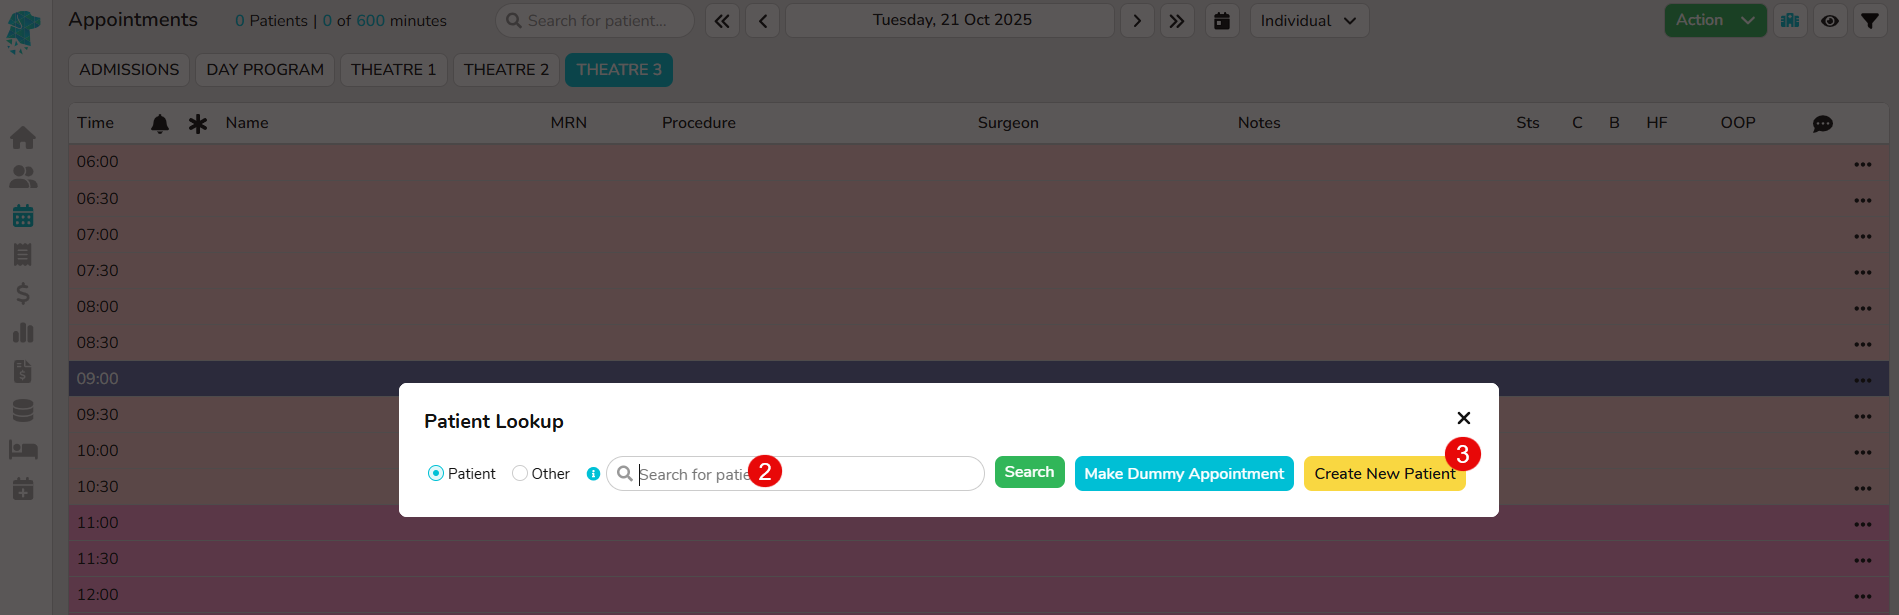
Once you have navigated to the date & time for the appointment, right click & select Make an Appointment
This will open up the Patient Lookup box where you are able to search for the desired patient
If you are unable to locate the patient click the Create New Patient button
You are required to add a minimum of First & Last Name and all other fields are optional when initially adding a patient (but be aware that certain fields may be required, once the patient is admitted, for reporting purposes)
Once all desired information is entered click Save
The appointment screen will then open to add all required information for that particular booking
Patients are also able to be added without having an appointment scheduled.
Select the Patients tab from the left main menu
Search to see if the patient is already entered into the system
If they have not previously been added, click Create Patient
You are required to add a minimum of First & Last Name and all other fields are optional when initially adding a patient (but be aware that certain fields may be required, once the patient is admitted, for reporting purposes)
Once all desired information is entered click Save
Cancel a Hospital Booking
If a patient cancels their appointment
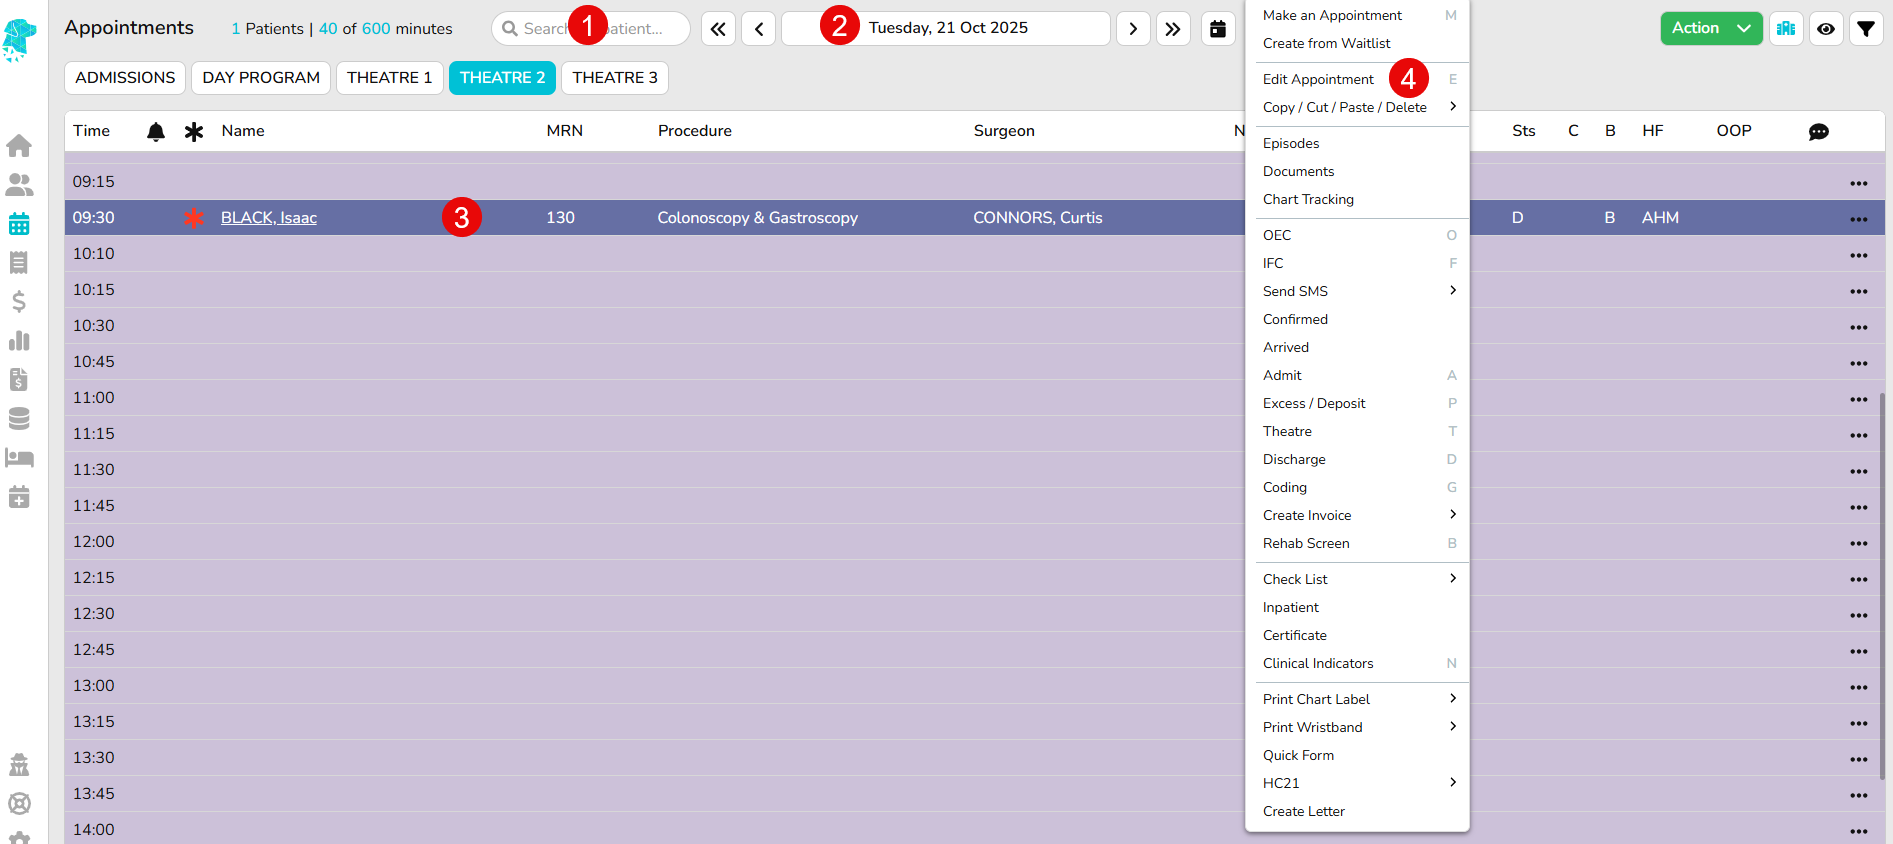
Search for the patient OR
Navigate to the date & theatre that the patient is booked for
Select the patient & right click to open menu
Select Edit Episode
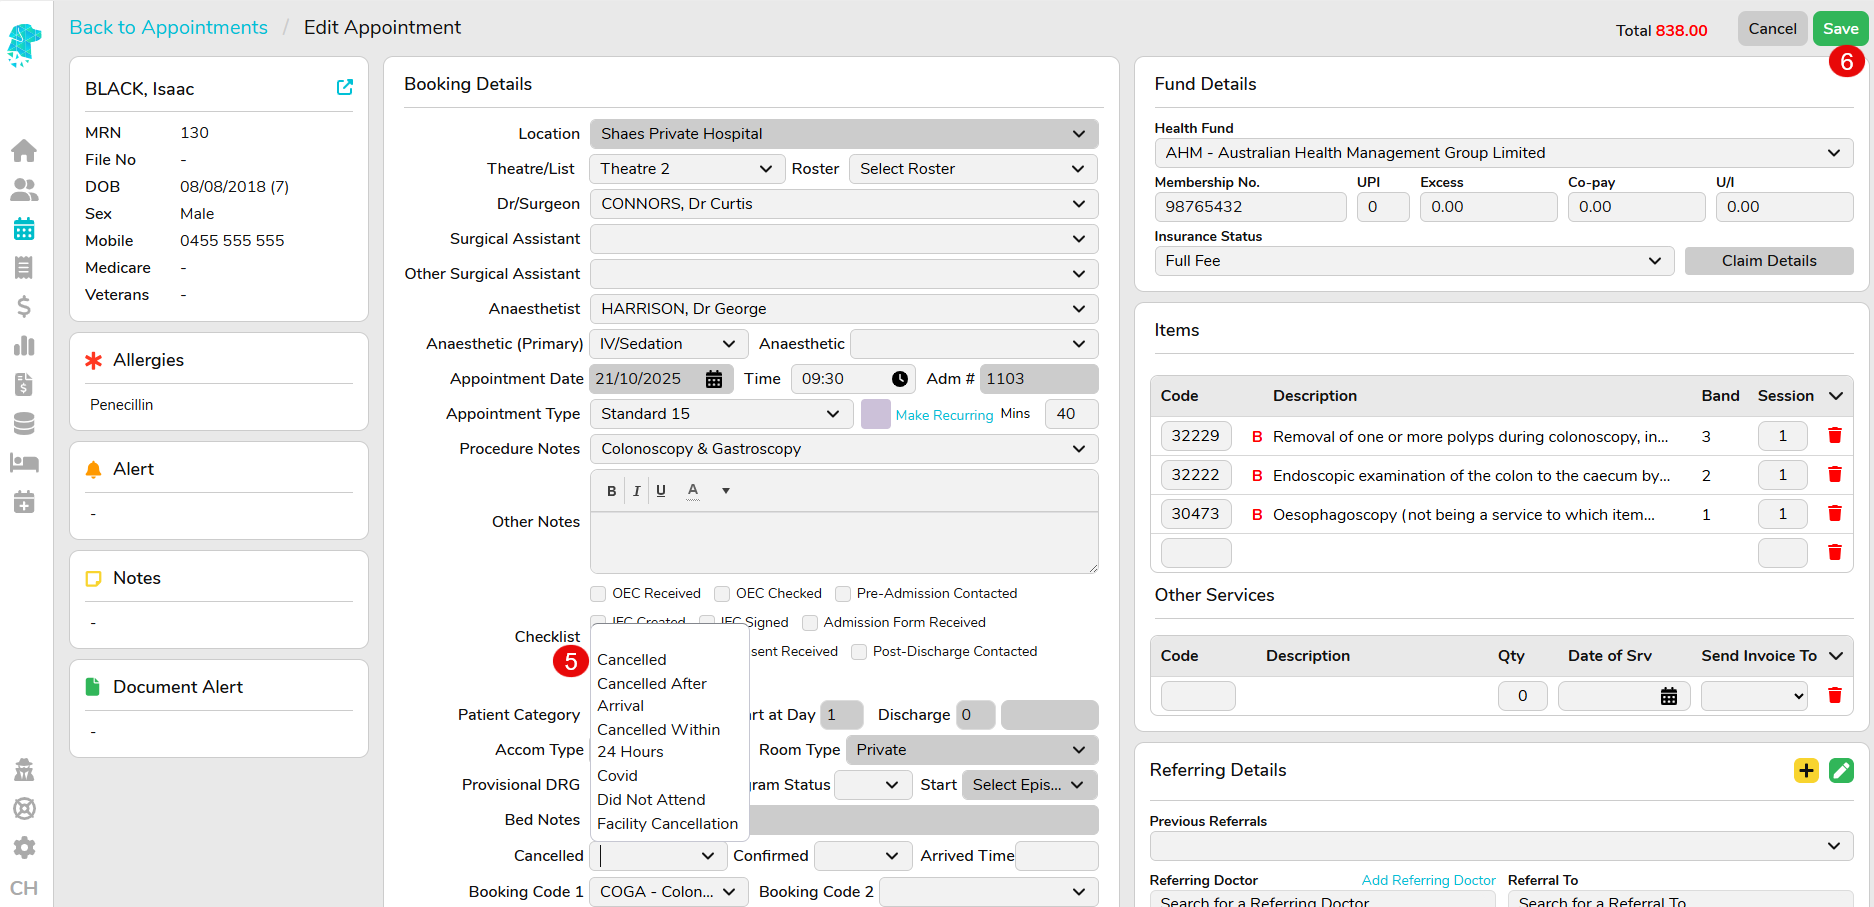
Use the Cancelled drop down to select a reason for cancellation (N.B these cancelled reasons are fully customisable & can be added or edited in Setting under the Cancelled Reasons option to assist facilities obtain the cancellation data that they require)
Click Save
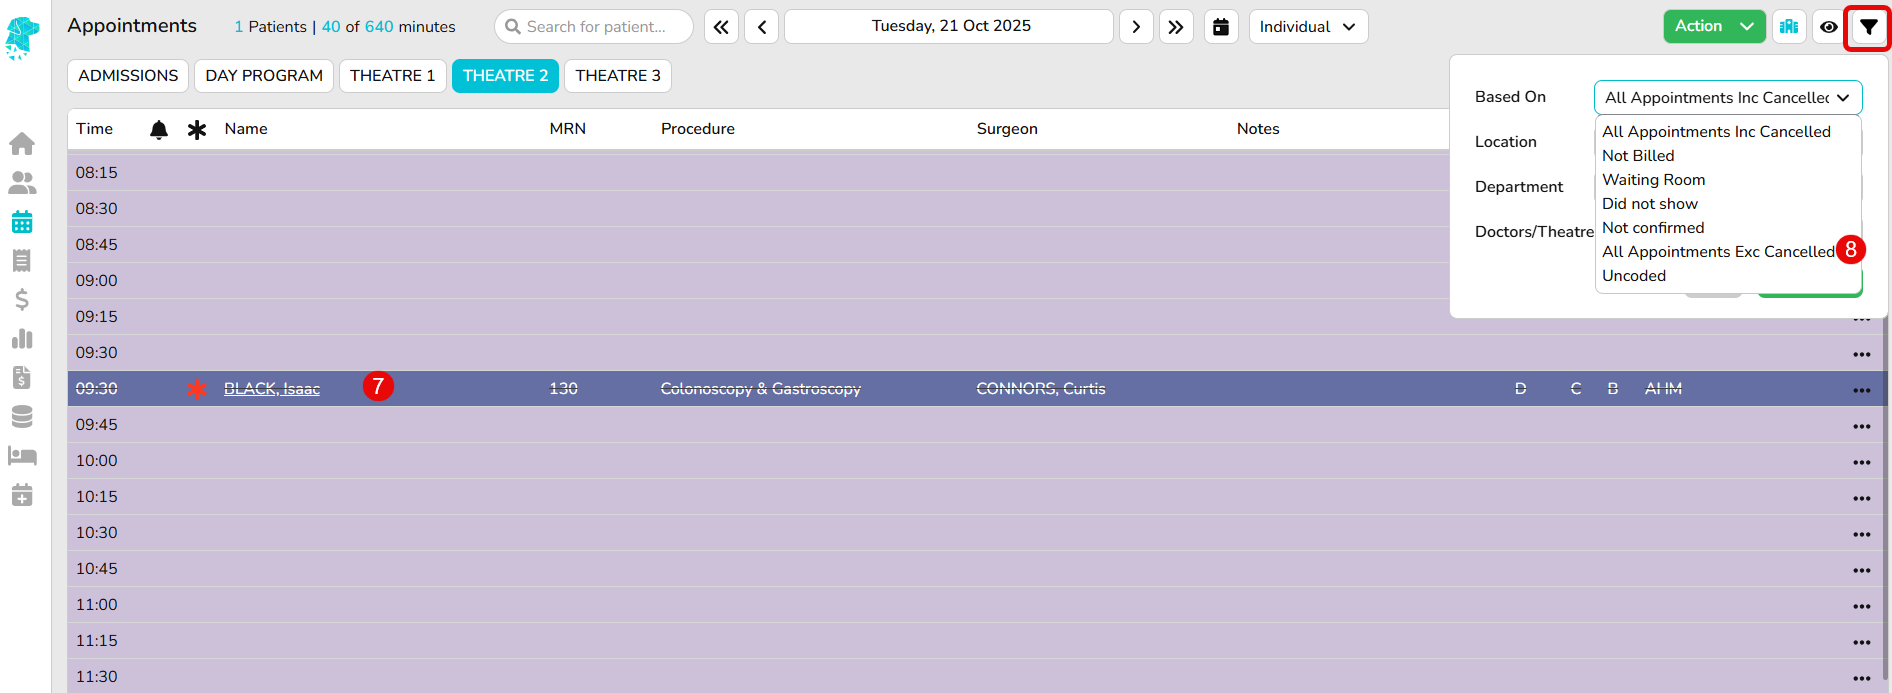
The patient will now be displayed with a strikethrough & the appointment time will be available to book another patient
To view your screen without the cancelled patients, use the Filter Dropdown Based On and select All Appointments Exc Cancelled
To view the cancelled patients ensure you select All Appointments Inc Cancelled from the Filter Dropdown
To reinstate an appointment, follow the above steps 1 > 4 and remove the cancellation reason from the episode before clicking Save
Options for dealing with cancelled patients
Depending on how far a patient is along their journey, there are different ways to handle a cancelled episode. For example, a patient who cancels before arriving at the facility will need to be handled differently than one who cancelled after admission. The facility should determine the most appropriate option for each individual scenario. Below are a few options for processing these cases in FYDO:
Option 1 If the patient did not arrive at the facility and was not admitted, the standard cancellation instructions above will apply. The episode will not be admitted and will simply be cancelled.
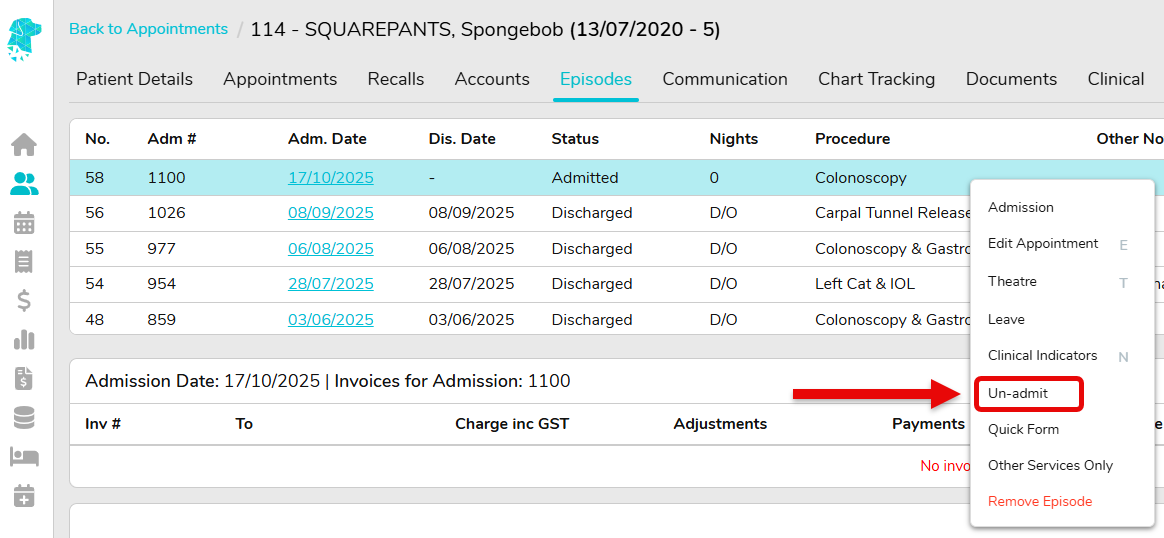
If the patient didarrive and was admitted but did not proceed, the facility can choose to revert the episode back to a booking by Un-discharging and Un-admitting the episode. Again, this will be up to the facility to decide if this is require depending on how far the patient journey progressed. This can be done via the Episodes Screen by utilising the Right-Click Menu.
The patient may need to be refunded any moneys paid, or the facility may choose to keep it and apply to another admission down the track.
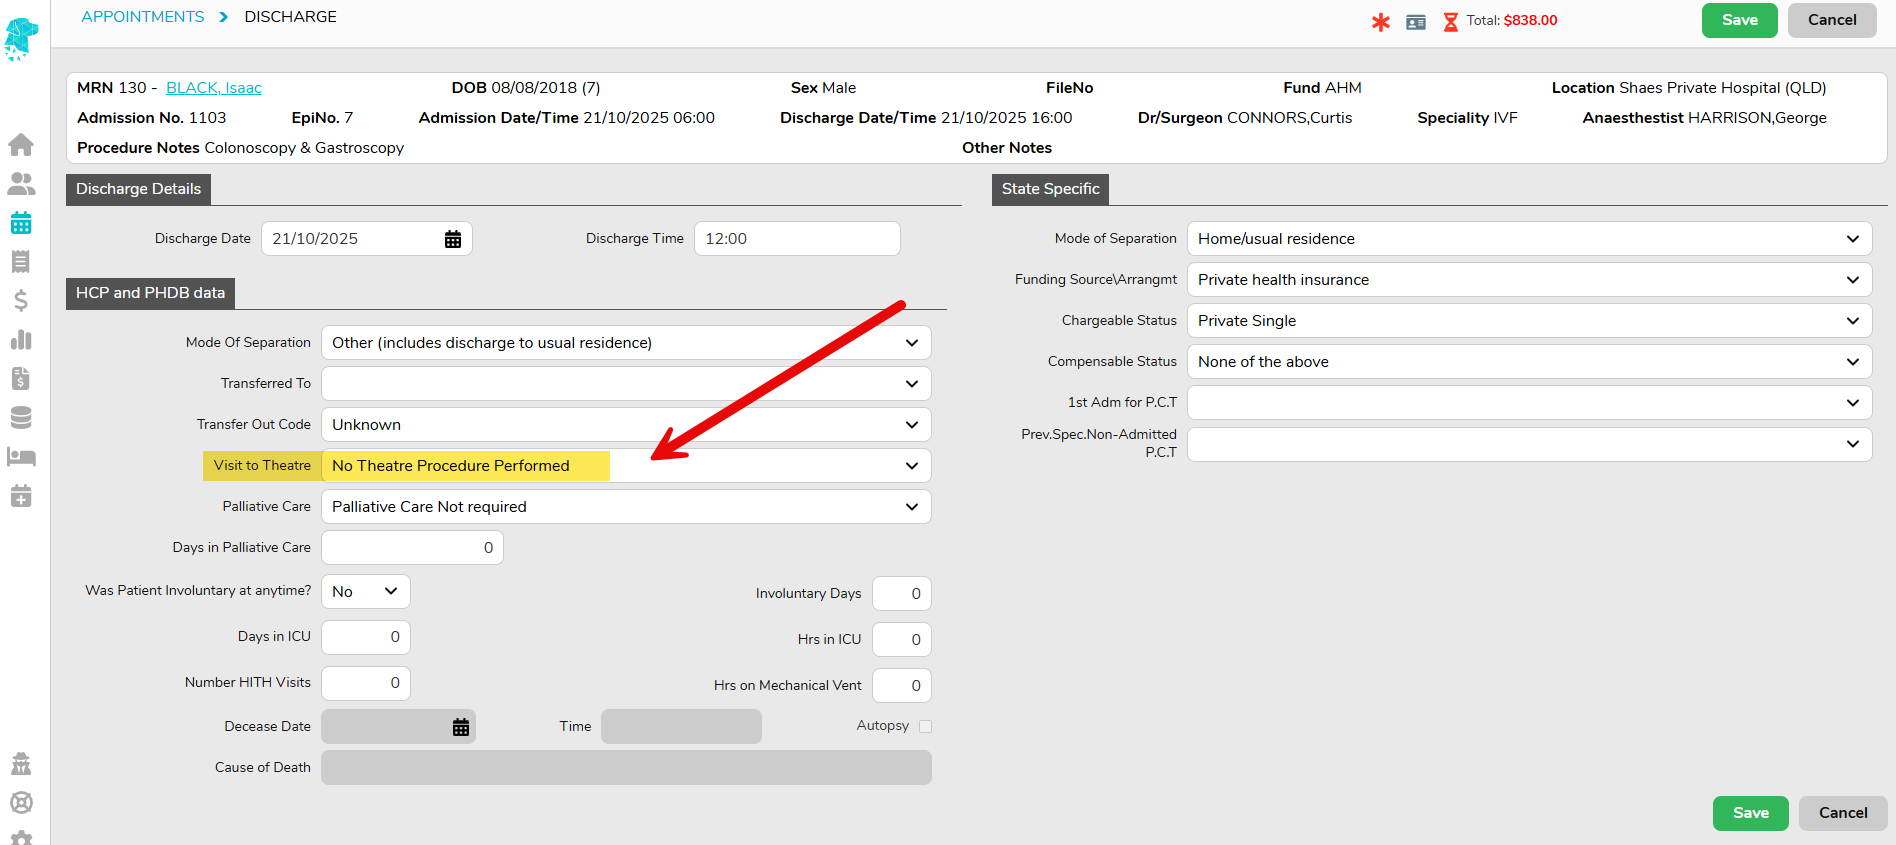
Option 2 If the patient was admitted and progressed partway through their journey, the more appropriate option may be to complete the episode by admitting and discharging them. Depending on how far they progressed, you may need to populate the Visit to Theatre field with No Theatre Procedure Performed when discharging the episode.
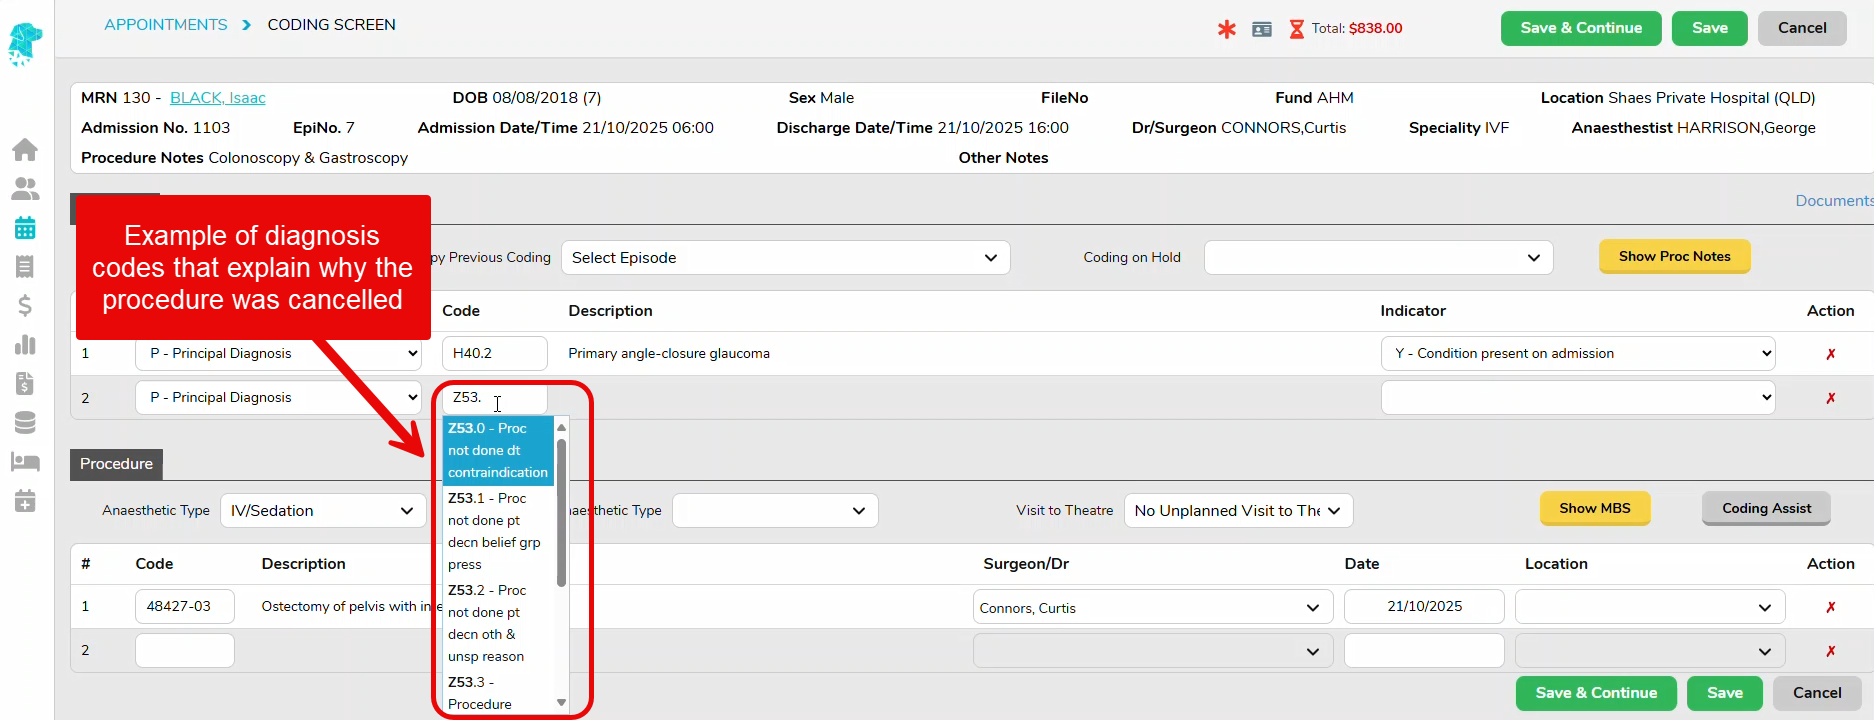
As every discharged patient is reported to the Department of Health, a principal diagnosis code is mandatory. If the facility opts to admit and discharge the episode, it will need to be coded. Please confirm the correct process with your coder. However, as an example, there would typically be a primary diagnosis code, and an additional diagnosis code explaining why the procedure was cancelled.
Other Notes When raising an invoice, please be aware that if an accommodation band is billed, it is implied to the health fund that the patient received an anaesthetic. In this instance, an anaesthetic procedure code must also be included in the coding screen. Facilities will need to check their individual health fund contracts in order to decide if they can raise a charge for the particular admission.
Cancellation Reasons
Facilities may be required to collect different cancellation information for benchmarking, auditing, accreditation, and reporting purposes. FYDO makes this easy through customisable Appointment Cancellation Reasons. Statistics such as Cancelled After Arrival, Cancelled Within 24 Hours, Facility Cancellation and other site-specific categories can all be configured as Cancelled Reasons (Appointments). Once configured, these reasons can be utilised in reporting to provide visibility into why appointments are being cancelled and identify trends over time. To ensure accurate reporting, your facility should configure the cancellation reasons required for your workflows and educate staff on when each cancellation reason should be used. Follow the instructions below to set this up.
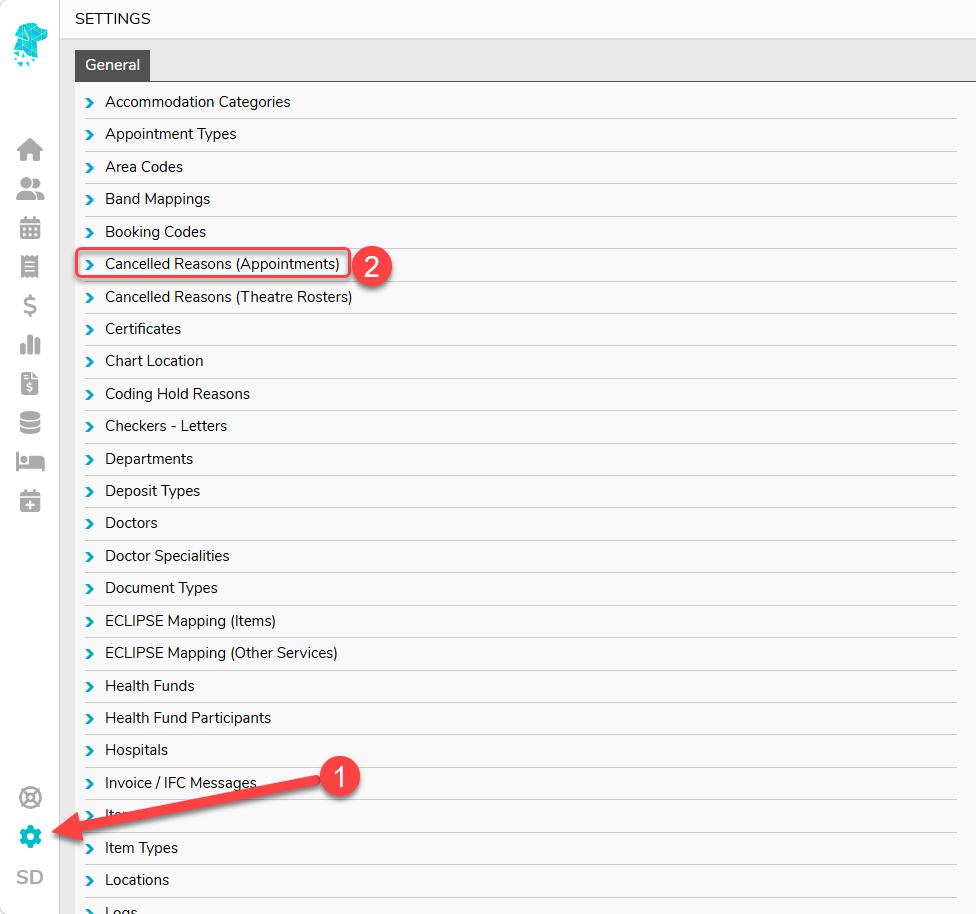
Navigate to Settings
Select Cancelled Reasons (Appointments)
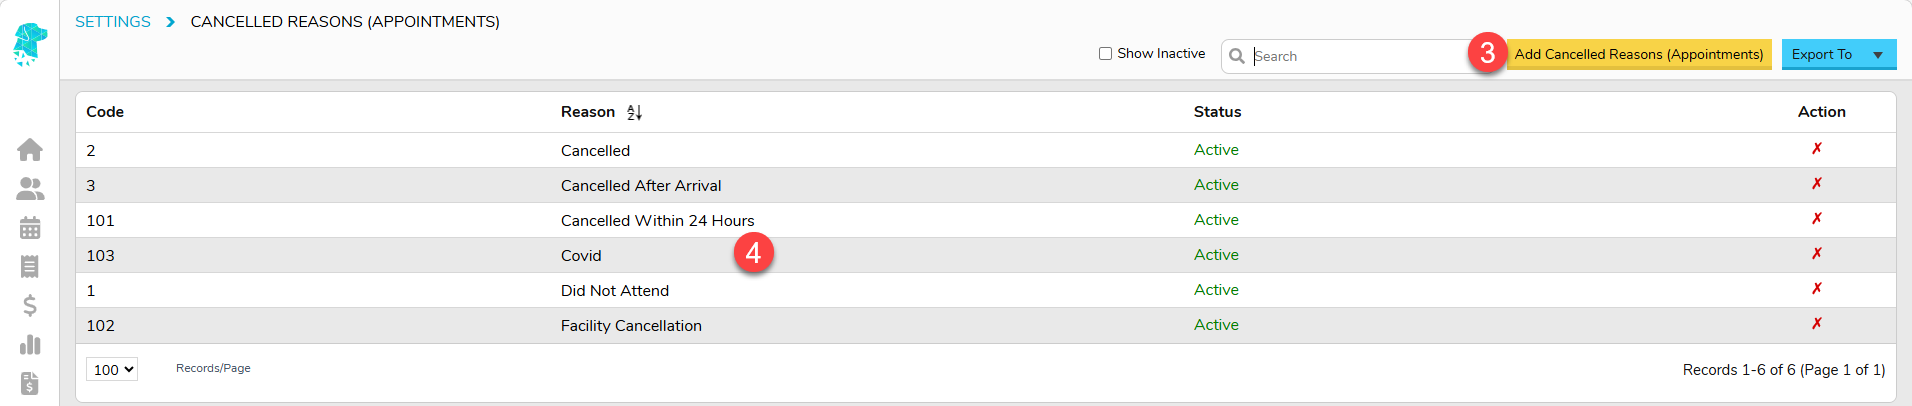
Click Add Cancelled Reasons (Appointments) to add new cancellation reasons
Double click on an existing cancellation reason to amend it
Utilise the correct Cancellation Reason when cancelling bookings, as per the instructions at the start of this page, and statistics than then be obtained from Reports.
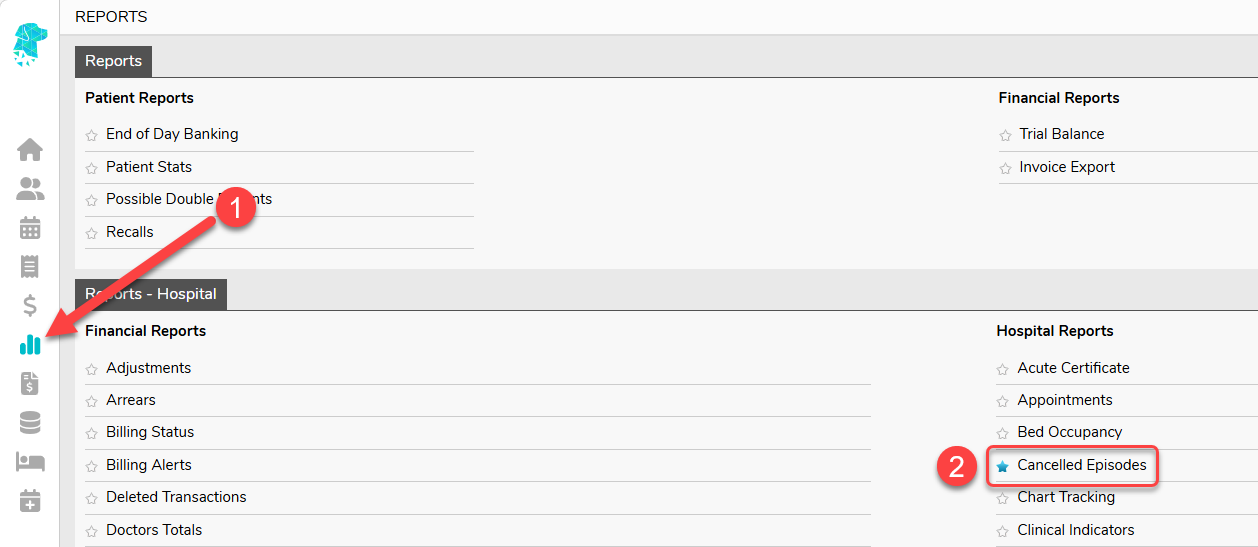
Navigate to Reports
Select Cancelled Episodes
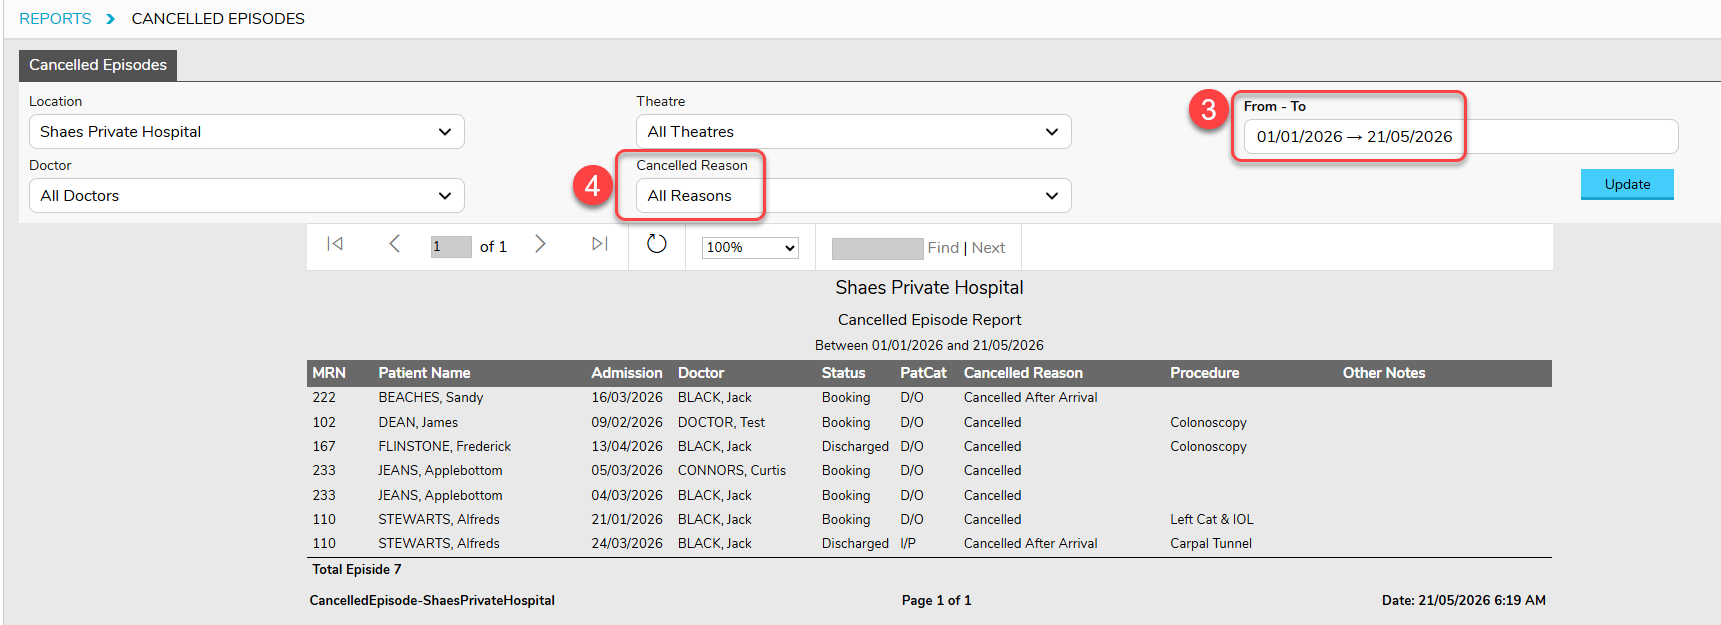
Simply run the report for the date range required for a comprehensive list of all cancelled procedures, or
Utilise the Cancelled Reason filter to obtain statistics on specific cancellation types
Hospital Appointments Screen
Navigating the Appointments Screen
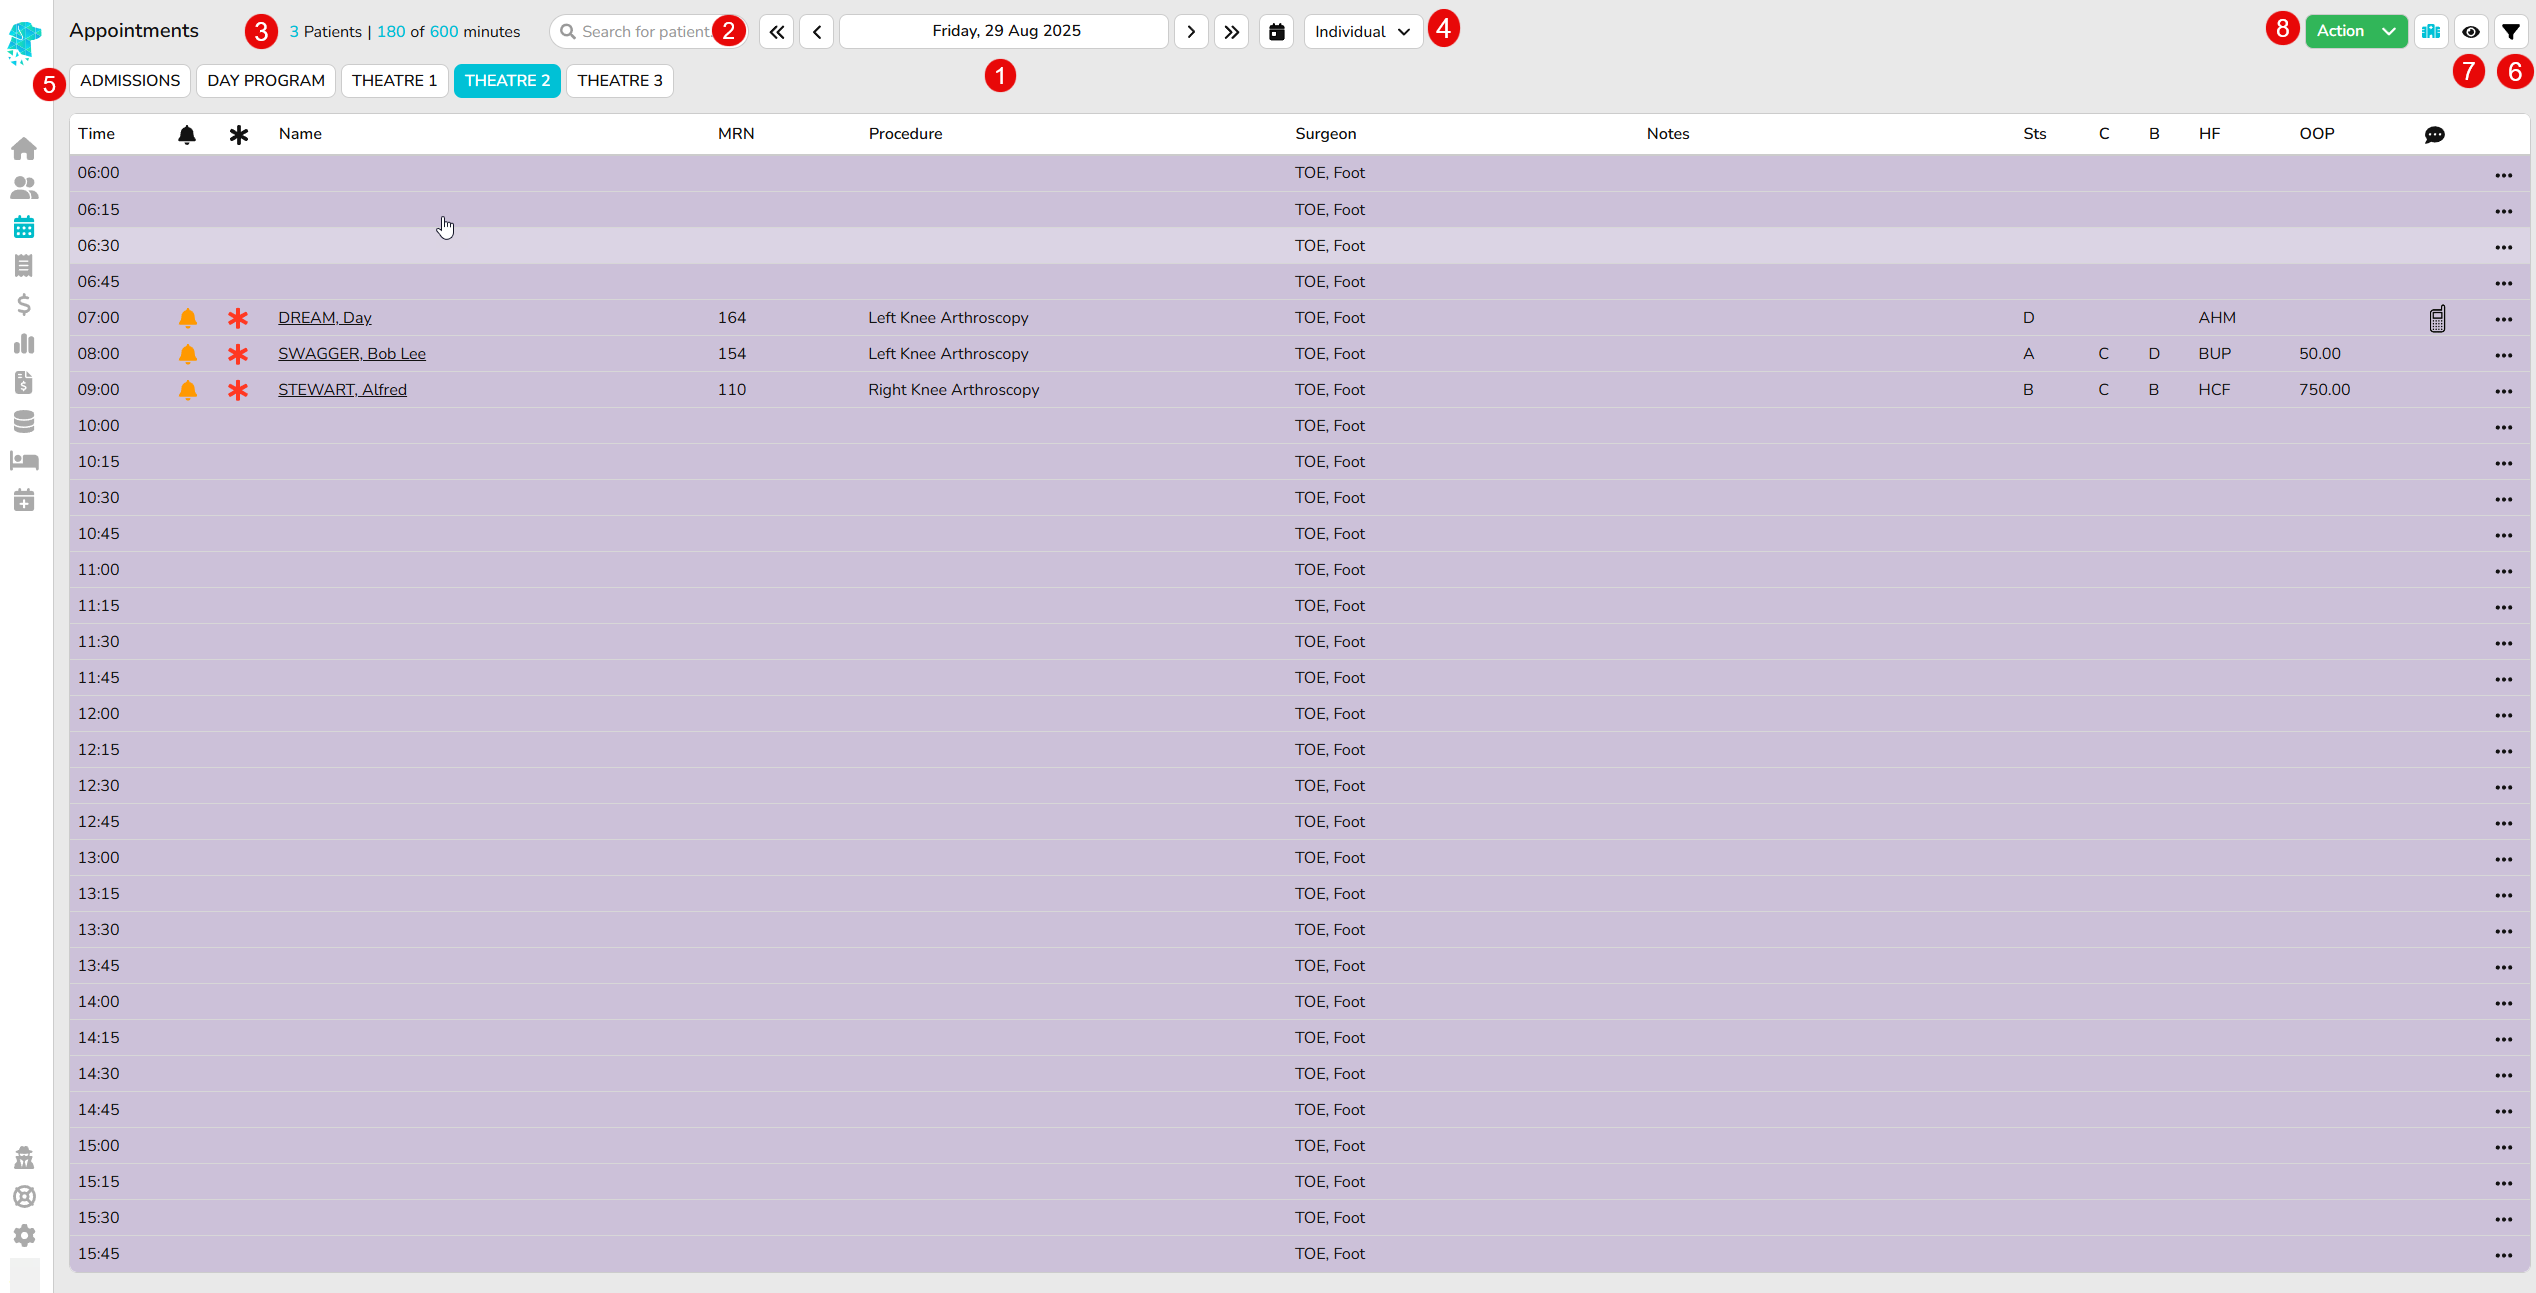
Date – Click on the date to display the calendar to select required date
Search – to locate a particular patient/booking
Info – will display the Number of patients booked & Minutes the theatre is being utilised
View – gives the ability to choose how the theatres are displayed
All – shows all theatres for 1 day
Individual – shows 1 theatre for 1 day
Weekly – shows 1 theatre for the whole week
List – shows all appointments in 1 list
Theatres – are able to be selected here
Filter – the patients viewed to include/exclude cancelled patients etc
Custom Views – Create and select Custom Views to displayed relevant information
If an adjustment is required for refund, write off, incorrect billing purposes etc it can be done using the Adjustments Screen or from the Patient History / Episode screen. Both options are explained below.
Making the entry from the Adjustments Screen
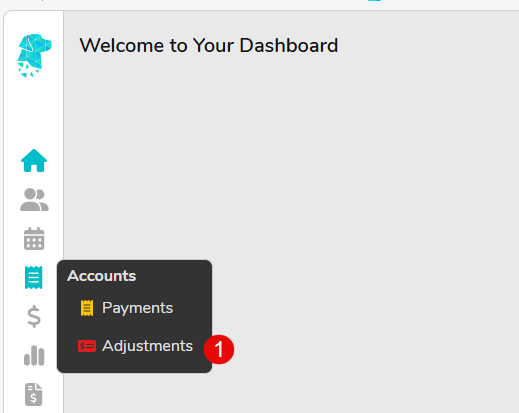
Go to Accounts in the main menu & select Adjustments
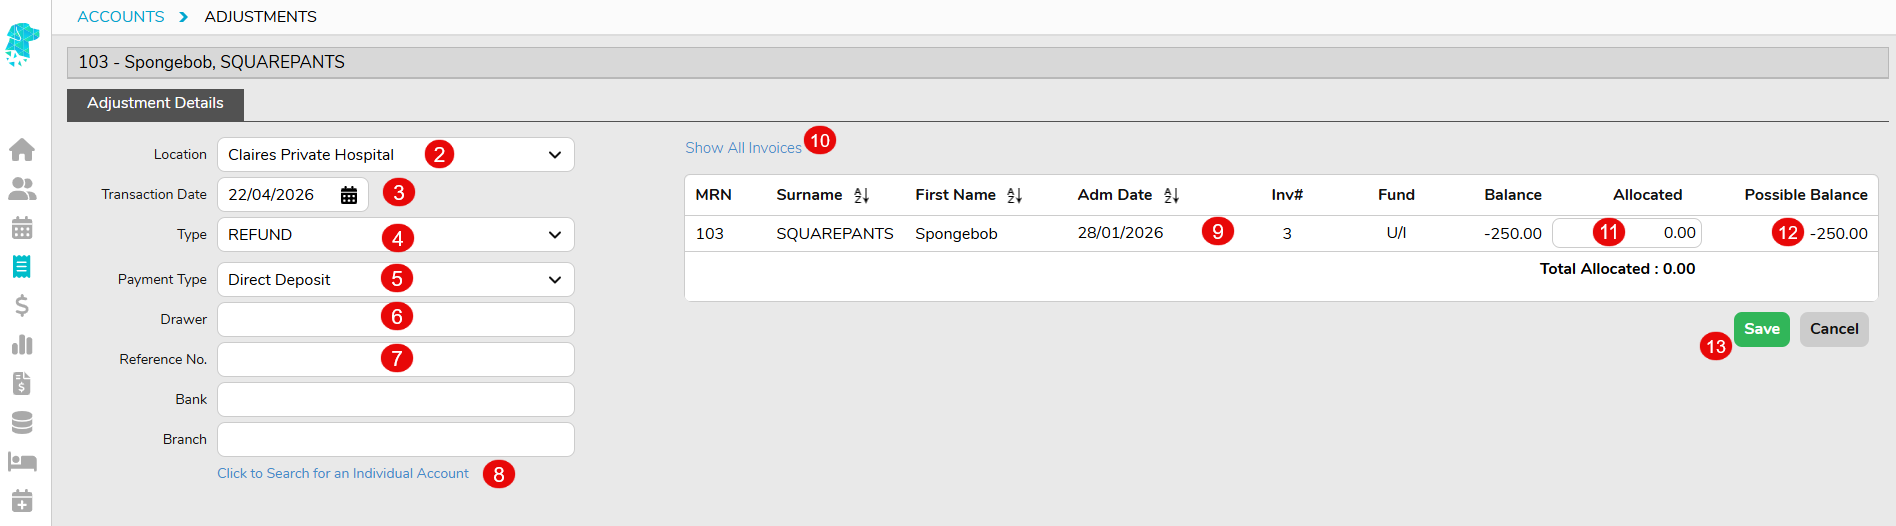
For multi-location systems, use the drop down to select the relevant Location
Enter the required Transaction Date if it differs from the current date
Use the Type dropdown to select the required transaction type e.g., write off, incorrect billing, discount, refund etc.
If Refund is selected as the Type, the Payment Type field will be displayed so the method of the transaction can be documented. For all other journal / adjustment Types this field will not be necessary & won’t be displayed
Type the required information in the Drawer field
Use the Reference No., Bank & Branch fields, if the facility work instructions require, to document additional information regarding a bank cheque for refunds etc
Click “Click to Search for an individual Account” and the search box will be displayed to find the required patient. (If processing this adjustment from the Episodes Screenany outstanding invoices will automatically be displayed)
Once a patient is selected, the invoices with an outstanding amount will be displayed
Use the Show All Invoices option to display invoices that don’t currently have an outstanding balance
Type the amount to be refunded in the Allocated column
Once you have moved from the Allocated field the system will show you the Possible Balance of the invoice, following the adjustment
Once all details have been confirmed & are correct click Save
Making the entry from the Episode Screen:
Search for the patient using the Search field or by selecting the required admission date & theatre
Right-click on the appointment & select Episodes
Once in the Episodes screen ensure that the correct date of admission is selected
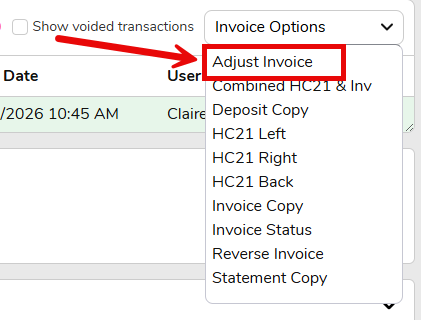
Then use the Invoice Options drop down on the right of the screen to select Adjust Invoice
You will be redirected to the Adjustments screen where you can follow the instructions above from step 2.
Tokens – Mailing Label
Token Name
Data
Notes
<<PracticeName>>
Practice Name
<<Title>>
Title
<<FirstName>>
First Name
<<LastName>>
Surname
<<MailingAdd1>>
Location Address 1
<<MailingAdd2>>
Location Address 2
<<MailingAdd3>>
Location Address 3
Tokens – Documents & Letters
Token Name
Data
Notes
<<DocFullName>>
Doctor Full Name
eg. SMITH, John
<<DocFirstname>>
Doctor First Name
eg. John
<<DocSurname>>
Doctor Second Initial
eg. SMITH
<<DocTitle>>
Doctor Title
<<DocID>>
Doctor ID
<<DocAdd1>>
Doctor Address 1
<<DocAdd2>>
If Address Line 2 is empty, this will show Suburb State Postcode
otherwise it will show Address Line 2
<<DocAdd3>>
If Address Line 2 is empty, this will show nothing
otherwise it will show Suburb State Postcode
<<DocSuburb>>
Doctor Suburb
UPPERCASE
<<DocState>>
Doctor State
UPPERCASE
<<DocPC>>
Doctor Post Code
<<DocMob>>
Doctor Mobile
9999 999 999
<<DocPh>>
Doctor Phone
99 9999 9999
<<DocFax>>
Doctor Fax
99 9999 9999
<<DocEmail>>
Doctor Email
<<DocQualif>>
Doctor Qualification
<<DocLoc>>
Doctor Location
<<DocProv>>
Doctor Provider Number
<<DocABN>>
Doctor ABN
<<DocInvAs>>
Invoice As for Clinic
<<DocAccName>>
Doctor Account Name
<<DocBSB>>
Doctor BSB
<<DocAccNum>>
Doctor Account Number
<<DocBankAdd>>
Doctor Bank Address
<<DocBank>>
Doctor Bank Name
<<RefFullName>>
Referring Doctor Full Name
eg. SMITH, John
<<RefFirstName>>
Referring Doctor First Name
eg. John
<<RefSurname>>
Referring Doctor Surname
eg. SMITH
<<RefTitle>>
Referring Doctor Title
<<RefID>>
Referring Doctor ID
<<RefPractice>>
Referring Doctor Practice
<<RefPracId>>
Referring Doctor Practice ID
<<RefAdd1>>
Referring Doctor Address 1
<<RefAdd2>>
If Address Line 2 is empty, this will show Suburb State Postcode
otherwise it will show Address Line 2
<<RefAdd3>>
If Address Line 2 is empty, this will show Suburb State Postcode
otherwise it will show Address Line 2
<<RefSuburb>>
Referring Doctor Suburb
UPPERCASE
<<RefState>>
Referring Doctor State
UPPERCASE
<<RefPC>>
Referring Doctor Postcode
<<RefMob>>
Referring Doctor Mobile
9999 999 999
<<RefPh>>
Referring Doctor Phone
99 9999 9999
<<RefFax>>
Referring Doctor Fax
99 9999 9999
<<RefEmail>>
Referring Doctor Email
<<RefQualif>>
Referring Doctor Qualification
<<RefSpecID>>
Referring Dr Speciality ID
<<RefSpec>>
Referring Dr Speciality Description
<<RefLoc>>
Referring Doctor Location
<<RefProv>>
Referring Doctor Provider Number
Adding SMS templates
Do you regularly SMS patients? If so, you can create custom SMS templates to save time typing up the message every time and to send tailored messages, complete with the patient’s name, appointment time, serving doctor, and more.
To begin, first go to Settings.
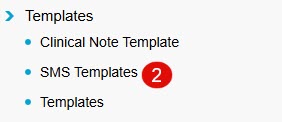
Then click on SMS Templates under the templates menu.
This reveals the SMS templates currently available. By default, an Appointment Reminder template will be available to you.
Adding a new SMS template
To add a new SMS template, click on the Add SMS Template button.
Then, select the SMS Type, enter the template Name, and type out the SMS content in the Description field.
SMS Tokens
You can use ‘SMS tokens’ which are commands that look like: <<patfirstn>> to send tailored SMS messages. The aforementioned token for instance dynamically pulls the patient’s first name.
There are SMS tokens for patient details, appointment details, doctor/ practice details, referral details, and more.
Once you’re happy with the contents of your SMS template, click Save and you’re done! Your new SMS template will be available next time you wish to send a custom SMS message.