Hospital Health Fund Fees – Overnight Accommodation Fees

When new contracts are negotiated with health funds, amended fees need to be loaded into FYDO to facilitate a seamless IFC & Billing process.
The Overnight Accommodation Fees tab allows the entry of any contracted fees.
For more information on adding Same Day Fees, please see our page 
Hospital Health Fund Fees – Same Day Fees Set Up
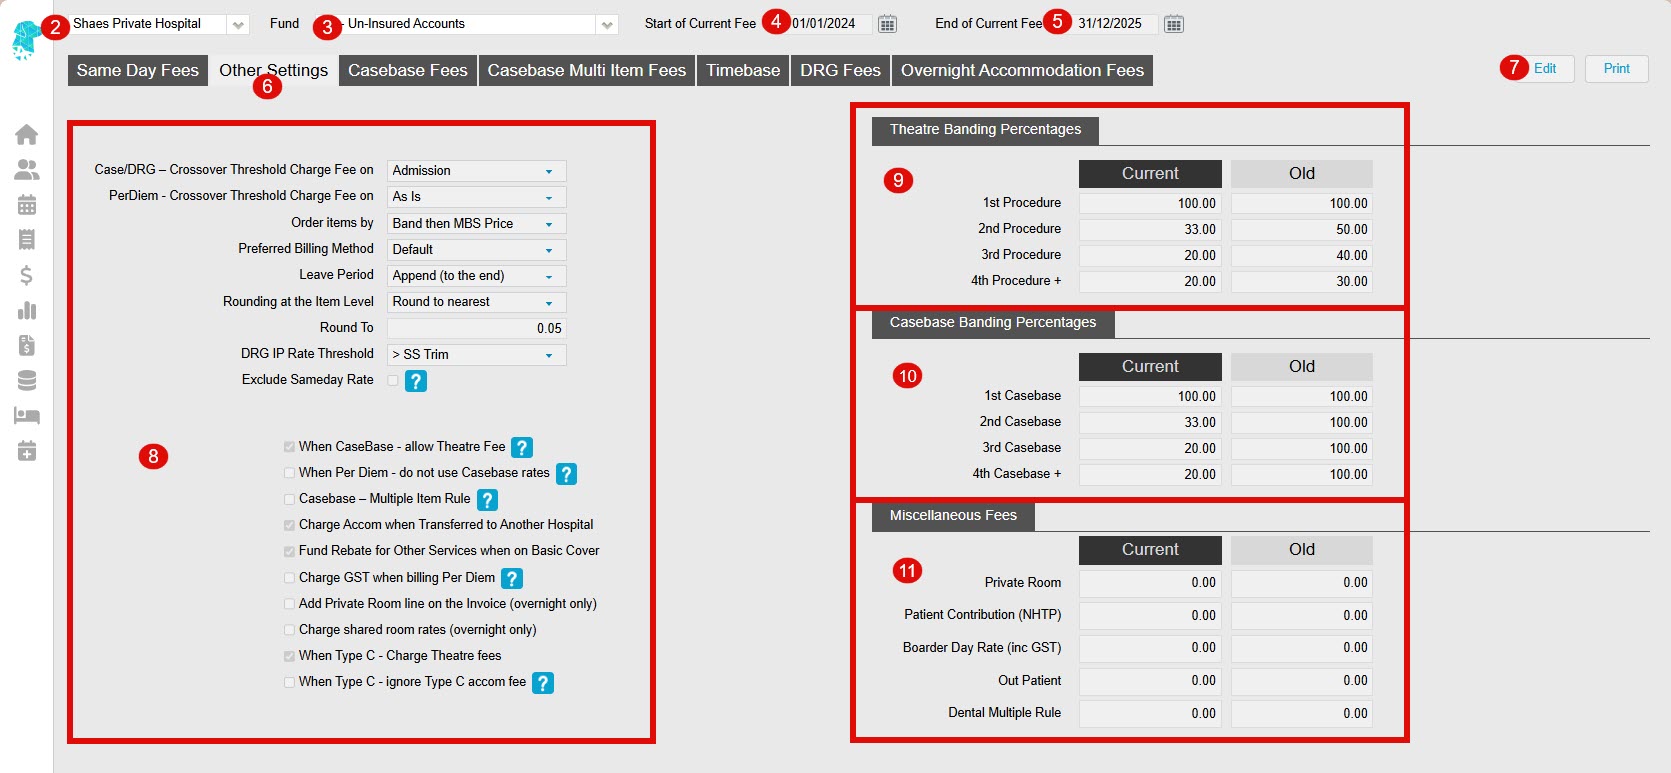
  1. Fees can be entered in Settings > Hospital > Fees Setup

  2. For multi-location databases, ensure the correct Location is selected
  3. Use the Fund drop down to select the required health fund
  4. The Start of Current Fee date indicates the date that the Current Fees will be utilised from. Any episode from before the start date will utilise the Old Fees (See Same Day Fee Instructions to amend these dates)
  5. The End of Current Fee date indicates the date that the Current Fees will expire. Users will still be able to create IFC’s for admissions after the End of Current Fee date. However, the system will prohibit billing for episodes that fall after this date. (This date isn’t mandatory. However, it is a good way to ensure accounts aren’t accidentally billed at old prices)
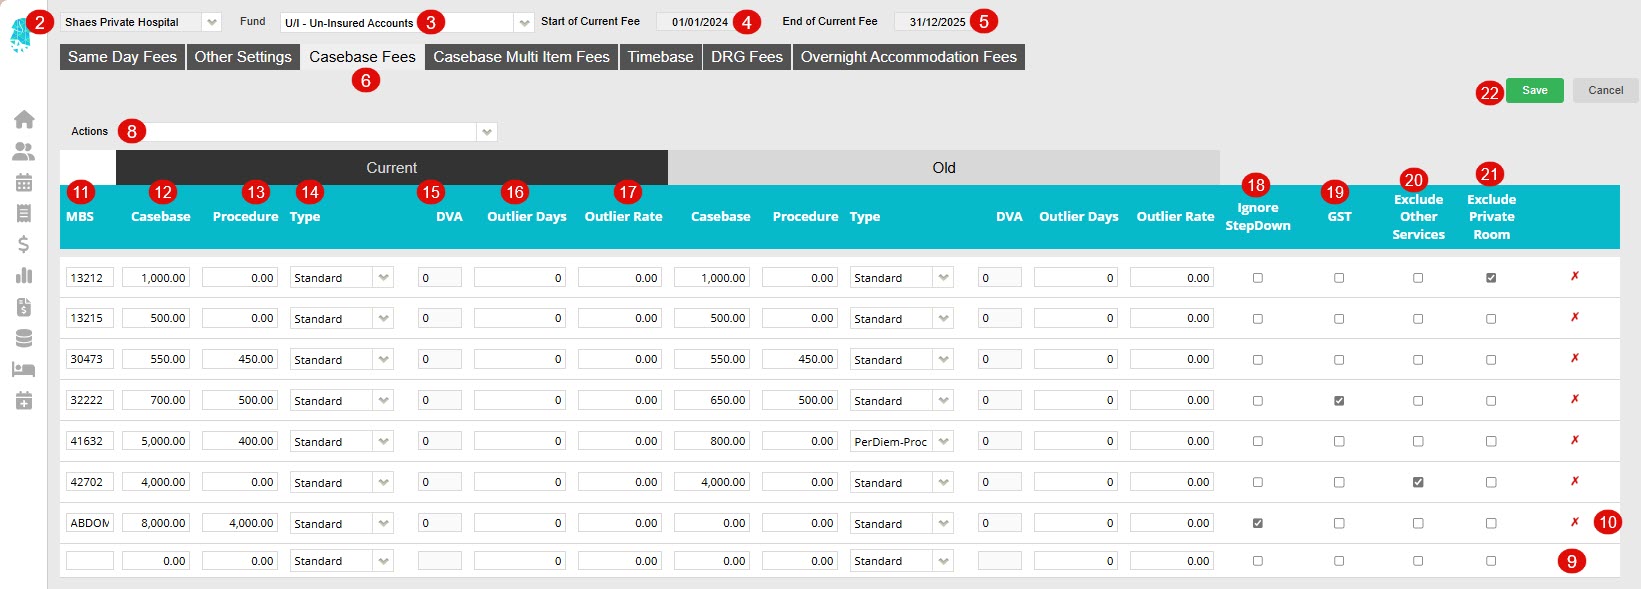
  6. Select the Overnight Accommodation Fees tab
  7. Select the required Accommodation Type from the drop down. (Accommodation Categories can be added or amended in Settings > Accommodation Categories)
  8. Click Edit
  9. If adding amended fees, use the More Actions dropdown to select Click to move all Current Fees to Old Fees
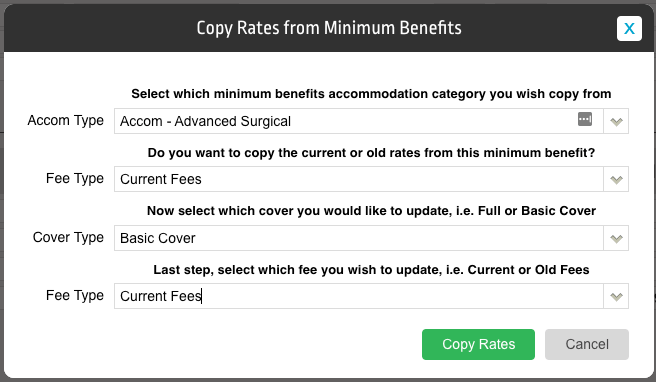
  10. If the fees are required to mirror the Minimum Benefits fees (Entered in Settings > Minimum Benefits), use the More Actions drop down & select Copy Rates from Minimum Benefits
  11. A pop up will appear to give all required options regarding copying the Minimum Benefits Rates into the Health Fund Contract rates
  12. Full Cover Fees can be added to the first section of the screen
  13. Basic Cover Fees can be added to the second section of the screen
  14. When entering fees, use the   to adjust the Day that the fees apply to. This will automatically adjust the following line to continue on.
  15. Add the relevant fees into the Shared, Private & Rebate columns
  16. Click Save
  17. The user is then able to select the next Accom Type that they require & follow the same process again

For further information on how to set up fees please visit our pages:

Other Settings
Casebase Fees
Casebase Multi Fees
Hospital Health Fund Fees – DRG Fees


IFC for an Episode that is partially covered by the Health Fund

There will be some instances where insured patients need to pay for part of their procedure.
Maybe some of the procedures is classified as a cosmetic procedure, maybe they have restrictions on their level of cover & the hospital is able to raise a charge to the patient for those extra procedures.
Maybe the hospital is contracted for 2nd Tier rates and can charge a patient gap or they want to charge a credit card surcharge to the patient.
Whatever the case may be, FYDO accommodates this split method of billing the health fund AND the patient seamlessly.

The first step in this process is to ensure the patient is entered with their Health Fund Details for the episode. And then adding the items to the Edit Appointment Screen.

As seen below, FYDO gives the option to Send Invoice To the Health Fund or the Patient. This allows the user to select certain items that will be billed to the patient.
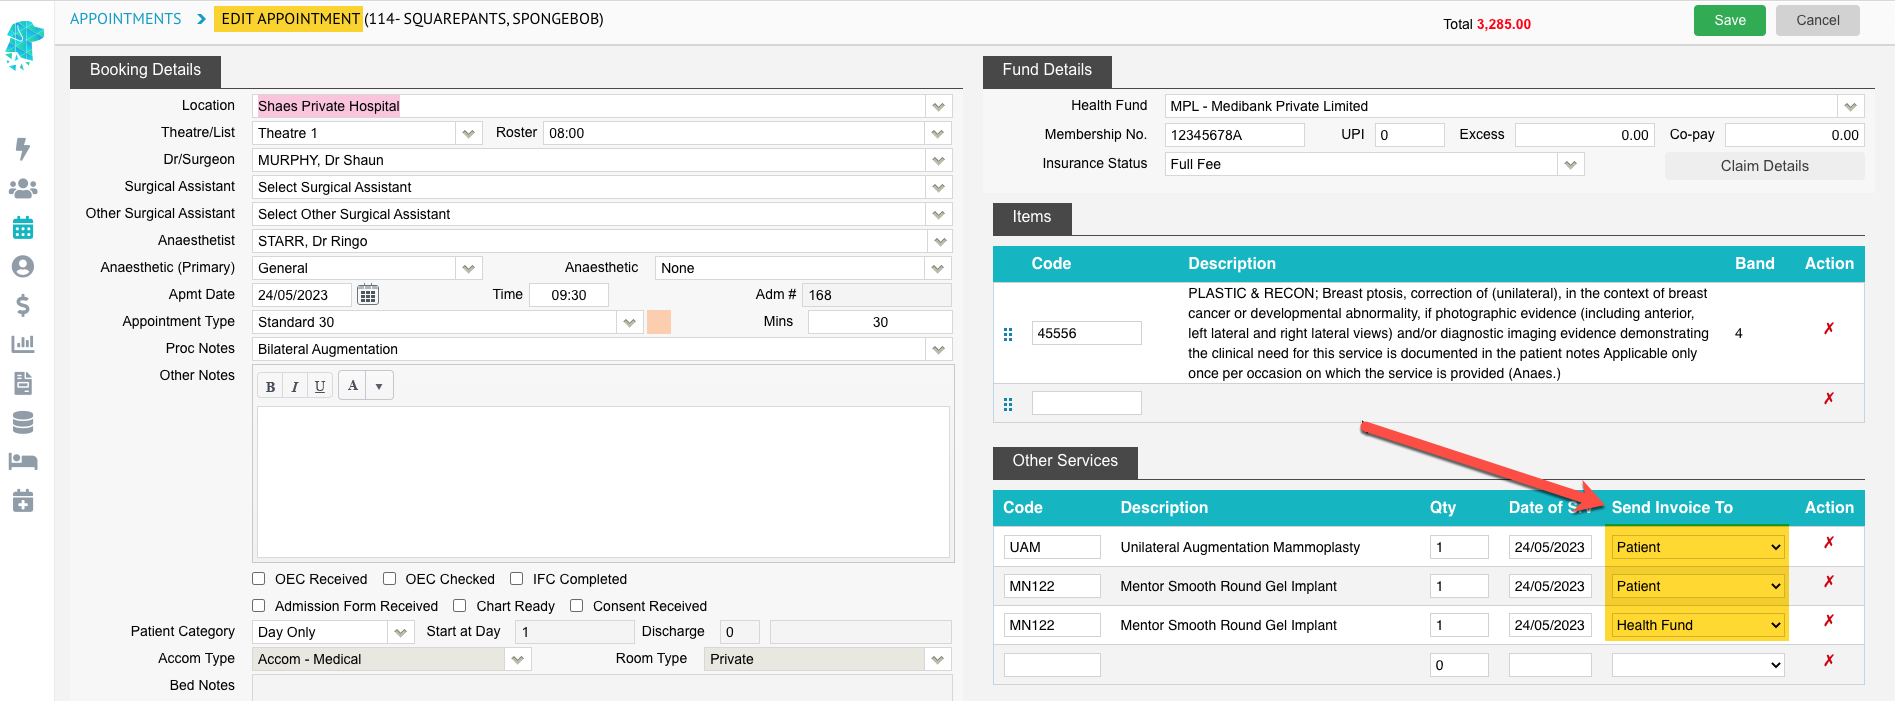
Each facility is able to add their own “codes” to the Other Services list in FYDO. This can be done by following the instructions for Adding Other Services Codes (Hospital) and then adding the corresponding fees by following the instructions for Adding Fees for Other Service Codes (Hospitals)

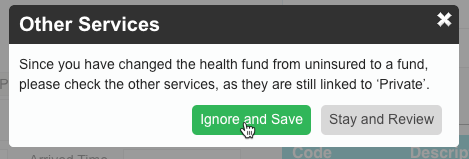
After all required information is entered, the user can click Save. They will then be prompted to review the information, as FYDO wants to be sure that the items are being bill correctly.

Therefore click Ignore and Save.
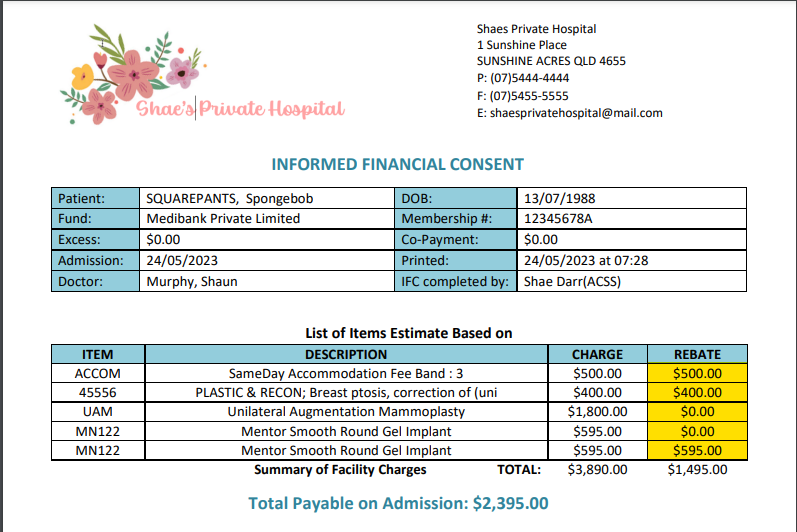
From here, the user is able to proceed to creating the IFC. This is where we will be able to see that the items being billed to the health fund will attract a rebate. And the items being billed to the patient will not attract a rebate.
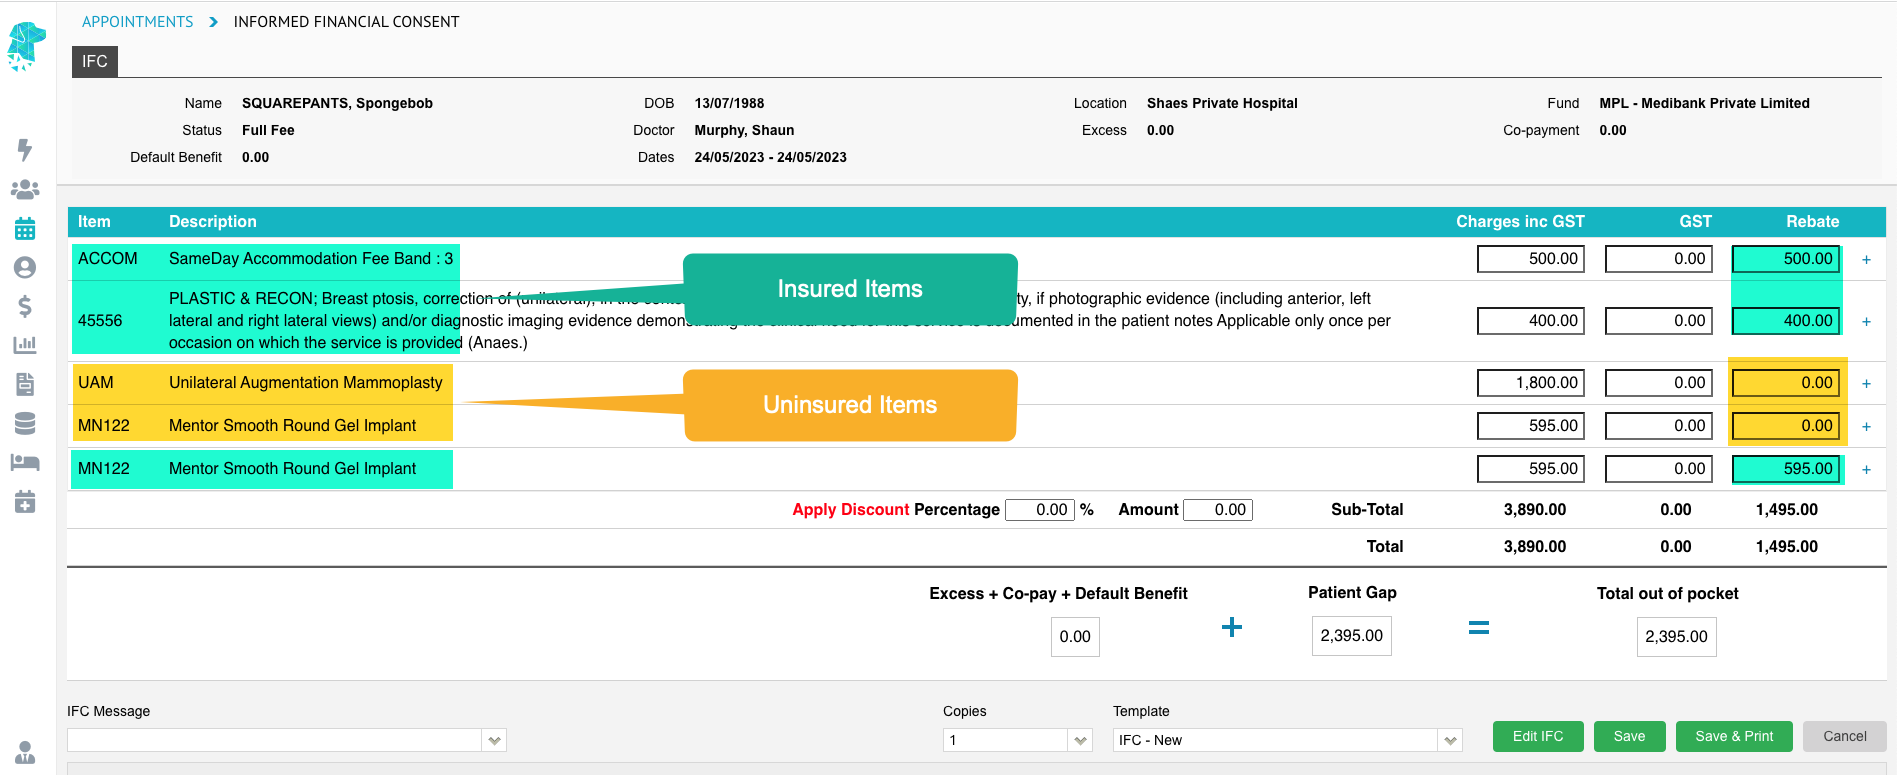
Once the IFC is produced the patient will be able to clearly see which items attract a health fund rebate & which items do not.
For information in receipting payments for these types of episodes visit these instructions for
Receipting for an Episode that is partially covered by the Health Fund

There will be some instances where insured patients need to pay for part of their procedure.
Maybe some of the procedures is classified as a cosmetic procedure, maybe they have restrictions on their level of cover & the hospital is able to raise a charge to the patient for those extra procedures.
Maybe the hospital is contracted for 2nd Tier rates and can charge a patient gap or they want to charge a credit card surcharge to the patient.
Whatever the case may be, FYDO accommodates this split method of billing the health fund AND the patient seamlessly.

To create an IFC for a patient whose admission is only partially covered by the health fund, see instructions on Creating an IFC for an Episode that is Partially Covered by the Health Fund

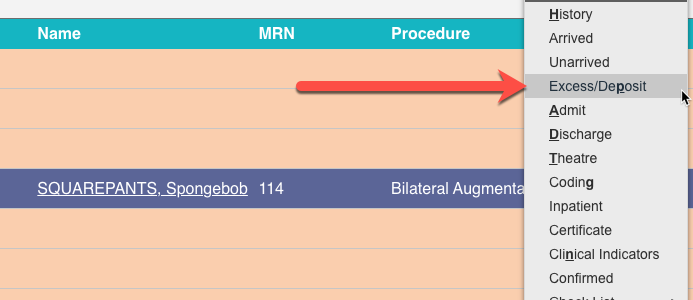
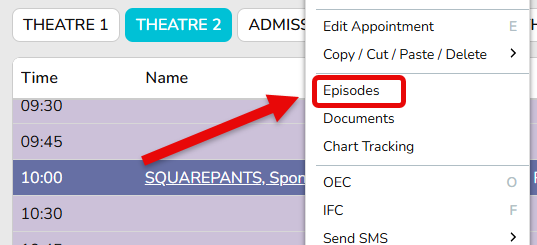
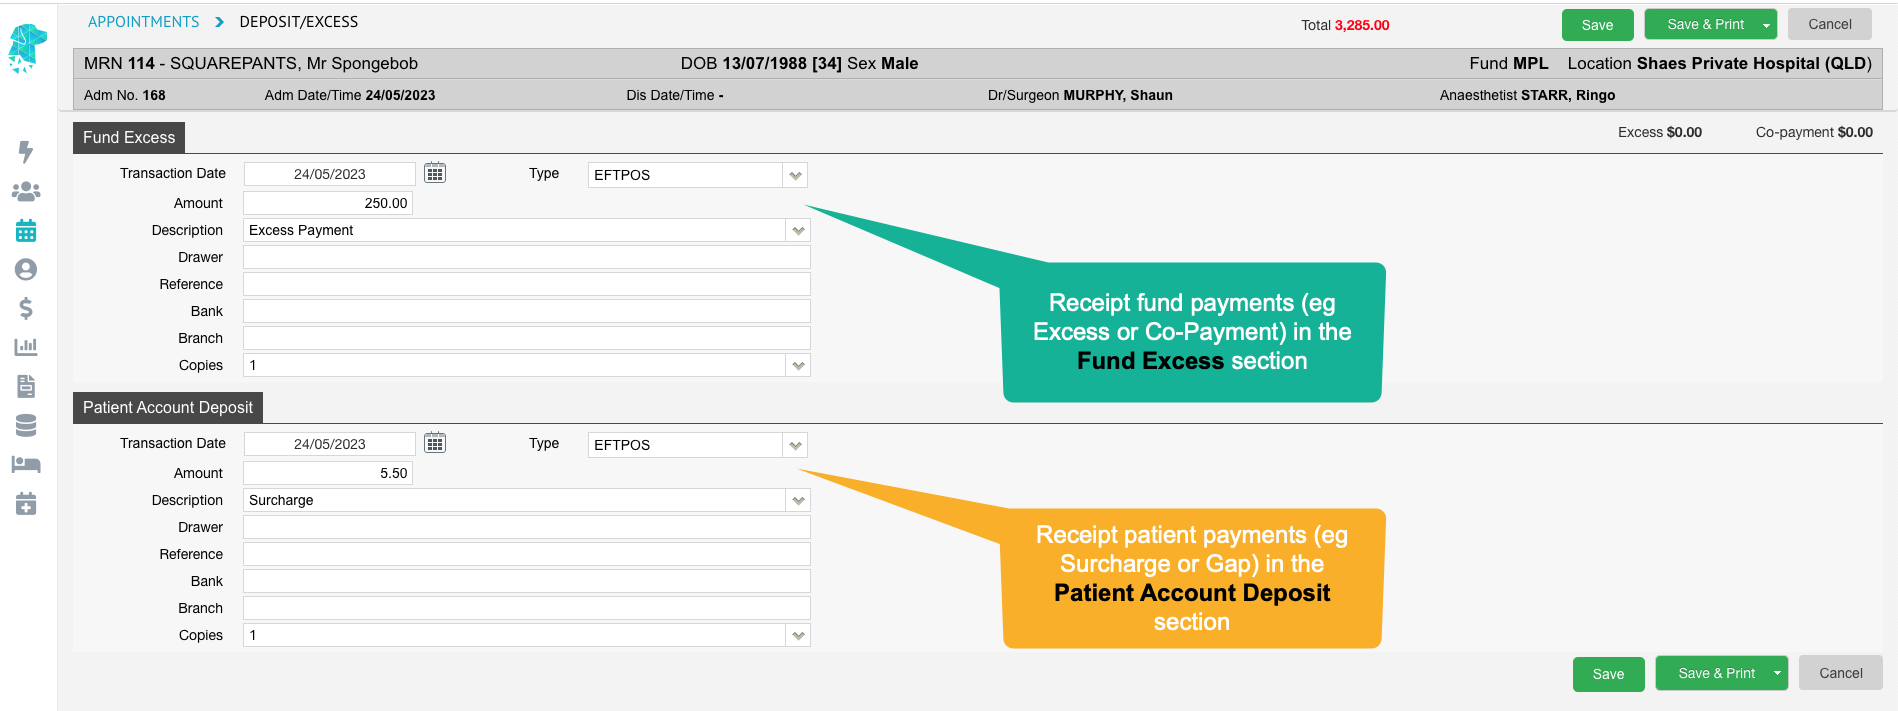
To receipt the patient for their Insured & Uninsured portions of their payment at the same time navigate to the appointments screen, right click on the episode & select Excess/Deposit.

Then use the Fund Excess section to receipt the payment that is required to go towards the Insured Fund Invoice and use the Patient Account Deposit section to receipt the payment that is required to go towards the Uninsured Patient Invoice.

Click Save & Print to produce a copy of the receipts for the patient.

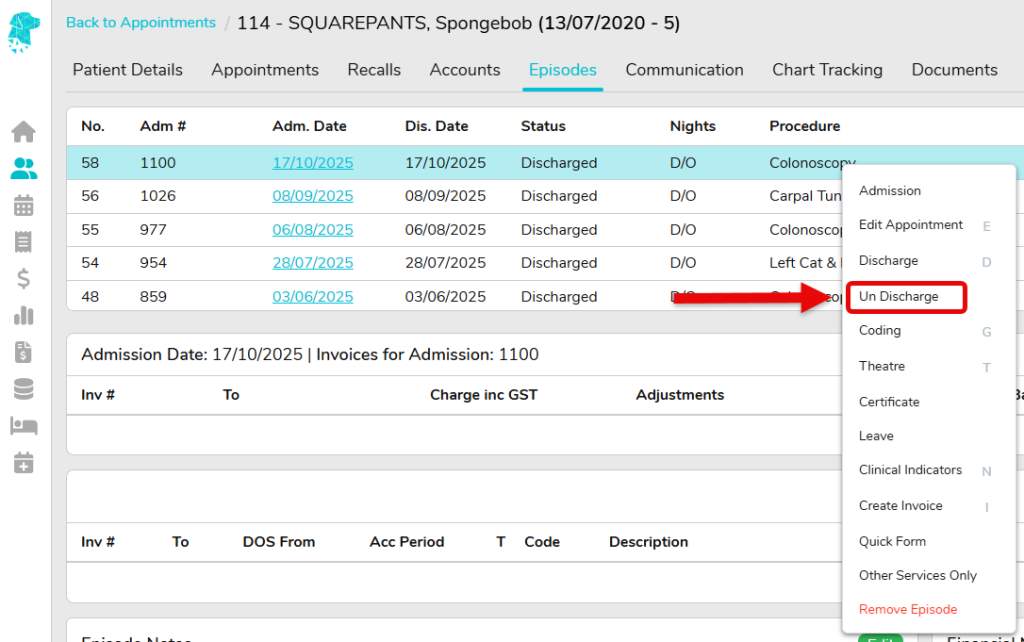
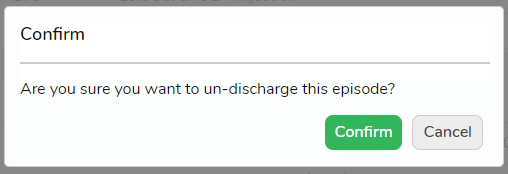
If you navigate to the History/Episodes screen you will be able to see that there has been an Insured Invoice Number raised, along with an Uninsured Invoice Number raise.


Hospital Appointment Screen Custom Views – All View

FYDO gives users the ability to customise the Appointments Screen to allow them to view the information that is important to their role. This assists in workflow & efficiency & allows users to view different information depending on the task that they are undertaking.
All custom views that are created for each facility are available to all users. Each user is then able to select their favourite view to open as their default. These instructions will provide ideas for different views & the set up required to accomplish them. For further details on how to create custom views please see the page on Creating Custom Views

Included below are examples of All View ideas. Please see our other pages on Individual & Weekly View ideas for those view types.

Administration View


Doctors Name View


Status Colours View


IFC Complete View


Procedure View


Hospital Appointment Screen Custom Views – Individual View

FYDO gives users the ability to customise the Appointments Screen to allow them to view the information that is important to their role. This assists in workflow & efficiency & allows users to view different information depending on the task that they are undertaking.
All custom views that are created for each facility are available to all users. Each user is then able to select their favourite view to open as their default. These instructions will provide ideas for different views & the set up required to accomplish them. For further details on how to create custom views please see the page on Creating Custom Views

Included below are examples of Individual View ideas. Please see our other pages on All & Weekly View ideas for those view types.

Administration Pre-Operative Process

Pre-Operative Phone Calls View


Theatre View


Recovery View


Patient Contact Information View


Status View

In addition to creating the Status Custom View the user will need to ensure the desired colours are set up in
Settings > System Configuration > Hospital.


Coding View


Billing View


Hospital Coding

Once the episode is complete it is required to be Coded. The episode needs to be Admitted for the Coding Screen to be made available. FYDO integrates with TurboGrouper & utilising this program, along with FYDO will result in a seamless coding & grouping process.

  1. The Coding Screen can be located by navigating to the Appointments Screen
  2. Use the Search feature to find a specific patient or
  3. Use the Calendar to view a specific date
  4. Once the episode has been located, use the Right-Click Menu to select Coding (Or use the Fast Key ‘g’)

  5. The Coder field will automatically populate with the current user’s name
  6. Copy Previous Coding will populate all fields according to a previous admission (This feature is especially handy when a patient has reoccurring admissions for the same procedure)
  7. Documents will open a new tab, allowing the user to view scanned documents while coding
  8. When a Diagnosis Codes is added, a new line will display below to enter the next code (This field searches Codes or Descriptions) The Type & Indicator can be selected for each individual line
  9. Anaesthetic Types are populated from the Edit Appointment Screen and can be edited if necessary (Any changes made here will be reflected in the Edit Appointment Screen)
  10. Visit to Theatre is populated from the Discharge Screen and can be edited if necessary (Any changes made here will be reflected in the Discharge Screen)
  11. Show MBS allows the user to hover over the button to display the MBS items that have been entered into the Theatre Screen (If these items need to be amended the user will need to navigate to the Theatre Screen)
  12. When a Procedure Code is added, a new line will display below to enter the next code (This field searches Codes or Descriptions)
  13. Once all required data has been entered click Save

  14. Once the coding has been saved the user will be able to obtain the DRG by running the Grouper (if TurboGrouper is installed)
  15. Ensure the correct DRG Version is selected (A default DRG Version can be set up for each fund in Settings > Health Funds which will then populate in this field)
  16. Click Run Grouper. This will complete the DRG Code field, the MDC field & the Date Grouped field
  17. Once complete click Exit to return to the appointments screen
  18. The episode will now display a “C” to identify that it has been coded
  19. Users are also able to use the Filter dropdown to view Uncoded episodes only


How to Find Your Minor ID

The minor ID, also referred to as the Location ID, will sometimes be required by Medicare. It is the same as your ADV client number. Here’s how to find it in FYDO:

  1. Hover over the Support icon
  2. Your Minor ID will be displayed in the heading


Claiming Hospital – Claims

Claiming Hospital is used to transmit the invoiced episodes to the health funds via ECLIPSE. It consists of 2 tabs, Claims & Not Yet Sent.
These instructions will cover the Claims Tab.
For information regarding the Not Yet Sent Tab see our instructions Claiming Hospital – Not Yet Sent

  1. The Claiming Hospital section can be opened by hovering over the and selecting Claiming Hospital.
  2. This will open to display the Claims tab which is where all the claims that have been transmitted to the health fund are displayed. It will open to show all outstanding claims. Claims that fall under the category of Receipted or Payment Received are not displayed by default when the page is open. (These categories will be touched on later in the instructions)
  3. For multi-location systems, use the Location dropdown to select the desired location
  4. The Provider dropdown gives the option to select a certain doctor/surgeon
  5. The Status dropdown allows the ability to display the claims according to their current status. (This status refers to the ability of the claim to be sent to the health fund. It is not a response from the health fund. The responses will be covered in the instructions Processing & Payment Reports)
    a. Open
    b. Closed
    c. Closed with Issues – There was a problem sending the claim
    d. Ready
    e. Queued – The claim is waiting to be sent to the fund
    f. Sent (white) – Has been sent to the fund less than 2 weeks ago or the fund has responded
    h. Sent (red) – Has been sent to the fund, but no response has been received for 2 weeks
    i. Processed – The fund has processed the claim
    j. Payment Received – The payment has been received
    k. Receipted – The payment has been received & applied
    l. Rejected – The claim hasn’t been received/accepted by the fund
  6. The Fund dropdown allows filtering to a particular health fund
  7. The Search field gives the ability to search any information e.g., batch number, invoice number, patient name, amount claimed or paid etc
  8. Hovering over the words Closed with Issues or Rejected will display a pop up that will give more information as to why the claim wasn’t successfully transmitted
  9. Clicking on the Invoice Number will open a new tab & display the health fund response, if it has been received, in the Processing IHC screen. Information on this tab will be covered in the Processing & Payment Reports instructions
  10. The blue arrow on the right of the screen, & also the Right Click feature, gives the option to go to the patient History screen, if you need to view the episode details.
    The Right Click function also allows the user to Remove Batch. However, this would only be utilised if the health fund has confirmed that it didn’t transmit successfully & they will not be making payment towards it. The batch is what allows the system to link this claim to the invoice number. Therefore, if a batch is removed prematurely, the associated invoice number will not display on the Electronic Remittance Advice when it is received from the fund. This makes it very difficult, & a lot more time consuming, to receipt a remittance so we do not advise to remove sent batches without liaising with the health fund first.
  11. As mentioned earlier, the Claims screen displays all claims Except Receipted & Payment Received when opening. Therefore, as soon as a payment has been processed in the system the claim will disappear from this screen by default. This allows users to easily identify claims that are still outstanding. Claims with the status of Payment Received or Receipted can always be vied by using the Status dropdown mentioned in #5 above


Claiming Hospital – Not Yet Sent

Claiming Hospital is used to transmit the invoiced episodes to the health funds via ECLIPSE. It consists of 2 tabs, Claims & Not Yet Sent.
These instructions will cover the Not Yet Sent Tab.
For information regarding the Claims Tab see our instructions on Claiming Hospital – Claims

  1. The Claiming Hospital section can be opened by hovering over the and selecting Claiming Hospital
  2. This will open to display the Claims Tab. (Click on this link to view the Claiming Hospital – Claims instructions)
  3. The Not yet sent tab displays all claims that have been invoiced & will include claims that can be sent via ECLIPSE & also Paperbase claims that need to be sent manually
  4. For multi-location databases, use the Location dropdown to select the desired facility
  5. Use the Type dropdown to select Eclipse or Paperbase claims
  6. Use the Status dropdown to display, or omit, claims that are Ready, Not Ready or On Hold
  7. Use the Fund dropdown to display, or omit, certain funds
  8. Use the Coding dropdown to display, or omit, claims that are Completed or Pending coding
  9. Use the DRG dropdown to show claims with a DRG or with an Empty DRG.  Using the Empty DRG option will identify claims that still require to be grouped
  10. Use the Run Pat Check button to run an OPV Check for all the patients on the list. This function will only work if the patients’ Medicare card & health fund cards are entered correctly. Sometimes this may need to be run twice as the Medicare card might be updated the first time, therefore running it a second time will enable the system to check the fund details
  11. For a claim to be ready to be sent it requires:
    a. A blue tick to confirm the OPV check has been successfully performed
    b.   A green tick to confirm that the coding has been completed
    c.  If it is still showing as Not Ready it will need to be grouped, in the coding screen
    d.   Once it is showing as Ready it is able to be transmitted via eclipse
  12. Use the Blue Arrow , or select the claim (so that it is purple) and Right Click to display a menu that allows you to navigate to:
    – The Coding Screen to check coding & grouper
    – The Patient History Screen to view the invoice details
    – The Patient Record Screen to complete the OPV check
    This feature assists in getting the claims ready to transmit via eclipse
  13. When an ECLIPSE claim is ready to be sent another option will be available in the menu called Send Invoice via ECLIPSE which will then send the invoice to the fund
  14. Once all claims are ready to be sent (or filters have been applied to only show Ready ECLIPSE claims) the select all function will be available to select & send multiple claims at once
  15. After all desired claims have been selected, use the Select dropdown to Send selected via ECLIPSE
  16. The claims will then be transmitted to the fund & will display on the Claims tab with their status. It is a great idea to check the Claims Tab straight away to make sure claims have been successfully transmitted
  17. Paperbase claims will also appear on the Not yet sent Tab. This is to remind the user to send the claim away manually.
  18. Paperbase claims will require the coding to be done & the episode to be grouped before it will show as Ready
  19. Once it is ready, the blue arrow on the right, or the right-click function, will display the option to Mark as Sent. Using this function, only after the invoice has been manually sent, is a great way to ensure no claims are missed. Once the claim is marked as sent it will no longer display on the Not yet sent tab. There will also be an audit in the Patient Episode Screen to state who marked the claim as sent & when.


Adding Fees to Other Services Codes (Hospital)

These instructions will assist users in adding or amending the fees associated with Other Service Codes / Prosthesis Codes.
Prostheses list updates will be automatically loaded into FYDO and any new items will be added with all new fees will be imported. However descriptions will not be updated, as some facilities prefer their own descriptions & do not what them overridden.
After following the instructions for Adding Other Services Codes the user will be able to add the correlating fees by following the steps below.
  1. Go to Settings
  2. Scroll down to Hospital > Fees Management & select Other Services
  3. Use the Search field to find the desired code / other service
  4. Double click on the item to display the information that has been entered, along with the table to enter the relevant fees

  5. If replacing fees that have already been entered, use the Action dropdown & select Move all Current Fees to Old Fees. This will copy the Current fees to the Old fees to allow the new fees to be entered, without losing the previous fee schedule or needing to type them in again
  6. If the cost of the item will be the same for each health fund, enter the charge for the first fund under the Charge inc GST column
  7. Then use the Action dropdown & select Make the First Charge the same for the rest of the Funds. This will replicate the fee added for the rest of the funds
  8. Then use the Action dropdown & select Move Current Charge into Current Rebate. This will replicate all the Charge inc GST fees in the Rebate column. You may then need to remove some of the fees listed in the Rebate column (or override them to $0) if the ‘fund’ doesn’t attract a rebate (e.g., Uninsured)
  9. Use the GST tick box column if the fee entered is inclusive of GST
  10. If the cost of the item is for a particular ‘fund’ (e.g., a gap fee for an uninsured patient), add the fee to the desired fund, instead of following the above steps to add to all funds
  11. Lastly enter the Threshold Date (start date) 
  12. Once all desired information has been entered click SAVE