Claiming Hospital is used to transmit the invoiced episodes to the health funds via ECLIPSE. It consists of 2 tabs, Claims & Not Yet Sent. These instructions will cover the Not Yet Sent Tab. For information regarding the Claims Tab see our instructions on Claiming Hospital – Claims
The Claiming Hospital section can be opened by hovering over theand selecting Claiming Hospital
This will open to display the Claims Tab. (Click on this link to view the Claiming Hospital – Claims instructions)
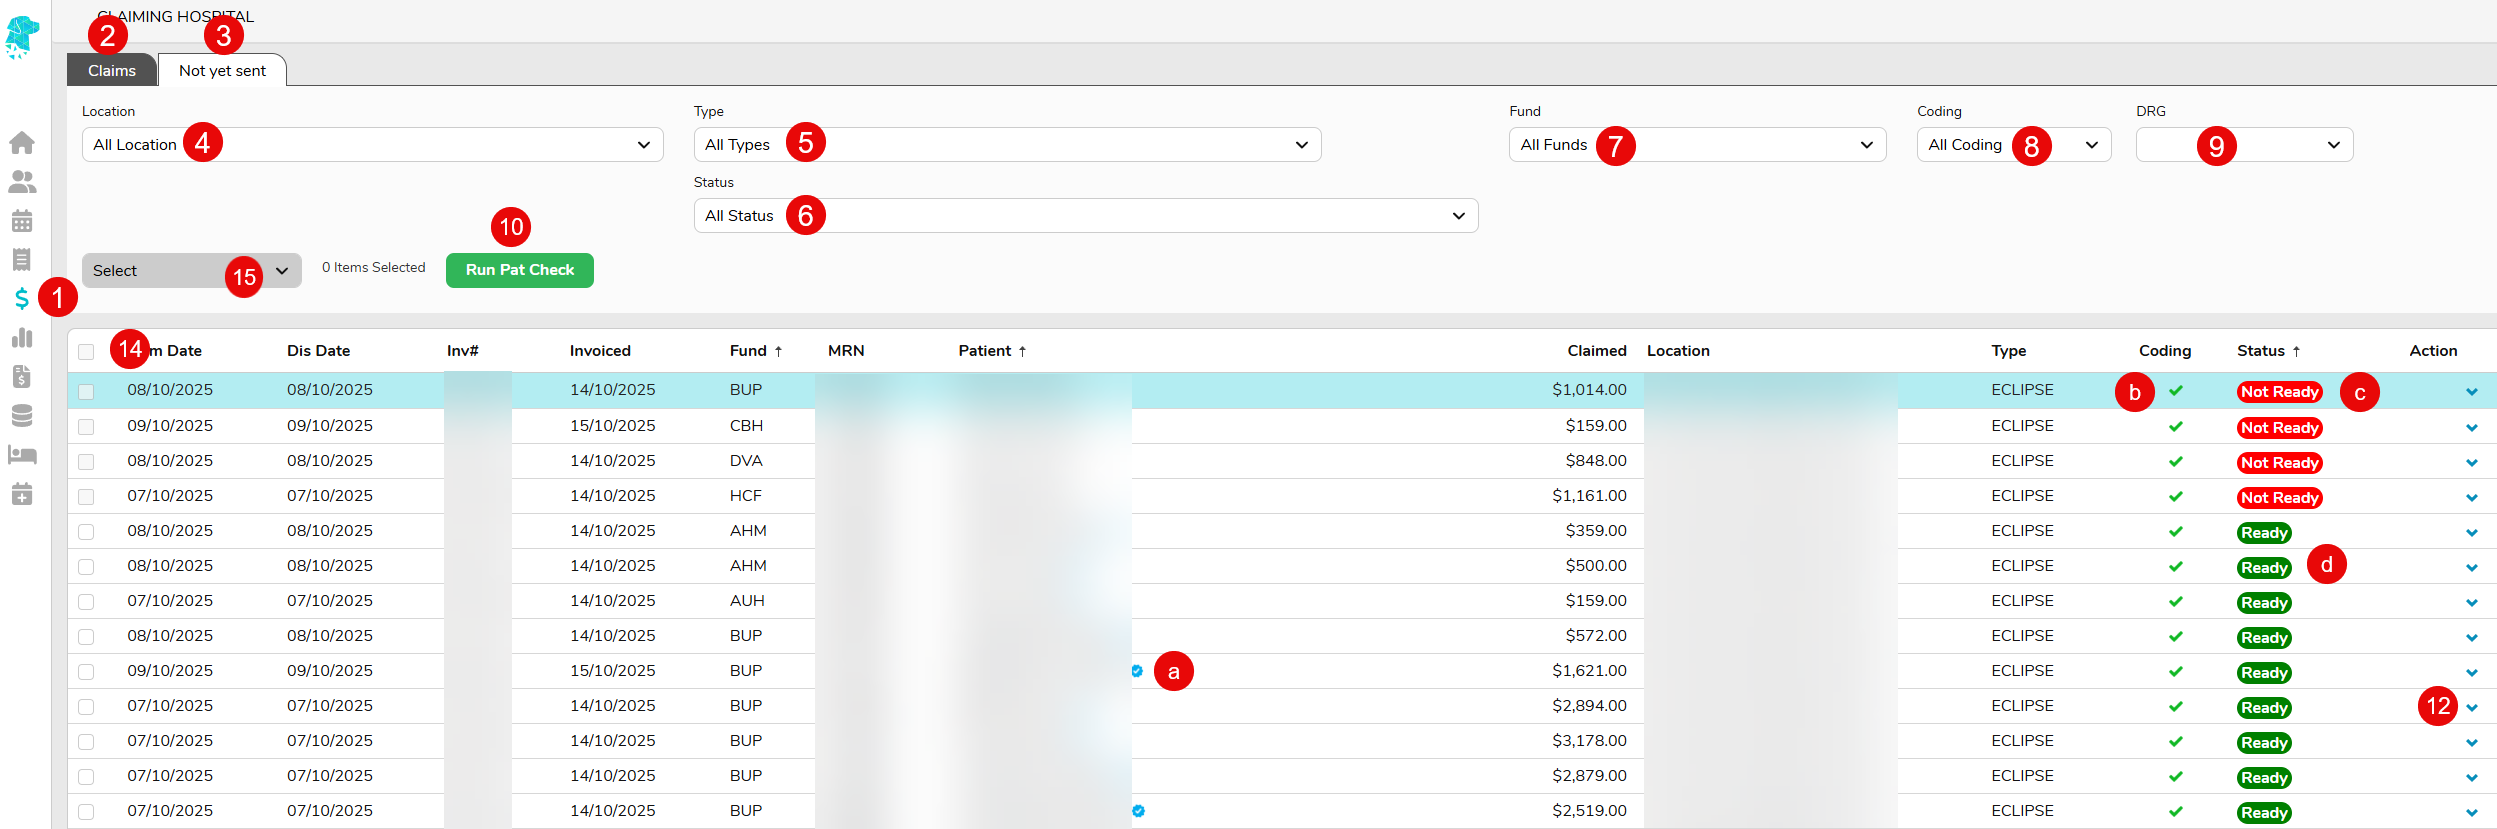
The Not yet sent tab displays all claims that have been invoiced & will include claims that can be sent via ECLIPSE & also Paperbase claims that need to be sent manually
For multi-location databases, use the Location dropdown to select the desired facility
Use the Type dropdown to select Eclipse or Paperbase claims
Use the Status dropdown to display, or omit, claims that are Ready, Not Ready or On Hold
Use the Fund dropdown to display, or omit, certain funds
Use the Coding dropdown to display, or omit, claims that are Completed or Pending coding
Use the DRG dropdown to show claims with a DRG or with an Empty DRG. Using the Empty DRG option will identify claims that still require to be grouped
Use the Run Pat Check button to run an OPV Check for all the patients on the list. This function will only work if the patients’ Medicare card & health fund cards are entered correctly. Sometimes this may need to be run twice as the Medicare card might be updated the first time, therefore running it a second time will enable the system to check the fund details
For a claim to be ready to be sent it requires: a. A blue tick to confirm the OPV check has been successfully performed b. A green tick to confirm that the coding has been completed c. If it is still showing as Not Ready it will need to be grouped, in the coding screen d. Once it is showing as Ready it is able to be transmitted via eclipse
Use the Blue Arrow , or select the claim (so that it is purple) and Right Click to display a menu that allows you to navigate to: – The Coding Screen to check coding & grouper – The Patient History Screen to view the invoice details – The Patient Record Screen to complete the OPV check This feature assists in getting the claims ready to transmit via eclipse
When an ECLIPSE claim is ready to be sent another option will be available in the menu called Send Invoice via ECLIPSE which will then send the invoice to the fund
Once all claims are ready to be sent (or filters have been applied to only show Ready ECLIPSE claims) the select all function will be available to select & send multiple claims at once
After all desired claims have been selected, use the Select dropdown to Send selected via ECLIPSE
The claims will then be transmitted to the fund & will display on the Claims tab with their status. It is a great idea to check the Claims Tab straight away to make sure claims have been successfully transmitted
Paperbase claims will also appear on the Not yet sent Tab. This is to remind the user to send the claim away manually.
Paperbase claims will require the coding to be done & the episode to be grouped before it will show as Ready
Once it is ready, the blue arrow on the right, or the right-click function, will display the option to Mark as Sent. Using this function, only after the invoice has been manually sent, is a great way to ensure no claims are missed. Once the claim is marked as sent it will no longer display on the Not yet sent tab. There will also be an audit in the Patient Episode Screen to state who marked the claim as sent & when.
 and selecting Claiming Hospital
 A blue tick to confirm the OPV check has been successfully performed
 A green tick to confirm that the coding has been completed
 If it is still showing as Not Ready it will need to be grouped, in the coding screen
 Once it is showing as Ready it is able to be transmitted via eclipse
 , or select the claim (so that it is purple) and Right Click to display a menu that allows you to navigate to: – The Coding Screen to check coding & grouper
