Manually Updating Clinic Health Fund Fees

Whether it is Medicare, DVA, or Health Funds, FYDO keeps your item fees up to date, automatically.

Note: Your FYDO system maintains the latest Medicare/ DVA fees by default. To enable automatic fee updates for the Health Funds, click on the link below:

https://wiki.fydo.cloud/Health-Fund-Fees


Manually updating health fund fees

The manual procedure can only update fees for items that have already been added to your FYDO system. So, to prevent having to re-run the update for a given health fund, we recommend that you add all the items you need to bill before running the update.

Not sure how to add items? Click on the link below to learn how:

https://wiki.fydo.cloud/adding-mbs-items/


Ready to manually update your health funds fees? Let’s get started!

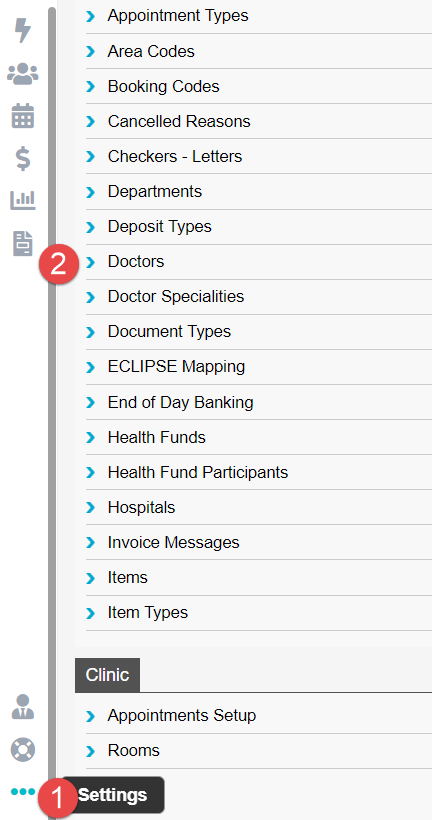
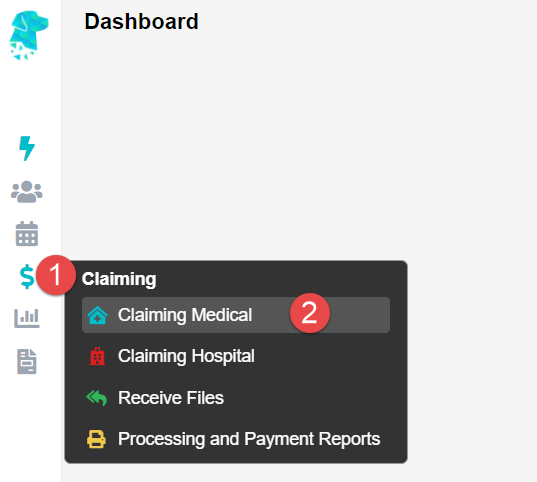
First, go to Settings > Bulk Fee Update


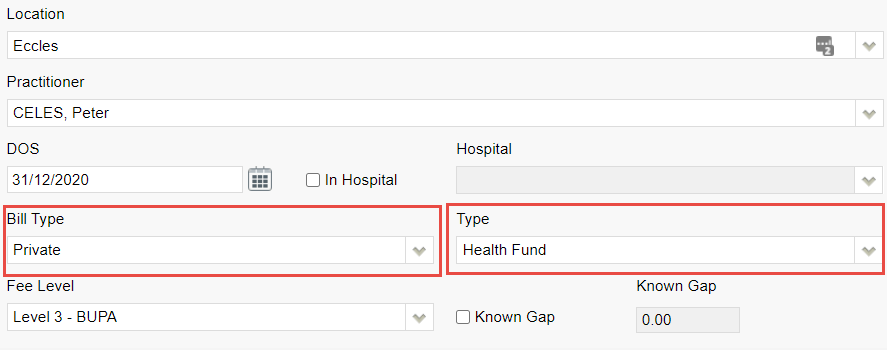
You will now see the Bulk Fee Update screen where you will need to update two sets of fees for each health fund. The first set are the “Old fees/ codes” and the second set are the “Current fees/ code” (To be updated in that order). 

  1. The Old Fees are what will be charged for services where the Date of Service is prior to the introduction date of new fees for a given item.
  2. The Current Fees are the latest fees and will be charged for services where the Date of Service is on or after when new fees were introduced for a given item. 

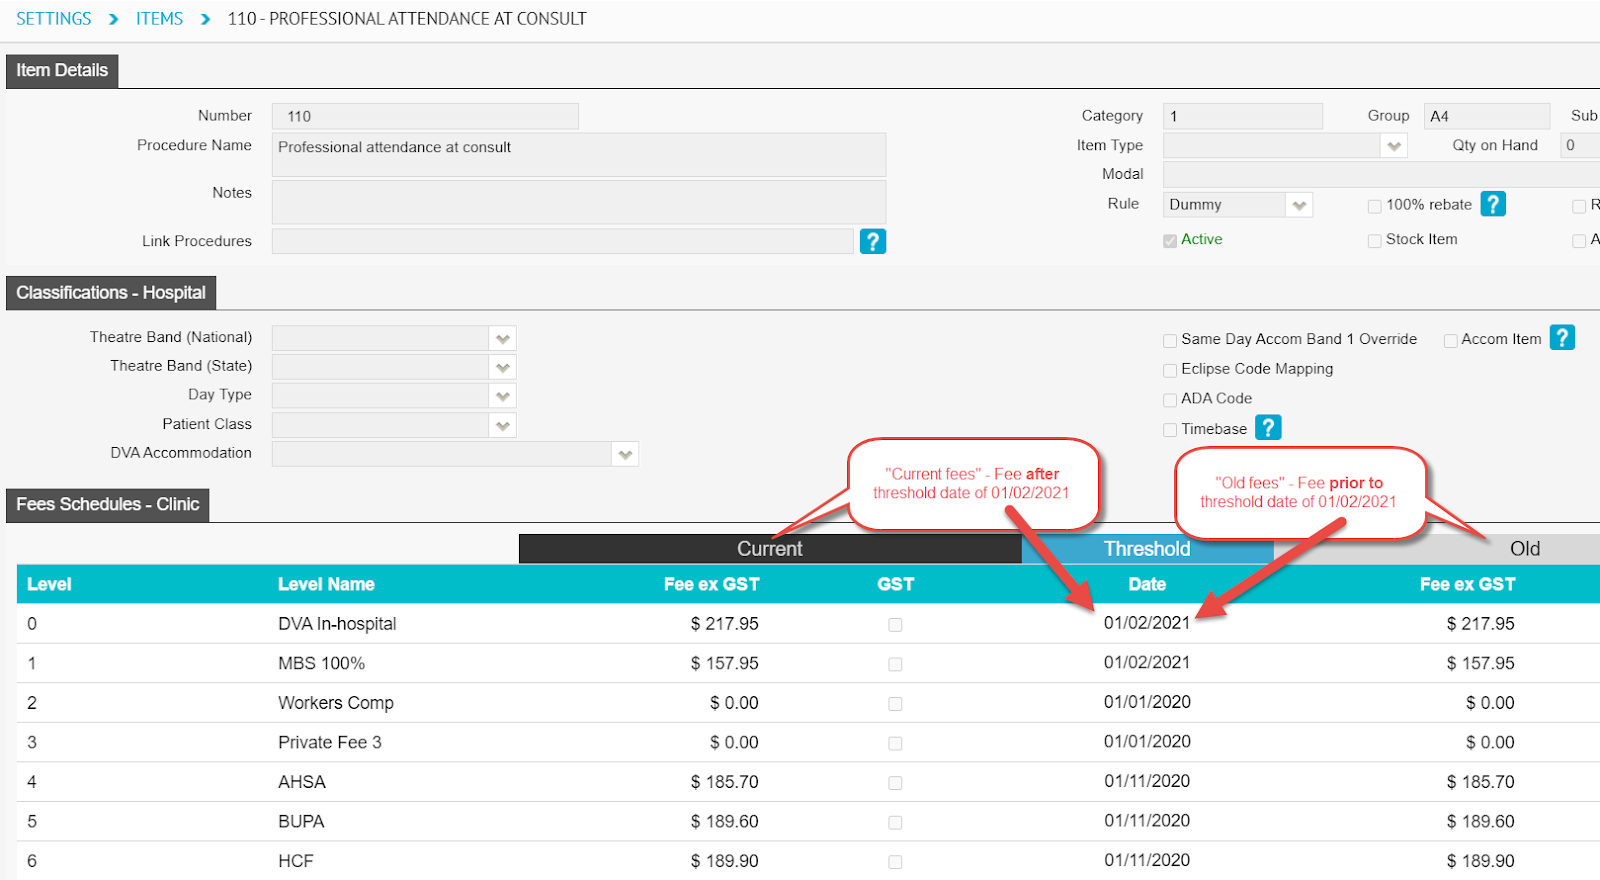
In other words, every item has two fees – the current fee and the last fee before the current. Therefore, before we can update the current fees, we need to push them to the old fees.

Updating the old fees

There are a number of ways to update fees:

  • Importing an Excel file – update fees from excel file
  • Percentage – update fees as a percentage of the old or current fees
  • Pricing – update fees by dollar amount 


This blog post recommends using the percentage option. So, as shown in the screenshot below:

  1. Set the Update Fee Level to: the health fund you wish to update fees for,
  2. Set the Codes to:  Old Codes,
  3. Set the Change Fee By: to Percentage 
  4. Set the Base Fee Level to: the same health fund chosen in step 1
  5. Set the Percentage to: 100.00

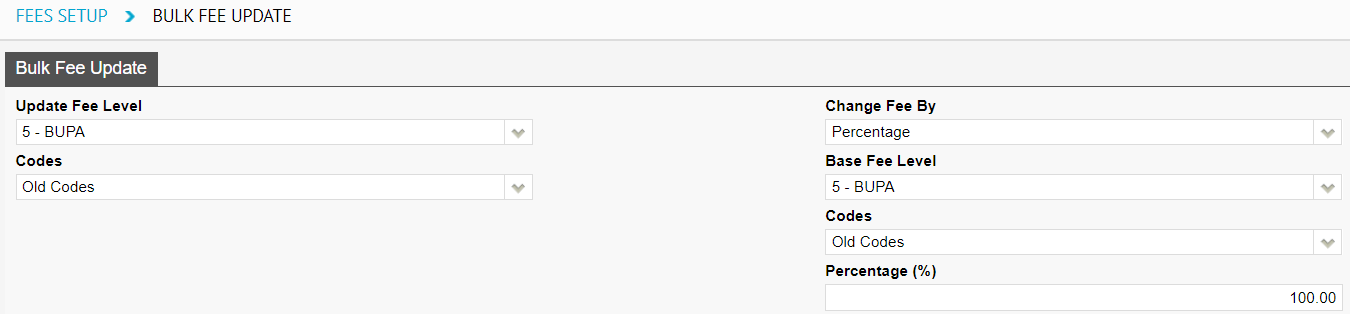
Then, click the Save button

This will replace the Old fees of all items for the selected health fund with the current value of the current fees.


Updating the current fees

Next, we must update the current fees; and we do this on the same screen as above. We will be updating the health funds fees by importing an Excel sheet.

As shown in the screenshot below:

  1. Set the Update Fee level to: the health fund you wish to update fees for,
  2. Set the Codes to: Current Codes,
  3. Set the Change Fee By to: Importing an excel file


Next, you’ll need to download the excel file containing the fees for that health fund from our website at the link below:

https://au.acsshealth.com/healthfundfees/


Note: Be sure to download the appropriate file based on your state (if applicable) and Gap or No Gap (if applicable).


Once downloaded, browse for the file using the Browse button, select the file, and hit Save.

This will replace the Current fees of all items for the selected health fund with the latest fees released by the health fund, from the Excel sheet uploaded.

That’s it! You have successfully updated the fees for the health fund. Repeat the process for as many funds as necessary.


Clinic Billing – Overseas Patients

Need to bill an overseas patient? Read on to learn how.

Step 1: Bill manual invoice

Overseas claims are received and processed manually. This means you cannot bill such claims through eclipse for electronic lodgement. Therefore, you’ll need to create and send a manual invoice.

Note: Ensure the Bill Type is set to: Private and the Type is set to: Health Fund


Step 2: Print manual invoice to PDF

Note sure how to print invoices? Click here to learn how


Step 3: (Conditional – If claim is for Medibank or AHM) complete the corresponding claim form and save it to your computer


Step 3: (Conditional – If claim is for BUPA, ) complete BUPA batch header form and save it to your computer

    • Click here to download batch header form
    • Enter the practice name as the location of the service and the practice id as the doctor’s BUPA FundPayeeId


If you have previously entered the doctor’s FundPayeeId into FYDO, you may find it by going to Settings > Doctors:


Step 4: Send off the documents

  • Once you are ready to send off the invoice, contact the health fund and ask what email address they would like the manual claim sent to, as well as whether they require any other supporting documents
  • Need their contact details? Follow the link below:

https://wiki.fydo.cloud/medicare-and-fund-contacts-dealing-with-rejections/


Step 5: Follow up & pay off the invoice 

  • We’d recommend you call the health fund a couple of business days after you email them to ensure your email has been received and will be looked at in the coming days
  • After this point, you may wish to follow up every couple of weeks, inquiring whether or not your invoice has been paid
  • Once the invoice has been confirmed to be paid, pay it off on FYDO


That’s it! That’s how to do overseas billing for patients. 


How to Resend a “Sent” Clinic Batch

From time to time, you may need to resend an already sent batch. But before we discuss how you’d do this, let’s first discuss why you may need to resend a batch.


In almost all cases, you’d need to resend a batch if it either:

  • Has not yet been paid / rejected within the expected period (up to 2 business days for Medicare/ DVA claims and up to 4 weeks for health fund claims). You’ve then called the health fund, Medicare, or DVA, and found out they have not received the claim. Thus, they’ve asked you to resend it
  • Has been partially or fully rejected and you can rectify the cause of rejection without rebilling


You do not want to resend a batch if:

  • It is rejected and you wish to resend it as it is, without making any changes to the original claim. Since, if nothing changes about the claim, it will likely be rejected again
  • If you have not first spoken with the body receiving the claim. It is always recommended that you first contact the organisation receiving the claim and inquire. This is because you do not want to send a duplicate claim if you do not need to. In most cases, this is not a major concern. However, it could cause problems such as a rejection of both claims (the original and the duplicate) or increased processing time if a duplicate claim is received

With that addressed, if you still need to resend an already sent claim, read on.


Start off by going to Claiming Medical.


If the batch Status is Sent or Processed, you may right-click on the batch and select Reset Batch Status


This will make the batch status revert to Closed, allowing you to resend the batch with the Send Batch button.


Otherwise, if the batch Status is Payment Received with a partial or full rejection, double click on the batch to open it up, revealing the invoice(s) inside.


If you wish to resend the invoice in its entirety (with all items inside), simply right-click on the desired invoice and click on Move Invoice Out.


Otherwise, if you wish to resend only a part of the invoice (1 or more items but not all), double click on the invoice, revealing the items inside.


Then, right-click on the item you wish to resent and select Move Item.

This will present you with the below pop-up window; and as you can see, it will move the invoice/ item to the current batch.


Current batch:

  • If it is a Medicare or DVA invoice: it will be moved into the Open batch for that provider. If no open batch is present, a new one will be created
  • If it is a Health Fund invoice: it will be moved into a new Closed batch.

From here, you may close the batch if it is not yet closed and send it by right-clicking the batch and selecting Send Batch.


Deceased Patient Clinic Billing

Need to bill Medicare, DVA, or a health fund for a patient that is now deceased? 

You can always attempt to send the claim electronically. However, in most cases, you will need to create a manual invoice and send it manually, for manual review. 

So, here’s one thing you can do before you decide whether or not to send the claim electronically. Run the Online Patient Verification check with the As At field date set to the latest Date of Service you wish to bill the deceased patient for.


If the check returns an eligible patient (noted with a green box around the Medicare and health fund card numbers), you may consider sending the claim electronically, as you’re used to. However, this does not guarantee the claim will be paid.


To learn how to create a manual invoice, click on the link below:

https://wiki.fydo.cloud/How-to-create-a-manual-invoice


How to Delete Clinic Invoices

Needing to remove an invoice? There are two places where you could do so:

  1. Via the Patient’s Record, or
  2. Via the Batch in Claiming Medical


Additionally, there are two use cases for deleting invoices:

  1. Deleting the entire invoice (all items held)
  2. Deleting a part of the invoice (1 or some items deleted, but not all)


Let’s take a closer look at both options and use cases.


Deleting through the Patient’s Record

Begin by opening the patient record of the patient in question and click on the Accounts button.


This button reveals a patient’s billing/ treatment history where each line is an invoice


So from here, simply double click on the invoice you wish to delete.


This will open up the invoice, revealing the item numbers inside.

From here, you may simply right click on the desired item and select delete, enter a reason, and hit OK to delete the item.

You may repeat this step for as many items as you need to delete.

Note: Deleting the final item in the invoice will effectively delete the entire invoice.


Alternatively, you can delete invoices from the Claiming Medical section of FYDO, found under the Claiming tab.


Deleting through the Claiming Medical

Place your mouse over the Medical tab ($ Sign) and select Claiming Medical.

You will now see all your batches. So select the batch holding the invoice(s) you wish to delete.


This screen is where invoices created go. They go inside a batch that is then sent from this screen.


Note: this does not apply to Private invoices. These are invoices with the Bill Type set to Private in the billing screen.


So you may double click on the batch holding the desired invoice to be deleted.


You will now see the invoice(s) inside the batch.


Import note: Pay attention to the number of items in the invoice in question.

  • If you wish to delete all of the items within the invoice, simply right click on the invoice here, and select Delete Invoice


  • Otherwise, if you wish to only delete a portion of the invoice (some items, but not all), simply double click on the invoice to open it up. Then right click on the items to be deleted and select Move Item


How to Create a Manual Clinic Invoice

From time to time, you may need to bill a manual invoice. Other terms for this type of invoice include: private invoice or paper based invoice.

When would you need to bill a manual invoice? In the event a patient is a private patient and thus will be paying for services rendered directly. Or perhaps when the patient does not have medicare entitlements (such as overseas patients) and the invoice will need to be sent to their health insurance. Additionally, you may need to send the health funds a manual invoice where manual assessment is required; such as when you are seeking an adjustment.


Now that you know when you’d need to create a manual invoice, let’s jump right into it.

Start off by opening the patient’s record and click on the blue “Bill Patient” button.

You can also use the hotkey ‘B’!


This will take you to the Clinical Billing page, where you’ll need to select the:

  • Location: the location where the service took place. If you only have one, it will be defaulted
  • Practitioner: the practitioner who performed the service. If you only have one, it will be defaulted
  • DOS: date of service
  • Bill Type: Private
  • Type: ‘Patient’ If the invoice is being sent to the patient, or ‘Health Fund’ – If the invoice is being sent to the patient’s Health Fund


Referrals

The last step before we can begin billing is to enter any needed referral information. If this does not apply to you, click on Add Items and proceed to the next section.

Otherwise, simply fill out the Referral section as seen below. If you only have one referring doctor for this patient, they will be automatically selected here (provided it has not expired).


Once you are done with the above segments, click on the green Add Items button in the bottom left corner of your screen.


You will arrive at the Clinic Billing page. Here we can see a brief overview of previous information for the patient, and where we can bill an invoice.


It is as easy as typing in the item you need and selecting it. There are two different ways to search for the item as shown below:


  • Search for the item number itself.
  • Search for a word in the description. This can either be at the start, or anywhere within the description!


Once you have entered all your items and payments as desired, click on the Review Charges button to proceed to the final page of billing.


(Conditional) Applying Payment at the billing process

If the patient is paying the invoice, you can add payments captured from the patient onto the invoice using the Add Payment button. 

Otherwise, if you are sending the invoice elsewhere to be paid. Skip this step for now and proceed to ‘Clinic Review Charges’. You will be able to add payment against the invoice later, once it is paid.


The above button will present you with a pop-up to enter the payment information. The total invoice amount will be prefilled in the Amount field. 


So, you may simply allocate the payment type and hit save as below:


Clinic Review Charges

You may notice that this page looks nearly identical to the previous Clinic Billing page. The only real difference is that you can no longer add or change items, and there are additional buttons at the bottom.


You will also be able to see the Total Charges for the items you have billed like so:


Lets go over the options on this screen:


Edit Item And Charges: Realised you have made a mistake? Click this button to go back to the previous page and fix it up!

Cancel: Cancel out of this billing. This will take you back to the Patient Screen.

Save: Saves this invoice. 

Save & Print: this saves and prints the invoice.


That’s it! You’ve successfully created a manual invoice; and if you’ve paid it off on the spot, there is nothing else that you need to do.

Otherwise, assuming you’ve sent the invoice to a health fund, you will need to follow up with them every couple of weeks to see whether or not it is paid. Once it is paid, follow the steps below to pay it off on FYDO.


Applying manual payments

Your manual invoice is paid now? Click here to learn how to apply a manual payment to it.


Resubmitting and Deleting Clinic Batches

Sometimes you may need to Resubmit or Delete a batch depending on rejections.

You will only be able to move or delete a batch if the invoices within do not have payments

Resubmitting a Batch

To Resubmit a Batch you will first have to move each invoice within to a new batch. We can then go ahead and send that new batch.

  1. View the batch in question so you can see the invoices within
  2. Right click and select ‘Move Invoice Out’
  3. Confirm the move


If you head back to Claiming Medical, you will now notice a new batch that contains any invoices that were moved. Simply follow the usual process for closing and sending this batch.

For Eclipse claims, you will still only be able to have one patient per batch.


Deleting a Batch

To Delete a Batch, you will have to either move or delete each invoice within. Then the batch will simply disappear.

  1. View the batch so you can see the invoices within
  2. Right click and select ‘Delete Invoice’
  3. Provide a reason and select Delete

This is an internal reason just for your future reference.


You can also use Reverse. This produces an adjustment against the invoice, rather than just deleting it.


Rejected Clinic Batches

Once you have done some billings, you may notice that payments have come back for a lower amount, or perhaps you have received no payment at all!

Identifying batches with issues

The easiest way to spot if a batch had an issue, is to simply look at the Paid column. If you see any amount in Red, then some action will be required.


We can see in the image above, that we have two batches that are partially paid (Less than what we claimed). We also have two batches that are just Rejected ($0.00 Paid).


Dealing with the Batches

First, double click on the batch to view inside. You can also right click and select View Batch Details if you prefer.

Once you can see a list of patients within a batch, the thing to keep an eye out for is an icon in the Issue column.


You may have one, or multiple patients with an issue. Any patient with a Rejection or Partial Payment will have the above icon.

Viewing the Rejection Reason

Now that we have identified which patient(s) have an issue. It’s time to see what the issue actually is.

Again, lets double click on a patient, or using the right click menu, select View Items.


In the above case, this is a fairly easy rejection to identify the issue. We have the error code 2001 No Hospital Claim (PEA). From this we can deduce that the hospital has not submitted their invoice yet, and as such we cannot be paid. Our options are to just wait and try to resubmit, or you could confirm with the hospital when they are sending their claim.

One of the most common issues is that you have been paid a different amount to what you claimed. This could happen for a number of reasons such as:

  • Fee Changes by Medicare/Health Funds
  • Doctors agreement with a fund
  • Old date of Service


To amend this, simply right click on the item and select Edit. Alternatively use the hotkey ‘E’Then just alter the Charge inc GST to be equal to the Payable amount, as shown above.


Contacts

Not all rejections will be as simple as the ones above. In a case where you are not sure what a rejection reason means, or why something has not been paid, it is best to contact the organisation who rejected it.

We have a complete list of phone and email for medicare and the health funds.


How to Bill Patient Clinic Claims

Ready to bill through the Patient Claims billing channel? Follow along to learn how.

Need to learn more about Patient Claims first? Click here for more.


To get started, from the Patient Record, we are going to click on the Bill Patient button.


You can also use the hotkey ‘B’!


This will take you to the Clinical Billing page, where you’ll need to select the:

  • Location: the location where the service took place. If you only have one, it will be defaulted
  • Practitioner: the practitioner who performed the service. If you only have one, it will be defaulted
  • DOS: date of service
  • Bill Type: Patient Claims
  • Type: ‘Store & Forward’, or ‘Real Time’ – more on this below


Store & Forward vs Real Time

The primary difference between these two types of Patient Claims is that:

  • With Real Time, your invoices are sent to Medicare in real time, as they are created. That is, they do not go into a batch that you then manually send off at the end of the day. They do end up in a batch however.
  • Whereas with Store & Forward, invoices enter a batch for later transmission. This is how all other Bill Types such as Eclipse, Medicare, and DVA behave. 


Some things to note about Real Time

  • Should you need to delete an invoice after creating it, you have until the close of business that day to delete it, via the software. This is called ‘Same Day Delete
  • However, if you realise you need to delete an invoice the next day or later, you will now need to contact Medicare and ask them to delete/ ignore the invoice on their end
    • If you realise you need to delete an invoice and it has already been paid, again, you will need to contact Medicare and process a refund.


Referrals

The last step before we can begin billing is to enter any needed referral information. If this does not apply to you, click on Add Items and proceed to the next section.

Otherwise, simply fill out the Referral section as seen below. If you only have one referring doctor for this patient, they will be automatically selected here (provided it has not expired).


Once you are done with the above segments, click on the green Add Items button in the bottom left corner of your screen.


You will arrive at the Clinic Billing page. Here we can see a brief overview of previous information for the patient, and where we can bill an invoice.

It is as easy as typing in the item you need and selecting it. There are two different ways to search for the item as shown below:

  • Search for the item number itself.
  • Search for a word in the description. This can either be at the start, or anywhere within the description!


Notice that for Patient Claims, the Date of Service (DOS) can be changed in an invoice.


Applying Payment

Once you have added all your desired items, you can add payments captured from the patient onto the invoice using the Add Payment button.


This will present you with a pop-up to enter the payment information. The total invoice amount will be prefilled in the Amount field. 

So, you may simply allocate the payment type and hit save as below:


Once you have entered all your items and payments as desired, click on the Review Charges button to proceed to the final page of billing.


Clinic Review Charges

You may notice that this page looks nearly identical to the previous Clinic Billing page. The only real difference is that you can no longer add or change items, and there are additional buttons at the bottom.

You will also be able to see the Total Charges for the items you have billed like so:


Lets go over the options on this screen:


Edit Item And Charges: Realised you have made a mistake? click this button to go back to the previous page and fix it up!

Cancel: Cancel out of this billing. This will take you back to the Patient Screen.

Save: Save this invoice, send it to the Claiming Medical section, ready to send. 

If Save & Print is selected, it will also be printed.


You’re all done! You have successfully billed a Patient Claims invoice. Now, head over to ‘Claiming Medical’ and send it off. 


Not sure how to send off your claims? Click here for more on Claiming Medical.


What is Patient Claims (Clinic)

In a nutshell 

Patient claims is where the practice sends off the patient’s claim on their behalf so that they can receive their medicare rebate 1-2 business days later. The patient could pay in full, partially, or nothing at all.

You would use this claiming channel when the practitioner charges above the medicare schedule. You would not use this claiming channel if you are happy to receive the medicare/bulk bill amount. 

This claiming channel is useful because whilst it would be easier to bulk bill the patient, and then charge a copayment, this is illegal.


Patient Claims is desirable for the practice because: 

  • The practice may be paid in full, on the spot
  • The practice decides what they would like to charge
  • Multiple dates of service per invoice supported
  • May avoid the 90 day scheme, more on this below


90 day scheme

When an unpaid or partially paid claim is sent to medicare, the patient receives a Pay Doctor Via Claimant (PDVC) cheque and they are expected to forward this cheque to the practitioner. 

  • The cheque will be in the the doctor’s name, so the patient cannot bank this money
  • The 90 day scheme is a measure in place to redirect the funds directly into the doctor’s bank account, in the event that the cheque is not banked by the doctor within 90 days
  • However, this is only eligible for gps and specialists, and is not applicable to allied health practitioners


Eligible health professionals


Ineligible practitioners

Allied health professionals, optometrists and dentists aren’t eligible to participate in the scheme.


Want to learn more about the 90 day scheme? Click here to read more. 


Important note: for this billing channel, you will send claims, assuming they will get paid as no communications are sent back. This is owing to a Medicare limitation that only allows for one-way communication. That is, you can send claims but will not receive any:

  • Exception statements, or
  • Payment statements


Medicare Easyclaim

Easyclaim is another billing alternative for bulk billing and patient claims. It may be a stand-alone process via an EFTPOS machine or integrated into your billing software.

Note: FYDO does not currently support Easyclaim


Key features

  • The patient receives their Medicare rebate almost immediately into their bank account
  • No additional bank transaction fees. However, standard EFTPOS charges still apply
  • May be used for bulk billing and patient claims
  • Single payment made to practitioner’s nominated bank account for bulk billed claims within 2-3 working days
  • Concession verification – instant confirmation of patients’ concessional status
  • Available to all allied health professionals


Want to learn more about Medicare Easyclaim? Click here to learn more.


Ready to bill through the Patient Claims billing channel? Click here to learn how.