Managing Remittances After Changing Minor ID During Migration

Before Changing the Minor ID

Before the Minor ID is changed over to FYDO, the hospital must ensure that:

  • All billing for the previous month has been completed and submitted through the previous system.
  • The required monthly data extracts have been submitted.
  • The hospital has confirmed its plans for recieving remittances by contacting the previous system.

Completing these steps helps ensure that the previous month’s billing and reporting requirements are finalised before transitioning to FYDO.

What Happens to Remittances for Previous Claims?

Remittances for claims submitted through the previous system may continue to be received electronically by that system after the Minor ID has been changed to FYDO.

Whether this occurs depends on how the previous system handles payment file retrieval. Some systems may continue checking for and receiving payment files associated with the original Minor ID, even after the hospital has transitioned to FYDO.

Important: A hospital provider number cannot be used to submit claims under two different Minor IDs simultaneously. However, payment files for claims submitted under separate Minor IDs may still be received.

What Should the Hospital Do?

1. Keep the Previous System Available

It is recommended that the hospital keeps its previous system active for a period after migrating to FYDO.

This allows the hospital to continue receiving and processing remittances for claims submitted through the previous system, where supported.

Hospitals should contact their previous software provider to confirm:

  • Whether the system will continue receiving electronic remittances after the Minor ID change.

2. Process Previous Claims in the Previous System

Where remittances for previous claims continue to arrive in the old system, the hospital should reconcile and receipt those payments within that system against the original claims.

This helps maintain accurate records and ensures payments are matched to the claims submitted through the previous system.

3. Request Manual Remittance Advice if Required

If an expected remittance is not received electronically, the hospital may need to contact the relevant health fund to request a manual remittance advice.

This can help the hospital identify and reconcile outstanding payments for claims submitted through the previous system.

4. Handling Rejected Claims

If a claim submitted through the previous system has been rejected or needs to be recreated for any other reason, recreate the episode in FYDO and manage the billing, payment processing and receipting through FYDO. This ensures the claim can be managed entirely within FYDO, as claims can no longer be submitted through the previous system.

Managing Billing in FYDO After Go-Live

Once billing is being processed through FYDO, claims submitted through FYDO will have their associated remittances managed within FYDO.

The hospital will receive training on processing payments, managing rejections and following up arrears as part of its FYDO onboarding.

It is important to distinguish between:

  • Previous system claims: Continue to be reconciled in the previous system where remittances are received there.
  • FYDO claims: Are managed and reconciled in FYDO using the remittance and payment information received for the FYDO Minor ID.

Hospital Inpatient and Ward Bed Tracker for Overnight Patients

FYDO allows you to seamlessly book Inpatient admissions and procedures whilst also tracking your overnight patients and their bed movements.

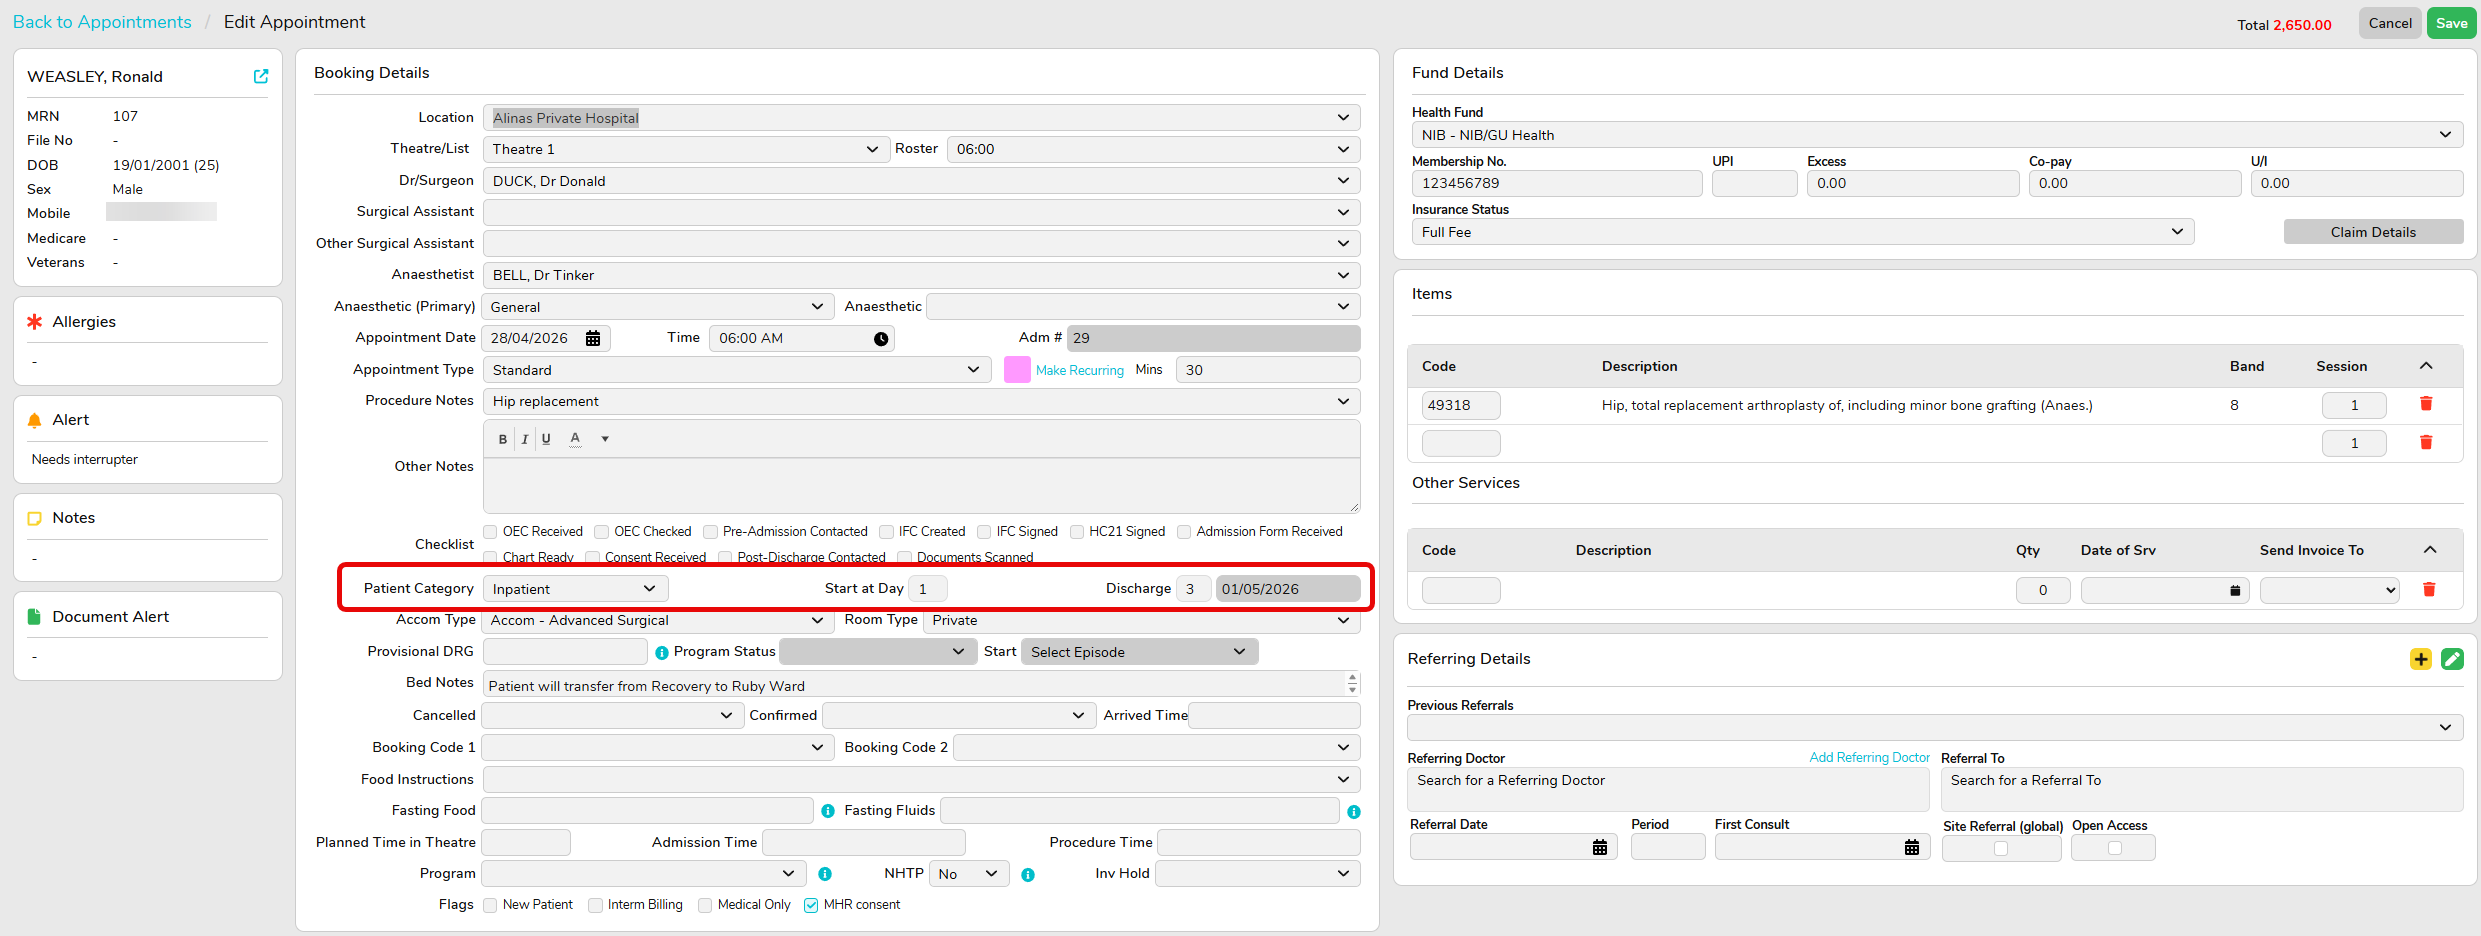
When booking a patient to stay overnight at the hospital, ensure the correct Patient Category is selected at the time of booking. This will be Inpatient. You will also need to select the estimated number of nights the patient will stay and enter this information in the Discharge field.

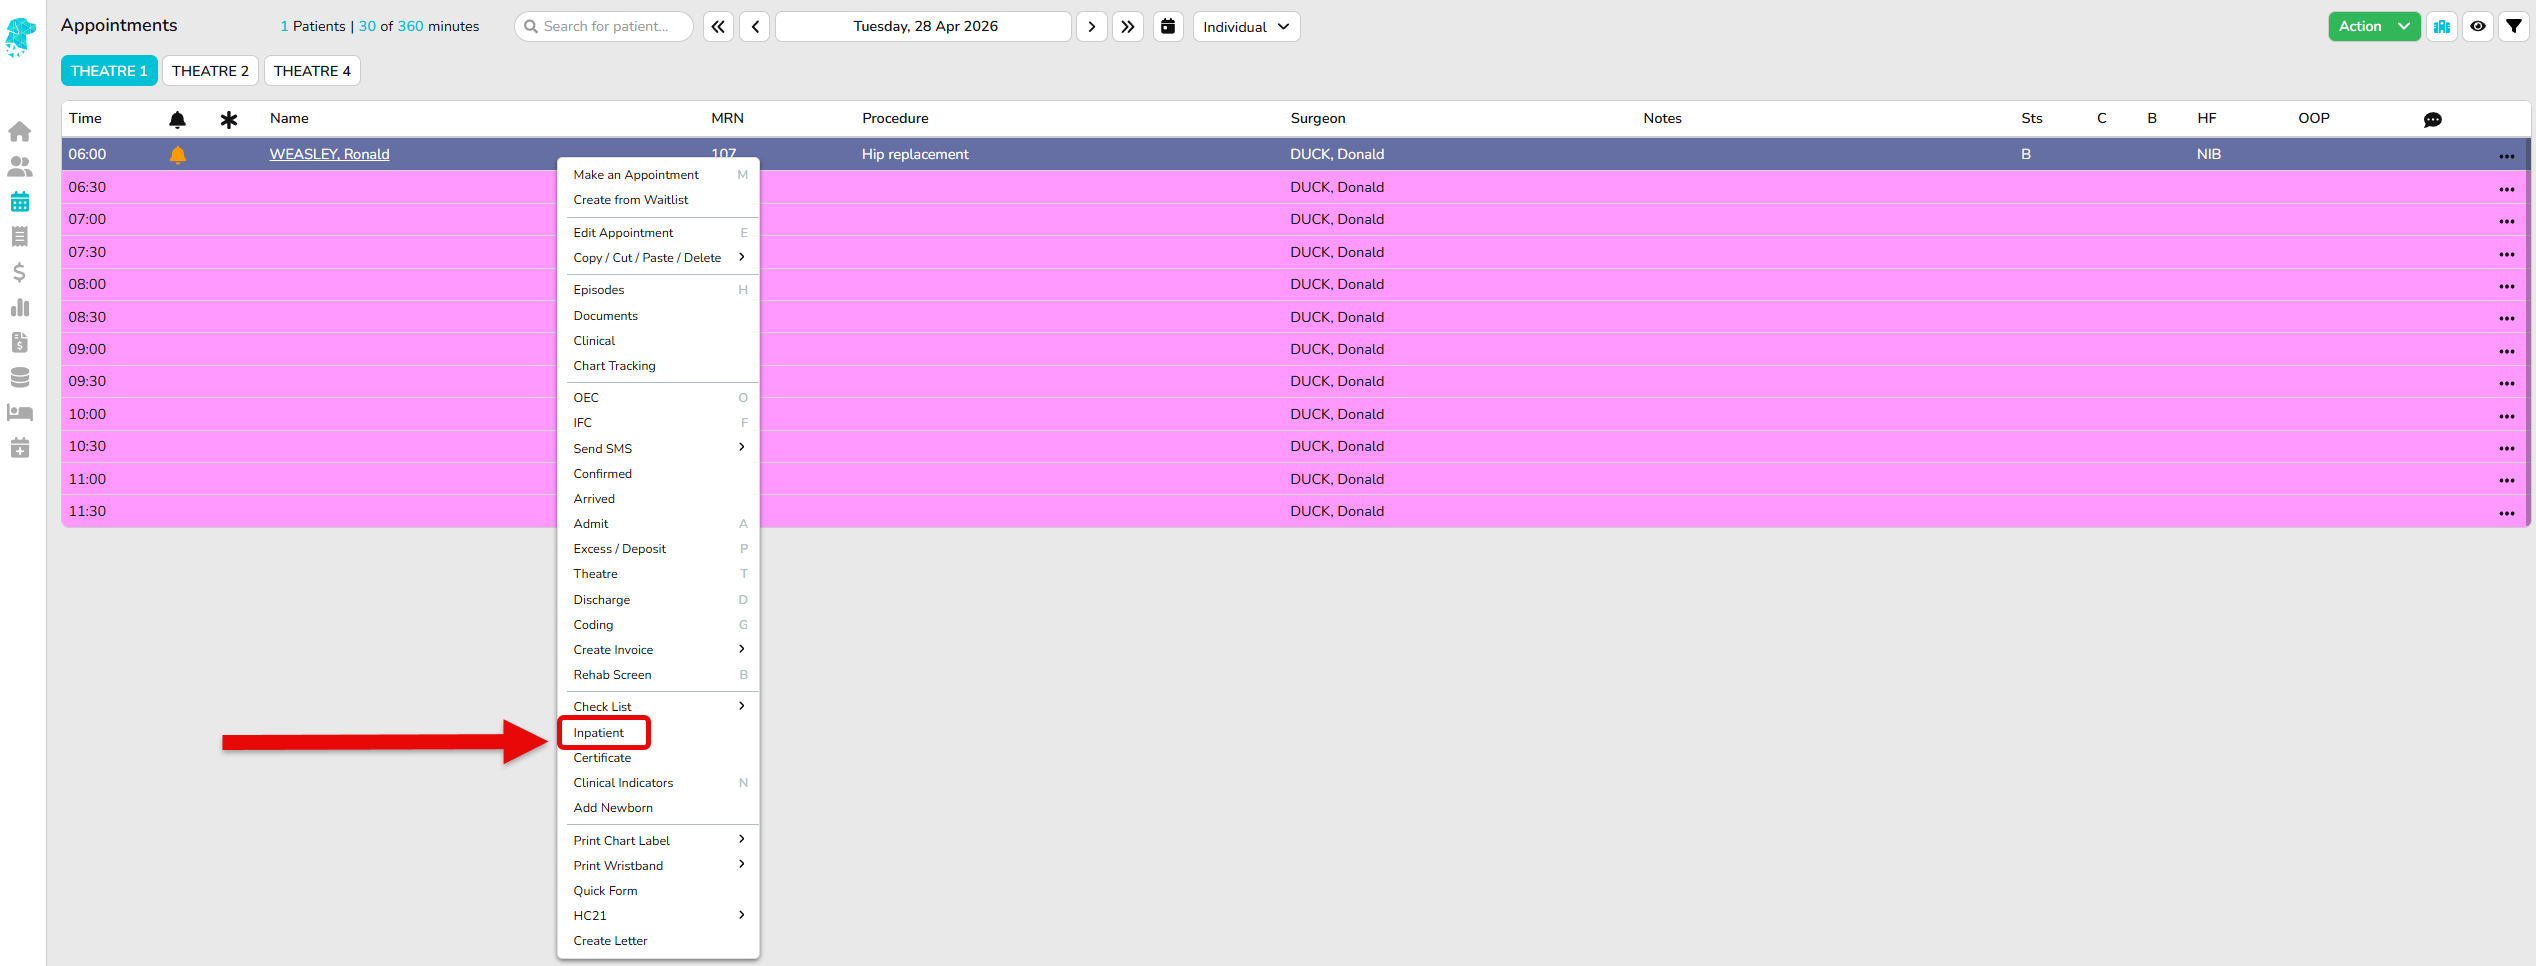
Once the patient has been booked in, you can access their Inpatient screen by right clicking on the appointment and selecting Inpatient.

On the Inpatient screen, you can book a theatre procedure and assign the patient a bed.

To book a theatre procedure in:

  1. Click the Inpatient tab
  2. This is the procedure schedule where you can see the procedures that are booked in
  3. Select the date the procedure will be performed
  4. Enter the time the patient is expected in theatre
  5. Select the appropriate theatre/ list
  6. Select the surgeon/ doctor
  7. Select the correct theatre roster
  8. Enter the procedure notes if different to the notes added when the admission was booked
  9. If required, select the booking code
  10. Click Save

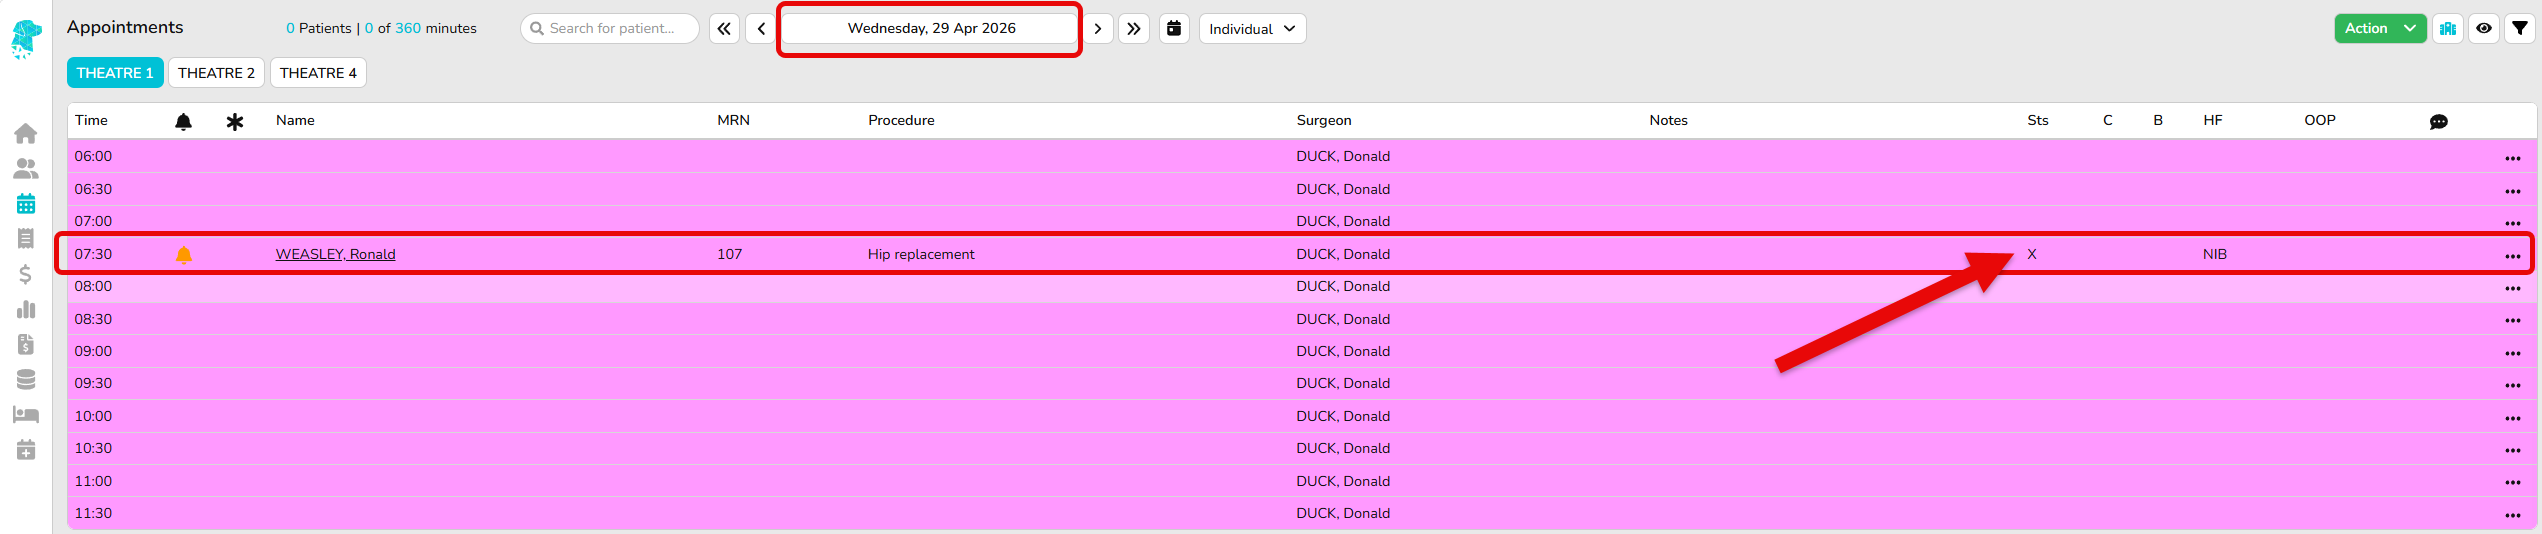
Once the procedure has been booked into theatre, the patient will appear on the Appointment screen with an X as the status, which means the patient is an inpatient and this isn’t their primary admission booking.

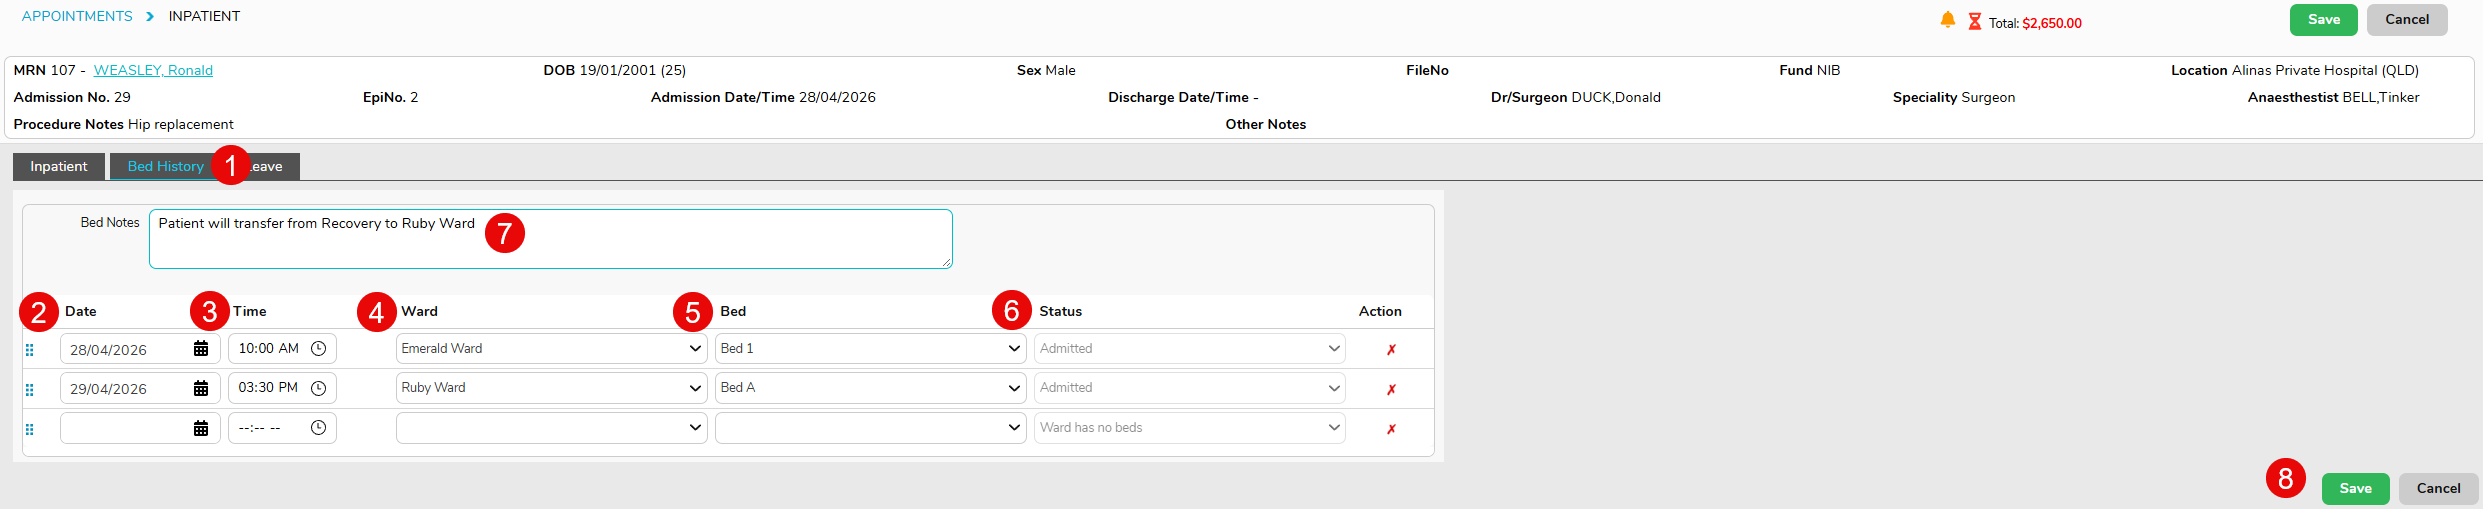
To allocate the patient a bed, navigate to the Inpatient screen.

  1. Click the Bed History tab
  2. Enter the date the patient is expected to arrive in the ward
  3. Enter the time the patient is arriving to their bed
  4. Enter the ward the patient will be admitting to
  5. Enter the bed the patient will be staying in
  6. The status will show the patient as Booked, prior to admission, and Admitted once they have been admitted
  7. You can add Bed Notes here if required as this is a free text field
  8. Click Save

Bed Tracker

Now we will look at navigating the Bed Tracker screen.

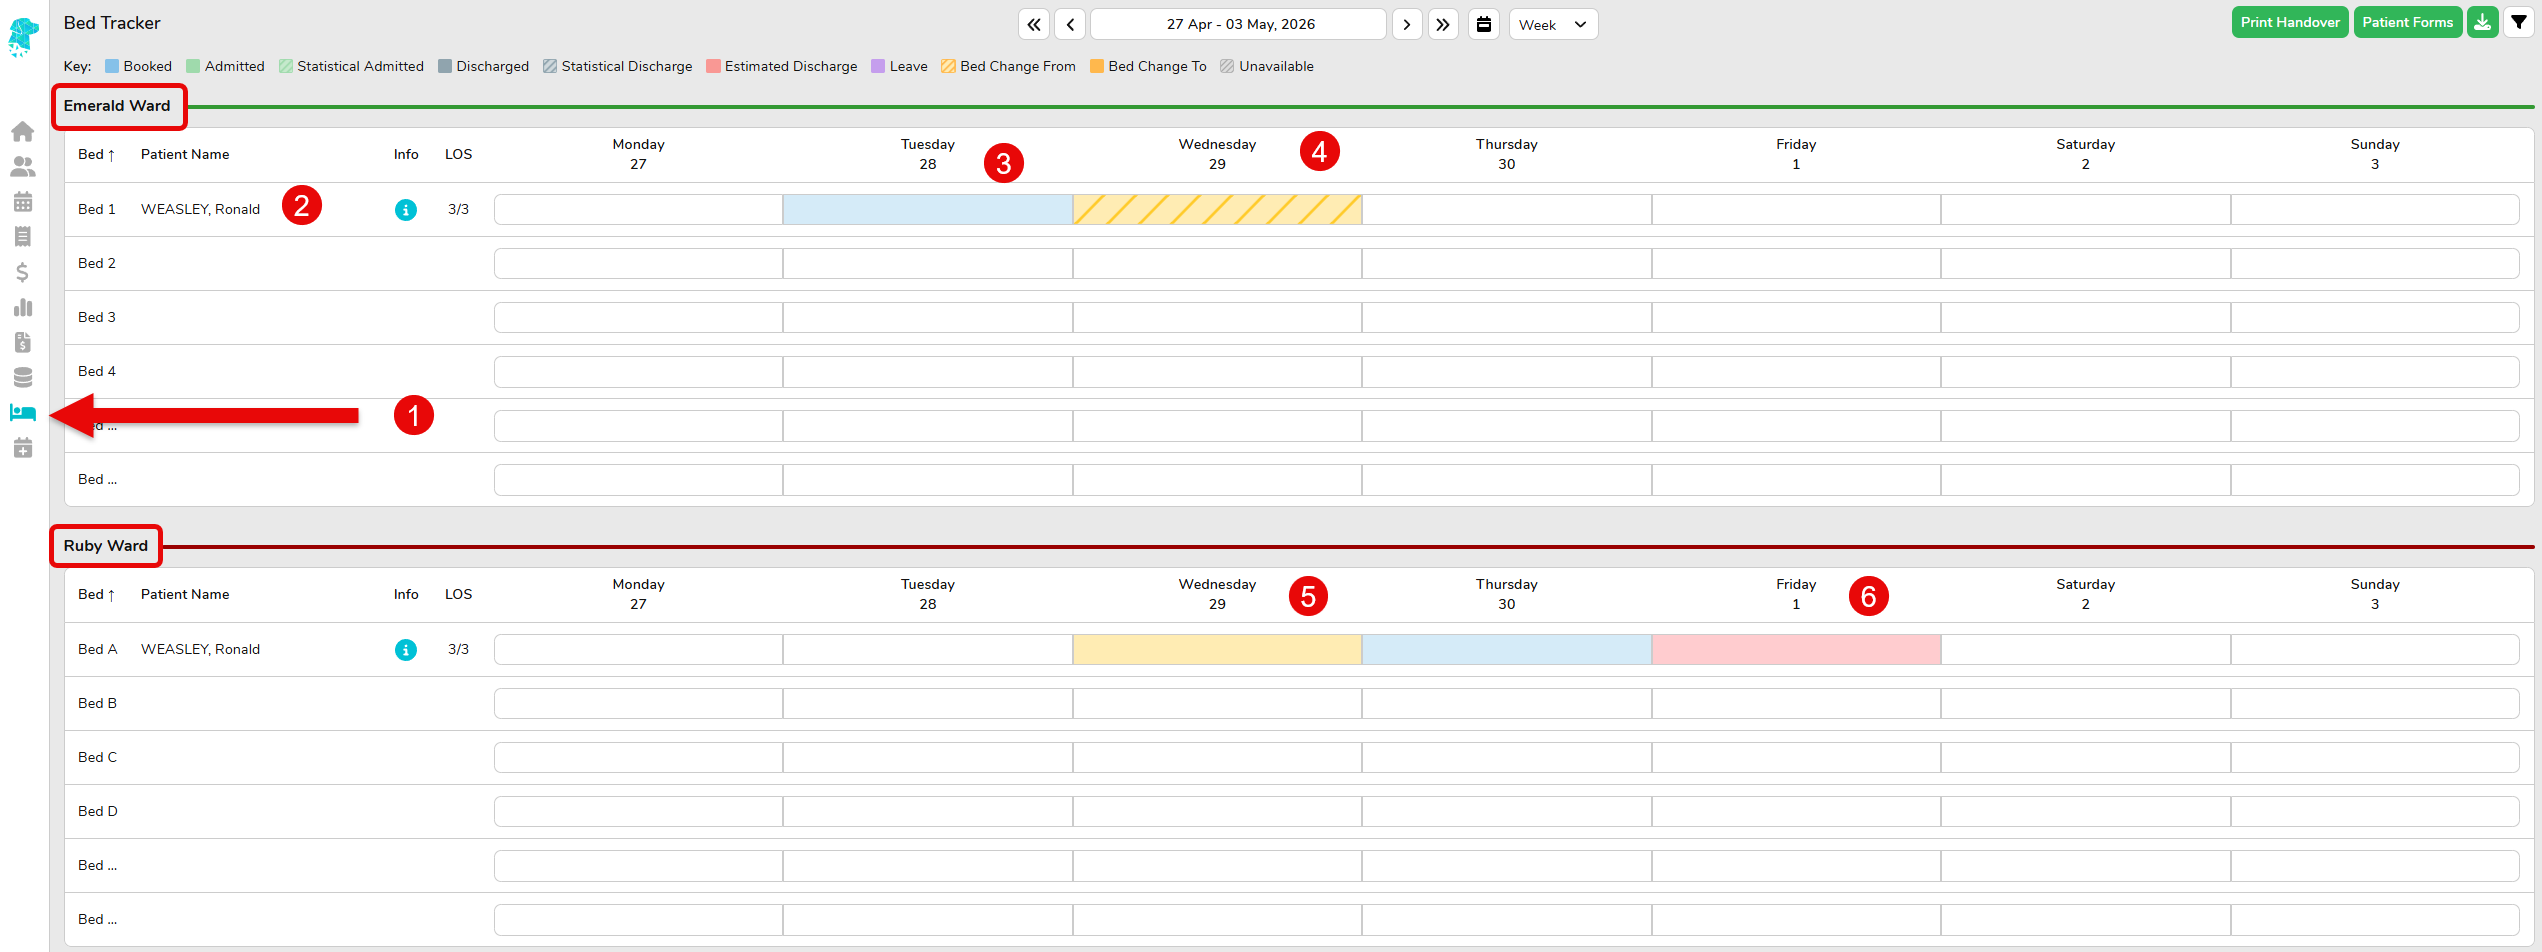
On this screen, the wards will be listed individually. There is also a colour-coded Key at the top of the screen to easily determine a patients bed status.

  1. To access the Bed Tracker, click the icon on the left-hand side of the screen
  2. The patients name will display in the bed allocated
  3. The bed is light blue, which as per the Key, the patient has been Booked in this bed for the day
  4. The patients bed status is Bed Change From on this date as they have been booked in the Bed History tab to change to another ward today
  5. The patients bed status is on the new ward, and shows as Bed Change To as per the Key
  6. The patient is showing as Estimated Discharge on this day from the number of days entered into the Booking screen when the appointment was made

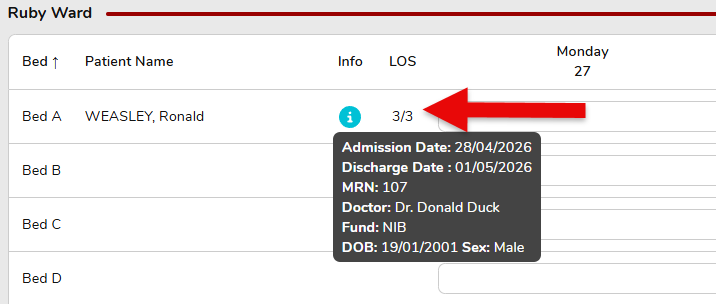
If you hover over the information symbol on the patient’s bed, this will show the admission information for this patient also, and the Length of Stay.

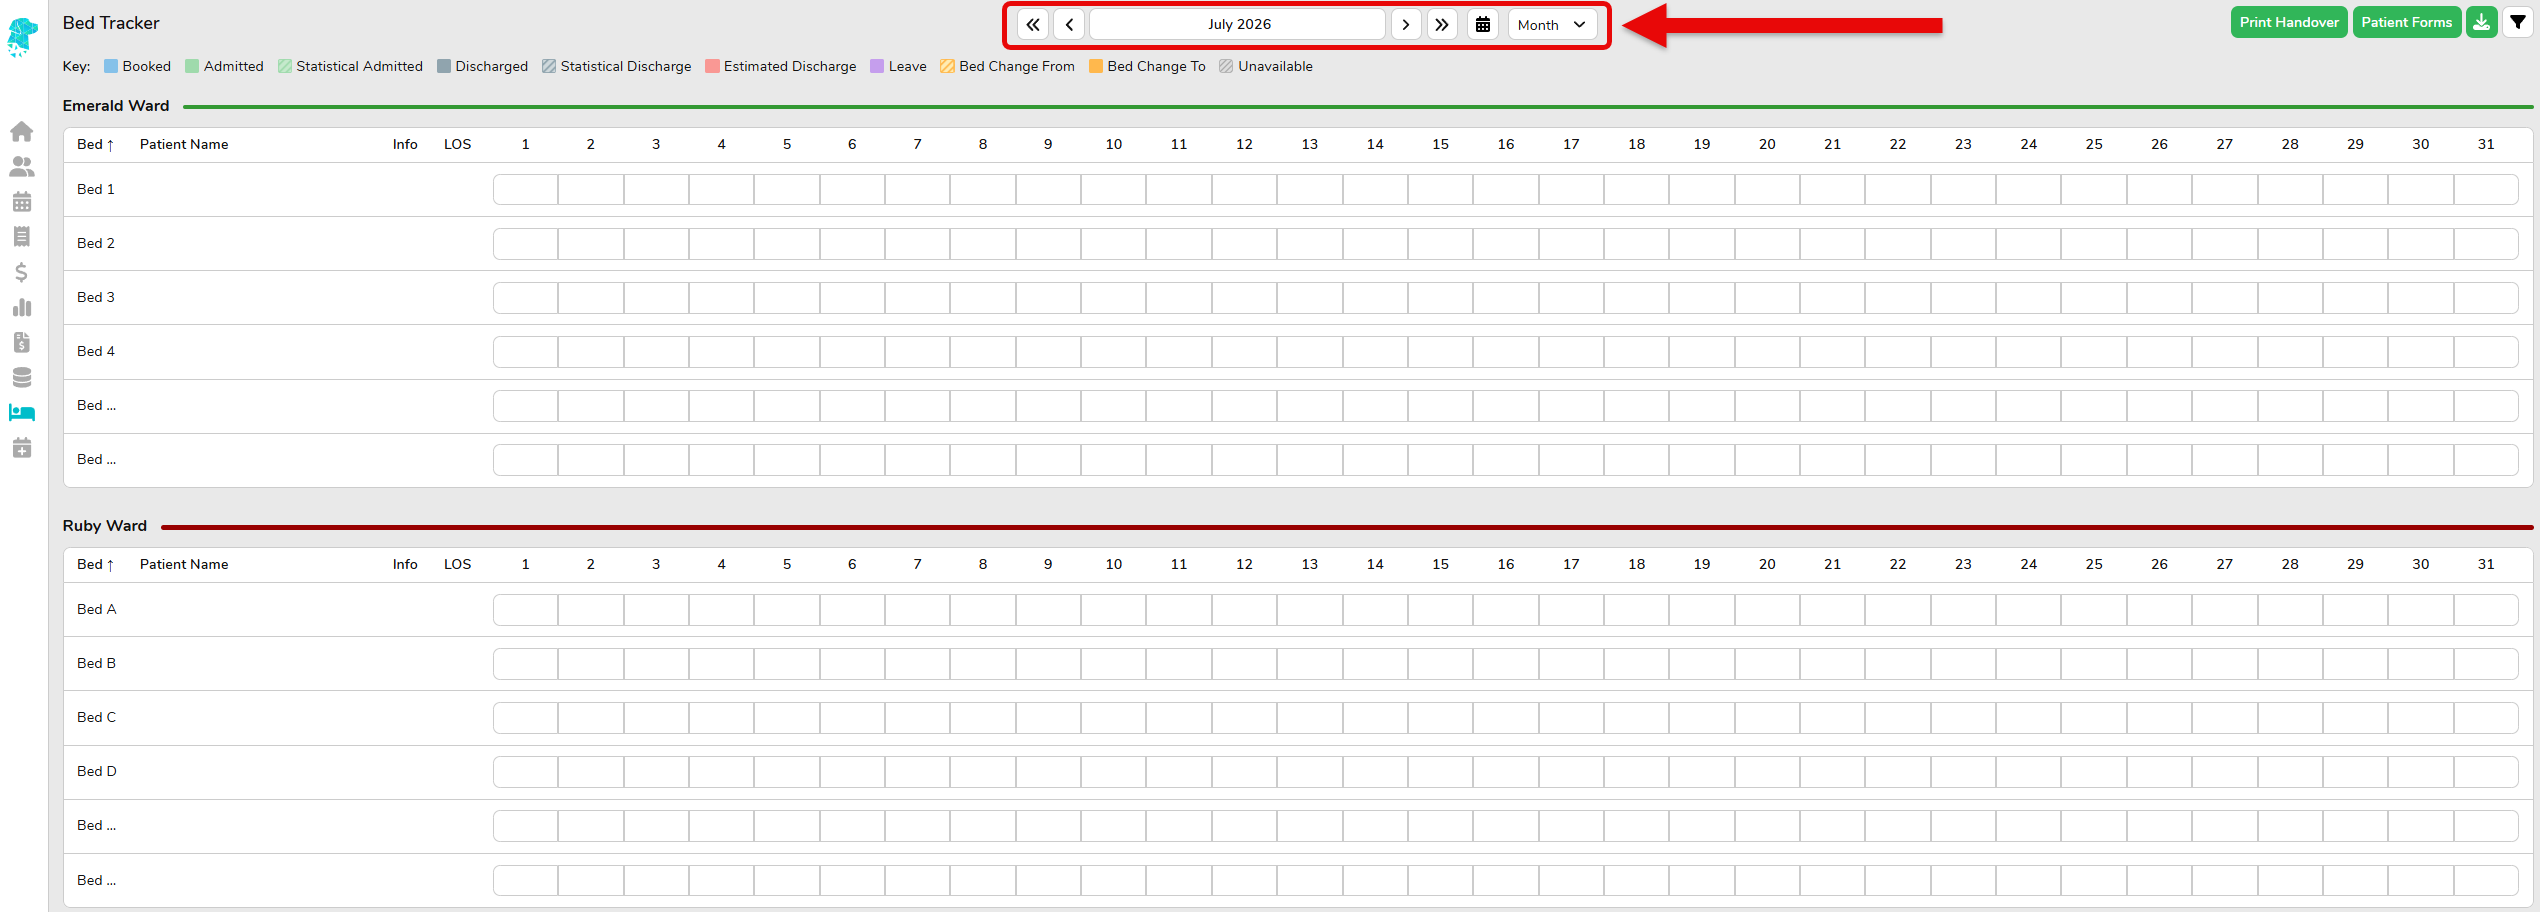
The Bed Tracker is able to be viewed in Day, Week or Month mode by changing the dropdown menu on the calendar.

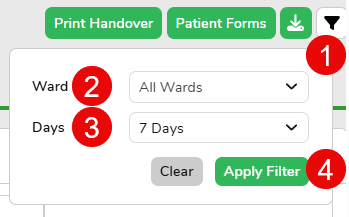
The Bed Tracker also has a filter function. You can filter the screen to All Wards or choose a specific ward to view, as well as the number of days you wish to view.

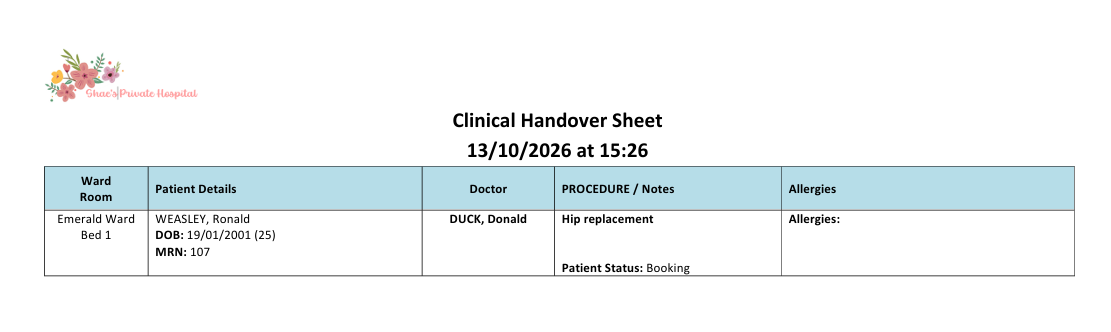
You can also print a Clinical Handover report from this screen.

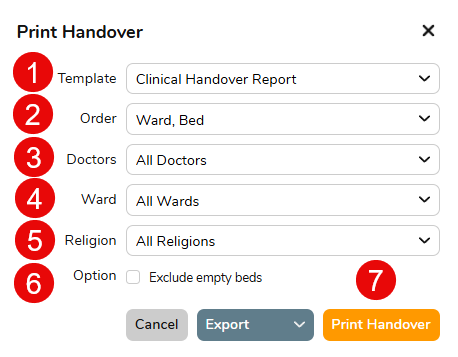
When selecting Print Handover, you can:

  1. Choose the Template you wish to print
  2. Choose the Order you wish to print the report
  3. Select the Doctors you wish the print, you can choose one or all which is useful for doctors who wish to only see their patients on the ward
  4. You can choose all or a specific Ward to print
  5. You can choose a Religion if required which is useful for religious visits to patients on the ward
  6. Select Exclude Empty Beds if you only wish to view occupied beds
  7. Print Handover

Your handover report template can be customised to suit your facility and the information you wish to see. If you need assistance with this, please reach out to our FYDO Hospital Support Team.


Training Sessions for Hospitals

Below is a list of training sessions included as part of the initial onboarding with FYDO. Should you require additional training, beyond the allocated hours, these can be arranged for an additional fee.

Pre Go Live Sessions

These sessions are best booked 1-3 weeks before the go live date

Admin/Reception Training: Estimated 1 hour session

  • Creating a patient  
  • How to search for an episode and the different search options. E.g. MRN, name, dob etc. 
  • How to make a Theatre Booking
  • How to make a Patient Booking 
  • Key fields to be completed  
  • How to edit patient demographics  
  • OPV checks (Green around Medicare and Health Fund details. Blue Tick on Appointments Screen)  
  • How to add patient Allergies and Alerts and where flags will show
  • How to do an Online Eligibility Check (OEC) 
  • How to create an Informed Financial Consent (IFC)  
  • Where OECs and IFCs save in the patient Document section 
  • Where you can view past Episodes  
  • How to print HC21 Left and Labels  
  • How to admit, add Theatre Information and Discharge a patient 
  • How to receipt a patient Excess/Deposit  
  • How to reprint a copy of the Excess/Deposit 
  • How to print a Theatre List  
  • How to mark Appointment as confirmed 
  • How to copy, cut and paste appointments if needed 
  • How to delete an appointment or mark as cancelled  
  • How to customise Appointment views  
  • Where to print Quick Forms
  • How to send Bulk SMSs and Individually SMSs
  • End of Day Banking  

Champ Training – Usually the Subscriber: Estimated 1 hour session 

  • How to create Theatre Roster  
  • How to create ad hoc Theatre Session 
  • How to add Doctors 
  • How to add Staff 
  • How to add Procedures
  • How to add Users and User groups 
  • Where to edit Templates and SMS Templates
  • How to view Logs and Audits  
  • How to do Adjustments for refunds and write offs etc. 

Post Go Live Sessions

These sessions are best booked 1-3 days post go live.Once some admissions have been completed and there is real data ready to bill and code.

Billing Training: Estimated 1 hour session

  • Billing Status Report > Show Not Billed Only
  • Where to edit Theatre Times
  • Where to add Prostheses
  • Ticking the Theatre Complete tick box 
  • How to raise an Invoice 
  • Where to send a claim – Hospital Claiming > Not Yet Sent
  • What to do if a claim is “Not Ready” 
  • Go through the different status of invoices  
  • Where to view the status of your claims  
  • Incomplete Report > Admitted but not yet Discharged
  • Receipting payments – both Eclipse and Manual 
  • How to do Adjustments for refunds and write offs etc. 

Rejections, Payments and Arrears Training: Estimated 30-minute session 

  • Episodes Screen > Invoice Information
  • Claiming Hospital > Claims Tab > Resending a Batch
  • Processing IHC Screen – Checking for Rejected Claims
  • Checking for Payments
  • Arrears Report

Coding and Monthly Data Extracts Training: Estimated 30-minute session

These sessions can be conducted separately, depending on which staff are required to perform each task.

  • How to Code an Episode
  • Where to enter Diagnosis codes 
  • Where to enter the Procedure and Anaesthetic code  
  • How to run the Grouper  
  • Incomplete > Uncoded Report  
  • How to fix any errors (needs to be done prior to the submission process) 
  • How to send Data Extracts (HCP, PHDB, State Health & Cancer Registry)

Reports Training: Estimated 1 hour session

  • Favourite Reports
  • Closing Accounting Period 
  • Running Financial Reports
  • Running Statistical Reports 

Updating Fee Setup: Estimated 30-minute session

  • How to add Casebase Items
  • How to enter Eclipse Mapping, if required
  • How to update Health Fund Fees
  • How to review and update all applicable fees


Second Tier Private Hospital Registration Process

There are a number of different relationships that hospitals can have with health funds.

Minimum Benefits is what all brand-new hospitals are approved for once they are registered with the Department of Health. These rates are paid for Accommodation Bandings only, and there is no Theatre Band paid for each item number. The Minimum Benefit Rates are renewed by the Department of Health. This funding source is only considered temporary and ideally facilities should only require these for a maximum of 3 months, as the goal is to obtain approval for Second Tier Rates.

And that is where these instructions fit in, in order to obtain Second Tier Rates:

  1. Obtain a Provider Number
  2. Apply to become a second-tier default benefits eligible hospital. Information can be found in the link below:
    Become a second-tier default benefits eligible hospital
  3. FYDO will initiate the ECLIPSE registration process for your facility. This involves contacting the health funds to get approval for your hospital to submit claims electronically via ECLIPSE. This is a service that Altura Health provides for our new hospitals and there is no action required by your facility for this part of the setup.
  4. You will need to contact all health funds (AHSA funds as a group) to inform them of your Second Tier Approval and request that their Second Tier Rates be provided. Please note that each fund has its own process, so it’s important to follow their specific requirements. Contact details for the funds can be found on our wiki page here:
    Medicare and Fund Contacts
  5. We recommend actioning the above as soon as possible, as some funds will not backdate Second Tier Approval. This means your facility may only be eligible to charge Minimum Benefit Rates until their Second Tier Rates are provided.
  6. Send the Second Tier Rates through to us at FYDO as you receive them, so that we can enter them into FYDO for you.
  7. Finally, please ensure you only bill each health fund once their Second Tier Rates have been received. This will allow you to bill at the maximum possible benefit.


How to prepare for ECLIPSE – Clinics

If you are already sending claims to the health funds, either manually / via another software or have already registered with each health fund, then you do not need to register again with the health funds. If this is you, then go to straight to step 2.

If you have never sent a claim to a health fund before or have you registered with the health funds yet, then you will need to start at step 1.

Step 1 – Register provider/s with each health fund

Each fund is different in their registration process. Some will require a form to be completed and signed, while others require an online form to be completed.

Forms required

The table below includes links to all downloadable and online forms required to register a new provider number or update your existing details with each health fund.

Processing times vary between funds but generally take between one and three weeks. Most funds will email you once your registration or update has been processed, so please remember to check your Spam or Junk folder, as these notifications can sometimes be filtered there.

If you have not received confirmation, we recommend contacting the fund by phone or email approximately one week after submitting the form to check the progress of your request.

Fund Type Email Notes
Alliance Online Form (for new registrations or changes) Requires attaching a bank statement and either your Medicare provider number confirmation letter or an HPOS screenshot. You must also provide a personal email address, as work or business email addresses cannot be accepted.
ARHG Online Form (for new registrations or changes)
BUPA Download Form (new registration)

Download Form (to change bank/contact details or to add provider numbers/providers to your practice)

provopsmedical@bupa.com.au Requires attaching a bank statement or another official bank document to confirm your bank account details.
GU Health Online Form (for new registration or any changes for GUH and NIB)
HBF (ONLY FOR WA) Download Form (new registration or to add provider numbers)

Download Form (to change bank/contact details)

medicalgap@hbf.com.au
HCF Download Form (new registration or to add provider numbers)

Download Form (to change bank/contact details)

Medicoverenquiry@hcf.com.au
Medibank/AHM Medibank GapCover scheme (for new registrations or changes) GapCoverForms@medibank.com.au Contact Medibank via web messaging, available through the registration link, or call the Provider Enquiries line on 1300 130 460 to complete the registration process and obtain the required form.

Requires attaching a Medicare provider number confirmation letter or HPOS screenshot.

NIB Online Form (for new registration or any changes for GUH and NIB)
RT Health Download Form (They come under HCF, but have their own registration form) Medicover@hcf.com.au

Links are accurate as of 27/07/2026 but may be changed by the funds any time.

Step 2 – Get your practice ID for BUPA

Bupa is the only health fund that will issue you with a Practice ID. Once received, please provide this to us so we can add it to your FYDO account.

The Practice ID is included when claims are submitted electronically to Bupa. If it has not been added to your FYDO account, Bupa may reject your claims.


Preparing for your First Billing Training Session – Clinics

To get the most out of your training session, our goal is to send a few claims out to Medicare and/or Veterans and/or to the health funds (ECLIPSE), then monitor those first few claims and ensure they get paid correctly. This way, we can ensure everything has been set up correctly for you.

Below is a checklist of things to prepare and have ready for your training session.

Please make sure to have at least 2-5 patients to bill. You need the following about the patients you plan to bill:

  • Patient first name, last name, date of birth, Medicare (or Veterans – if Veterans claim)
    • e.g. Michelle, Romero, 19/11/1981, 2111-11111-1 (or if a Veterans number NX123456)
  • If doing ECLIPSE (i.e. billing the health fund), you will also need the patient’s health fund and membership number
    • e.g. Bupa, ABC12345
  • You need the servicing provider’s details:
    • Doctor name and provider number
  • If the service provided was referred, you need to have the referral details, such as referring doctor’s name and provider number, as well as the referral date
    • e.g. Dr Pete Sampras, provider number 123456AF, referral date 01/01/2017
  • About the invoice itself, you will need the following
    • The item number/s performed, i.e the MBS e.g. 104, 110, 42702 etc
    • The date the patient was seen, i.e. the date of service
  • If you plan to do ECLIPSE (i.e. in hospital), you will also need:
    • The hospital’s provider number. Call the hospital, hey should be able to provide this to you. However, if this proves difficult, please let us know prior to your training, so we can try to track it down for you.
  • For BUPA, we will need to know the practice ID for each provider.

For more details, see https://wiki.fydo.cloud/how-to-prepare-for-eclipse-clinics/

DVA Community Nursing

Minimum Data Requirements for DVA Community Nursing Claims:

PATIENT DETAILS

  • Patients Full Name
  • Date of Birth
  • Sex/Gender
  • Veterans Number
  • Referral Details – Doctor Name, Provider Number and if they’re a GP/Specialist
  • Date of Admission
  • First Cycle Date (First date of care)
  • Discharged Date (If the client has been discharged from care)

BILLING DATA

  • Cycle Date
  • Overnight Care Dates (If overnight care is provided, each overnight care needs to be billed on the actual date the service was provided)
  • Total number of Hours and Visits for each type of workers for the whole 28 day cycle:
  • Clinical Nurse Consultant (CNC)
  • Enrolled Nurse (EN)
  • Nursing Support Staff (NSS)
  • Registered Nurse (RN)


Print/Scan Tool Setup

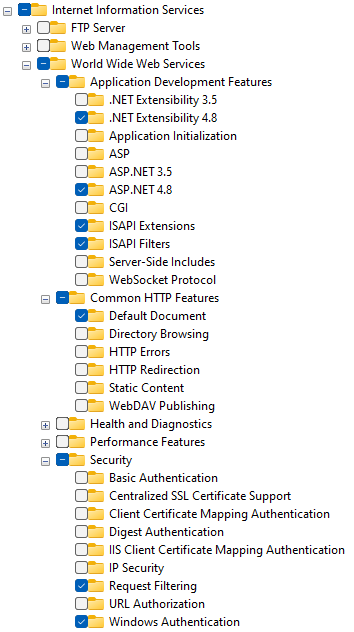
You will need to follow these steps when you go to install the Fydo print Scanner tool and it complains that IIS is older or maybe not even setup.

Setting Up IIS

  1. Go to Control Panel > View by: Large/Small icons > Programs and Features > Turn Windows features on or off
  2. Enable all features which are shown in attached screenshot and click ok. It may ask for reboot.
  3. Let it all Install

Download/Install the Print Tool

  1. Please call or email to request a download link
  2. Install with Admin Permissions
    (If you get ISS issues please follow previous steps or contact Altura Health Support Line)
  3. Launch the FYDO Print Tool
    (Note this will need to be done on every machine)
  4. Once launched login to the app
    1. Hospital Name (Grab your hospitals unique name from your FYDO url)
    2. Username (From FYDO Login – email)
    3. Password
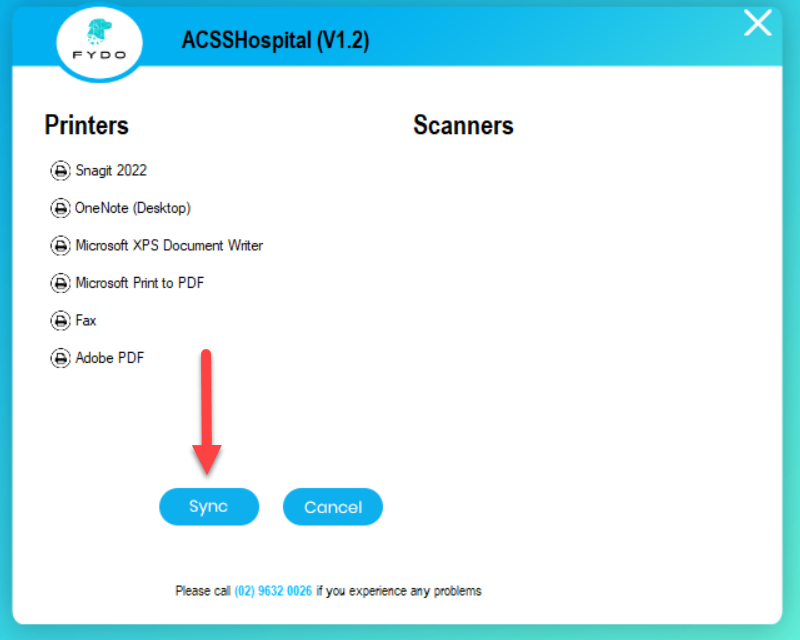
  5. Click Login
  6. Click Sync
    (Note this might take some time, wait for completed message before closing)


Data Migration Testing

When we migrate your data across from your old system into FYDO, it is important you check the data to ensure all information has come across correctly and there is no data missing. 

Please ensure you follow the steps below and test your data before we move to the final migration stage. We recommend you have your old system open as well as your new FYDO account and compare all information listed below.

Please compare at least 40 patients records from a range of different dates to ensure we get a comprehensive overview of data that has been transferred. 

Please check:

  • 10 very old patients select patients from 5-10 years ago (depending on how long you’ve used your previous system)
  • 10 patients who have been admitted within the last 2-3 years 
  • 10 Patients who have been admitted within the last 12 months 
  • 10 Patients who have been admitted within the last 6 months

When reviewing these records, please ensure the following information is accurate:

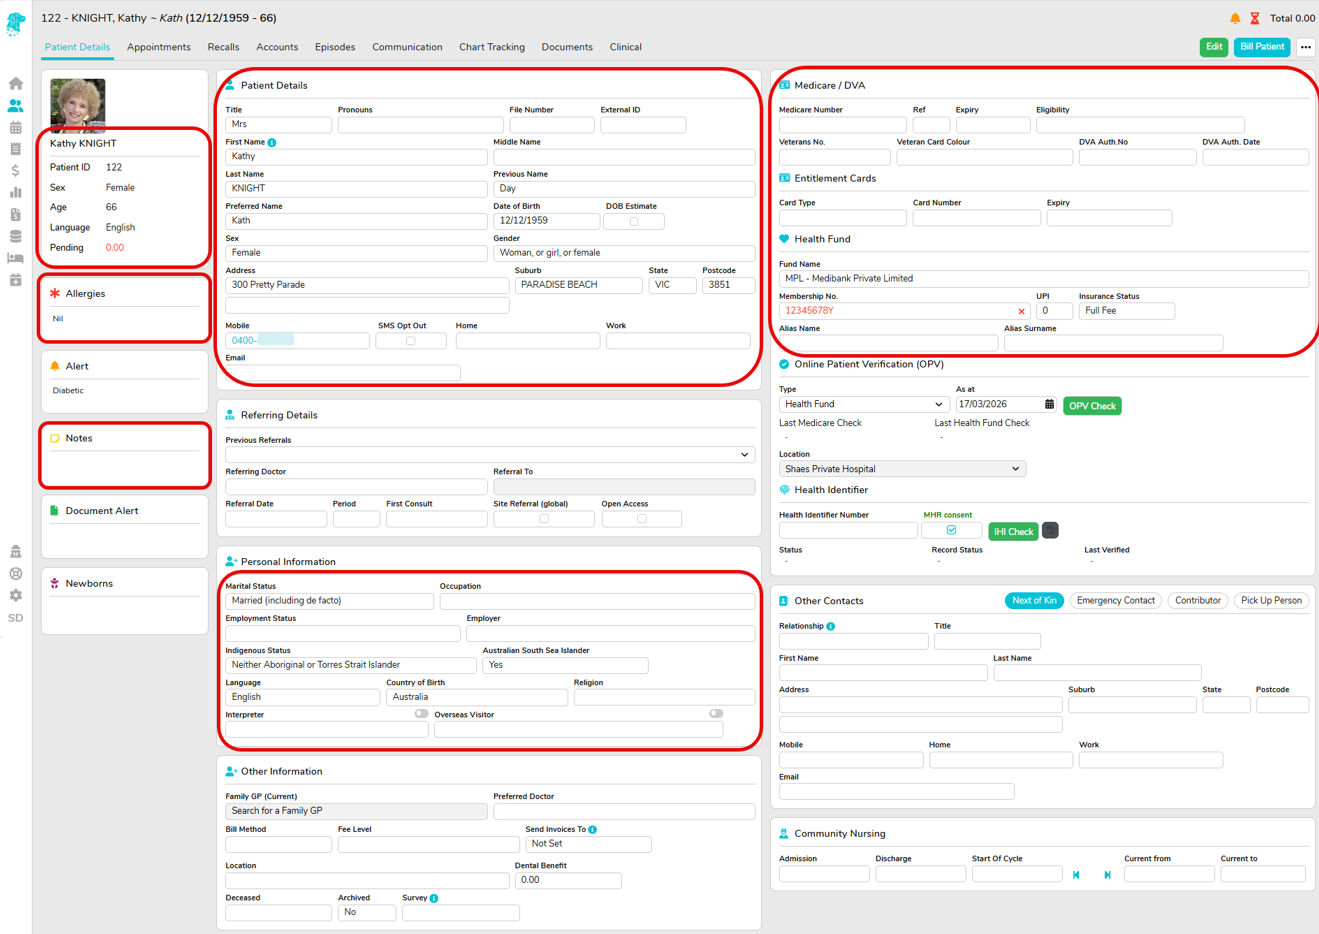
Patient Screen Example:

  • Patient demographics – Patient Names, DOB, address
  • Medicare Number or DVA Number
  • Private Health Fund and Number
  • Other Information Fields – Allergies and Notes if applicable
  • Personal Information – Marital Status, Indigenous Status, Language
  • Referring doctor information if applicable
  • Next of Kin details if applicable

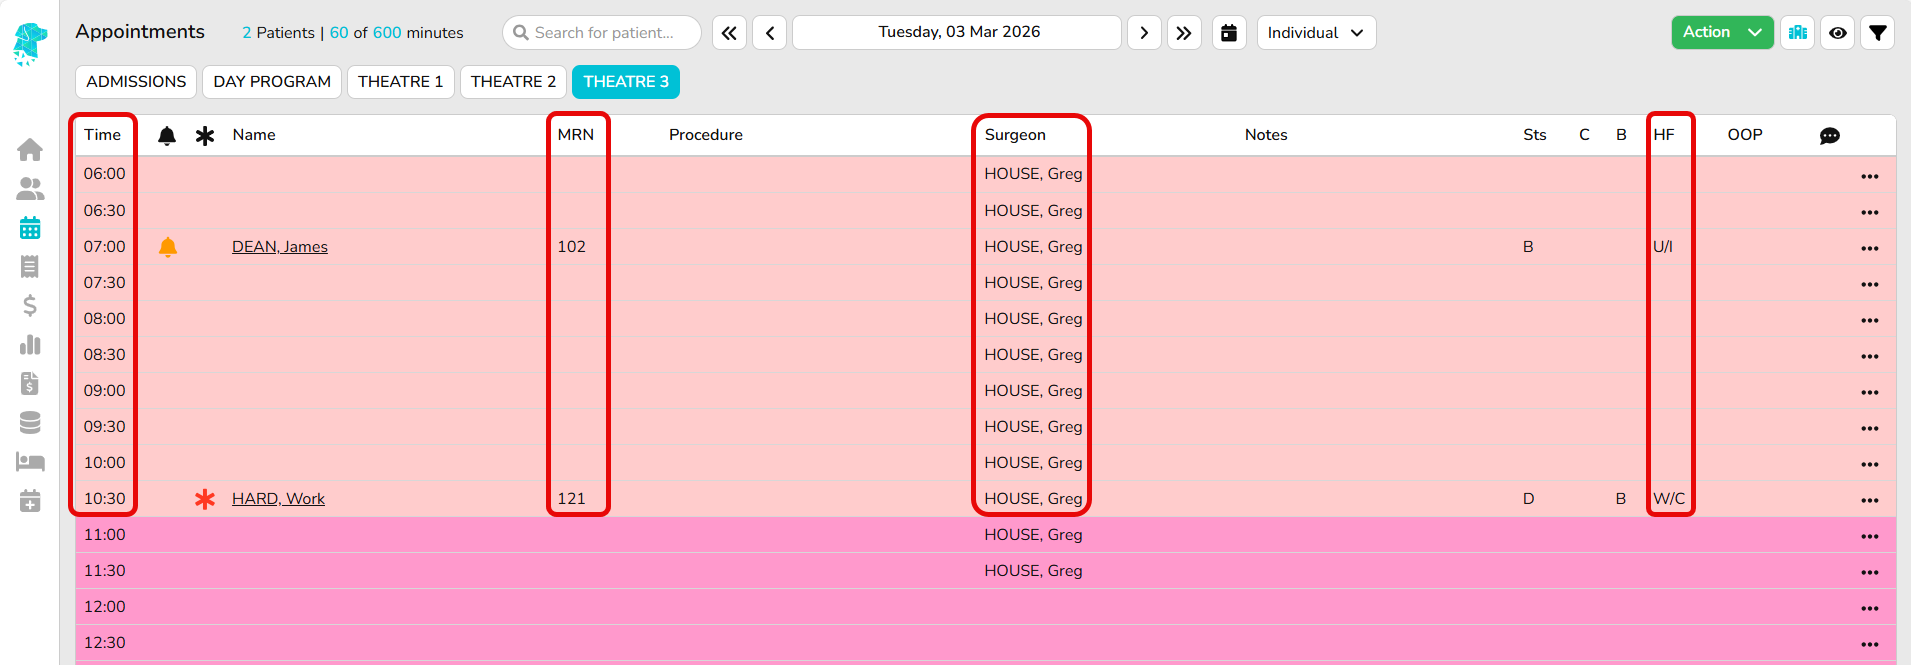
Hospital List Example:

  • Episode information – For example: If a patient in your old system has 3 episodes, please ensure there are 3 episodes in your FYDO database. 
  • Appointment Information – Validate Appointment Date and Time, Admission Time, Discharge Time. 
  • Cancelled Appointments – Please also check some cancelled appointments to ensure they appear correctly.
  • Time, MRN, Patients Name, Surgeons Name (this is the admitting doctor for the hospital episodes that is needed for ECLIPSE claiming), Health Fund or Uninsured.

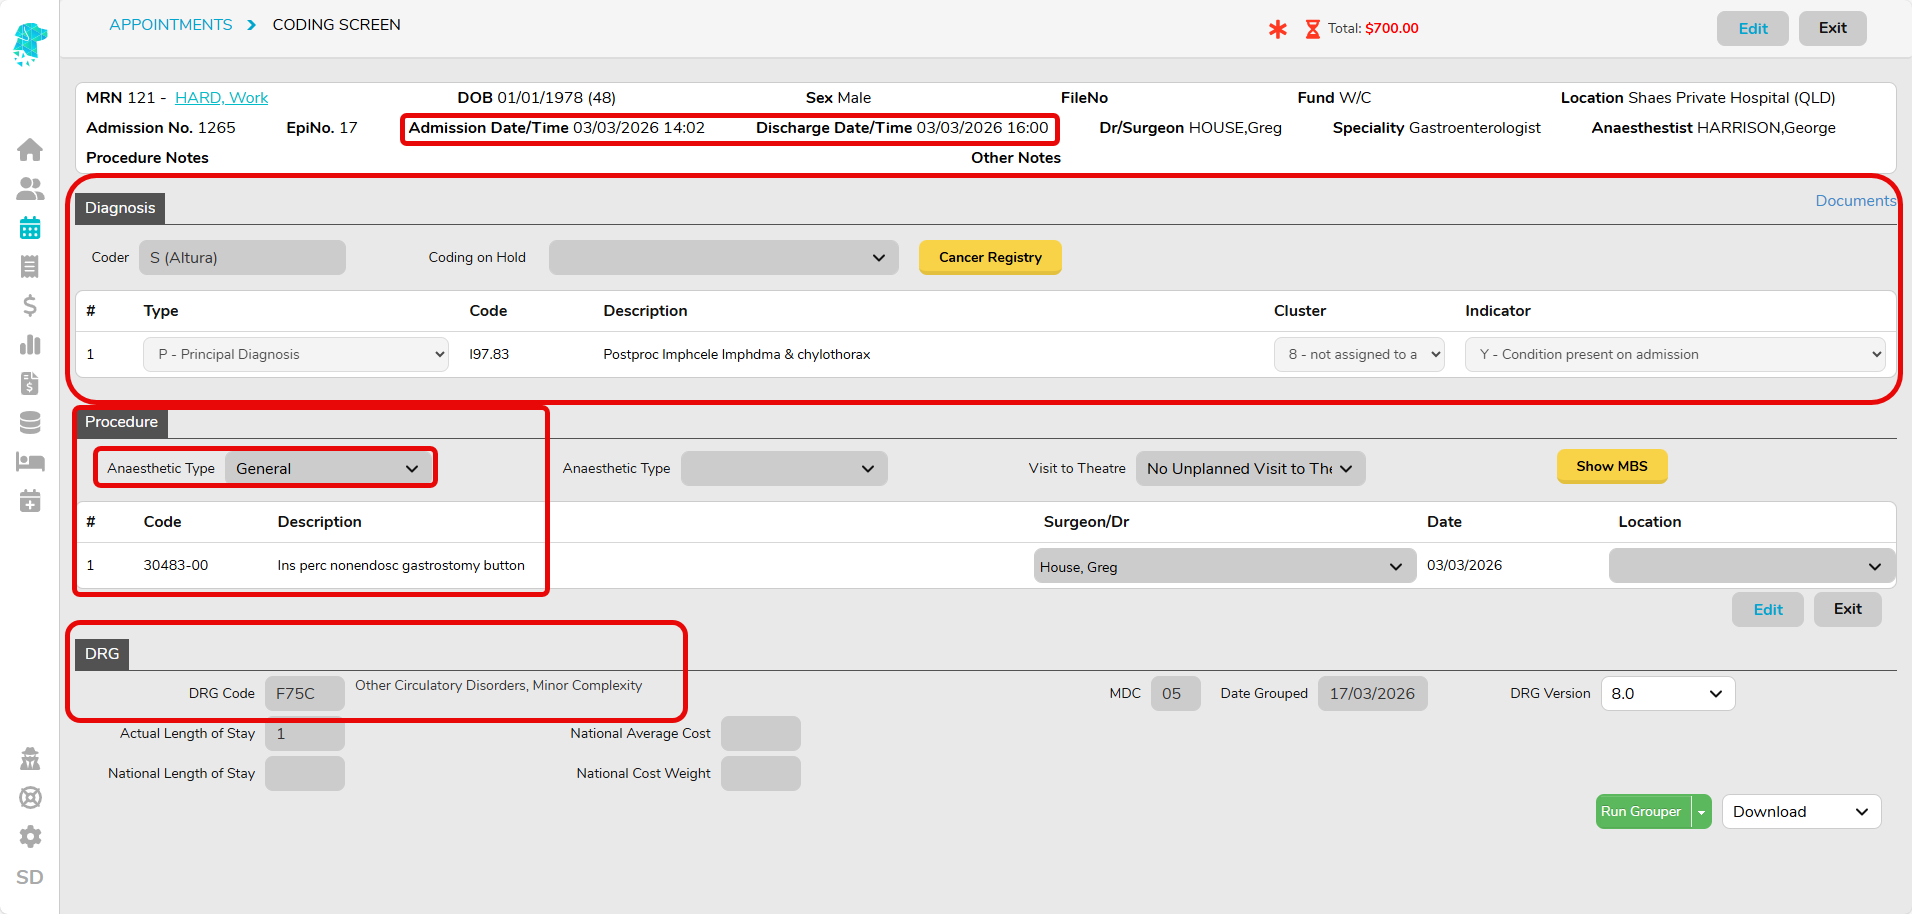
Hospital Coding Details:

Coding Screen – Diagnosis Codes, Procedure Codes, Anaesthetic Type, DRG

Clinic List Example:

Time, Cancelled Patients, MRN, Patients Name, Notes, Appointment Type

Please note: Depending on the system we are migrating your data from, bringing across all this information may not be possible and in this case, your FYDO onboarding specialist will highlight the information you need to check. Once you have checked the data is correct, please email us at sales@alturahealth.com.au to confirm you are happy with the data migration, and we will proceed to the final migration stage. If you have any issues with your data migration, please contact your FYDO Onboarding Specialist as soon as possible. 


SMS – How to order credits

Need to order SMS credits? Read on to learn how!

There are two places where you may order SMS credits. The first is through the settings, and the other is through the SMS sending screen. We will first explore ordering through the SMS sending screen. If you wish to order through the settings screen, please scroll down to – Ordering credits – through the settings screen

Ordering credits – through SMS sending screen:

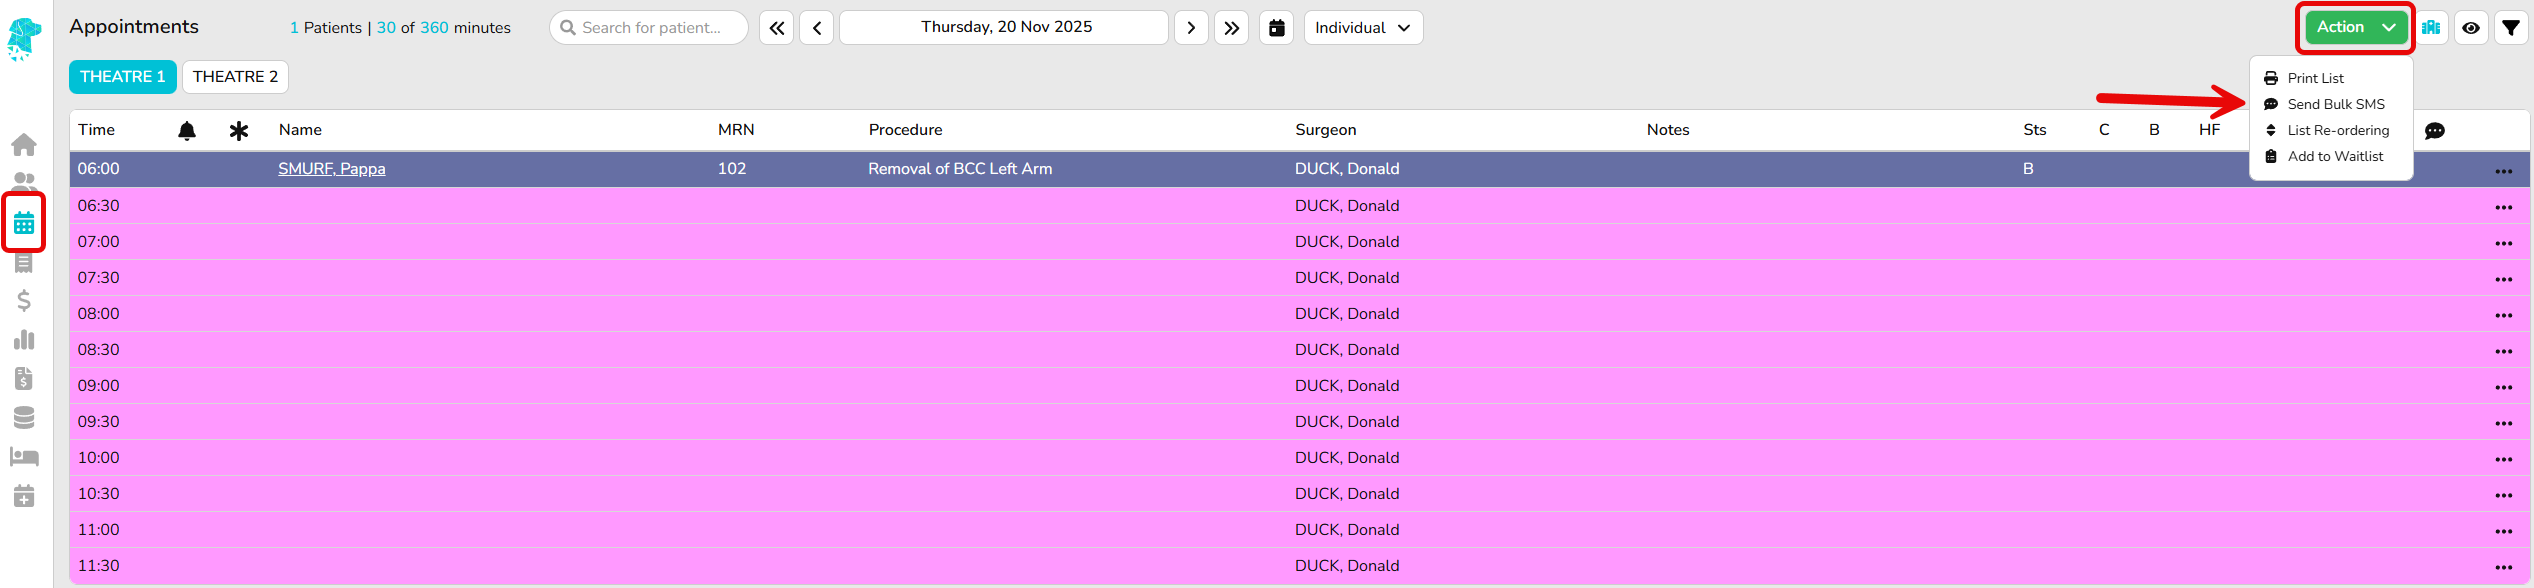
Start off by going to Appointments > Select an action > Send bulk SMS

From there, you may click on the Order more SMS credits button to order additional credits.

Ordering credits – through the settings screen:

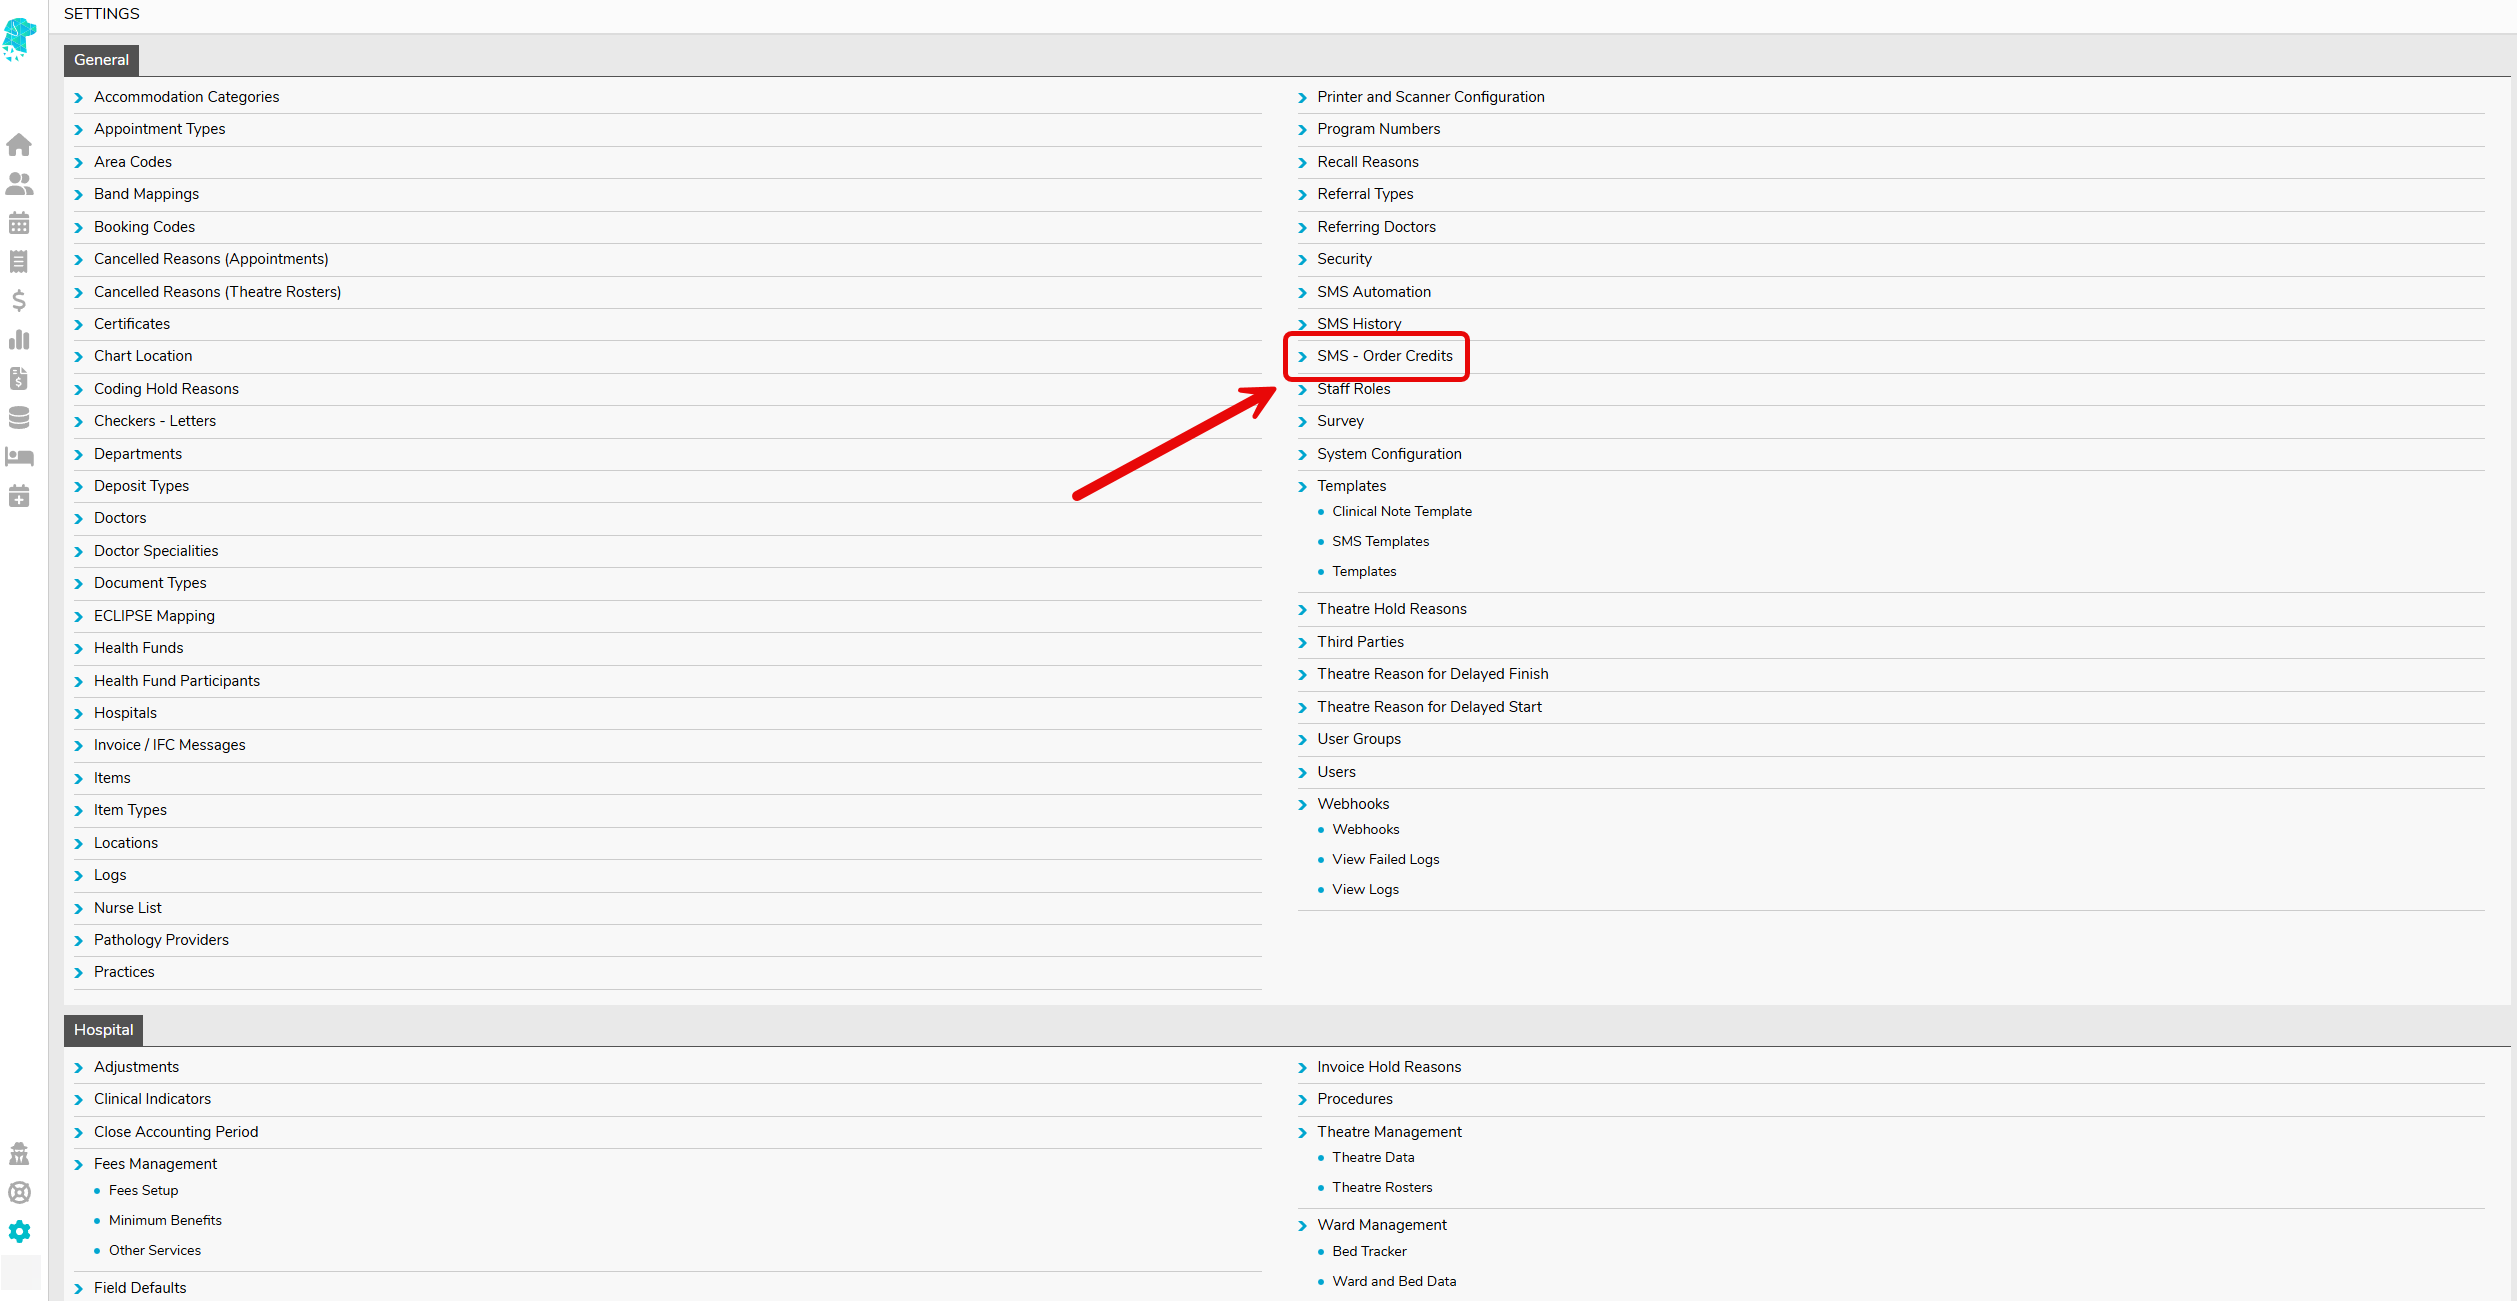
Start off by going to Settings > SMS – Order Credits

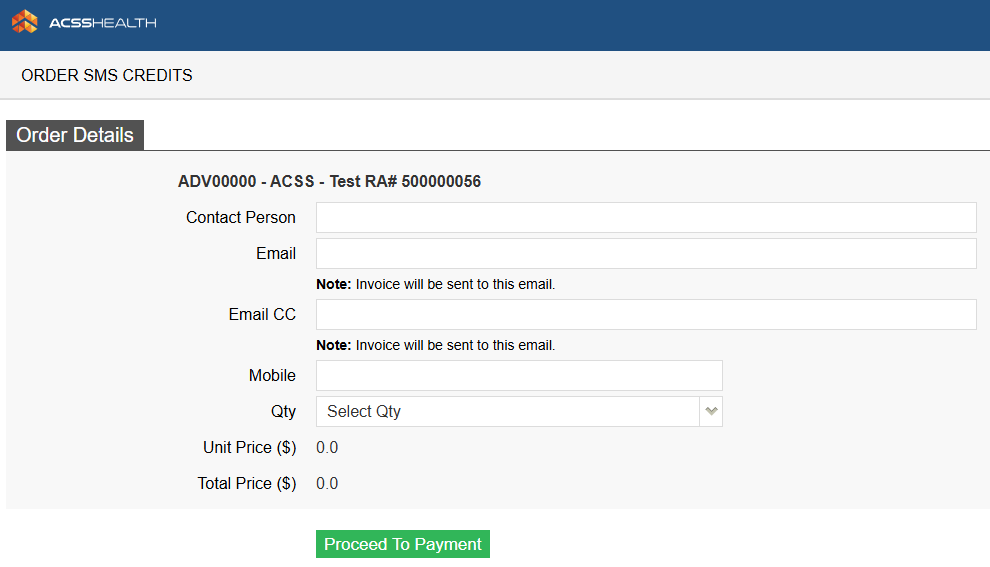
This will open a new tab. From there, complete the form and proceed to payment.

Note: the more credits you order, the lower the cost per credit.

That’s it! Once your order is complete, the credits will be applied to your account nearly instantly. 

Should you have any issues or questions regarding your order, please do not hesitate to contact us at support@alturahealth.com.au or on (02) 9632 0026.


Hospital ECLIPSE Registration

For each of the health funds, send an email to the contact/s below, advising them that you would like to register your facility for ECLIPSE IHC claiming or if you need to edit your bank details.

Include the following information:

  • Facility Name
  • Facility Provider Number
  • Contact Person
    • Contact Person’s Position/Role
    • Contact Person’s Email Address
    • Contact Person’s Phone Number
  • Bank Account Details
    • BSB
    • Account Number
    • Account Name
    • Bank
    • Branch
Fund Fund Name Email / Phone Comments
ACA ACA Health acahealthit@acahealth.com.au You need to have a AHSA contract or second tier first
AUH Australian Unity dgilder@australianunity.com.au
03 8682 4219
After you email them, they go through a parallel testing period to ensure that all data is being received correctly. During this parallel period, AUH requires you to scan and email dgilder@australianunity.com.au and Scan_HI_Indexing@australianunity.com.au a copy of the signed HC21 claim form, invoice and any certificate for claims sent via Eclipse for comparison. Any Accident Certificates and Type B/C Certificates are also required to be entered via Eclipse.
BUP BUPA eclipseprovidercomms@bupa.com.au

gordon.barrett@bupa.com.au

You need to have BUPA contract or second tier first. Also, they will initially require a scanned copy of the invoice for the first two claims submitted through Eclipse.The scanned invoices should be emailed to Swati Alladi (Swati.Alladi@bupa.com.au) and copied to Gordon (gordon.barrett@bupa.com.au) so that they have an overview of interactions. They will be viewing all new Eclipse claims for billing and system accuracy to ensure both organisations get the best outcome.
CBH & CBC CBHS Corporate Health and CBHS Health Fund providers@cbhs.com.au
julie.mckinnon@cbhs.com.au
CDH Cessnock enquiries@cdhbf.com.au
CUA CUA ashlee.young@cua.com.au
DHF Defense Health providerrelations@defencehealth.com.au Include a note in company letterhead indicating the bank account details
AMA Doctors Health Fund lesley.rutter@doctorshealthfund.com.au
03 6345 0100
You need to have a AHSA contract or second tier first
ESH Emergency Services Health (also managed by Police Health) providerenquiries@eshealth.com.au
GMH Frank Health Insurance joannesheldon@gmhba.com.au
FAI GU Health gapsupport@guhealth.com.au
HBF HBF ahsaproviderrelations@hbf.com.au You need to have HBF contract or second tier first
HCF HCF hospital_benefits@hcf.com.au
HCI Health Care Insurance jamie.gillam@hciltd.com.au
HIF Health Insurance Fund hospital.team@hif.com.au You need to have a AHSA contract or second tier first
SPS Health Partners Kirstyn.Schmidt@healthpartners.com.au
hospitalclaims@healthpartners.com.au
LHS Latrobe tan@lhs.com.au
MPL & AHM Medibank / AHM eclipse@medibank.com.au Use the form https://simdaywinhelp.acsshealth.com/wp-content/uploads/2020/03/MPLAHM.pdf
MDH Mildura eclipse@mildurahealthfund.com.au Include a bank statement or remittance advice that shows the correct bank account details
MYO MO Health health.claims@aia.com
NHB Navy Health query@navyhealth.com.au
NIB NIB ContractSpecialistTeam@nib.com.au
providers@nib.com.au
Use the form https://simdaywinhelp.acsshealth.com/wp-content/uploads/2020/03/NIB.docx
NMW Nurse and Midwives EclipseClaims@nmhealth.com.au
George.Drakakis@nmhealth.com.auAlternatively, try:
dianne.roe@teachershealth.com.au
OMF OneMediFund info@onemedifund.com.au
LHM Peoplecare Health Insurance info@peoplecare.com.au
PHF Phoenix Health enquiries@phoenixhealthfund.com.au
POL Police Health (also managed by Emergency Services Health) providerenquiries@policehealth.com.au
QCH Queensland Country info@queenslandcountry.health
1800 813 415
Accreditation needs to be completed first.
QTU Queensland Teachers (TUH) claims.enquiries@tuh.com.au They require that you have a claim history with them first
RBH Reserve Bank health info@myrbhs.com.au
RTH RT Health hospitals@rthealthfund.com.au Use the form https://simdaywinhelp.acsshealth.com/wp-content/uploads/2020/03/RTH-Hospital-EFT-Form.pdf
SLM St Lukes general@stlukes.com.au You need to have a ARHG contract or second tier first
TFH Teachers Federation elizabeth.cashman@teachershealth.com.auAlternatively, try:EclipseClaims@teachershealth.com.au
George.Drakakis@nmhealth.com.au
dianne.roe@teachershealth.com.au
TFS Transport Health hospitals@transporthealth.com.au
WFD Westfund hospital@westfund.com.au