| Endpoint |
Description |
Details of Data shared |
| /api/Anaesthetictype/getAnaesthetictypeSyncList |
Anaesthetic Type |
Anatype code and description (no PII or PHI) |
| /api/AppointmentTypes/getAppointmentTypesSyncList |
Appointment Type |
Appointment type name, length, color, status (no PII or PHI) |
| /api/BookingCodes/getBookingCodesSyncList |
Booking Code 1 and 2 |
Booking code 1 and 2 description and status (no PII or PHI) |
| /api/Doctor/CheckPractitioner |
Cgov Integration |
|
| /api/Doctor/UpdatePractitioner |
Cgov Integration |
|
| /api/Clinic/getClinicApptsList |
Clinic Appointments |
Contains PHI for clinical appointments |
| /api/Codingdiag/getCodingdiagSyncList |
Episode Diagnosis Codes |
ICD diagnosis code (de-identified PHI) |
| /api/CodingProc/getCodingprocSyncList |
Episode Procedure Codes |
ICD procedure code (de-identified PHI) |
| /api/Countries/getCountriesSyncList |
Country List |
Country of birth code and description (no PII or PHI) |
| /api/Diag/getDiagSyncList |
Diagnosis Codes List |
Latest version of ICD diagnosis code,
description and effective date (no PII or PHI) |
| /api/Doctors/getDoctorsSyncList |
Doctor List |
Doctor ID, specialty, name, contact details,
APHRA, provider number, specialty and
insurance details |
| /api/Drg/getDrgSyncList |
DRG List |
DRG codes and description (no PII or PHI) |
| /api/DrSpeciality/getDrSpecialitySyncList |
Doctor Specialty List |
Specialty code, type, description and status
(no PII or PHI) |
| /api/Episode/getEpisodeList |
Episode Details |
Contains PHI and PII for each episode within
the selected period e.g.: Adm/discharge date/time and Doctor ID etc. |
| /api/Episode/getEpisodeListAnon |
Episode Details |
De-identified episodic details |
| /api/Episode/EpisodeDetailReportList |
Episode Details |
Aligns with the Episode Stats Report output
(Contains PII and PHI) |
| /api/Episode/EpisodeSurvey |
Cemplicity Integration |
Contains PHI |
| /api/Episodeitems/getEpisodeitemsSyncList |
Episode MBS Items |
Episode identifier and MBS item (no PHI) |
| /api/Episodeitems/getEpisodeOSSyncList |
Episode Other Service Items |
Episode identifier and other service item
codes e.g.: prosthesis, misc. items etc.
(no PHI) |
| /api/Episodevisits/getEpisodevisitsSyncList |
Theatre Time Values |
Episode identifier, theatre time, proc time,
other theatre personnel e.g.: nurse, surgical
assistant etc. (no PHI) |
| /api/Healthfunds/getHealthfundsSyncList |
Health Fund List |
Fund code, name, status and other relevant
settings (no PHI) |
| /api/InProcSch/getInProcSchSyncList |
Inpatient Procedure Information |
Episode ID, theatre, proc date and booking
code (no PHI) |
| /api/Languages/getLanguagesSyncList |
Language List |
Language code, description, state code and
threshold date (no PHI) |
| /api/Locations/getLocationsSyncList |
Location List |
Hospital location, address, contact, BSB and
account details (no PHI) |
| /api/LoginDetails/getLoginDetails |
FYDO User Login Details |
UserID, user Type, username and created
date (no PHI) |
| /api/Mbsitem/getMbsitemSyncList |
MBS List |
MBS code, description, theatre band, day
band, other relevant settings and status
(no PHI) |
| /api/Misccode/getMisccodeSyncList |
Misc code list |
Code (Prosthesis rebate code and misc/other service code) and description (no PHI) |
| /api/Morp/getMorpSyncList |
Morphology List |
ICD morphology code, description and ICD
date (no PHI) |
| /api/Patient/getPatientList |
Patient List |
Patient demographics (Contains PII) |
| /api/Patient/Cemplicity |
Cemplicity Integration |
|
| /api/Patrefs/getPatrefsSyncList |
Patient Referral Details |
Patient ID, referral no, referral period and
referral first visit date (no PHI) |
| /api/Practice/getPracticeSyncList |
Practice List |
Practice name, address, contract and status (no PHI) |
| /api/Proc/getProcSyncList |
ICD Procedure List |
ICD procedure code, description, sex code
and ICD date (no PHI) |
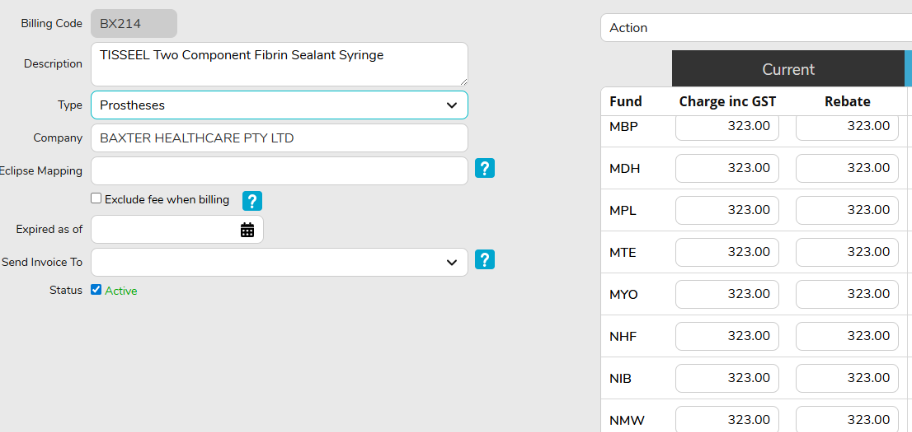
| /api/Prostheses/getProsthesesSyncList |
Prothesis List |
Billing code, prod name, company and status |
| /api/Recdata/getRecdataSyncList |
Patient Recall Details |
MRN, next recall date, reason, action and
recall date |
| /api/Ref/getRefList |
Referring Doctors List |
Referral #, name, provider number and
contact |
| /api/Report/GetUnbilledRevenueData |
Unbilled Revenue Report |
Derived from the same data source and
business logic as Unbilled Revenue Report
(contains PII and PHI) |
| /api/Report/ArrearsReportHospital |
Arrears Report |
Derived from the same data source and
business logic as Arrears Report (contains PII and PHI) |
| /api/Service/getServiceSyncList |
Financials Revenue |
De-identified episodic ID, service code, date
of service, date of transaction, date of audit,
charges, GST charges and service code type |
| /api/Service/getserviceListDoc |
De-Identified Financials |
Same output as getServiceSyncList, however, no doctors’ names and drawer |
| /api/Theatres/getTheatresSyncList |
Theatre List |
Theatre name, type, location ID, color and
theatre no (no PHI) |
| /api/TheatreSchedule/getTheatreScheduleSyncList |
Theatre Roster |
Date, time, length, theatre, Doctor ID,
anaesthetist ID, other nursing staff, reason
for delay and cancel status (no PHI) |